

54
H8602-i
Even though we go to great efforts to ensure the quality of each product we produce, occasional errors
and/or omissions do occur. In any event should you find this product to has either a defective or a
missing part. Please contact us for a replacement.
Terms of references
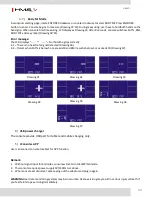
Stationary bike exercises are replacing bicycle exercises. Magnetic elliptical bike H8602-i is item class H.
Unit is not intended for commercial use therapy or rehabilitation.
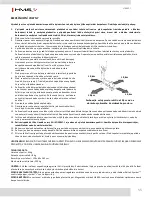
The equipment label depicting a crossed-out wheeled bin symbol informs that it is forbidden to dispose of
waste electrical and electronic equipment together wi th other types of waste. In accordance with the WEE
directive on waste electrical and electronic equipment, separate waste management processes should be
applied for this type of equipment. The user who intends to dispose of such a product is obliged to return
it to an electronic equipment collection point thanks to which they can contribute to its re-use, recycling,
and recovery and, in this way, protect the environment. To do this, contact the sales point where the equipment was
purchased or a representative of the local authorities. Hazardous substances included in electronic equipment can have
negative long-term influence on the natural environment and they can also have negative effect on human health.
Consumer service department:
ABISAL Sp. z o.o.
ul. Św. Elżbiety 6
41–905 Bytom
Содержание H8602-i
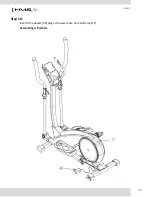
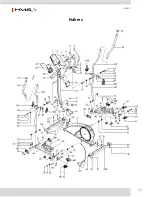
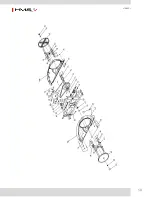
Страница 4: ...4 H8602 i Diagram zbiorczy ...
Страница 5: ...5 H8602 i ...
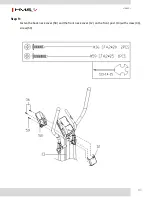
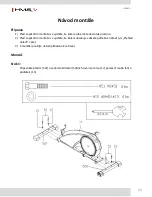
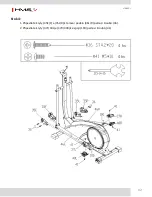
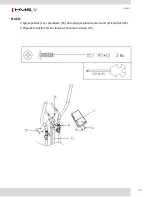
Страница 10: ...10 H8602 i Krok 5 1 Przymocuj pedał 47L R do ramienia 46L R za pomocą nakrętek 26 oraz śrub 3 4 szt 4 szt ...
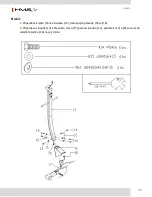
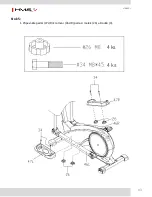
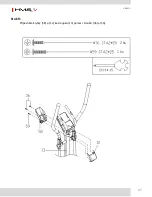
Страница 12: ...12 H8602 i Krok 7 Przykręć kierownicę środkową 6 do słupka 13 za pomocą śrub 10 i podkładek 9 2 szt 2 szt ...
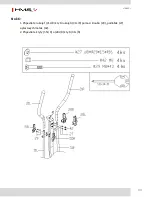
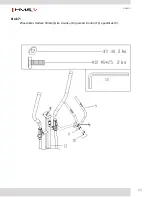
Страница 14: ...14 H8602 i Krok 9 Przykręć kołnierze 58 i 12 do słupka 13 za pomocą śrub 36 oraz 59 2 szt 1 szt ...
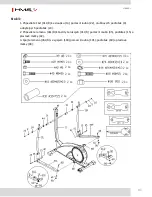
Страница 15: ...15 H8602 i Krok 10 Podłącz wtyczkę 48 do gniazda w głównej ramie 17 Koniec montażu ...
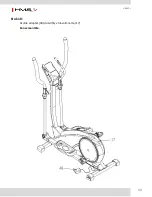
Страница 31: ...31 H8602 i Explode View ...
Страница 32: ...32 H8602 i ...
Страница 37: ...37 H8602 i Step5 1 Lock the pedal 47L R on the pedal arm 46L R with nut 26 bolt 3 ...
Страница 39: ...39 H8602 i Step7 Lock the middle handlebar 6 on the front post 13 with screw 10 spring washer 9 ...
Страница 42: ...42 H8602 i Step 10 Insert the adapter 48 plug into power hole on mainframe 17 Assembling is finished ...
Страница 57: ...57 H8602 i Nákres ...
Страница 58: ...58 H8602 i ...
Страница 63: ...63 H8602 i Krok 5 1 Připevněte pedál 47L R k rameni 46L R pomocí matek 26 a šroubů 3 4 ks 4 ks ...
Страница 65: ...65 H8602 i Krok 7 Připevněte středová řídítka 6 ke sloupku 13 pomocí šroubů 10 a podložek 9 2 ks 2 ks ...
Страница 67: ...67 H8602 i Krok 9 Připevněte krytky 58 a 12 ke sloupku 13 pomocí šroubů 36 a 59 2 ks 1 ks ...
Страница 68: ...68 H8602 i Krok 10 Vsuňte adaptér 48 do zdířky v hlavním rámu 17 Konec montáže ...


