


47
H8602-i
3.3.)
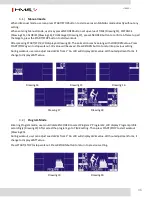
User Program mode
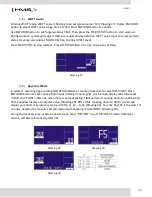
In USER program mode, user can rotate ENCODER button to create personal program profile with 10
columns. For each column, user can adjust level from 1~16 (Drawing 21) and confirm by pressing ENCODER
button.
To quit out setting, press ENCODER button for 2s. Use ENCODER button to set Target workout TIME.
Then press START/STOP to start exercise (Drawing 22).
Press START/STOP to stop workout. Press RETURN button to return to previous setting.
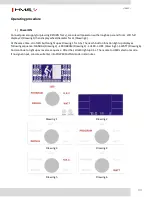
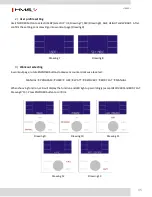
3.4.)
HRC mode
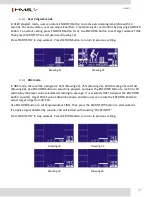
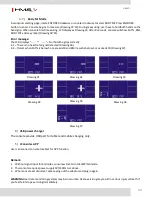
In HRC mode, there will be 4 programs: 55% (Drawing 23), 75% (Drawing 24), 90% (Drawing 25) and TAG
(Drawing 26). Use ENCODER button to select one program and press the ENCODER button to confirm. LCD
will display the preset value calculated according to user age. If user selects HRC TAG (press the ENCODER
button to enter), target PULSE value 100 will be shown and then user can rotate the ENCODER button to
adjust target range from 30~230.
Use ENCODER button to set Target workout TIME. Then press the START/STOP button to start workout.
If no pulse signal detected by console, LCD will remind with showing “PULSE INPUT”.
Press START/STOP to stop workout. Press RETURN button to return to previous setting.
Drawing 21
Drawing 22
Drawing 23
Drawing 24
Drawing 25
Drawing 26
Содержание H8602-i
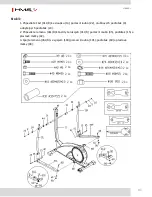
Страница 4: ...4 H8602 i Diagram zbiorczy ...
Страница 5: ...5 H8602 i ...
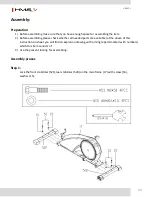
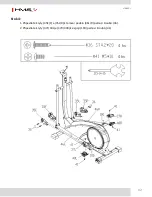
Страница 10: ...10 H8602 i Krok 5 1 Przymocuj pedał 47L R do ramienia 46L R za pomocą nakrętek 26 oraz śrub 3 4 szt 4 szt ...
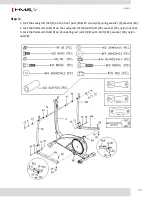
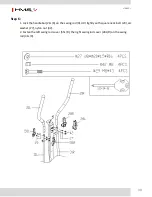
Страница 12: ...12 H8602 i Krok 7 Przykręć kierownicę środkową 6 do słupka 13 za pomocą śrub 10 i podkładek 9 2 szt 2 szt ...
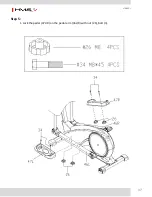
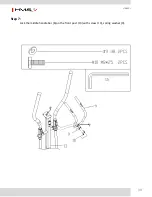
Страница 14: ...14 H8602 i Krok 9 Przykręć kołnierze 58 i 12 do słupka 13 za pomocą śrub 36 oraz 59 2 szt 1 szt ...
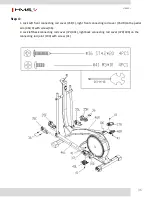
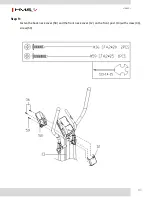
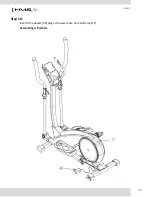
Страница 15: ...15 H8602 i Krok 10 Podłącz wtyczkę 48 do gniazda w głównej ramie 17 Koniec montażu ...
Страница 31: ...31 H8602 i Explode View ...
Страница 32: ...32 H8602 i ...
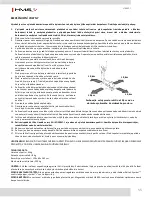
Страница 37: ...37 H8602 i Step5 1 Lock the pedal 47L R on the pedal arm 46L R with nut 26 bolt 3 ...
Страница 39: ...39 H8602 i Step7 Lock the middle handlebar 6 on the front post 13 with screw 10 spring washer 9 ...
Страница 42: ...42 H8602 i Step 10 Insert the adapter 48 plug into power hole on mainframe 17 Assembling is finished ...
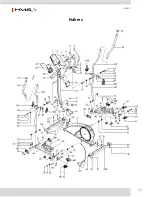
Страница 57: ...57 H8602 i Nákres ...
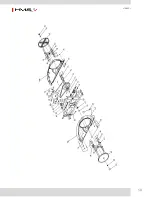
Страница 58: ...58 H8602 i ...
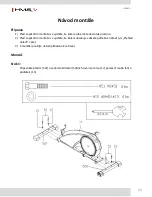
Страница 63: ...63 H8602 i Krok 5 1 Připevněte pedál 47L R k rameni 46L R pomocí matek 26 a šroubů 3 4 ks 4 ks ...
Страница 65: ...65 H8602 i Krok 7 Připevněte středová řídítka 6 ke sloupku 13 pomocí šroubů 10 a podložek 9 2 ks 2 ks ...
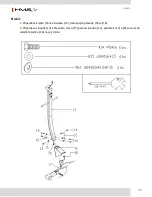
Страница 67: ...67 H8602 i Krok 9 Připevněte krytky 58 a 12 ke sloupku 13 pomocí šroubů 36 a 59 2 ks 1 ks ...
Страница 68: ...68 H8602 i Krok 10 Vsuňte adaptér 48 do zdířky v hlavním rámu 17 Konec montáže ...


