


53
H8602-i
Training instruction
1.
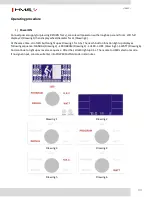
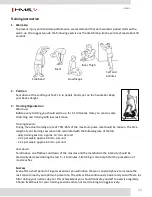
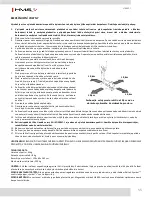
Warm-Up
To prevent injury and maximize performance we recommend that each workout period starts with a
warm-up. We suggest you do the following exercise as the sketch map. Each exercise at least about 30
seconds.
2.
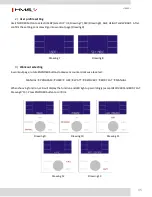
Position
Seat down at the saddle, put feet’s in to pedals, hands put on the handlebar. Keep
your back straight.
3.
Training Organization
Warm-up:
Before every training you should warm-up for 5-10 minutes. Here you can do some
stretching and training with low resistance.
Training session:
During the actual training a rate of 70% -85% of the maximum pulse rate should be chosen. The time-
length of your training session can be calculated with the following rule of thumb:
- daily training session: approx. 10 min. per unit
- 2-3 x per week: approx. 30 min. per unit
- 1-2 x per week: approx. 60 min. per unit
Cool down:
To introduce an effective cool-down of the muscles and the metabolism the intensity should be
drastically decreased during the last 5 – 10 minutes. Stretching is also helpful for the prevention of
muscle aches.
Success
Even after a short period of regular exercises you will notice that you constantly have to increase the
resistance to reach your optimum pulse rate. The units will be continuously easier and you will feel a lot
fitter during your normal day. For this achievement you should motivate yourself to exercise regularly.
Choose fixed hours for your training session and do not start training too aggressively.
Side bend
Bent
Quadriceps
Calf and
Achilles
Inner Thigh
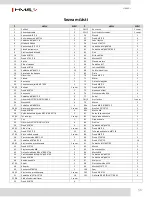
Содержание H8602-i
Страница 4: ...4 H8602 i Diagram zbiorczy ...
Страница 5: ...5 H8602 i ...
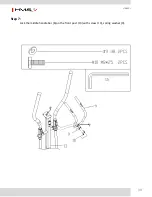
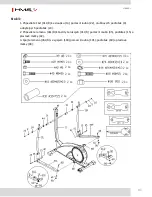
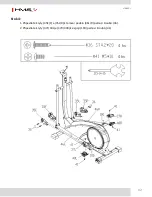
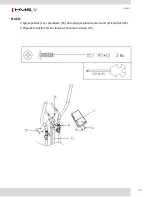
Страница 10: ...10 H8602 i Krok 5 1 Przymocuj pedał 47L R do ramienia 46L R za pomocą nakrętek 26 oraz śrub 3 4 szt 4 szt ...
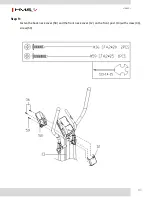
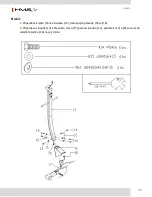
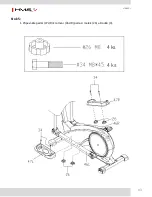
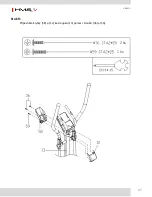
Страница 12: ...12 H8602 i Krok 7 Przykręć kierownicę środkową 6 do słupka 13 za pomocą śrub 10 i podkładek 9 2 szt 2 szt ...
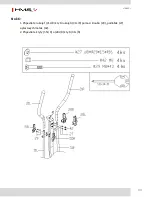
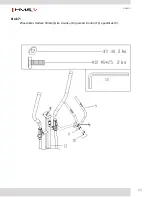
Страница 14: ...14 H8602 i Krok 9 Przykręć kołnierze 58 i 12 do słupka 13 za pomocą śrub 36 oraz 59 2 szt 1 szt ...
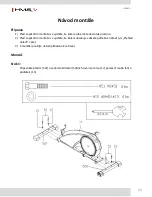
Страница 15: ...15 H8602 i Krok 10 Podłącz wtyczkę 48 do gniazda w głównej ramie 17 Koniec montażu ...
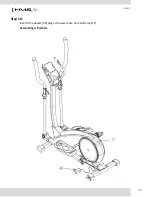
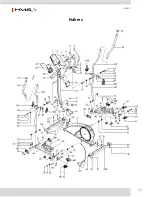
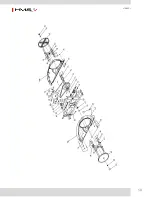
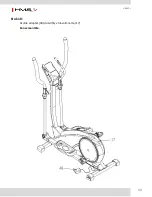
Страница 31: ...31 H8602 i Explode View ...
Страница 32: ...32 H8602 i ...
Страница 37: ...37 H8602 i Step5 1 Lock the pedal 47L R on the pedal arm 46L R with nut 26 bolt 3 ...
Страница 39: ...39 H8602 i Step7 Lock the middle handlebar 6 on the front post 13 with screw 10 spring washer 9 ...
Страница 42: ...42 H8602 i Step 10 Insert the adapter 48 plug into power hole on mainframe 17 Assembling is finished ...
Страница 57: ...57 H8602 i Nákres ...
Страница 58: ...58 H8602 i ...
Страница 63: ...63 H8602 i Krok 5 1 Připevněte pedál 47L R k rameni 46L R pomocí matek 26 a šroubů 3 4 ks 4 ks ...
Страница 65: ...65 H8602 i Krok 7 Připevněte středová řídítka 6 ke sloupku 13 pomocí šroubů 10 a podložek 9 2 ks 2 ks ...
Страница 67: ...67 H8602 i Krok 9 Připevněte krytky 58 a 12 ke sloupku 13 pomocí šroubů 36 a 59 2 ks 1 ks ...
Страница 68: ...68 H8602 i Krok 10 Vsuňte adaptér 48 do zdířky v hlavním rámu 17 Konec montáže ...


