background image


LIFTY 4  user guide 

Version 08/2013  


1. PREAMBLE


Only entitled staff who has read and understood these complete instructions can use Lifty4
 
 
Always use Lifty4 with a person who can belay the patient in case of blackout of the patient or failure of the 
hoist. 
 
 
Use Lifty4 following the maintenance instructions (see Lifty4 maintenance paragraph). If you have any doubt 
about Lifty4 operating, please call HMS-VILGO After Sales Service for a diagnostic before using the hoist on a 
patient. 
 
 
HMS-VILGO will not be responsible for damage if these warnings are not followed. 
 
 
This manual contains all the technical information you need to make a good use of this product. This 
information has been carefully checked by HMS-VILGO. This is not an exhaustive list and HMS-VILGO is not 
responsible for any kind of mistakes or omissions. 


2. DESCRIPTION 


2.1. WHERE TO USE LIFTY 4 

 
The Lifty4  is a lifting device. It is used to transfer disabled or elderly people in: 


- home medical care for the transfer of a person toward an armchair, a WC seating or chair, 


- medical care small structure, 


- communities (old people’s home, convalescent home). 

 
Do not use Lifty4 outdoors or on a surface whose declivity could make the patient fell down (>5°). 


Before any use of the product : 
1- Read the leaflet : It will inform you how to use the product securely and must 
be at the disposal of the caring personnel. 
2- Product cleaning and disinfection : Please see chapter 5. 
3- Connection of the Lifty4
 to the electrical network : Please see chapter 4.5 
4- Make sure of the good working of all functions. 


Содержание LIFTY 4

Страница 1: ...1 LIFTY 4 user guide Version 08 2013 200 Kg 31 5 stones ...

Страница 2: ...2 LIFTY 4 user guide Version 08 2013 ...

Страница 3: ...side anytime TABLE OF CONTENTS 1 PREAMBLE page 4 2 DESCRIPTION page 4 7 2 1 Where to use Lifty4 2 2 General description 2 3 Technical description 2 4 Dimensional characteristics 2 5 Labelling 3 LIFTY4 ASSEMBLING page 7 14 3 1 Package contents 3 2 Lifty4 assembling page 13 3 3 Plugging 4 USE page 14 17 4 1 First use 4 2 Lifty4 use 4 3 Safety 4 4 Control box operating battery charge 4 5 Storage inst...

Страница 4: ...rmation has been carefully checked by HMS VILGO This is not an exhaustive list and HMS VILGO is not responsible for any kind of mistakes or omissions 2 DESCRIPTION 2 1 WHERE TO USE LIFTY 4 The Lifty4 is a lifting device It is used to transfer disabled or elderly people in home medical care for the transfer of a person toward an armchair a WC seating or chair medical care small structure communitie...

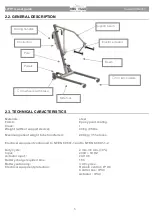
Страница 5: ...0 kg 31 5 stones Electrical equipment conformed to NF EN 60 601 1 and to NF EN 60 601 1 2 Duty cycle 2 min 18 min 10 Input 230V 50 HZ Actuator input 24 V CC Battery charge required time 15 h Battery autonomy 40 cycles Electrical equipment protection Remote control IP X6 Control box IPX4 Actuator IP X4 Pedals Pole Control box Driving handles Support beam Beam Side foot Electric actuator 3 in twin c...

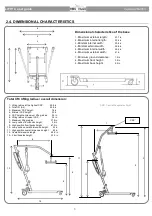
Страница 6: ...in Total lift lifting radius overall dimension 1 Lifting radius at the highest CSP 29 9 in 2 Total lift 3 4 45 8 in 3 Maximum CSP height 76 in 4 Minimal CSP height 35 in 5 CSP height at maximum lifting radius 52 in 6 Lifting radius at lowest CSP 35 in 7 Maximum lifting radius 37 8 in 8 Low position floor hooks height 26 in 9 High position floor hooks height 67 3 in 10 Low position overall dimensio...

Страница 7: ...To ensure the follow up of the medical disposal It also gives to you the security loading charge for a good use There are 3 labels One on the basis of the Lifty4 one on the electric actuator and one on the control box Standards By this label HMS VILGO ensures that Lifty4 hoist is conformed to European directive 89 336 referring to electromagnetic compatibility and to European directive 93 42 refer...

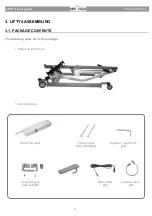
Страница 8: ...IFTY4 ASSEMBLING 3 1 PACKAGE CONTENTS The following parts are in the package 1 folded up Lifty4 hoist 1 box containing Control box x1 Main cable x1 Actuator cable x1 Fixing screw CHC 6x80 x2 Anti pulling up Cable kit x1 Spanner 6 section 5 x1 ...

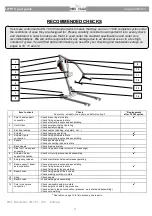
Страница 9: ...support beam axle connection Check stop nut presence and assembling Check fixing screw worn state Check fixing metal tongue welding 12 Beam hooks Check fixing points of the 4 hooks Check welding points worn state 12 Sling Check seams 13 Beam hooks check welding and assembling 14 Pole cross piece connection Check removable axle worn state Check spigot and safety ring presence Check screw stop nut c...

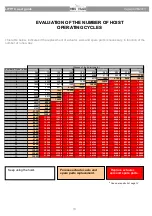
Страница 10: ...23725 28470 33215 37960 42705 47450 14 5110 10220 15330 20440 25550 30660 35770 40880 45990 51100 15 5475 10950 16425 21900 27375 32850 38325 43800 49275 54750 16 5840 11680 17520 23360 29200 35040 40880 46720 52560 58400 17 6205 12410 18615 24820 31025 37230 43435 49640 55845 62050 18 6570 13140 19710 26280 32850 39420 45990 52560 59130 65700 19 6935 13870 20805 27740 34675 41610 48545 55480 6241...

Страница 11: ...IFTY 4 user guide Version 08 2013 M MA AI IN NT TE EN NA AN NC CE E B BO OO OK K HOIST REFERENCE Serial number Date of 1st use DATE Number of cycles evaluated MAINTENANCE AND QUALITY CHECKING NAME APPROVALS ...

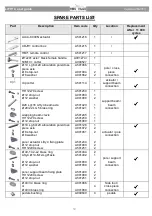
Страница 12: ... Ø 28 22 LG 5 brass ring wrapping beam clevis HH 12x70 screw Ø 12 stop nut A501250 A001080 A001088 A501420 A501421 A501245 A501250 A001080 1 1 2 1 1 1 1 1 support beam beam connection Ø 10 Lg 64 20 articulation pole cross piece axle Ø 8 stop nut Ø 8 washer pole actuator Lifty 4 fixing plate Ø 12 stop nut HH 12x80 screw A001128 A001072 A001061 A501244 A001080 A501251 1 2 2 2 2 2 actuator pole conne...

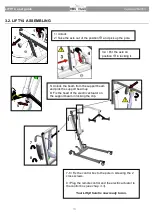
Страница 13: ... pole in screwing the 2 cross screws 9 Plug the remote control and the electric actuator to the control box see chap 3 3 Your Lifty4 hoist is now ready to run 2 1 6 8 5 Unlock the beam from the support beam and pick the support beam up 6 Fix the head of the electric actuator on the support beam in locking the clip 5 3 4 Put the axle on position in locking it ...

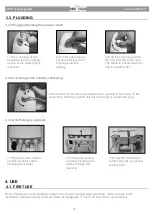
Страница 14: ...red make sure the hoist installation has been strictly done as shown on paragraph 3 Test it off load first to get used to it 3 Screw the hood to the control box with a crossed screw driver 3 Grip the notches and turn the ring from left to the right The cable is locked when the ring is turned to 90 1 The 3 notches of this ring show that the griping device of the cable plug is unlocked 2 Put the cab...

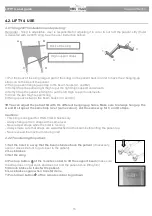
Страница 15: ... with the different hanging up holes Make sure to always hang up the A and B straps at the same hole level same colour Act the same way for C and D straps Cautions This sling is designed for HMS VILGO hoists only Always hang up the 4 straps at the same level Never adjust straps while the hoist is running Always make sure that straps are well attached on the beam before lifting the patient up Never...

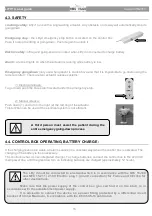
Страница 16: ...tion can be used if the electrical system is not efficient 4 4 CONTROL BOX OPERATING BATTERY CHARGE If the charging level is too weak an alarm sounds in a constant way when the control box is activated The charging of the battery is then necessary The control box has its own integrated charger To charge batteries connect the control box to the 220 VAC main power line until the green led turn on in...

Страница 17: ...ng Check the sling by looking at its seams condition immediately replace a sling that starts to show any tear Electrical parts Test the emergency stop switch while lifting and lowering the support beam Look at the electrical cables cover Test crushing safety system by placing an item on the support beam going down way Chassis Check the brake of the back wheels Look at the global geometry on the Li...

Страница 18: ...E COVERED BY THE WARRANTY Warranty does not cover breakdown due to a wrong use or maintenance shock on the battery charger cut cable Any breakdown of dysfunction which could be imputable to a modification or replacement by any other spare part than original ones will affect the warranty 5 5 RECYCLING Recycling must be done according to the type of materials and components and in compliance with th...

Страница 19: ...19 LIFTY 4 user guide Version 08 2013 ...

Страница 20: ...com Distributor stamp Site de Lille Parc Eurasanté 243 Rue Allendé 59120 LOOS LEZ LILLE Tél 33 0 3 20 84 81 50 Fax 33 0 3 20 59 58 08 Site de Bergerac Rte de Sainte Alvère Creysse BP 212 24102 BERGERAC Cedex Tel 33 0 5 53 74 45 50 Fax 33 0 5 53 63 06 07 ...

Отзывы: