background image


IMPORTANT SAFETY INFORMATION 


This product has been designed for home use only and built for optimum safety. Please note the following safety precautions: 

1.  Before  starting  any  exercise  program  you  should  consult  your  doctor  to  determine  if  you  have  any  physical  or  health 

conditions that could create a risk to your health and safety, or prevent you from using the equipment properly. Your doctor's 

advice  is  essential  if  you  are  taking  medication  that  affects  your  heart  rate,  blood  pressure  or  cholesterol  level.  This  is 

especially important for persons over the age of 35, pregnant women, or those with pre-existing health problems or balance 

impairments.   

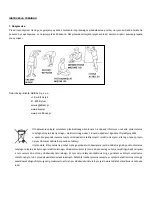
2.  Before using this equipment to exercise, always do stretching exercises to properly warm up.   

3.  Be aware of your body's signals. Incorrect or excessive exercise can damage your health. Stop exercising if you experience 

any of the following symptoms: pain, tightness in your chest, irregular heartbeat, extreme shortness of breath, feeling light 

headed, dizzy or nauseous. If you do experience any of these conditions you should consult your doctor before continuing 

with exercise program. Injuries to health may result from incorrect or excessive training.   

4.  During exercises and after keep children and pets away from the equipment. 

5.  Use the equipment on a solid, flat level surface with a protective cover for your floor or carpet. Move    all sharp    objects. 

6.  Free area shall be not less than 0,6 m greater than the training area in the directions from which the equipment is accessed. 

Free area must also include the area for emergency dismount. Where equipment is positioned adjacent to each other the 

value of the free area may be shared.   

7.  Before each use, visually inspect the unit including hardware and resistance bends. 

8.  Before using the equipment, check if the nuts, bolts and other bends are securely tightened.


9.  Always use the equipment as indicated. If you find any defective components whilst assembling or checking the equipment, 

or if you hear any unusual noise coming from the equipment while using, stop. Do not use the equipment until the problem 

has been rectified. 

10.  Do not insert any object into any openings. 

11.  Be aware of all regulation and constructions parts which may disturb during exercises. 

12.  The safety level of the equipment can only be maintained if it is regularly examined for damage and/or wear and tear.   

13.  Wear suitable clothing whilst using the equipment. Avoid wearing loose clothing which may get caught in the equipment or 

that may restrict or prevent movement. 

14.  The  equipment  has  been  tested  and  certified according  to  EN ISO  20957-1  under class  HC.  It  is not  suitable  for 

therapeutic use. 

15.  Care must be taken when lifting or moving the equipment so as not to injure your back. Always use proper lifting techniques 

and/or use assistance. 

16.  The equipment is designed for adult use only. Keep unsupervised children away from the equipment.   

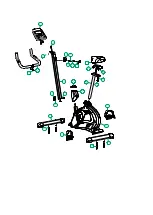
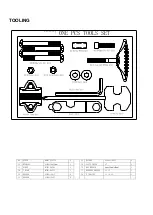
17.  Assemble this unit as described in this manual. Use only parts from the set. Check all parts with the part list. 


WARNING:    READ  ALL  INSTRUCTIONS  BEFORE  USING  ANY  FITNESS  EQUIPMENT.  WE  ASSUME  NO 

RESPONSIBILITY  FOR  PERSONAL  INJURY  OR PROPERTY  DAMAGE  CAUSED  BY OR THROUGH THE  USE OF  THIS 

PRODUCT 


Содержание M6993

Страница 1: ...ROWER MAGNETYCZNY MAGNETIC BIKE MAGNETICK ROTOPED MAGNETISCHER HEIMTRAINER M6993 INSTRUKCJA U YTKOWANIA MANUAL INSTRUCTION N VOD K OBSLUZE BEDIENUNGSANLEITUNG...

Страница 2: ...u nale y sprawdza mocowanie wszystkich rub bolc w i pozosta ych po cze 7 Przed rozpocz ciem wicze sprawd umocowanie cz ci i cz cych je rub Trening mo na rozpocz tylko wtedy je eli urz dzenie jest ca k...

Страница 3: ...T RE ZOSTA Y SPOWODOWANE NIEW A CIWYM U YTKOWANIEM TEGO PRODUKTU DANE TECHNICZNE Waga netto 28 kg Ko o zamachowe 8 kg Rozmiar po roz o eniu 97 x 59 x 132 cm Maksymalne obci enie produktu 120 kg KONSER...

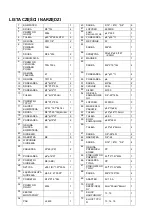
Страница 4: ...22 23 24 25 26 27 28 30 33 31 32 34 35 36 37 R 37 L 38 39 R 39 L 40 41 42 43 44 45 46 47 48 49 50 51 52 53 54 55 56 57 58 59 60 61 62 63 64 L 64 R 65 66 R 66 L 67 68 13 20 10 1 9 4 5 6 7 8 11 12 14 1...

Страница 5: ...28 27 26 24 23 22 37 L 37 R 65 67 68 19 10 21 9 8 1 18 19 20 11 12 14 15 16 17 3 2 73...

Страница 6: ...19 2T 4 15 TULEJA 7 12 25mml 1 70 KLUCZ SZE CIOK TNY 6mm 30mml 84mml 1 13 RUBA M7 P1 0 30L 1 71 KLUCZ HARPUNOWY 13 15 1 16 POKR T O TYPU T M7 P1 0 55L 1 73 KLUCZ TYPU N 13 14 15 1 14 PODK ADKA 7 12 1T...

Страница 7: ...5 O YSKO 6000RS 3 17 S UPEK KOMPUTERA 45 51 1 5T 847 4L 1 56 MA E KO O PASOWE 39 7 26 1 18 RUBA M8 P1 25 16L 6m 6m 4 57 TULEJA 10 16 11 5mml 1 19 PODK ADKA 8 19 2T 9 58 TULEJA 39 3 1 20 PODK ADKA 8 19...

Страница 8: ...35 KO O PASOWE 232 6 1 73 RAMA G WNA 1 36 KORBA 6 190W 1 2 1 37 PEDA 1 2 1 38 OBUDOWA KORBY PVC 2 39 OS ONA G WNA L P PS 1...

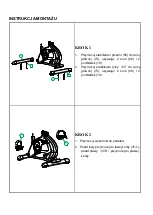
Страница 9: ...nej 73 u ywaj c 2 rub 68 i 2 podk adek 19 2 Przymocuj stabilizator tylny 67 do ramy g wnej 73 u ywaj c 2 rub 68 i 2 podk adek 19 KROK 2 1 Przymocuj wsporniki do peda w 2 Peda lewy przymocuj do lewej k...

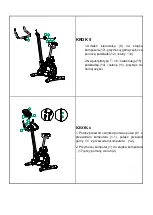
Страница 10: ...pokr t a 27 i podk adki 26 2 Przymocuj sztyc 28 do ramy g wnej zabezpiecz przy pomocy pokr t a KROK 4 1 Na os ony 21 70 na s upek komputera 17 2 Po cz przew d dolny 32 z przewodem g rnym 3 3 Umie s up...

Страница 11: ...Na pokr t o typu T 16 na tulej 15 podk adk 14 i os on 11 przykr do dolnej cz ci KROK 6 1 Po cz przew d czujnika pomiaru pulsu 9 z przewodem komputera 1 1 po cz przew d g rny 3 z przewodem komputera 1...

Страница 12: ...KOMPUTER...

Страница 13: ...as definiowania ustawie w asnych u ytkownika aby przej do nast pnej sekcji 7 MODE RECOVERY A B d c w menu g wnym wci nij przez 3 sekundy aby dokona zmian w systemie metrycznym imperialnym 8 ENTER RECO...

Страница 14: ...ni szym diagramie przedstawiono 12 wbudowanych tryb w Tryb Fitness Wybierz tryb Program wci nij ENTER aby potwierdzi wyb r Czas domy lny ustawiony jest na 12 minut op r 6 wci nij START aby rozpocz tre...

Страница 15: ...Dystans 3KM 2 8KM 2 4KM 2 2KM SPEED Pr dko 15KM 14KM 12KM 11KM F4 M czyzna DISTANCE Dystans 3 2 4KM 3 3 8KM 2 8 3 4KM 2 6 3 2KM SPEED Pr dko 20KM 19KM 17KM 16KM Kobieta DISTANCE Dystans 3 3 6KM 2 8 3...

Страница 16: ...a RPM i WATT Kiedy RPM 20 warto wynosi 20 Kiedy RPM 120 warto wynosi 120 PERSONAL PERSONALNY Definiowanie w asnego trybu Wybierz tryb PERSONAL a nast pnie wci nij ENTER aby potwierdzi tryb i przejd do...

Страница 17: ...R0 USER4 wci nij ENTER aby potwierdzi wyb r a nast pnie ustaw gender p e age wiek height wzrost weight wag Opis funkcji dotycz cych wicze Rodzaj funkcji Zakres wy wietlania Ustawienia domy lne Zwi ksz...

Страница 18: ...undy aby przej do ustawie Po zmianie ustawie automatycznie zostanie wykonany reset Sleep mode Tryb u pienia Urz dzenie wejdzie w tryb u pienia je li przez 4 minuty nie zostanie wykonany aden ruch ani...

Страница 19: ...z innymi odpadami Zgodnie z Dyrektyw WEE o sposobie gospodarowania zu ytymi odpadami elektrycznymi i elektronicznymi dla tego typu sprz tu nale y stosowa oddzielne sposoby utylizacji U ytkownik kt ry...

Страница 20: ...he equipment is accessed Free area must also include the area for emergency dismount Where equipment is positioned adjacent to each other the value of the free area may be shared 7 Before each use vis...

Страница 21: ...re this we recommend that you do the following keep your unit clean by wiping sweat dust or other residue off with a soft clean cloth after each use Always make sure that the bands are secure and show...

Страница 22: ...22 23 24 25 26 27 28 30 33 31 32 34 35 36 37 R 37 L 38 39 R 39 L 40 41 42 43 44 45 46 47 48 49 50 51 52 53 54 55 56 57 58 59 60 61 62 63 64 L 64 R 65 66 R 66 L 67 68 13 20 10 1 9 4 5 6 7 8 11 12 14 15...

Страница 23: ...28 27 26 24 23 22 37 L 37 R 65 67 68 19 10 21 9 8 1 18 19 20 11 12 14 15 16 17 3 2 73...

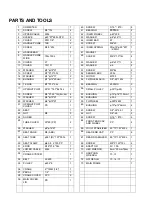
Страница 24: ...9 2T 4 15 BUSHING 7 12 25mml 1 10 PLATE COVER 4T 1 13 SCREW M7 P1 0 30L 1 72 HEX WRENCH 6mm 30mml 84mml 1 16 T KNOB M7 P1 0 55L 1 73 HARPOON WRENCH 13 15 1 14 WASHER 7 12 1T 2 74 4 N TOOLING 13 14 15...

Страница 25: ...47 4L 1 56 SMALL PULLEY 39 7 26 1 18 SCREW M8 P1 25 16L 6m 6m 4 57 BUSHING 10 16 11 5mml 1 19 WASHER 8 19 2T 9 58 BUSHING 39 3 1 20 WASHER 8 19 2T 2 59 FLYWHEEL 280 26W 1 21 UPRIGHT POST COVER PS 1 60...

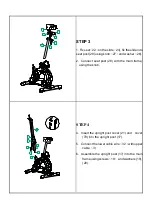
Страница 26: ...73 using 2 screws 68 and 2 washers 19 to lock 2 Fix the rear stabilizer 67 on the main frame 73 using 2 screws 68 and 2 washers 19 to lock STEP 2 3 Fix pedal tie on the pedal 4 Fix left pedal 37 L on...

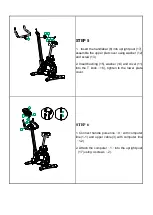
Страница 27: ...eat post 28 with the main frame using the knob STEP 4 4 Insert the upright post cover 21 and cover 70 into the upright post 17 5 Connect the lower cable wire 32 with upper cable 3 6 Assemble the uprig...

Страница 28: ...screw 13 2 Insert bushing 15 washer 14 and cover 11 into the T knob 16 tighten to the lower plate cover STEP 6 1 Connect handle pulse line 9 with computer line 1 1 and upper cable 3 with computer line...

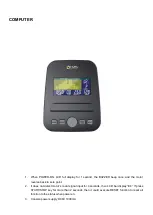
Страница 29: ...tor reverse back to zero point 2 If does not detect motor s count signal input for 4 seconds then LCD bar display E4 If press START STOP key for more than 2 seconds then it could execute RESET functio...

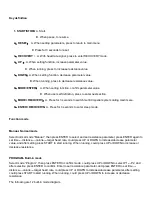
Страница 30: ...r 3 seconds to enter sleep mode Function mode Manual Normal mode Select normal mode Manual then press ENTER to select and set resistance parameter press ENTER again to set time distance calorie target...

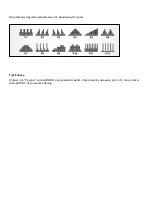
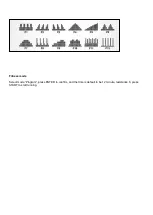
Страница 31: ...Fitness mode Select mode Program press ENTER to confirm and the time is default to be 12 minute resistance 6 press START to start running...

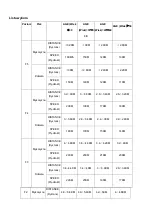
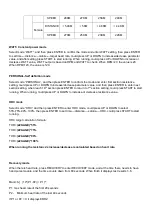
Страница 32: ...E 40 49 AGE 50 F5 Male DISTANCE 3 2KM 3KM 2 8KM 2 6KM SPEED 16KM h 15KM 14KM 13KM Female DISTANCE 3KM 2 8KM 2 4KM 2 2KM SPEED 15KM 14KM 12KM 11KM F4 Male DISTANCE 3 2 4KM 3 3 8KM 2 8 3 4KM 2 6 3 2KM S...

Страница 33: ...n press ENTER to enter next section setting when reach 16th section press ENTER to return to 1st section setting could press START to start running When running could press UP or DOWN to increase or d...

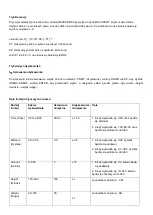
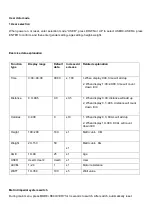
Страница 34: ...splay 1 00 99 00 time will count down till 0 Distance 0 0 99 5 0 0 0 5 1 When display 0 00 distance will add up 2 When display 0 1 99 5 distance will count down till 0 Calories 0 990 0 10 1 When displ...

Страница 35: ...ment ABISAL Sp z o o ul w El biety 6 41 905 Bytom serwis abisal pl www abisal pl www hms fitness pl The equipment label depicting a crossed out wheeled bin symbol informs that it is forbidden to dispo...

Страница 36: ...Za zen by m lo b t pravideln kontrolov no z hlediska opot eben a po kozen pouze tehdy budou spln ny bezpe nostn podm nky Zvl tn pozornost je pot eba v novat potahu a p novk m kter podl haj opot eben n...

Страница 37: ...24 25 26 27 28 30 33 31 32 34 35 36 37 R 37 L 38 39 R 39 L 40 41 42 43 44 45 46 47 48 49 50 51 52 53 54 55 56 57 58 59 60 61 62 63 64 L 64 R 65 66 R 66 L 67 68 13 20 10 1 9 4 5 6 7 8 11 12 14 15 16 1...

Страница 38: ...28 27 26 24 23 22 37 L 37 R 65 67 68 19 10 21 9 8 1 18 19 20 11 12 14 15 16 17 3 2 73...

Страница 39: ...72L 4 19 Podlo ka 8 19 2T 4 15 V le ek 7 12 25mml 1 70 Kl 6mm 30mml 84mml 1 13 roub M7 P1 0 30L 1 71 Kl 13 15 1 16 T roub M7 P1 0 55L 1 72 Kl 13 14 15 1 14 Podlo ka 7 12 1T 2 12 Podlo ka 7 12 2T 2 B3...

Страница 40: ...ladka 39 7 26 1 18 roub M8 P1 25 16L 6m 6m 4 57 Lo isko 10 16 11 5mml 1 19 Podlo ka 8 19 2T 9 58 V le ek 39 3 1 20 Podlo ka 8 19 2T 2 59 Z t ov kolo 280 26W 1 21 Kryt PS 1 60 V le ek 10 14 9mmL 4 22 S...

Страница 41: ...73 pomoc dvou roub 68 a 2 podlo ek 19 2 Zadn stabiliz tor 67 p ipevn te k hlavn mu r mu 73 pomoc dvou roub 68 a dvou podlo ek 19 KROK 2 1 Na ped ly p ipevn te em nky 2 Lev ped l 37 L na roubujte do le...

Страница 42: ...olejnici a p ipevn te pomoc roubu 27 a podlo ky 26 3 Sedlovou trubku 28 vsu te do hlavn ho r mu a zajist te roubem KROK 4 1 Na sloupek nasu te kryt 70 a 21 2 Spodn kabel 32 spojte s horn m kabelem 3 3...

Страница 43: ...13 a podlo kou 12 2 Na T roub 16 nasu te v le ek 15 podlo ku 14 plastovou krytku 11 a v roubujte do spodn sti profilu KROK 6 1 Sign ln vodi 9 propojte s po ta em 1 1 horn kabel 3 propojte s po ta em...

Страница 44: ...Po ta...

Страница 45: ...k 7 MODE RECOVERY A V hlavn nab dce stiskn te na 3 vte iny pro p epnut mezi m lemi a kilometry 8 ENTER RECOVERY A Stiskn te na 3 vte iny pro re im sp nku Programy MANUAL Manu ln re im V hlavn nab dce...

Страница 46: ...kn te START z t upravujte tla tky UP a DOWN Fitness program V hlavn nab dce vyberte mo nost PROGRAM a rovnou stiskn te START zah j se tr nink s v choz mi hodnotami kdy as je nastaven na 12 minut a z t...

Страница 47: ...3KM 2 8KM 2 6KM RYCHLOST 16KM h 15KM 14KM 13KM ena VZD LENOST 3KM 2 8KM 2 4KM 2 2KM RYCHLOST 15KM 14KM 12KM 11KM F4 Mu VZD LENOST 3 2 4KM 3 3 8KM 2 8 3 4KM 2 6 3 2KM RYCHLOST 20KM 19KM 17KM 16KM ena...

Страница 48: ...vn 1 16 tr ninku a potvrd te stisknut m ENTER posunete se na nastaven z t e pro 2 16 atd a po 16 t sloupe ek Tr nink zah j te stisknut m START B hem tr ninku m ete upravovat z t tla tky UP a DOWN HRC...

Страница 49: ...Zobrazovan hodnoty Funkce Rozsah V choz hodnot a Posun Popis Time as 0 00 99 00 00 00 1 00 1 Pokud je zobrazena 0 bude se hodnota na tat 2 Pokud je zobrazeno 1 00 99 00 hodnota se bude ode tat do 0 D...

Страница 50: ...ejte kryt a zkontrolujte kabelov veden pravd podobn do lo k uvoln n konektoru nebo po kozen kabelu N VOD K TR NINKU 1 Rozcvi ka P ed zapo et m tr ninku doporu ujeme prov st zah vac cviky dle obr zku K...

Страница 51: ...l kter se chce tohoto za zen zbavit je povinen jej odevzdat ve sb rn m dvo e pro elektrick a elektronick odpad d ky emu se spolupod l na jejich op tovn m vyu it recyklaci a t m i ochran ivotn ho prost...

Страница 52: ...rockenen und sauberen Oberfl che gestellt werden Aus Sicherheitsgr nden sollte der Abstand zu anderen Gegenst nden mindestens 0 6 m betragen 8 Es sollten entsprechende Sportkleidung und schuhe verwend...

Страница 53: ...dabei zu ber cksichtigen Benutzen Sie ein weiches Tuch zur Schmutz und Staubbeseitigung Danach reiben Sie das Ger t trocken Achten Sie immer darauf dass die B nder sicher sind und keine Verschlei ersc...

Страница 54: ...21 22 23 24 25 26 27 28 30 33 31 32 34 35 36 37 R 37 L 38 39 R 39 L 40 41 42 43 44 45 46 47 48 49 50 51 52 53 54 55 56 57 58 59 60 61 62 63 64 L 64 R 65 66 R 66 L 67 68 13 20 10 1 9 4 5 6 7 8 11 12 14...

Страница 55: ...28 27 26 24 23 22 37 L 37 R 65 67 68 19 10 21 9 8 1 18 19 20 11 12 14 15 16 17 3 2 73...

Страница 56: ...8 19 2T 4 15 H LSE 7 12 25mml 1 70 SECHSKANTSCHL SSEL 6mm 30mml 84m ml 1 13 SCHRAUBE M7 P1 0 30L 1 71 SCHL SSEL 13 15 1 16 DREHKNOPF T M7 P1 0 55L 1 72 WERKZEUG N 13 14 15 1 14 UNTERLEGSCHEIBE 7 12 1...

Страница 57: ...8 26 145L 1 16 DREHKNOPF T M7 P1 0 55L 1 55 LAGER 6000RS 3 17 LENKERST TZROHR 45 51 1 5T 84 7 4L 1 56 KLEINE RIEMENSCHEIBE 39 7 26 1 18 SCHRAUBE M8 P1 25 16L 6m 6m 4 57 H LSE 10 16 11 5 mml 1 19 UNTE...

Страница 58: ...EL 6 190W 1 2 1 37 PEDAL 1 2 1 38 ABDECKUNG DER KURBEL PVC 2 39 HAUPTGEH USE L R PS 1 MONTAGEANLEITUNG SCHRITT 1 1 Befestigen Sie den vorderen Standfu 65 am Hauptrahmen mittels 2 Schrauben 68 und 2 Un...

Страница 59: ...L und das rechte Pedal 37 R an der rechten Kurbel SCHRITT 3 1 Befestigen Sie den Sattel 22 an der Sitzst tze 24 und den Drehknopf 27 mit der Unterlegscheibe 26 am Sattelst tzrohr 28 2 Befestigen Sie...

Страница 60: ...scheiben 19 sowie 2 Unterlegscheiben 20 am Hauptrahmen SCHRITT 5 1 Befestigen Sie die Abdeckung des Tellers 10 das Befestigungselement 1 die Unterlegscheiben 14 und 12 die Schraube 13 sowie den Lenker...

Страница 61: ...ie das Kabel des Sensors zur Pulsmessung 9 mit dem Kabel des Computers 1 1 und das obere Kabel 3 mit dem Kabel des Computers 1 2 an 2 Befestigen Sie den Computer 1 am Lenkerst tzrohr 17 mittels 4 Schr...

Страница 62: ...Motor wird auf Null neu gestartet 2 Wenn kein Eingangssignal 4 Sekunden lang empfangen wird wird E4 auf dem Display angezeigt Wenn Sie die Taste START STOP mehr als 2 Sekunden lang gedr ckt halten wi...

Страница 63: ...d des Trainings um den Wert des Widerstands zu erh hen 5 DOWN A Dr cken Sie die Taste w hrend der Einstellung der Funktionen um den Wert der Parameter zu verringern B Dr cken Sie die Taste w hrend des...

Страница 64: ...m das entsprechende Programm P1 P2 zu w hlen Dr cken Sie dann die Taste ENTER um die Einstellungen zu best tigen Stellen Sie den Wert des Widerstands ein und dr cken Sie ENTER um Zeit time Distanz dis...

Страница 65: ...E Distanz 3 2 4KM 3 3 8KM 2 8 3 4KM 2 6 3 2KM SPEED Geschwindigk eit 20KM 19KM 17KM 16KM Frau DISTANCE Distanz 3 3 6KM 2 8 3 4KM 2 4 3KM 2 2 2 8KM SPEED Geschwindigk eit 18KM 17KM 15KM 14KM F3 Mann DI...

Страница 66: ...verringern Dr cken Sie nach der eingef hrten Einstellungen die Taste START um das Training zu beginnen W hrend des Trainings k nnen Sie den WATT Wert verringern bzw erh hen Dr cken Sie daf r die Taste...

Страница 67: ...eruntergez hlt Nach der Messung wird das Ergebnis im Bereich 1 6 auf dem Display angezeigt Markierung 6 10 P1 P2 P1 P1 maximale Herzfrequenz aus ersten 20 Sek P2 minimale Herzfrequenz aus letzten 40 S...

Страница 68: ...VEL Niveau 1 24 1 1 Widerstand des Motors WATT 10 350 100 5 Watt Wert nderung des metrischen imperialen Ma systems Halten Sie im Hauptmen MODE RECOVERY 3 Sekunden lang gedr ckt um in die Einstellungen...

Страница 69: ...er Nutzer der dieses Ger t entsorgen will ist dazu verpflichtet es an die Sammelstelle f r Elektro und Elektronik Altger te zur ckzugeben was zur Wiederverwendung zum Recycling oder zur Verwertung und...

Страница 70: ...a niew a ciwy monta i konserwacja uszkodzenia i zu ycie takich element w jak linki paski elementy gumowe peda y uchwyty z g bki k ka o yska itp 6 Gwarancja traci wa no w przypadku Up ywu terminu wa no...

Страница 71: ...sulting from incorrect storage and usage of the equipment against its purpose incorrect assembly and maintenance damages and consumption of such elements as cables straps rubber parts pedals sponge gr...

Страница 72: ...Notes on the course of repairs Item Date of notificacion Date of provision Course of repairs Signature of the recipient shop owner...

Страница 73: ...nespr vn ho pou it a skladov n patnou mont a dr bu po kozen a opot eben sou st kter podl haj zk ze jako jsou kabely p sy pry ov prvky ped ly dr ky na houby kola lo iska atd 6 Z ruka zanik pokud vypr j...

Страница 74: ...Upozorn n o oprav Datum nahl en Datum vyd n Pr b h oprav Podpis p jemce obchod majitel...

Страница 75: ...ng und Verschlei von Elementen wie Kabeln Riemen Gummielementen Pedalen Schwammhaltern R dern Lagern usw 6 Die Garantie erlischt nach Ablauf der Haltbarkeit bei freiwilligen Reparaturen Nichteinhaltun...

Страница 76: ...VERWENDUNG ZUR REHABILITATION UND THERAPEUTISCHEN ZWECKEN BESTIMMT VERMERKE BER DEN VERLAUF DER REPARATUREN Lfd Nr Datum der Anmeldung Datum der Ausgabe Verlauf der Reparaturen Unterschrift des Empf...

Страница 77: ...IMPORTER ABISAL SP Z O O ul wi tej El biety 6 41 905 Bytom Service Pyskowicka 14 41 807 Zabrze abisal abisal pl www abisal pl...

Отзывы: