background image


IMPORTANT SAFETY INFORMATION


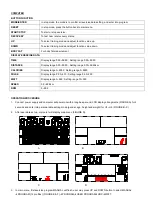
This  product  has  been  designed  for  home  use  only  and  built  for  optimum  safety.  Please  note  the  following  safety 

precautions: 


1. 

Before starting any exercise program you should consult your doctor to determine if you have any physical or health 

conditions that could create a risk to your health and safety, or prevent you from using the equipment properly. Your 

doctor's advice is essential if  you are taking medication that affects your heart rate, blood pressure or cholesterol 

level. This is especially important for persons over the age of 35, pregnant women, or those with pre-existing health 

problems or balance impairments.   

2. 

Before using this equipment to exercise, always do stretching exercises to properly warm up.   

3. 

Be aware of your body's signals. Incorrect or excessive exercise can damage your health. Stop exercising if you experience 

any  of  the  following symptoms: pain, tightness  in  your  chest,  irregular  heartbeat, extreme  shortness  of breath, feeling  light 

headed, dizzy or nauseous. If you do experience any of these conditions you should consult your doctor before continuing 

with exercise program. 

4. 

During exercises and after keep children and pets away from the equipment. 

5.  Use  the  equipment  on  a  solid,  flat  level  surface  with  a  protective  cover  for  your  floor  or  carpet.  For  safety,  the  equipment 

should have at least 0.5 meter of free space all around it. Move    all sharp    objects to. 

6.  Before each use, visually inspect the unit including hardware and resistance bends. 

7.  Before using the equipment, check if the nuts, bolts and other bends are securely tightened. 

8.  Always use the equipment as indicated. If you find any defective components whilst assembling or checking the equipment, or 

if you hear any unusual noise coming from the equipment while using, stop. Do not use the equipment until the problem has 

been rectified. 

9.  Do not insert any object into any openings. 

10.  Be aware of all regulation and constructions parts which may disturb during exercises. 

11.  The safety level of the equipment can only be maintained if it is regularly examined for damage and/or wear and tear.   

12.  Wear suitable clothing whilst using the equipment. Avoid wearing loose clothing which may get caught in the equipment or that 

may restrict or prevent movement. 

13.  The equipment has been tested and certified according to EN 957 under class H. Unit is not intended for commercial 

use therapy or rehabilitation. 

14.  Care must be taken when lifting or moving the equipment so as not to injure 

your  back.  Always  use  proper  lifting 

techniques and/or use assistance. 

15.  The equipment is designed for adult use only. Adults should take care and responsibility for children. 

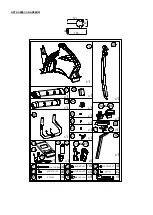
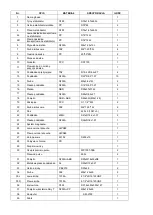
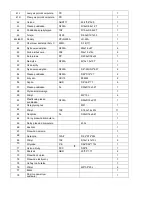
16.  Assemble this unit as described in this manual. Use only parts from the set. Check all parts with the part list. 


WARNING:

    READ  ALL  INSTRUCTIONS  BEFORE USING  ANY  FITNESS EQUIPMENT. WE  ASSUME  NO  RESPONSIBILITY 

FOR PERSONAL INJURY OR PROPERTY DAMAGE CAUSED BY OR THROUGH THE USE OF THIS PRODUCT 


Содержание ABI17-1-064

Страница 1: ...ROWER MAGNETYCZNY MAGNETIC BIKE MAGNETICK ROTOPED M1820 INSTRUKCJA U YTKOWANIA MANUAL INSTRUCTION N VOD K OBSLUZE...

Страница 2: ...dza w trakcie wicze 11 Sprz t wykorzystuj jedynie zgodnie z przeznaczeniem Je li kt ra z cz ci ulegnie uszkodzeniu b d zu yciu lub te us yszysz niepokoj ce d wi ki podczas u ywania sprz tu natychmiast...

Страница 3: ...49 63 23 22 47 70 30 36 42 45 44 37 43 55 71 62 56 3 2 64 66 73 62 65 67 74 1 X1 X1 X1 X1 29 2 4 38 M8 1 25 95L D22 D8 5 1 5T D15 4 D8 2 2T M8 1 25 15L 7 X4 13 X10 12 X4 20 X6 X1 28 X1 42 X1 45 43 X1...

Страница 4: ...ianka NBR D30x3Tx575L 2 17 P aska podk adka Q235A D25xD8 5x2T 1 18 Pokr t o SS41 ABS D60x32L M8x1 25 1 19 Za lepka PVC D1 1 4 29L 2 20 Sruba imbusowa 35 M8 1 25 15L 6 21 Pas 420 J5 1067 J5 1 22 Podk a...

Страница 5: ...5T 2 54 P aska podk adka Q235A D22 D10 2T 2 55 o ysko GCr15 99502 2 56 Szpila ABS D6 26 5 7 7 6 57 P aska podk adka Fe D30xD10x3 2T 1 58 P ytka ko a ja owego 1 59 Wkr t M5 10L 4 60 Plastikowa p aska p...

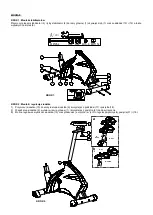
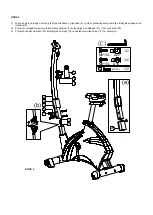
Страница 6: ...10 do szczytu s upa siode ka 9 korzystaj c z podk adki 17 i pokr t a 18 2 Wsad s up siode ka 9 w otw r w ramie g wnej 1 i korzystaj c z pokr t a 31 zablokuj czenie 3 Mo na regulowa wysoko siode ka 10...

Страница 7: ...kazano na ilustracji b 2 Przymocuj s upek kierownicy 29 do ramy g wnej 1 korzystaj c z podk adek 13 i 15 oraz rub 20 3 Przykr uchwyt na bidon 75 korzystaj c ze ruby 76 a nast pnie umie bidon 77 w uchw...

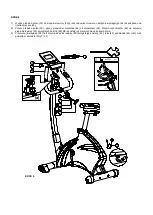
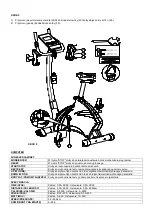
Страница 8: ...rny przew d komputerka 64 z komputerem 38 Przymocuj komputer 38 na szczycie s upa kierownicy 29 korzystaj c ze rub 59 kt re zosta y ju przymocowane do komputera 3 Przymocuj kierownic 36 na szczycie s...

Страница 9: ...pulsu UP W G R S u y do wyboru trybu wiczenia oraz zwi kszania warto ci wybranego parametru DOWN W D S u y do wyboru trybu wiczenia oraz zmniejszenia warto ci wybranego parametru BODY FAT POZIOM T US...

Страница 10: ...azu rozpocz wiczenia Przyciskaj c UP lub DOWN ju w trakcie wicze dostosujesz poziom oporu 5 PROGRAM Przed rozpocz ciem wicze w trybie Program u ytkownik mo e ustawi po dany czas wiczenia TIME Wciskaj...

Страница 11: ...jgorsz Mo esz kontynuowa wiczenia w celu poprawy swojego statusu Wci nij przycisk RECOVERY ponownie aby powr ci do menu g wnego UWAGA 1 Komputerek wymaga zasilacza 9V 500mA 2 Je li komputerek nie otrz...

Страница 12: ...lub peda owa przez kilka minut przy ma ym oporze Sesje treningowe D ugo treningu mo e by okre lona wed ug nast puj cej regu y Trening codzienny ok 10 min 2 3 razy w tygodniu ok 30 min 1 2 razy w tygo...

Страница 13: ...y o czas niezb dny do jej sprowadzenia jednak nie d u ej ni o 40 dni 5 Gwarancj nie s obj te Uszkodzenia mechaniczne i wywo ane nimi wady uszkodzenia i wady wynik e wskutek niew a ciwego z przeznaczen...

Страница 14: ...around it Move all sharp objects to 6 Before each use visually inspect the unit including hardware and resistance bends 7 Before using the equipment check if the nuts bolts and other bends are secure...

Страница 15: ...e item Magnetic bike M1820 not acquire breaking system or emergency break PARTS LIST AND TOOLS PART NO DESCRIPTION MATERIAL SPECIFICATION Q TY 1 Main frame 1 2 Rear stabilizer Q195 D76x1 5Tx480L 1 3 A...

Страница 16: ...6 handlebar Q195 D31 8x550x350x1 5T 1 37 T knob Q235A PP M8x1 25x65 1 38 computer SM 2750 1 39 Motor 1 41L left computer bracket PS 1 41R right computer bracket PS 1 42 cover for handlebar ABS717 80 6...

Страница 17: ...ter cable 400L 1 66 Adaptor 1 67 Tension cable 1 68 Spring D2 2 D14 65L 72A D2 2 D14 65L 1 69 Cross screw 10 ST4x1 41x15L 4 70 Insert plug P E D66 D52 170L 1 71 Cover for screw D35 8 PVC D35 8 1 72 Bu...

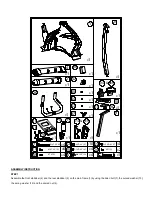
Страница 18: ...44 X1 X1 X1 36 X1 9 X1 11 D16 D8 5 1 2T 15 X4 X1 10 14 ST4 15L X4 X2 69 X1 6 M8 1 25 15L X1 X4 41L 41R 46L 46R 75 77 X1 X1 66 78 18 ASSEMBLY INSTRUCTION STEP 1 Assemble the front stabilizer 4 and the...

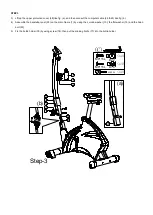
Страница 19: ...e flat washer 17 and the knob 18 5 Insert the seat post welding sets 9 into the main frame 1 and use the ball quick release knob 31 to lock the seat post 6 The seat 10 could be adjusted to different h...

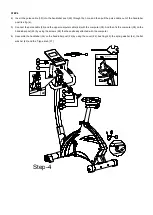
Страница 20: ...ssemble the handlebar post 29 on the main frame 1 by using the curved washer 13 the flat washer 15 and the Allen bolt 20 5 Fix the bottle holder 75 by using screw 76 then put the drinking bottle 77 in...

Страница 21: ...the upper computer cable 64 with the computer 38 And then fix the computer 38 on the handlebar post 29 by using the screws 59 that have already attached with the computer 6 Assemble the handlebar 36 o...

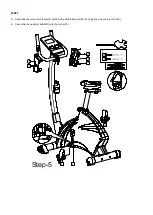
Страница 22: ...STEP 5 3 Assemble the computer bracket 41L R on the handlebar post 29 by using the cross screw 14 69 4 Assemble the pedals 46L 46R onto the crank 35 41L 14 69 14 41R 14 69 Step 5 46L 35L 46R...

Страница 23: ...y range 0 00 99 99 Setting range 0 00 99 90km CALORIES Display range 0 9999 Setting range 0 9990 PULSE Display range P 30 230 Setting range 0 30 230 WATT Display range 0 999 Setting range 10 350 SPEED...

Страница 24: ...a sign of 55 will be displayed in the PULSE column according to the AGE user inserted If user selects H R C TAG press the MODE key to enter preset PULSE value 100 will be shown in flashing text and us...

Страница 25: ...ase plug out the adaptor and plug in again ERROR MESSAGE E1 handgrip test fail please hold tight with two hands E2 motor line fail E4 preset Age Weight Height are over range WARNING Heart rate monitor...

Страница 26: ...minutes Stretching is also helpful for the prevention of muscle aches Success Even after a short period of regular exercises you will notice that you constantly have to increase the resistance to rea...

Страница 27: ...ter je spojuj Tr nink je mo n zapo t pouze v p pad e je za zen dn sestaveno 8 Za zen by m lo b t pravideln kontrolov no z hlediska opot eben a po kozen pouze tehdy budou spln ny bezpe nostn podm nky Z...

Страница 28: ...a ozna uj c jeho min a max v ku ZP SOB BR D N Pro zastaven rotopedu je pot eba p estat lapat Magnetick rotoped M1820 nen vybaven bloka n m syst mem a nem bezpe nostn brzdu SEZNAM ST A N AD ST POPIS MA...

Страница 29: ...2 x9 16 20UNF 1 36 d tka Q195 D31 8x550x350x1 5T 1 37 T roub Q235A PP M8x1 25x65 1 38 Po ta SM 2750 1 39 Motor 1 41L Lev kryt po ta e PS 1 41R Prav kryt po ta e PS 1 42 Krytka d tek ABS717 80 6 56 52...

Страница 30: ...ta ov p evod 1 65 Doln po ta ov p evod 400L 1 66 Adapt r 1 67 P evod nap t 1 68 Pru ina D2 2 D14 65L 72A D2 2 D14 65L 1 69 K ov roub 10 ST4x1 41x15L 4 70 Plastov obj mka P E D66 D52 170L 1 71 Krytka r...

Страница 31: ...38 M8 1 25 95L D22 D8 5 1 5T D15 4 D8 2 2T M8 1 25 15L 7 X4 13 X10 12 X4 20 X6 X1 28 X1 42 X1 45 43 X1 37 44 X1 X1 X1 36 X1 9 X1 11 D16 D8 5 1 2T 15 X4 X1 10 14 ST4 15L X4 X2 69 X1 6 M8 1 25 15L X1 X4...

Страница 32: ...x4 M8 15L D15 4 D22 M8 95L D22 2 6 12 13 7 4 12 6 1 Step 1 13 P ipevn te p edn stabiliz tor 4 a zadn stabiliz tor 2 k hlavn mu r mu 1 pomoc roubu 7 zak iven podlo ky 13 pru inov podlo ky 12 a epi kov...

Страница 33: ...n te sedadlo 10 k ty i sedadla 9 pomoc ploch podlo ky 17 a hlavi ky 18 2 Vlo te ty sedadla 9 do hlavn ho r mu 1 a pou ijte hlavi ku 31 k upevn n ty e sedadla 3 Sedadlo 10 m e b t nastaveno na r znou v...

Страница 34: ...M5 20L 75 76 77 76 x2 1 Zvedn te ochrannou krytku 28 dle obr a a zapojte po ta ov p evod 64 65 dle obr b 2 P ipevn te ty d tek 29 k hlavn mu r mu 1 pomoc zak iven podlo ky 13 ploch podlo ky 15 a roub...

Страница 35: ...d pulsu vyt hn te z dr adla d tek dle obr a 2 Spojte p evod idla 30 a horn po ta ov p evod 64 s po ta em 38 Pot upevn te po ta 38 na ty i d tek 29 pomoc roub 59 kter byly k po ta i p ipevn n ji d ve 3...

Страница 36: ...KROK 5 41L 14 69 14 41R 14 69 Step 5 46L 35L 46R 1 P ipevn te kryt po ta e 41L R k ty i d tek 29 pomoc k ov ho roubu 14 69 2 P ipevn te ped ly 46L 46R ke klice 35...

Страница 37: ...RAZEN HODNOTY TIME Rozmez displeje 0 00 99 99 Rozmez nastaven 0 00 99 00 DISTANCE Rozmez displeje 0 00 99 99 Rozmez nastaven 0 00 99 90km CALORIES Rozmez displeje 0 9999 Rozmez nastaven 0 9990 PULSE R...

Страница 38: ...as Stiskn te tla tko UP DOWN pro v b r Program s 12 profily a stiskn te tla tko ENTER MODE pro potvrzen rove m e b t nastavena b hem tr ninku pomoc tla tek UP nebo DOWN 6 H R C Vyberte H R C re im a...

Страница 39: ...r te dlan i nad le na d tk ch a stiskn te tla tko RECOVERY V echny funkce displeje se zastav krom funkce TIME as kter bude odpo t vat od 00 60 do 00 00 Displej zobraz Va i srde n frekvenci a zobraz st...

Страница 40: ...Pro zlep en kondice a zdrav je pot eba dit se n vodem k tr ninku Pokud jste ji del as aktivn nesportovali je pot eba se p ed tr ninkem poradit s l ka em 4 Pl n tr ninku Rozcvi ka P ed ka d m tr ninke...

Страница 41: ...si motivaci k pravideln m tr nink m Vyberte si konkr tn hodinu tr ninku a nezapo nejte tr nink p li agresivn P esto e d l me v e pro to abychom zajistili maxim ln kvalitu na ich v robk mohou se objevi...

Страница 42: ...17 18 33 34 35L 46L 25 31 9 1 41L 14 59 69 14 41R 19 53 54 51 50 32 58 68 60 57 53 24 46R 35R 26 27 61 48 21 52 49 63 23 22 47 70 38 16 30 36 42 45 44 37 43 55 71 62 56 13 7 5L 4 72 12 6 5R 3 2 66 73...

Страница 43: ......
Отзывы: