background image

C18UE001-1804 


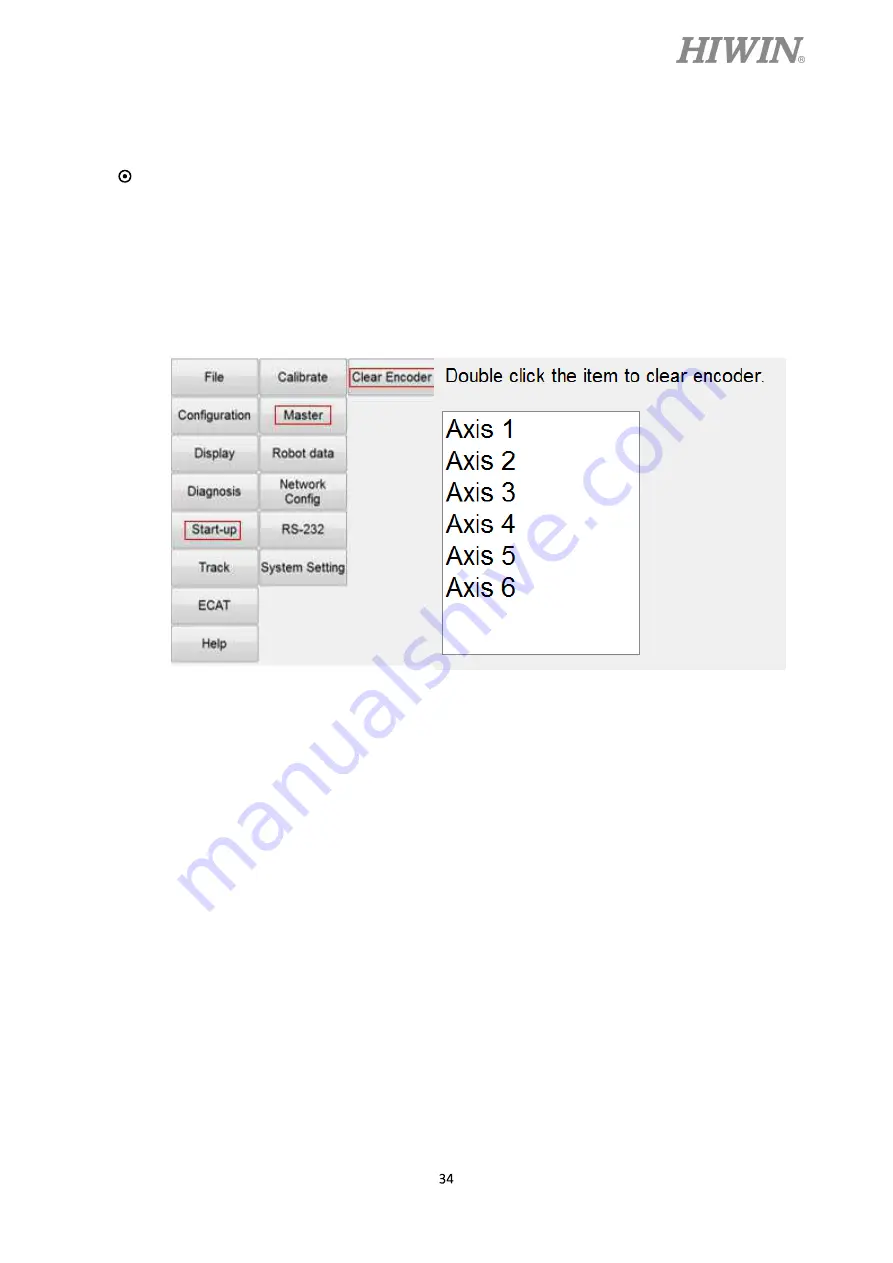
Clear encoder by HRSS 

Step1.


Select the “JOINT” as the coordinate system. 

Step2.


Move the robot to the Zero-position. (Refer to section 4.1) 

Step3.


Click Main Menu>>Start-up>>Master>>Clear Encoder.   

(As shown in Figure 4-8) 

Step4.


Double click the axis to clear encoder. (As shown in Figure 4-8) 


Figure 4-8 Clear encoder by HRSS 


Содержание RT605 Series

Страница 1: ......

Страница 2: ...ideway Automation Semiconductor Medical Ball Type HG EG WE MG CG Quiet Type QH QE QW QR Other RG E2 PG SE RC Medical Equipment Hospital Rehabilitation centers Nursing homes Robotic Gait Training Syste...

Страница 3: ...ditions are not covered by the warranty Product serial number or date of manufacture month and year cannot be verified Using non genuine HIWIN products Adding or removing any components into out the p...

Страница 4: ...Description Failure to follow instructions with this symbol may result in serious hazard or personal injury Please be sure to comply with these instructions Failure to follow instructions with this sy...

Страница 5: ...ng robot operator needs to wear safety equipment such as smock for working environment safety shoes and helmets When encountering danger or other emergency or abnormal situation please press the emerg...

Страница 6: ...malfunction Using non HIWIN repair components may cause robot damage or malfunction Beware of the heat generated by the controller and servo motor Do not overbend the cable to avoid poor circuit cont...

Страница 7: ...e rotary shaft Special attention should be paid to the operating safety The end effector should be mounted firmly on the robot to avoid workpiece release during operation which may cause personal inju...

Страница 8: ...ents will be stopped And the control system will be shut down Emergency stop should be reset if the restoration of operating procedure is wanted Avoid using emergency stop to replace a normal stop pro...

Страница 9: ...ion of Serial Number 2 2 Labels 2 3 Robot Specifications 2 4 Outer Dimensions and Motion Range 2 5 Wrist Moment Conditions 3 Equipment Mounting Surface and Interface 3 1 Mounting Surface for End Effec...

Страница 10: ...C18UE001 1804 Version Date Product Note 1 0 0 2017 12 18 RT605 710 GB First edition 2 0 0 2018 01 08 RT605 710 GB RT605 909 GB Manual specification updated RT605 909 GB...

Страница 11: ...int is shown in the table of Figure 1 1 Step2 Secure the suspension plate to the robot with four M8 1 25P 12L screws as shown in Figure 1 2 Make the sling go through the suspension plate to keep the c...

Страница 12: ...be sure to remove the end effector which changes the center of gravity Please keep stable slow down and avoid excessive vibration or shock during transportation While placing the robot be sure to avoi...

Страница 13: ...C18UE001 1804 Center of gravity Center of gravity Hexagon socket cap screw M8x1 25Px12L Suspension plate Center of gravity Center of gravity Hexagon socket cap screw M8x1 25Px12L Suspension plate...

Страница 14: ...C18UE001 1804...

Страница 15: ...ions fix the robot on the installation surface with M10 screws Figure 1 5 table 1 1 and table 1 2 show the forces and moments acting on the installation surface during operation The strength of surfac...

Страница 16: ...ent Mv Nm Vertical force Fv N Horizontal moment MH Nm Horizontal force FH N Stop 160 490 0 0 Acceleration Deceleration 526 1205 244 748 Power cut stop 660 1467 407 1246 Ensure the installation surface...

Страница 17: ...etween robot controller teach pendant and power source Figure 1 8and Figure 1 9 show the interface of J1 and the pin assignment of CN2 connector Figure 1 6 Drawing of robot structure Figure 1 7 Robot...

Страница 18: ...04 Figure 1 8 Interface at the rear of J1 Figure 1 9 Pin assignment of CN2 connector When connecting the cable be sure to turn off power supply first Battery box Power signal socket Air in socket Air...

Страница 19: ...obot operation may have greater resistance in the beginning and then an overload alarm may be raised It is recommended to warm up the robot at low speed for a few minutes Ambient conditions Ambient te...

Страница 20: ...1 Suspension plate set 4C201E41 Refer to section 1 1 Robot base GB 4C300F42 J2 belt 45310141 Refer to section 5 2 2 J2 belt 453100X8 Refer to section 5 2 2 J3 belt 453100QN Refer to section 5 2 2 J3 b...

Страница 21: ...Figure 2 1 Description of serial number 2 2 Labels The labels on the robot are shown in Table 2 1 Table 2 1 Labels description Labels Name Description Collision Keep safety distance from robot system...

Страница 22: ...ot please refer to section 1 1 for detailed information Specification Robot specification and serial number Air in The connection port of air tube for air input Air out The connection port of air tube...

Страница 23: ...65 J2 85 125 85 125 J3 185 55 185 55 J4 190 190 J5 115 115 J6 360 360 Maximum speed J1 360 s 250 s J2 288 s 200 s J3 420 s 300 s J4 444 s 444 s J5 450 s 450 s J6 720 s 720 s Allowable load moment at w...

Страница 24: ...this application Note 2 For details about load capacity please refer to section 2 5 Note 3 The cycle time is the time that the robot moves forward and backward in the vertical height 25mm and the hor...

Страница 25: ...C18UE001 1804 2 4 Outer Dimensions and Motion Range The motion range is shown in Figure 2 3 and Figure 2 4 Figure 2 3 RT605 710 GB Motion range...

Страница 26: ...C18UE001 1804 Figure 2 4 RT605 909 GB Motion range...

Страница 27: ...load capacity of the robot is not only limited by the weight of the load but also limited by the center of gravity of the load Figure 2 5 shows allowable center of gravity of the load when the robot i...

Страница 28: ...r on the wrist end is shown in Figure 3 1 Figure 3 1 Mounting surface for end effector 3 2 Pneumatic Interface Pneumatic holes AIR IN AIR OUT are installed on the rear of J1 as shown in Figure 3 2 The...

Страница 29: ...and the pin assignment of I O connector are shown in Figure 3 3 Figure 3 4 to Figure 3 7 show the wiring diagram of I O interface Figure 3 3 Pin assignment of the I O connector Power output 24V 1A Fi...

Страница 30: ...C18UE001 1804 Figure 3 5 Wiring diagram of input Optional Sourcing type Figure 3 6 Wiring diagram of output Standard Sinking type...

Страница 31: ...001 1804 Figure 3 7 Wiring diagram of output Optional Sourcing type Pin 1 and pin 9 which are 24V 1A are used for signal not for power input of end effector The maximum output current at each pin is 1...

Страница 32: ...libration tool B Calibration tool C Figure 4 1 The calibration tool set J1 axis Zero position setting Step1 Secure the calibration tool A on J1 axis by using positioning pin and screws Step2 Operate J...

Страница 33: ...f J2 axis is completed Figure 4 3 Illustration of J2 axis Zero position setting J3 axis Zero position setting Step1 Operate J3 at low speed to align the pinhole of J4 with the pinhole of J3 Step2 Inse...

Страница 34: ...efer to page 34 Step5 Zero position setting of J4 axis is completed Figure 4 5 Illustration of J4 axis Zero position setting RT605 909 GB J4 axis Zero position setting Step1 Operate J4 at low speed to...

Страница 35: ...ear encoder by HRSS Refer to page 34 Step5 Zero position setting of J5 axis is completed Figure 4 6 Illustration of J5 axis Zero position setting J6 axis Zero position setting Step1 Operate J6 at low...

Страница 36: ...the coordinate system Step2 Move the robot to the Zero position Refer to section 4 1 Step3 Click Main Menu Start up Master Clear Encoder As shown in Figure 4 8 Step4 Double click the axis to clear en...

Страница 37: ...ny of the robot installation screws cover installation screws and end effector installation screws loose Securely tighten the screws 2 Are all the cables securely connected Such as the power and signa...

Страница 38: ...p batteries is dead Please replace the backup batteries Refer to section 5 2 1 and set the Zero position Refer to section 4 1 3 The Robot J1 base retaining bolt might loosen Please apply LOCTITE and t...

Страница 39: ...1 Inspection item E 3years 11520hours 1 Change the lubrication grease of the reducer Change the grease Refer to section 5 2 3 Table 5 3 Inspection schedule It is normal that the belt produces debris...

Страница 40: ...ss the emergency stop button to prohibit the movement of the robot motion Step2 Ensure the robot and controller are connected with the cables Keep the power ON Step3 Please remove the battery cover th...

Страница 41: ...ension It is very important to keep proper belt tension The belt tooth jumping will happen if the belt tension is too loose If the belt tension is too tight it will cause damage to the motor or bearin...

Страница 42: ...h mm Span mm Tension N 2 RT605 710 GB 365 5GT 9 9 117 5 55 RT605 909 GB 375 5GT 9 116 9 3 RT605 710 GB 440 5GT 9 9 154 9 55 RT605 909 GB 635 5GT 9 254 9 5 Common 285 3GT 6 6 100 3 29 6 Common 285 3GT...

Страница 43: ...n in Figure 5 3 Figure 5 3 Cover removal diagram Inspection maintenance and replacement of timing belt in J2 axis Figure 5 4 shows the structure of J2 axis Figure 5 4 J2 axis structure diagram Screws...

Страница 44: ...ove No need to remove the screws Step2 Refer to Table 5 4 loosen or tighten the adjusting screw to adjust the tension of the belt Step3 Tighten the two fixing screws on motor flange Replace J2 axis ti...

Страница 45: ...or can be move No need to remove the screws Step2 Refer to Table 5 4 loosen or tighten the adjusting screw to adjust the tension of the belt Step3 Tighten the two fixing screws on motor flange Replace...

Страница 46: ...or can be move No need to remove the screws Step2 Refer to Table 5 4 loosen or tighten the adjusting screw to adjust the tension of the belt Step3 Tighten the two fixing screws on motor flange Replace...

Страница 47: ...t the belt tension Adjust J6 axis timing belt Step1 Loose the two fixing screws on motor flange so that the motor can be move No need to remove the screws Step2 Refer to Table 5 4 loosen or tighten th...

Страница 48: ...d air inlet outlet positions J5 axis grease inlet J6 axis grease inlet Bevel gear grease inlet J1 axis grease inlet J4 axis grease inlet Bevel gear air outlet J6 axis air outlet J5 axis air outlet J4...

Страница 49: ...t used for 2 years replace the grease of each axis Note2 The J3 cover needs to be removed for J2 grease replacement Procedure of grease replenishment Step1 The grease inlets and the air outlets of the...

Страница 50: ......

Страница 51: ......

Отзывы: