background image

30

31

To help you get the maximum benefit from your Aurora, we will guide you through a simple set-up of a standard sport plane. 
The operations shown during this exercise will help you learn many of the basic programming steps required by most of the Auroras features.

9 CHANNEL 2.4GHz AIRCRAFT COMPUTER RADIO SYSTEM

9 CHANNEL 2.4GHz AIRCRAFT COMPUTER RADIO SYSTEM

Receiver channel assignments are;

Simple Powered Plane with one or two aileron servos. 

#1 Aileron 
#2 Elevator 
#3 Throttle
#4 Rudder 
#5 Second Aileron (if used)

Simple two channel un-powered glider.

#1 Aileron (plug your rudder or aileron servo in ch. 1)
#2 Elevator 

After installing the servos and accessories in your aircraft, follow these steps to set-up your first airplane.

For safety reasons during this set-up exercise on an electric powered plane, remove the propeller. 

Warning

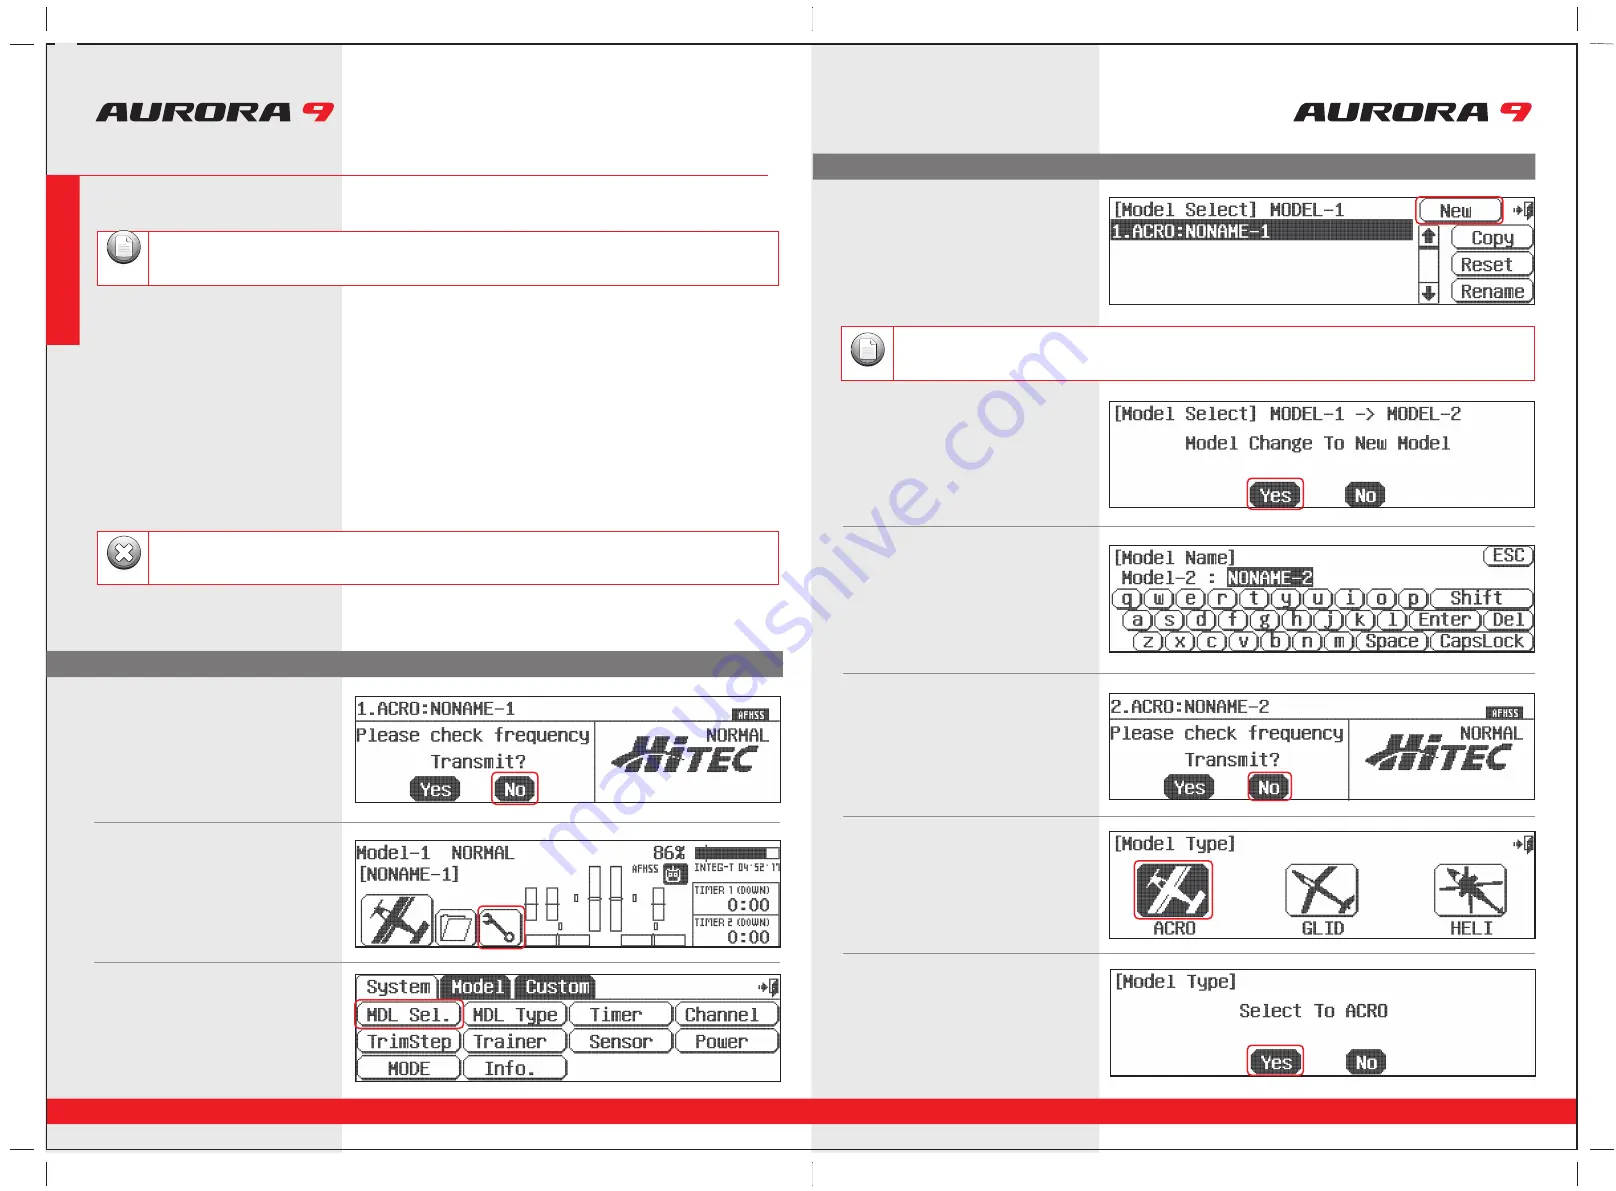
2. The first screen is the transmit option, 
     select 

No

.

1. Turn on the transmitter; 
    do not turn on the airplane.

3. This is the home screen; 
     select the 

wrench icon

 for the System menu.

4. Note the system menu function choices, 
     select, 

MDL Sel

 .

6. Select, 

Yes

  to confirm the selection of 

     a new model.

7. At the Model naming menu, 
    name your new model using the keyboard.

a. Press 

Shift

 to see the other characters.

b. When done press, 

Enter

.

8. Here at transmit option screen, press, 

No

     We do not wish to transmit yet.

9. Next you are drawn into the model type screen
     where we select 

ACRO

 (the airplane icon on 

     the left).

10. Select change to  ACRO, 

Yes

 at the model

       type change confirmation screen.

 If you are setting-up a powered or un-powered glider, we will be programming your plane into the ACRO menu for 
our demonstration. Later you can explore the functions found in the GLID menus. 

Note

Note

We are programming a new model into the model memory slot number two, not the model memory slot one. 
For the purpose of this exercise it will ensure a fresh model memory with no existing programming.  

5.  At the model selection screen press, 

New

.

System Menu Programming

System Menu Programming

Quick Start Guide to Set up a Simple Powered Airplane or Glider

Sec

tion  

Tw

o

Содержание Aurora 9

Страница 1: ...tock 40101 Battery Charger To charge the supplied NiMH transmitter battery Use the CG S45 battery charger Part 44450 for 110V Use the CG S35 battery charger Part 44350 for 220V Servo Installation Wiri...

Страница 2: ...ck Length Adjustment Hands come in all sizes so to accommodate everyone we use a two piece stick top that can be adjusted to t a wide variety of users Stick Tension Adjustment Control Mode Changes The...

Страница 3: ...ress the frequency number icon to enter the Frequency menu See page 57 for detailed instructions on changing the frequency 4 You are prompted to Please check frequency and asked to Transmit by selecti...

Страница 4: ...el PPM QPCM or AFHSS 11 Active or Inactive Transmit Icon Displays the transmitters transmit status If the icon is dark the Aurora is not transmitting If the icon is clear with lighting bolts and the o...

Страница 5: ...irplane 3 This is the home screen select the wrench icon for the System menu 4 Note the system menu function choices select MDL Sel 6 Select Yes to con rm the selection of a new model 7 At the Model n...

Страница 6: ...u must select how many servos your wing has and what they control Select 1AILE if you have one aileron servo controlling both ailerons OR 2AILE if your plane has 2 aileron servos in the wing b Then pr...

Страница 7: ...undamental programming techniques available in the Aurora We highly suggest you follow along with programming the EPA dual and exponential rate functions Doing so will teach you valuable lessons and t...

Страница 8: ...back out 31 This is a map of the Aurora switch layout You can put the aileron dual rate function on any of the switches shown 30 At the intermediary switch screen press the SEL icon Now we can apply...

Страница 9: ...w model 7 At the model naming menu name your new model using the keyboard 8 Here at transmit option screen press No We do not wish to transmit yet a Press Shift to see the other characters b When done...

Страница 10: ...Touch the1 2 icon and note the second screen has even more swash type selections Many function menus will have more than one screen of options Check for the 1 2 icon as you program your heli into the...

Отзывы: