p18
p19
section 4
section 4
transmitter preparation
transmitter preparation
Transmitter Operating Instructions:
NULL
S1
S2
S3
S4
GPS
NRM
Switching on the Transmitter:
1. Install 4 AA batteries into the battery compartment as per positive and negative directions.
2. Ensure the two sticks are in the center position. Push switches S1and S2 to the top position.
3. Push the transmitter switch to the ON position to switch on the transmitter.
4. After switching on the transmitter, the power indicator remains on and is red.
Caution:
1. Before each use, make sure the transmitter has sufficient battery charge. If the charge is too low, the
transmitter will sound a lower power alarm. Please replace the battery immediately.
2. Please remove the batteries if you do not intend to use the transmitter for a long time.
3. After the batteries are depleted, please remove the batteries and follow the battery instructions for recycling.
Antenna Signal Description:
Point transmitter antenna vertically skywards towards the receiver antenna on the quadcopter. Try to maintain
an unobstructed view between the antennas, otherwise you may lose control of the quadcopter. Be careful not
to let the mobile device and the repeater on the transmitter block the antennas.
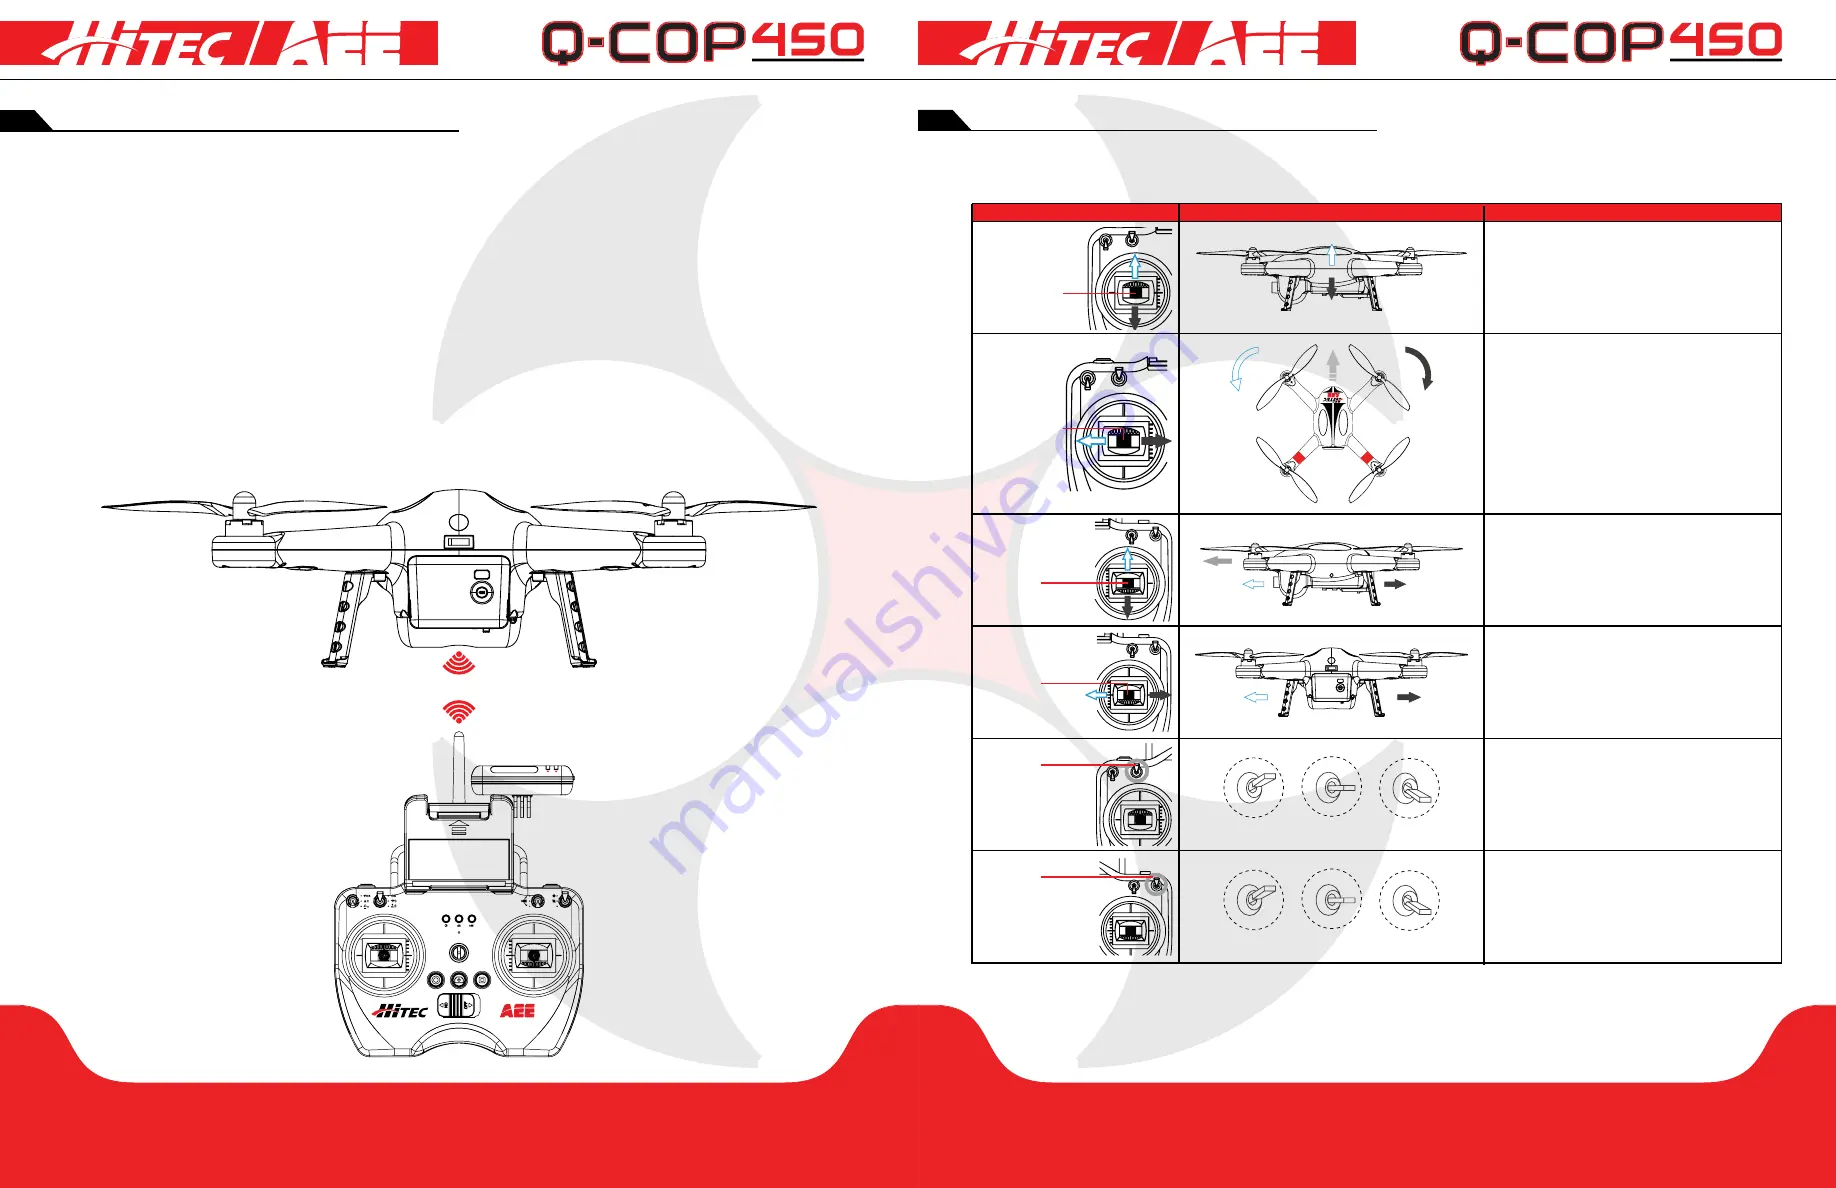
Transmitter [US Mode]
Quadcopter Action
Explanation
Position 1
Position 2
Position 3
Position 1
Position 2
Position 3
The throttle stick controls quadcopter elevation. Push the
stick up and the quadcopter rises. Pull the stick down and
the quadcopter descends. Keep the stick at the center
position, and the quadcopter hovers at that particular
height [height is automatically set.] Push the throttle stick
upwards over the centered position to make quadcopter
take off from the ground. [Please push the throttle
stick slowly to prevent the quadcopter from suddenly/
unexpectedly rising.]
The yaw stick controls the quadcopter rudder. Push the
stick left and the quadcopter rotates counterclockwise.
Push the stick right, and the quadcopter rotates clockwise.
If the stick is centered, the quadcopter flies in the same
direction without rotating. The stick controls the rotating
angular velocity of the quadcopter. Move the stick to
increase quadcopter rotation velocity.
The pitch stick controls the quadcopter’s front & back
tilt. Push the stick up and the quadcopter will tilt and fly
backward. The quadcopter will keep level and straight if
the stick is centered. Move the stick faster to increase
the tilt angle [maximum is 35 degrees], and faster flight
velocity.
The roll stick controls the quadcopter’s left & right tilt.
Push the stick left and the quadcopter will tilt and fly left.
Push the stick right and the quadcopter will tilt and fly
right. The quadcopter will keep level and straight if the
stick is centered. Move the stick faster to increase the tilt
angle [maximum is 35 degrees], and for faster flight velocity.
S2 Switch is used to calibrate the throttle position. Toggle
the S2 to position 3 to start the transmitter. Toggle the
throttle stick from left to right and back to left in a circle,
to make the stick touch the maximum positions. After
doing this for 5-8 times, toggle S2 to position 1, the Video
Recording Indicator lights up [green], and calibration is
completed.
S4 Switch is the flight mode toggle switch:
Position 1: GPS mode
Position 2: Notmal [NRM] mode
Position 3: Null [Manual]
In GPS Mode, when all sticks are in the neutral position
[centered], the quadcopter hovers at a fixed point. In
Normal Mode, when all sticks are in the neutral position
[centered], the quadcopter remains level but may drift in a
horizontal direction.
Throttle/Yaw
Stick
Throttle/Yaw
Stick
Pitch/Roll
Stick
Pitch/Roll
Stick
S2 Switch
S4 Switch
Rear
Содержание AEE Q-COP 450
Страница 1: ......


