--- 27 ---
10-5. Disassembly and Reassembly of the Cap and the Magazine Section
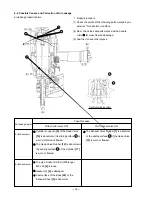
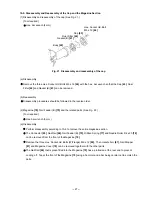
(1) Disassembly and reassembly of the cap (See Fig. 21.)
[Tool required]
Hex. bar wrench (4 mm)
Fig. 21 Disassembly and reassembly of the cap
Body [22]
Hex. Socket Hd. Bolt
M5 x 16 [44]
Cap [43]
Gasket (B) [41]
(a) Disassembly
Remove the three Hex. Socket Hd. Bolts M5 x 16 [44] with the hex. bar wrench so that the Cap [43], Dust
Filter [42] and Gasket (B) [41] can be removed.
(b) Reassembly
Disassembly procedures should be followed in the reverse order.
Dust Filter [42]
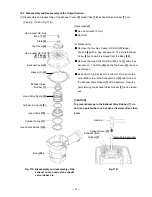
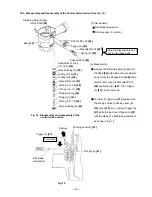
(2) Magazine [79], Nail Feeder (B) [75] and the related parts (See Fig. 22.)
[Tool required]
Hex. bar wrench (5 mm )
(a) Disassembly
Perform disassembly according to 10-4 to remove the entire magazine section.
The Connector [65], Nail Rail [66], Nail Feeder (B) [75], Ribbon Spring [77] and Needle Roller D4 x 20 [78]
can be removed from the front of the Magazine [79].
Remove the three Hex. Socket Hd. Bolts (W/Flange) M6 x 12 [80]. Then Handle Arm [67], Nail Stopper
[81] and Magazine Cover [70] can be removed together with the other parts.
The Nail Rail [66] that is press-fitted into the Magazine [79] has a protrusion at the rear end to prevent
coming off. Tap at the front of the Magazine [79] using a hammer and a bar being careful not to scratch the
parts.
Содержание NR 90AC3
Страница 39: ......


