background image

34

Basic Features

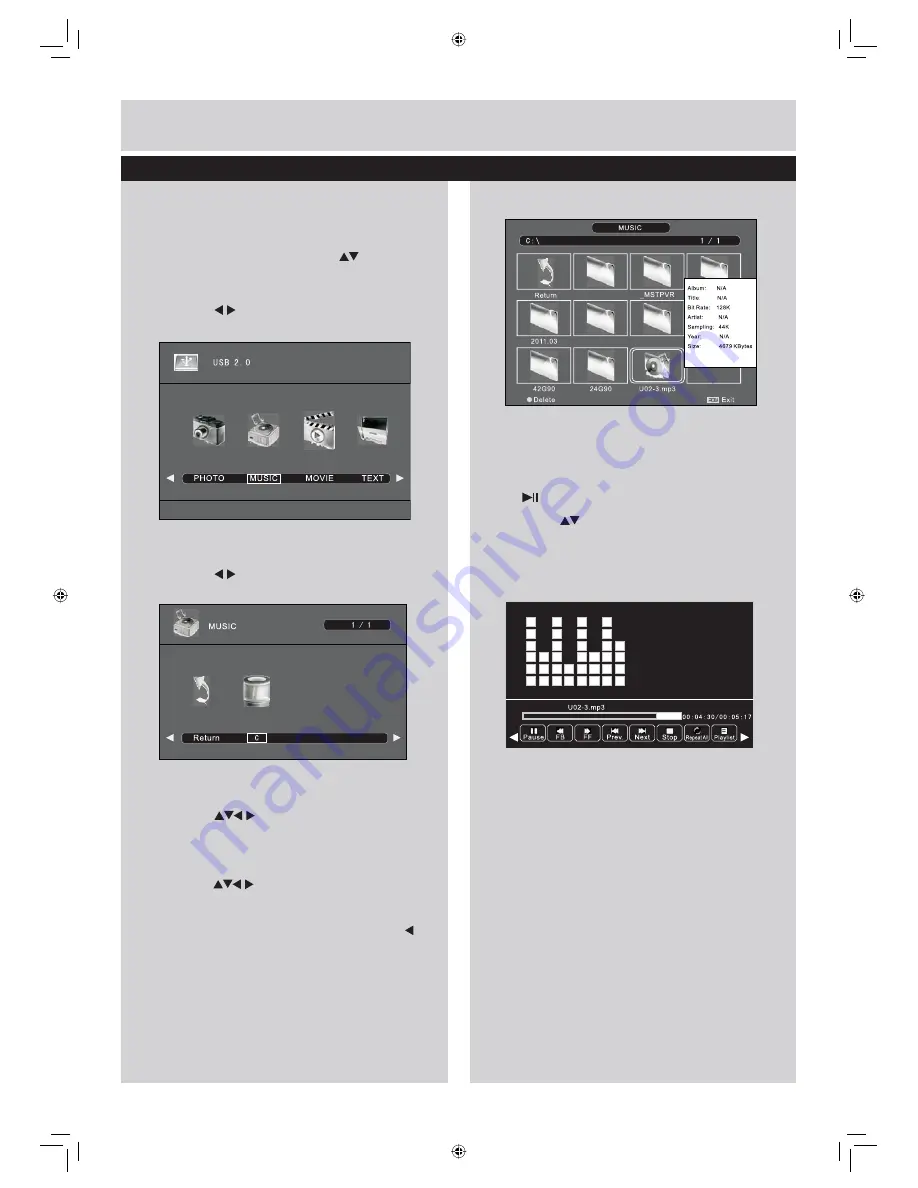
Listening to Music

1.

Press the

SOURCE

button at the front right

side of the TV or the

SOURCE

button on the

remote control then press the

buttons to

select the

Media

mode and then press the

ENTER

button.

2.

Press the

buttons to select

MUSIC

and

then press the

ENTER

button. (fig.

1

)

3.

Press the

buttons to select your storage

device and then press the

OK

button. (fig.

2

)

4.

Press the

buttons to navigate in the

music folder and then press the

ENTER

button.

(fig.

3

)

If you want to select the specified music,
press the

buttons to select the music

file. A tick box will be displayed. If you want
to delete the file, press the

RED

button to

enter the

Sub Menu

and then press the

button to confirm.

5.

Select the music you want to play, it will show
the music information (Album / Title / Bit Rate
/ Artist / Sampling / Year / Size). Then press
the

button to play.

6.

Press the

buttons and then press the

ENTER

button to select the function: Pause / FB /
FF / Prev / Next / Stop / Repeat (Repeat All
/ Repeat None / Repeat 1) / Playlist / Info. /
Goto Time. (fig.

4

)

7.

Press the

EXIT

button to return back to the

previous menu and to select another file to
play. Press the

EXIT

button repeatedly to

return to the root menu.

Entertainment

fig.

1

fig.

2

fig.

3

fig.

4

Содержание LE70EC04AUD

Страница 1: ...eep for future reference Model LE70EC04AUD These instructions contain important information which will help you get the best from your television and ensure safe and correct installation and operation Important Please read these instructions fully before installing or operating ...

Страница 2: ...uide EPG DTV mode 13 Teletext ATV mode 14 Digital Teletext DTV mode 15 Time Shift Function DTV mode 15 16 Recording DTV Programme onto a USB Storage Device 16 Timer Programming 17 Play Recorded Programme 18 Channel management ATV DTV Mode 19 21 Picture management 21 Basic Features 13 37 Viewing Photo 33 Listening to Music 34 Viewing Movies 35 My Text 36 Entertainment 33 36 Sound management 22 Time...

Страница 3: ......

Страница 4: ...Safety Information Please read these instructions fully before installing or operating ...

Страница 5: ......

Страница 6: ...FREEZE Freeze the current screen press again to release it TV mode 12 AUTO Adjust the picture PC mode Record the current programme DTV mode 13 RED GREEN YELLOW BLUE Press these buttons directly to select corresponding function on the screen 3 NICAM A2 Switch between different audio channels only applicable when the TV programme has this feature 5 ASPECT Select from the following mode settings 16 9...

Страница 7: ...nnel 21 VOL Adjust the volume 14 SLEEP Set the TV sleep timer 16 Allows you to navigate the OSD menus and adjust the system settings to your preference ENTER Confirm the selection in the OSD menus Display a list of channels saved in the TV tuner memory 17 MENU Display the OSD On Screen Display menu 18 EXIT Exit the OSD On Screen Display menu 19 SUBTITLE Display the subtitle which is broadcast with...

Страница 8: ...n the teletext screen ATV DTV mode NICAM A2 ASPECT DISPLAY FREEZE AUTO BLUE YELLOW GREEN RED SLEEP SOURCE MENU EXIT SUBTITLE T SHIFT HOLD REVEAL SIZE INDEX S PAGE TEXT FAV AUDIO DTV EPG TV RADIO CH VOL PMODE SMODE 1 2 3 6 5 4 7 8 9 0 24 29 27 26 31 33 25 28 32 30 34 ENTER Press once to stop Media mode 28 29 FAV 30 To skip to the beginning of the previous chapter track photo Media mode Turn on and ...

Страница 9: ...er recording has started in the standby mode 2 IR Infrared Receiver Receives IR signals from the remote control 3 VOL Adjust the volume Select and adjust a setting in the OSD On Screen Display menus 4 CH Select a channel Select a sub menu of the OSD menu 5 MENU Displays the OSD menu 6 SOURCE ATV DTV Media AV1 AV2 PC Component1 Component2 HDMI1 HDMI2 HDMI3 7 Switch the TV on from standby Switch the...

Страница 10: ...to the aerial sockdt on wall with the RF coaxial cable VIDEO AUDIO L R Connect to the composite VIDEO and AUDIO L R output sockets on external video devices 9 Connect earphones for private listening Y PB PR Connect to a DVD player Digital Set Top Box or other AV devices with component YPbPr video and audio output sockets POWER PC ANALOG PC AUDIO COAXIAL ANT Y PB PR COMPONENT IN 1 COMPONENT IN 1 AV...

Страница 11: ...le Blu Ray Player Recorder VCR Satellite Receiver Satellite antenna cable Component Cable not included HDMI HDMI Cable not included COAXIAL Cable not included TIP AV YPBPR share a set of audio POWER PC ANALOG PC AUDIO COAXIAL ANT Y PB PR COMPONENT IN 1 COMPONENT IN 1 AV IN1 AV IN1 VIDEO R L AUDIO Y PB PR COMPONENT IN 2 COMPONENT IN 2 AV IN2 AV IN1 VIDEO R L AUDIO or or ...

Страница 12: ... corrosion Getting Started Switching the TV On Switch on the POWER ON OFF switch which is located at the rear of the TV With power cord plug connected to the mains power socket and TV in Standby mode To switch the TV on from standby mode either a The Remote control Press the button b The TV Press the button on the right of the TV Switching the TV Off Either press the button on the remote control o...

Страница 13: ...uen des Grafen von Gleichen 5 France 5 2 France 2 3 France 3 21 45 23 15 Donna Leon Sanft entschlafen 23 15 23 45 Lebensläufe 23 45 01 25 Genesung 801 MDR FERNSEHEN 02 Sep 2007 21 45 23 15 02 Sep 2007 21 56 Spielfilm Deutschiand 2004 Im Altenpflegeheim St Leonardo das auch Commissario Brunettis Mutter beherbergt kommen Menschen offenbar nicht nur auf natürliche Weise zu Tode 02 Sep Record Move Vie...

Страница 14: ...n that are listed in the teletext index To Turn on Teletext Function In ATV mode press the TEXT button to enter Teletext mode Press the INDEX button to display the index page Press the TEXT button once to exit and the TV will return to the channel you were watching To select a page of text Find the number of the page in the index and enter it using the 0 9 buttons The number of the page will appea...

Страница 15: ...on the screen The video and sound may have a little bit of delay or be out of sync for a few seconds when the unit starts to playback the missed broadcast programme It will soon turn to normal fig 1 2 Press the 0 9 buttons to select a page number 3 Follow the instructions on digital teletext and move onto the next step by pressing ENTER RED GREEN YELLOW BLUE or 0 9 buttons etc 4 To change digital ...

Страница 16: ... fast forward fast backward state press the button to return to normal playback ENTER During playback press the ENTER button to display a still screen and then press the button again to resume playback If you want to exit the PVR Time Shift progress bar and return to the current live broadcast press the button and then press the button to confirm Time Shift Function DTV mode Recording DTV Programm...

Страница 17: ...s A Timer Save Success screen will display fig 3 4 The Schedule List will then be displayed with your preset reminders shown fig 4 5 Press the YELLOW button to return to the EPG 6 Press the EXIT button to exit EPG Timer Programming 7 ARTE 13 LCP 20 France Ô 800 arte PROGRAMME GUIDE 21 00 21 45 Ehe zu Dritt Die Frauen des Grafen von Gleichen 5 France 5 2 France 2 3 France 3 21 45 23 15 Donna Leon S...

Страница 18: ... ENTER button fig 3 5 Press the buttons to select your recorded programme A tick box will be displayed If you want to delete the file press the RED button to enter the Sub Menu and then press the button to confirm Press the button to view 6 Press the ENTER button or DISPLAY button to display the function bar Press the buttons and then press the ENTER button to select the function Pause FB FF Prev ...

Страница 19: ...ode Allows you to make manual fine tuning adjustments if the channel reception is poor under ATV mode 1 IN the CHANNEL menu press buttons to select ATV Manual Tuning and then press button or the ENTER button to enter sub menu fig 1 and fig 2 a Press buttons to select channel number you want to store b Press buttons to select color system press the buttons to select Auto SECAM PAL c Press buttons t...

Страница 20: ...l Tuning and then press button or the ENTER button to enter fig 1 2 Press the buttons to select channel and then press the ENTER button to search fig 2 DTV 0 Programme VHF CH 21 DTV Manual Tuning Bad Freq 474 MHz Good NO SIGNAL fig 2 Programme Edit DTV mode 1 Press MENU button to display the main menu and then use the buttons to select CHANNEL in the main menu and then press ENTER button 2 Press b...

Страница 21: ...n the main menu then press or ENTER button it will highlight the first option 2 Press buttons to select the option you want to adjust in PICTURE menu fig 1 3 Press buttons to change the following settings TIPS a You can change the value of contrast brightness color and sharpness when the picture is in Personal mode b You can press P MODE button on the remote control to change the Picture Mode dire...

Страница 22: ...on that provides an additional audio track for visually challenged persons This function handles the Audio Stream for the AD Audio Description when it is Sent along with the main Audio from the broadcaster Set to Off for normal broadcasting sound coming out from Speakers Set to On to activate the description sound track if available fig 1 Stereo Dual Sound Reception ATV Mode When a programme is se...

Страница 23: ... Move Menu fig 2 Sleep Timer 1 Press the MENU button to display the main menu Press the buttons to select TIME in the main menu then press the or ENTER button it will highlight the first option 2 Press the buttons to select the Sleep Timer and then press the or ENTER button fig 1 3 Press the buttons to select Available time is Off 10 20 30 60 90 120 180 240 min The timer begins to count down from ...

Страница 24: ...on to display the main menu Press the buttons to select TIME in the main menu then press the or ENTER button it will highlight the first option 2 Press the buttons to select the OSD Timer and then press the or ENTER button fig 1 3 Press the buttons to time 5 10 15 20 25 30s fig 2 4 Press the ENTER button to save the setting and return back to the previous menu 5 Press the EXIT button to exit the m...

Страница 25: ...or ENTER button it will highlight the first option 2 Press the buttons to select the Set Password and then press ENTERbutton fig 1 3 Use the 0 9 buttons to input the old password and then input the new 4 digit password Re enter new password for confirmation fig 2 4 Press the EXIT button to exit the menu fig 1 fig 2 Please enter password Default password 0000 If you change the password be sure to r...

Страница 26: ...ig 2 Parental Guidance 1 Press the MENU button to display the main menu Press the buttons to select LOCK in the main menu then press the or ENTER button it will highlight the first option 2 Press the buttons to select the Lock System and then press the ENTER button 3 Use the 0 9 buttons to input a 4 digit password to enter the LOCK menu 4 Press the buttons to select the Parental Guidance and then ...

Страница 27: ...m and then press the ENTER button Lock management LOCK Lock System On Set Password Block Program Parental Guidance Off Key Lock Hotel Mode Off fig 2 LOCK Lock System On Set Password Block Program Parental Guidance Off Key Lock Hotel Mode Off fig 3 HOTEL Hotel Mode On Source Lock Default Source Off Default Prog 1 Max Volume 100 Clear Lock Key Lock 3 Use the 0 9 buttons to input a 4 digit password t...

Страница 28: ...lect SETUP in the main menu then press the or ENTER button it will highlight the first option 2 Press the buttons to select the OSD Language and then press the ENTER button The default on screen menu language is English fig 1 3 Press the buttons to navigate the menu and change the settings Press the ENTER button to confirm and return to the previous menu fig 2 4 Press the EXIT button to exit the m...

Страница 29: ...uttons to select the Subtitle Language and then press the ENTER button fig 1 3 Press the buttons to select the Primary and Secondary Subtitle Language Press the button and then press the buttons to select your desired subtitle language Press the ENTER button to confirm and return to the previous menu fig 4 Press the ENTER button to save the setting and return back to the previous menu 5 Press the ...

Страница 30: ... Disk If the Check PVR File System has a SUCCESS it will show Pass Format Press the ENTER button a File System Size menu will pop up Press the buttons to select your preferred file type between FAT32 and HiSpeed FS If you select HiSpeed FS press button and then press the buttons to select your preferred file size Press the ENTER button to confirm and then press the button to start formatting fig 3...

Страница 31: ...his selection will allow you to zoom in the picture without any alteration while the four sides of the picture will be cropped This selection will allow you to zoom in the picture without any alteration while the four sides of the picture will be cropped but the enlargement ratio is more lager than ZOOM1 mode Setup management Type This option cannot be chosen if you have selected FAT32 in PVR File...

Страница 32: ...ess the buttons to select SETUP in the main menu then press the or ENTER button it will highlight the first option 2 Press the buttons to select the First Time Installation and then press the ENTER button fig 1 3 Prees the buttons to navigate the menu and change the settings Select OSD Language and the country where you will operate the TV Then it will search automatically for analogue and digital...

Страница 33: ...k box will be displayed If you want to delete the file press the RED button to enter the Sub Menu and then press the button to confirm 5 Press the button to view 6 Press the ENTER button or DISPLAY button to display the function bar Press the buttons and then press the ENRER button to select the function Pause Prev Next Stop Repeat Repeat All Repeat None Repeat 1 Music Playlist Info Rotate clockwi...

Страница 34: ...ed music press the buttons to select the music file A tick box will be displayed If you want to delete the file press the RED button to enter the Sub Menu and then press the button to confirm 5 Select the music you want to play it will show the music information Album Title Bit Rate Artist Sampling Year Size Then press the button to play 6 Press the buttons and then press the ENTER button to selec...

Страница 35: ...cified movie press the buttons to select the movie file A tick box will be displayed If you want to delete the file press the RED button to enter the Sub Menu and then press the button to confirm 5 Press the button to view 6 Press the ENTER button or DISPLAY button to display the function bar Press the buttons and then press the ENTER button to select the function Pause FB FF Prev Next Stop Repeat...

Страница 36: ...the buttons to select the text file A tick box will be displayed If you want to delete the file press the RED button to enter the Sub Menu and then press the button to confirm 5 Press the button to view 6 Press the ENTER button or DISPLAY button to display the function bar Press the buttons and then press ENTER button to select the function Prev page Next page Prev Next Stop Music Playlist Info fi...

Страница 37: ...500 5000 1 Brightness Centre Typ Cd M 2 250 Response Time G To G 6 ms Lamp Life Typ Hours 30 000 hours Horizontal Viewing Angle At CR 10 Vertical Viewing Angle At CR 10 170 170 z H 0 6 0 5 V 0 4 2 0 0 1 C A e g a t l o V g n i t a r e p O Audio Output Power WRMS 10 THD 2 x 8 W Panel Dimensions DxLxH with foot 340 x 1628 x 1063 mm Weight with foot 52 kg Panel Dimensions DxLxH without foot 84 x 1628...

Страница 38: ...er of the TV The power supply maybe interrupted Check if the sleep timer is set Check whether the Auto Standby is activated The video function does not work No picture No Sound Check whether the TV is switched on Try another channel The problem may be caused by the broadcaster Picture appears slowly after switching on This is normal the image is muted during the TV startup process Please contact y...

Страница 39: ...necting HDMI Check if the input source is HDMI1 HDMI2 HDMI3 Audio noise Keep the RF coaxial cable away from the other connected cables Password Lost password Select the SET Password setting in the LOCK menu then enter the following master password 8899 The master password clears your previous password and allows you to enter a new password There is a problem in PC mode The signal is out of range i...

Отзывы: