


-5-
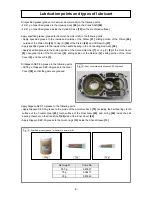
Fig. 6 • Mounting the striker
Fig. 7 • Mounting oil seal (A)
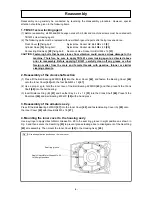
5. Mounting the striker
The striker can be mounted in either of the following two ways.
• Mount the Connecting Rod Ass’y
[28]
to the Crank Shaft
[48]
inside the Housing Ass’y
[49]
. Mount the
Piston
[26]
and apply grease for hammer. hammer drill (Code No. 980927) to the inside and outside of
the Striker
[21]
. Turn the Crank Shaft
[48]
and move the Connecting Rod Ass’y
[28]
all the way inside the
Housing Ass’y
[49]
. Then mount the Striker
[21]
.
• Mount the Piston
[26]
onto the Connecting Rod Ass’y
[28]
. Apply grease for hammer. hammer drill
(Code No. 980927) to the inside and outside of the Striker
[21]
. Mount the Striker
[21]
.
Either of the above two ways requires a pressing force of more than 30 kg.
When a "hissing" sound is heard, the Piston
[26]
is properly inserted in the Striker
[21]
.
(The "hissing" is the sound of the compressed air escaping from the Striker
[21]
when the Piston
[26]
reaches the respiratory hole in the Striker
[21]
.)
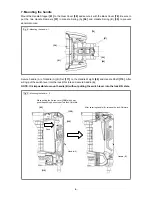
6. Mounting oil seal (A)
When mounting Oil Seal (A)
[27]
on the Piston
[26]
,
ensure that the lip portion of Oil Seal (A)
[27]
is
directed toward the rear surface of the Piston
[26]
as
illustrated in Fig. 7. Before mounting, thoroughly coat
Oil Seal (A)
[27]
and O-ring (A)
[22]
with grease for
hammer. hammer drill (Code No. 980927) and
carefully ensure they are not damaged.
[21]
(Grooved for identification)
Piston length 48 mm
[49]
[48]
Press.
[28]
Press.
Respiratory holes
[26]
Respiratory holes
[22]
[27]
Lip
[26]