


-4-
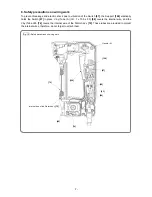
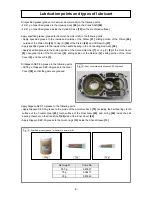
Fig. 5 • Grease application positions on the inner cover
Seal ring groove
Apply Hitachi Motor Grease No. 29
to the eight positions.
Reassembly can generally be conducted by reversing the disassembly procedure. However, special
attention should be given to the following items.
1. TB1401 screw locking agent
(1) Before reassembly, all M5 and M6 hexagon socket hd. bolts and machine screws must be coated with
TB1401 screw locking agent.
(2) The following parts must be replaced with new Hitachi genuine parts after being loosened once.
Front Cover
[8]
fixing bolt:
Nylock Hex. Socket Hd. Bolt M8 x 30
[5]
Cylinder Case
[19]
fixing bolt:
Nylock Hex. Socket Hd. Bolt M8 x 40
[23]
Connecting Rod Ass’y
[28]
fixing bolt:
Seal Lock Hex. Socket Hd. Bolt M8 x 16
[31]
CAUTION: Fastening bolts that become loose from vibration could cause serious damage to the
machine. Therefore, be sure to apply TB1401 screw locking agent as directed above
prior to reassembly. Before applying TB1401, carefully clean off any grease or other
foreign matter from the male and female threads with gasoline, thinner or similar
cleaning solvents.
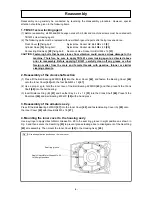
2. Reassembly of the crank shaft section
(1) Press-fit the Ball Bearing 6205DD
[45]
into the Inner Cover
[42]
, and fasten the Bearing Cover
[46]
onto the Inner Cover
[42]
with the four Bolts M5 x 16
[47]
.
(2) Use a proper jig to hold the inner race of the Ball Bearing 6205DD
[45]
and then press-fit the Crank
Shaft
[48]
into the ball bearing.
(3) Insert Distance Ring (B)
[41]
and Feather Key 4 x 4 x 12
[51]
into the Crank Shaft
[48]
. Press-fit the
Final Gear
[40]
and Ball Bearing 6302VV
[39]
with a hand press.
3. Reassembly of the armature ass’y
Press fit the Ball Bearing 6203DD
[67]
into the Inner Cover
[42]
, and fasten Bearing Cover (A)
[65]
onto
the Inner Cover
[42]
with three Bolts M5 x 16
[47]
.
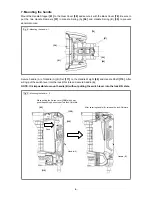
4. Mounting the inner cover to the housing ass'y
Use a syringe to apply Hitachi Motor Grease No. 29 to the seal ring groove in eight positions as shown in
Fig. 5 and then secure the Seal Ring
[43]
to prevent grease leakage due to misalignment of the Seal Ring
[43]
at reassembly. Then mount the Inner Cover
[42]
to the Housing Ass’y
[49]
.
Reassembly