background image

4 - 46

(4) Write method

Restrictions:

Never write data of any other product.
The EEPROM data includes adjustment values, etc. that
are peculiar to that product: It is different for each
product even if the model is the same.
If you write the data of another product by mistake,
rewrite the correct data.

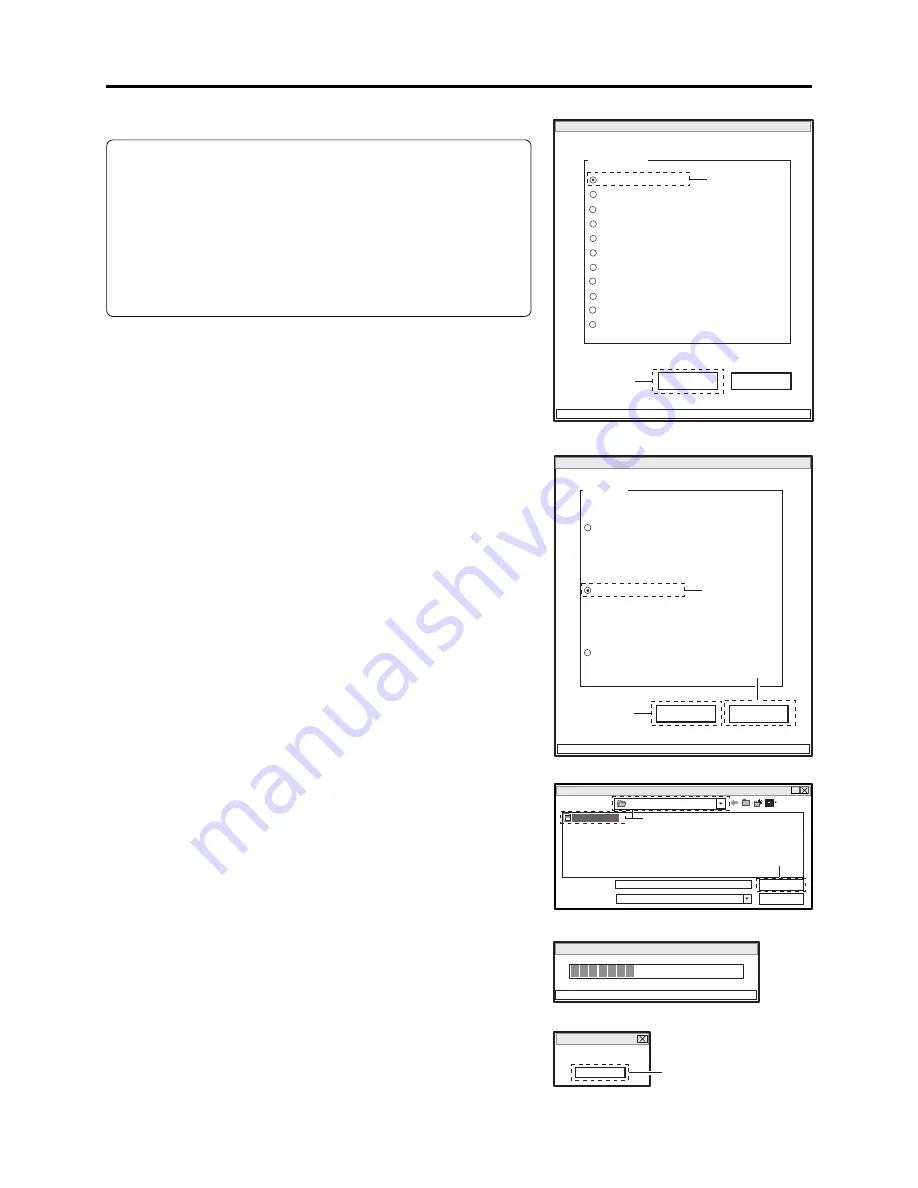
1) Choose DATA INITIALIZE on the ADJUST MENU

screen.

2) Click the EXECUTE button on ADJUST MENU screen

to proceed with the DATA INITIALIZE MENU screen.

3) Choose Backup Data Write on the DATA INITIALIZE

MENU screen.

4) Click the EXECUTE button on DATA INITIALIZE

MENU screen to proceed with the WRITE FILE
SELECT screen.

5) From WRITE FILE SELECT screen, select the folder

and file in which the data has previously been backed
up.
This section refers to the folder and file as “EEP” and
“backup.eep” for explanation.

6) Click the OPEN button on WRITE FILE SELECT screen

to start writing.
The progress status can be confirmed using the
PROGRESS STATUS dialog.

7) When writing is complete, the INITIALIZATION

FINISHED dialog will appear: Click the OK button in
dialog to restore the DATA INITIALIZE MENU screen.

8) Click the RETURN button on DATA INITIALIZE

MENU screen to restore the ADJUST MENU screen,
and then perform adjustment according to “6-3-2 List of
Adjustments Needed After Replacing Major
Components”.

Troubleshooting > Special Functions

ADJUST MENU screen

MANUAL ADJUSTMENT PROGRAM for SERVICE STATION

MODEL NAME: 

××××

DATA INITIALIZE

EXECUTE

RETURN

CONNECTION

ADJUST MENU

SAMPLING PULSE

AUTO IRIS CONTROL

MATRIX

CHROMA GAIN

AUTO FUCUS

SPOT NOISE

LCD

EVF

VIDEO LEVEL

BURST LEVEL

2

1

DATA INITIALIZE MENU screen

Data Initialize

Initial Data Write

EXECUTE

RETURN

CONNECTION

FILE MENU

Original Data Backup

Backup Data Write

4

3

8

 WRITE FILE SELECT screen

?

Look in (T):

File name (N):

File of type (T):

backup.eep

.eep

*

Open

Cancel

EEP

backup.eep

5

6

PROGRESS STATUS dialog

DATA INITIALIZE

PLEASE WAIT A MOMENT

INITIALIZATION FINISHED dialog

FINISHED

FINISHED WRITING DATA

OK

7

Содержание DZ-MV1000E

Страница 1: ...OVEMENT Digital Media Division Tokai DVD VIDEO CAMERA RECORDER 2004 March SM0404 DZ MV580E DZ MV580E AU DZ MV580E SW DZ MV580E SWH DZ MV580E UK DZ MV550E DZ MV550E AU DZ MV550E SW DZ MV550E SWH DZ MV550E UK MultiMediaCardTM DO NOT RESELL OR DIVERT IMPROPERLY DZ MV1000E UK ...

Страница 2: ...cedure 4 26 4 5 3 Procedure for resetting camera functions 4 26 4 6 Checking Versions of Firmware and Updating 4 27 4 6 1 Checking firmware versions 4 27 4 6 2 Updating firmware 4 28 4 7 Trouble Diagnosis 4 30 4 7 1 Trouble diagnosis table 4 30 4 7 2 Disassembly reassembly for enable service position 4 35 4 8 Procedure for Removing Disc from Faulty DVD Video Camera Recorder 4 41 4 8 1 Item to be c...

Страница 3: ...r Adjustment 6 15 6 2 6 Starting and Terminating Adjustment Program 6 17 6 3 List of Adjustment Items 6 20 6 3 1 Adjustment Program Hierarchy Diagram 6 20 6 3 2 List of Adjustments Needed After Replacing Major Components 6 21 6 3 3 Purpose of Adjustments and Incompleted Phenomenon 6 23 6 4 Adjustment Procedure 6 24 6 4 1 Initial Data Write 6 24 6 4 2 Video Level 6 25 6 4 3 Burst Level 6 26 6 4 4 S...

Страница 4: ...r 1 B 3 B 4 Power 2 B 4 Information on MAN H MAN DRV R MOD and HDM Circuit Boards If a fault is located on the MAN H MAN circuit board the entire circuit board must be replaced for servicing If there is a fault in the DRV R MOD or HDM circuit board the entire disc drive unit must be replaced since these circuit boards are included in this unit Because of this servicing method this service manual d...

Страница 5: ...n inside the DVD video camera recorder When repairing or inspecting it take great care to prevent electric shock Use an isolating transformer wear gloves etc CLASS 1 LASERPROCTECT CAUTION This product contains a laser diode of higher class than 1 To ensure contin ued safety do not remove any covers or attempt to gain access to the in side of the product Refer all servicing to qualified personnel C...

Страница 6: ...that static electricity charged on clothes will not be discharged by wrist strap Therefore do not allow your clothes to touch the semiconductor components Fig 1 2 1 Grounding Work Bench Fig 1 2 2 Grounding Human Body Antistatic mat Ground 1M ohm 1M ohm Antistatic wrist strap 1 3 Cautions When Handling DVD Drive The optical pickup in DVD drive has a high precision structure Be sure to observe the f...

Страница 7: ...rox 220 C Point to be soldered Surface mounted chip parts other than those shown below Surface mounted chip parts for DVD cameras cellular phones only Discrete parts Chassis metal shield etc Tip temperature 320 30 C heating time less than 5 seconds 350 10 C heating time less than 3 seconds 380 30 C 420 30 C 3 Lead free solder for servicing Use the following lead free solder for servicing Recommend...

Страница 8: ... 1 Before using lead based solder remove the lead free solder completely from the point to be soldered 2 For additional soldering for repair set the soldering iron tip temperature for lead free solder mix lead based solder and lead free solder sufficiently Do not perform any repair using the bare soldering iron tip without adding solder since it will cause secondary failure due to lack of strength...

Страница 9: ...ce Indication No indication K k M M No indication 5 All tolerances other than 5 are indicated in schematic diagrams No indication 1 8W 1 16 W for leadless resistors with no indication All capacitances other than the above are indicated in schematic diagrams Item Value Dielectric strength Indication No indication µF P pF No indication 50V All dielectric strengths other than 50 V are indicated in sc...

Страница 10: ...grams 2 Two diagrams indicated for each board 1 One diagram indicated for each board Safety Precaution for Repair Notes When Using Service Manual Parts Location 2 A Symbol No IC IC1201 Type of part Zone A on circuit board diagram Symbol no Zone 2 on circuit board diagram Parts Location A 2 A Symbol No IC IC1201 Zone 2 on board diagram A Shows side A B Shows side B Zone A on board diagram ...

Страница 11: ...n the LCD unit DRF H DRF CIRCUIT BOARD SAF H SAF CIRCUIT BOARD SWL3 H SWL3 CIRCUIT BOARD USB H USB CIRCUIT BOARD SWL2 CIRCUIT BOARD 1 The board names suffixed with H are for DZ MV580E only 2 Film type board that connects MAN H MAN circuit board and disc drive unit 3 Film type board in LCD unit 4 Film type board that connects AEL H AEL circuit board and SWL2 circuit board 5 Applicable only to DZ MV...

Страница 12: ... 000 Photo Approx 960 000 Video Approx 410 000 Photo Approx 410 000 F1 8 2 4 f 3 8 38 mm F1 8 2 8 f 2 1 37 8 mm 37 mm 0 75mm Auto Manual Optical 10 240 with digital zoom added 40 for photo Optical 18 500 with digital zoom added 40 for photo 0 3 lx When Low Light mode is selected 0 33 inch color TFT approx 110 000 pixels 2 5 inch color TFT approx 120 000 pixels Electronic Type 1 50 1 4000 second vi...

Страница 13: ... DZ MV550E 640 480 pixels and DVD video recording DVD VR format 704 576 pixels JPEG of line input 1 640 480 pixels Video Conforming to DVD video format Audio MPEG Audio layer 2 Photo Conforming to JPEG DZ MV580E 1280 960 pixels DZ MV550E 640 480 pixels format Line input 1 640 480 pixels MPEG Audio layer 2 Dolby AC3 8 cm DVD RAM disc conforming to DVD RAM Ver 2 1 8 cm DVD R disc conforming to DVD R...

Страница 14: ...ses in the above model names show the destinations and are displayed only on packing box Refer to 2 5 Differences in Rating Labels and Difference in Function when checking the body of DVD video camera recorder to judge whether or not it is equipped with the line input function destination Specifications of DZ ACS1 AC Adapter Charger Item Power supply Input capacity DC output max Charge output Weig...

Страница 15: ...hoto 37 mm 0 3 lx When Low Light mode is selected 0 33 inch color TFT approx 110 000 pixels 2 5 inch color TFT approx 120 000 pixels DZ MV580E Approx 4 4 W DZ MV550E Approx 4 1 W DZ MV580E Approx 500 g DZ MV550E Approx 490 g DZ MV580E Power Control terminal provided DZ MV550E Power Control terminal not provided Type mini B USB 2 0 DZ MV380E MV350E DZ MV380E DZ MV350E 1 4 inch interlaced DZ MV380E ...

Страница 16: ...pprox 64 89 146 mm DZ MV550E Approx 64 89 146 mm DZ ACS1 Provided DZ BP14S 7 2V 1360mA Optional DZ BP14SW 7 2V 1360mA DZ RM3W Pin 8 type Provided Software disc protect DZ MV580E Video mode only DZ MV550E Video and photo mode Provided Varies depending on the model destination 1 XTRA FINE 704 576 pixels STD LPCM 352 576 pixels DZ MV580E 1280 960 pixels DZ MV550E 680 480 pixels 704 576 pixels DZ MV38...

Страница 17: ...Function Check the mark in rating label to identify the destination and determine any difference in function by checking the body of DVD video camera recorder There are five models each of DZ MV580E and DZ MV550E headed for different destinations noted in parentheses as shown in the table below The key difference is whether the line input function is provided or not The destinations in parentheses...

Страница 18: ... edited and played back on DZ MV580E MV550E However the DZ MV100E cannot handle DVD R disc and a scene memo recorded on the DZ MV100E Disc Navigation function cannot be played back or edited on another DVD video camera recorder 1 The DZ MV380E MV350E can release the disc protect that has been set on DZ MV580E MV550E Therefore if the disc protect set on DZ MV580 MV550 is released the discs can be r...

Страница 19: ...id crystal display inside 13 QUICK MODE switch To switch the menu display on screen between Normal mode and Quick mode 14 BATTERY EJECT switch The BATTERY EJECT switch is located on the bottom of this DVD video camera recorder Slide it when removing the battery 15 Viewfinder 16 Diopter control To adjust the focus of image appearing in the viewfinder Pull out the viewfinder 17 ACCESS PC indicator W...

Страница 20: ...he joystick to select a scene or menu item and then press the center to play back the scene pause it or designate an option of the menu 40 Stop cancel button To end playback or cancel setting of menu 41 REC button 42 DIGITAL ZOOM button 43 Reverse skip button 44 Reverse search button 45 DISC NAVIGATION button 46 MENU button 47 ZOOM T button 48 ZOOM W button 49 Forward search button 50 Play pause b...

Страница 21: ...D Video DVD R and DVD RW Video recording playback standard that applies to DVD RAM and DVD RW This allows versatile editing functions differing from the DVD Video Format Exchangeable image file format File format used for recording photos on digital cameras established by JEIDA now merged to JEITA See IEEE1394 Also referred to as FireWire or i LINK Standard for serial interface that connects PC an...

Страница 22: ...kers the Recording Industry Association of America RIAA and music industry companies to protect copyrights of musical compositions Formally named Secure Digital Memory Card This compact memory card 32 mm long 24 mm wide 2 1 mm thick is equipped with an advanced copyright protection function See Secure MultiMediaCard Also referred to as SecureMMC This compact memory card has multimedia card specifi...

Страница 23: ...s cover Single sided 8cm DVD RAM in round DVD holder Infrared remote control Lithum battery for infrared remote control DZ MV550E UK Printed moodel name DZ MV550E User replaceable lens cover is available Provided two colors Provided Provided DZ RM3W Provided CR2025 Fig 2 2 1 Differences in Structural Components Filter piece Hood Lens cover L cover Printed model name Hood Lens cover L cover Printed...

Страница 24: ...cted to AEL H AEL circuit board Fig 3 1 1 DZ MV580E DZ MV380E DISC DRIVE UNIT DISC DRIVE UNIT FRT H FRT CIRCUIT BOARD GYR H GYR CIRCUIT BOARD SHE H SHE CIRCUIT BOARD MAN H MAN CIRCUIT BOARD SEN H CIRCUIT BOARD DRF H DRF CIRCUIT BOARD SAF H SAF CIRCUIT BOARD SWL3 H SWL3 CIRCUIT BOARD FAF CIRCUIT BOARD FRT CIRCUIT BOARD LENS UNIT LENS UNIT SEN CIRCUIT BOARD GYR CIRCUIT BOARD SHE CIRCUIT BOARD AEL CI...

Страница 25: ...t the accessory shoe on DZ MV550E doesn t 2 Lens unit The lens unit in DZ MV550E includes the cushion crystal filter CCD image sensor and SEN H circuit board which are discrete from the lens unit in DZ MV580E Description of Operation Description of Structure DZ MV550A LENS UNIT LENS UNIT LENS UNIT Circuit board equivalent to SEN H CRYSTAL FILTER CCD IMAGE SENSOR SEN H CIRCUIT BOARD CUSHION DZ MV58...

Страница 26: ...me setting screen in Normal mode 2 step operation until setting screen appears Date time setting screen in Quick mode 1 step operation until setting screen appears Date Setup Date Setup Date Mode Date Set Date Mode Date Set 1 1 2004 0 00 ENTER RETURN ENTER RETURN Date Setup Date Set 1 1 2004 0 00 QUICK MODE switch Item function explanatory display Display mode setting is omitted Camera function se...

Страница 27: ... settings on received product referring to 4 5 System Resetting Resetting Camera Functions The notes will be necessary not only for resetting but for checking defects that occur under the particular setting conditions Check phenomenon System reset section 4 5 No message or error code appears 1 Message appears 1 Error code appears 1 Check firmware version section 4 6 1 Problem guide section 4 2 Mes...

Страница 28: ...n usual at low temperatures Keep extra batteries on hand Battery may be dead Replace with a new one The performance of battery will deteriorate if it is used for an extended period of time or frequently Is the ambient temperature is too low or high Always charge the battery at 10 30 C The battery may be over discharged Continue charging The CHARGE indicator will change to a steady light and the ba...

Страница 29: ... DVD video camera recorder being used outdoors Use the viewfinder When using LCD monitor adjust angle so that LCD screen is not exposed to direct sunlight The panels used for LCD monitor and viewfinder of the DVD video camera recorder are produced using highly precise technology However 0 01 or less of total pixels may not light black dots or may remain lit red blue green dots The effective amount...

Страница 30: ...connections Does dirt or fingerprint adhere to disc or is disc scratched Clean the disc Was the image input from analog VCR VHS 8 mm and recorded The problem may be improved if a VCR equipped with TBC time base corrector circuit is used for playback Was recording of external input made with Frame specified Specify Field for PHOTO Input in record mode settings Applies only to models that have the l...

Страница 31: ...eo camera recorder off and try again The DISC EJECT button is invalid while the DVD video camera recorder is connected to PC Start Windows Explorer right click the drive icon corresponding to the DVD video camera recorder and then click Eject Was DVD MovieAlbbumSE software provided with DVD video camera recorder started Terminate DVD MovieAlbbumSE Since the file system of this DVD video camera rec...

Страница 32: ...fications state that DVD MovieAlbumSE complies only with images recorded on DVD RAM disc It cannot edit video DVD VR data stored on hard disk of PC To edit image data stored on hard disk copy the data to DVD RAM disc and then edit it Is a disc other than DVD RAM loaded Load a DVD RAM disc DVD MovieAlbumSE is exclusively for DVD RAM disc Use the following procedure to select the drive where DVD RAM...

Страница 33: ...h setting item as required Has the DVD video camera recorder been subjected to impact The DVD video camera recorder could be damaged Has the DVD video camera recorder been left unused for a long period of time The internal backup battery may be discharged Charge it Charge procedure Connect the AC adapter charger to the DVD video camera recorder and AC outlet set the power switch on the DVD video c...

Страница 34: ...emote control Also check the polarities of battery Replace the battery if necessary Is the DVD video camera recorder powered Turn it on Is disc correctly loaded Remove the disc and then reload it Is round DVD holder being used A bare disc that is not in round DVD holder or is in a square cartridge or caddy cannot be used Put disc in the round DVD holder Is round DVD holder inserted in the proper o...

Страница 35: ... is made to record photos on DVD R disc The specifications state that no photo is recordable on DVD R disc Troubleshooting Replace with a charged battery or use the AC adapter charger Stop trying to combine scenes or create a play list containing the scenes to be combined and combine them on the play list Select only video scenes or stop trying to combine scenes Select multiple scenes and then com...

Страница 36: ...hen the card cannot be recognized because its terminals are dirty Also appears when data other than photos is recorded on card Appears when the recording capacity of card has reached the limit during recording Appears when a card whose remaining recording capacity is small and on which no photo can be recorded is loaded Appears when the remaining capacity of card has reached the recordable limit A...

Страница 37: ...c menu Clean the disc or replace it Stop trying to record Choose YES and designate partial repair automatic repair of video file Choosing NO will display a message for verifying initialization 3 Do not execute repair but set the power switch to POWER OFF with the disc loaded and then leave the DVD video camera recorder in a dry place until condensation disappears usually 1 2 hours 3 Take care with...

Страница 38: ...DVD video camera recorder and mismatch has occurred in recorded data Also appears when reading or writing from to recorded file cannot be performed because the disc is dirty Appears when the disc could not be finalized because it was dirty Appears if accident such as power off has occurred during finalizing If the message still appears even when the disc has been cleaned and finalized again and ag...

Страница 39: ...e in program units Although the DVD video camera recorder is equipped with a software disc protect function that is effective for disc units it does not comply with software write protect for program units The DVD Forum defines two types of software protect for DVD RAM disc disc units and program units Appears if the number of scenes on play list exceeds the upper limit 999 while control informati...

Страница 40: ...if the disc recordable capacity has reached the limit during recording Appears when the last image of scene was selected to divide the scene The specifications state that dividing a scene at its end is not possible When initializing it deleting all recorded data choose YES and designate it Choose NO and designate partial repair or total repair When initializing it deleting all recorded data choose...

Страница 41: ...age file Repair data now appeared Appears if repair has failed with DVD R disc after message Data error in all image file Repair all data now or Found error in image file Repair data now appeared Appears if the self diagnosis function in the DVD video camera recorder detects a serious problem during recording or when the same trouble occurs three times consecutively during recording Appears if acc...

Страница 42: ... cannot be held If all registered scenes have been deleted the play list will also be deleted Appears if an attempt is made to create a new play list or edit play list after the number of registered play lists has reached the upper limit 99 that is defined by the DVD video recording format This message appears during user operation if even one play list has been created during scene deletion This ...

Страница 43: ...ding a scene at its top is not possible Appears when an unformatted or logically damaged disc was loaded Also appears when a dirty disc was loaded If the message appears when a normal formatted disc has been loaded condensation might have occurred on the lens or drive of the DVD video camera recorder Condensation will occur when the DVD video camera recorder is moved from a cold place to a warm pl...

Страница 44: ...attempt is made to record on write protected disc Appears when an SD memory card whose erasure prevention switch was locked is loaded Set the power switch to POWER OFF with the disc loaded remove the battery and then connect the AC adapter charger Refer to 3 page 4 11 Stop trying to copy a video or select photos and execute copy Release the software disc protect Unlock the erasure prevention switc...

Страница 45: ... problems These messages appear when troubleshooting is likely possible for the problem detected when power was turned on following the procedure below Procedure when message shown in Fig 4 4 1 appears Set the power switch to POWER OFF reconnect the AC adapter charger or battery and then set the power switch to VIDEO or PHOTO disc Procedure when message shown in Fig 4 4 2 appears Set the power swi...

Страница 46: ...power on again or reloading the disc Error codes 4 digit alphanumeric characters will directly appear and similar messages will appear if a problem from the same cause occurs three times consecutively during operation If messages for serious problems appear perform troubleshooting according to 4 4 3 Major error codes and troubleshooting The error codes appearing with messages will be stored in fla...

Страница 47: ...laying and checking error code be sure to clear the error code display If you neglect this the error code will always be displayed 2 Details of error code display 1 Error codes of 2 problems are displayed one above the other The error code of the latest problem appears in the upper row and the error code of the problem that occurred before appears in the lower row However when the same problem occ...

Страница 48: ...e disc without regard as to whether it is dirty scratched or distorted Replace the disc 1 Check the ambient temperature 2 Set the power switch to POWER OFF remove the disc and check whether or not it is dirty scratched or distorted If it is dirty clean it and then reload it If it is scratched or distorted replace the disc Then set the power switch to VIDEO or PHOTO disc 3 Check to see whether or n...

Страница 49: ...or PHOTO disc Take care not to subject the DVD video camera recorder to impact or vibrations at this time 2 Set the power switch to POWER OFF remove the disc and check whether or not it is dirty scratched or distorted If it is dirty clean it referring to the next page and then reload it If it is scratched or distorted use another disc Then set the power switch to VIDEO or PHOTO disc 3 Replace the ...

Страница 50: ... set the power switch to VIDEO For subsequent steps operate the DVD video camera recorder while viewing the LCD monitor or viewfinder 4 Press the MENU button to display the camera function setup menu screen Make sure of the settings 5 Operate the joystick to display the menu screens for record function setup date function setup LCD monitor setup and initial setup in sequence making sure of the set...

Страница 51: ...TD FINE NORM ECO CAMERA LINE Frame Field On Off On Off 17 00 D M Y 5 00PM M D Y PM5 00 Y M D Remarks Low Light will not appear when VIDEO mode STD is specified Displayed on DZ MV580E only in the Video mode Displayed only in the Video mode Displayed only in the Video mode Displayed only in the card photo mode Displayed only on models that have the line input function 1 Displayed only when Input Sou...

Страница 52: ...y the camera setting menu screen 5 Use the joystick to choose Initial Setup and then press the center of joystick 6 Use the joystick to choose Reset and then press the center of joystick The screen for verifying reset will appear 7 Use the joystick to choose YES and then press the center of joystick Reset will be executed 8 After reset press the MENU button to close the camera setting menu Fig 4 5...

Страница 53: ...k battery input output These programs control the DVD disc drive system mechanism block Remarks Does not require updating 4 6 1 Checking firmware versions 1 Purpose When checking whether updating firmware is needed or not use the following procedure to view the version display screen see Fig 4 6 1 and check the version number Only the titles at top left of screens will be different when no disc is...

Страница 54: ...ing Information Display on subsequent screen shows the numbers or alphabets 4 6 2 Updating firmware 1 Purpose If you receive information from the factory that updating firmware is needed you should do it to improve the performance functions and operability of the DVD video camera recorder Detail Model DZ MV5 PAL System Ver x xx Date xxxx xx xx xx xx xx Cam Ver x xx Drive Main xxxx xx xx REV Drive ...

Страница 55: ...d on service bulletin etc 2 Set the power switch to POWER OFF and then use the AC adapter charger to power the DVD video camera recorder A battery cannot be used because it may interrupt power of the DVD video camera recorder during work 3 Insert the disc card for updating firmware 4 Set the power switch to POWER OFF when using a disc for updating or to CARD PHOTO when using a card for updating 5 ...

Страница 56: ... four service positions A D for this DVD video camera recorder Set to the appropriate service position referring to Disassembly reassembly to enable service position If only dashes are entered in the service position column trouble diagnosis is possible without disassembling this DVD video camera recorder 3 Connect the measurement terminals to the check points and collate the results with the deta...

Страница 57: ...firmed Can approx 2 5 V DC D2 5V be confirmed Can approx 15 V DC C15V be confirmed Can approx 3 V DC B U3V be confirmed Even if manual focus is set and buttons are operated focus is not correct and when power is turned on again abnormal sound is heard from the lens and it takes more than 20 seconds before an image appears No zoom is operated by the remote control and when power is turned on again ...

Страница 58: ... Can change in voltage be confirmed when switch KEY2 is moved Does backlight turn on Can approx 5 V DC INV5V be confirmed Can video signal EVF G be confirmed Can sensor drive pulses V1 4 H1 H2 RG be confirmed Can video signal CCD OUT be confirmed Does image appear on LCD monitor or in EVF Can video signal VIDEO be confirmed Yes Replace MAN H MAN circuit board No Replace rear cover Yes Replace MAN ...

Страница 59: ...dio signal EXTMIC_LCH EXTMIC_RCH be confirmed This bright point will not disappear even when 6 4 9 Spot Noise is performed Can approx 3 1 V DC C3V be confirmed Can approx 0 V DC GYRO_RST be confirmed Can approx 1 3 V DC be confirmed when the camera is fixed and can variation in voltage be confirmed when the camera is shaken Yes Replace disc cover No IC6103 and its peripheral circuits are faulty Ye...

Страница 60: ...c is inserted Message NO DISC appears within 10 seconds after a normal disc is inserted Even when a disc not protected is inserted message Write protected Check disc appears Even when a formatted disc is inserted message Disc is not formatted appears Replace disc drive unit If the DRF H DRF circuit board is not damaged or its connection status is normal replace disc drive unit Replace disc drive u...

Страница 61: ...e power supply system and the system of disc cover operation buttons on side case R Perform trouble diagnosis using the check points on MAN H MAN circuit board Remove the MAN H MAN circuit board in advance referring to 5 Disassembly and Reassembly 1 Solder a lead wire of approx 10 cm to the check points except for IC pins on side A of MAN H MAN circuit board referring to 4 7 1 Trouble diagnosis ta...

Страница 62: ... board to MAN H MAN circuit board first and then attach them to the frame If the AEL H AEL circuit board is connected to MAN H MAN circuit board that is already attached to the frame connection error may occur or the circuit boards or frame could be damaged a MAN H MAN circuit board b Frame c DRF H DRF circuit board d USB holder e USB circuit board f Rear cover g Disc cover h Hinge of side case R ...

Страница 63: ... MAN H MAN and C 2 AEL H AEL circuit board diagrams See Figs 4 7 5 4 7 6 Fig 4 7 4 Service Position B Fig 4 7 5 Lead wire soldering of MAN H MAN circuit board Fig 4 7 6 Lead wire soldering of AEL H AEL circuit board MAN H MAN CIRCUIT BOARD AEL H AEL CIRCUIT BOARD LEAD WIRES LEAD WIRES TL0510 TL0513 TL0522 TL0515 TL0512 TL0517 TL2090 TL2085 TL2086 TL2082 TL2089 TL2091 TL2084 TL2095 TL0520 GND TL052...

Страница 64: ...e front block Fig 4 7 7 Setting to service position B 1 2 Fig 4 7 8 Setting to service position B 2 2 a MAN H MAN circuit board b AEL H AEL circuit board c Frame d SHE H SHE circuit board e Accessory shoe f Heat sink rubber g USB holder h USB circuit board i Rear cover j EVF unit k Disc cover m Hinge of side case R n Side case R p Flat cable q Disc drive unit r Loader 2 G 2 2 2 G 2 G c e b f a 3 G...

Страница 65: ...eck points on MAN H MAN and AEL H AEL circuit boards Set to service position B in advance 1 Connect the L block to AEL H AEL circuit board See Fig 4 7 10 Fig 4 7 9 Service Position C AEL H AEL CIRCUIT BOARD SAF H SAF CIRCUIT BOARD LEAD WIRES LEAD WIRES L BLOCK Fig 4 7 10 Setting to service position C 1 1 1 a b c a L block b AEL H AEL circuit board Troubleshooting Trouble Diagnosis ...

Страница 66: ...ct the flat cable of fulcrum block to LCD and AEL H AEL circuit boards 2 Connect the MR circuit board to LCD circuit board Fig 4 7 11 Service Position D Fig 4 7 12 Setting to service position D a Fulcrum block b LCD circuit board c AEL H AEL circuit board d MR circuit board e MAN H MAN circuit board AEL H AEL CIRCUIT BOARD LCD CIRCUIT BOARD FULCRUM BLOCK MR CIRCUIT BOARD 1 1 2 c a d b e Troublesho...

Страница 67: ...nto it If laser beam strikes your eye it could cause serious vision damage 4 8 2 How to remove disc DZ MV550E DZ MV580E If the disc cannot be ejected after performing 4 8 1 Item to be checked remove it using the procedure in this section Information Numbers in diagrams are step numbers of setting procedure and letters in brackets show the types of screw 1 Turn the hood in the direction of the arro...

Страница 68: ... to remove it 2 Remove three screws A and then remove the filter piece being careful not to scratch the lens surface with screwdriver at this time 3 Remove the lens cover in the direction of the arrow 4 Use a fine tipped flat bladed screwdriver etc to move the lock arm in the direction of the arrow and then open the disc cover Information When reinstalling removed components use the reverse proced...

Страница 69: ...ring work the disc could become unusable 2 Make sure that the DVD RAM disc to be formatted is free from dirt or scratch If the disc is dirty clean it if the disc is scratched replace it Any dirt or scratch on disc could disable normal formatting Fig 4 9 1 3 Insert the DVD RAM disc to be formatted 4 After the disc is recognized operate the following buttons to display the disc formatting screen Fig...

Страница 70: ...a for details on jig tool and power supply in the figure 2 Copy the adjustment program to HDD of PC Refer to 6 1 5 Copying or Deleting Adjustment Program for copying 3 Start the adjustment program in order to display the adjustment menu screen on PC display Prohibition Completely assemble the DVD video camera recorder create backup file of EEPROM data and write it with only the adjustment cover re...

Страница 71: ...ustment cover in 5 3 Disassembly SKYLARK CONNECTION JIG No TP14161 WHT RD PIN 18 YEL BLK BLK RED DSP R JIG No 7099448 DC POWER SUPPLY 5V 1A GND PIN 16 SD PIN 20 RS 232C CABLE PC POWER CABLE To AC OUTLET DC POWER CORD Fig 4 9 3 Connections when creating backup file of EEPROM data and writing ...

Страница 72: ...P FILE SELECT screen to start backup The progress status can be confirmed using the PROGRESS STATUS dialog 7 When backup is complete the BACKUP FINISHED dialog will appear Click the OK button in dialog to restore the DATA INITIALIZE MENU screen 8 Then click the RETURN buttons on each menu screen to restore the MODEL SELECT screen and click the EXIT button on MODEL SELECT screen to exit the adjustm...

Страница 73: ...e progress status can be confirmed using the PROGRESS STATUS dialog 7 When writing is complete the INITIALIZATION FINISHED dialog will appear Click the OK button in dialog to restore the DATA INITIALIZE MENU screen 8 Click the RETURN button on DATA INITIALIZE MENU screen to restore the ADJUST MENU screen and then perform adjustment according to 6 3 2 List of Adjustments Needed After Replacing Majo...

Страница 74: ...Make sure that no card is loaded in the card slot After check close the card slot cover 5 2 Order of Disassembly Refer to Disassembly Flowchart in Fig 5 2 1 for the order of removing components When reassembling components use the reverse order to removal unless otherwise specified Note When replacing components be sure to use only those shown in Replacement Parts List Information 1 Board names su...

Страница 75: ... EVF unit 5 3 11 LCD case B LCD circuit board 5 3 21 SWL3 H SWL3 circuit board 5 3 7 5 3 8 Side case L LCD Unit SWL2 circuit board Side case L Fulcrum cover U Fulcrum cover B Fulcrum unit 5 3 20 5 3 5 Jack cover FRT H FRT circuit board Microphone Microphone cover 5 3 6 Front case SHE circuit board 5 3 13 SHE H circuit board Accessory shoe Accessory shoe 5 3 12 DZ MV580E DZ MV550E 5 3 14 DZ MV550E ...

Страница 76: ...Lens cover 1 Adjustment Cover 1 Open the LCD monitor b 2 Insert a fine tipped flat bladed screwdriver d into the groove of adjustment cover a and remove the adjustment cover in the direction of the arrow being very careful not to scratch the adjustment cover or side case L c with screwdriver 2 Hood and Lens Cover DZ MV550E DZ MV580E 1 Turn the hood a in the direction of the arrow to remove it 2 Re...

Страница 77: ...ul not to scratch the lens surface with screwdriver at this time 3 Remove the lens cover c in the direction of the arrow Fig 5 3 2a Hood Filter Piece and Lens Cover Information Since user cannot replace the DZ MV1000E UK lens cover the lens cover cannot be removed unless the filter piece 1 is also removed 1 On DZ MV550E it is not necessary to remove the filter piece when removing the lens cover Di...

Страница 78: ...o damage the SAF H SAF circuit board a or flat cable between L block and R block d 4 Remove the SAF H SAF circuit board The SAF H SAF circuit board is a film like board Do not bend or fold it 5 Disconnect the flat cable between L and R blocks Disconnect the flat cable between L and R blocks Do not forcibly pull out the flat cable from connectors at this time 6 Remove the L block from R block d in ...

Страница 79: ...ack cover d FRT H FRT circuit board e AEL H AEL circuit board Fig 5 3 5 5 Jack Cover 1 Release the two tabs and then remove the jack cover a a Jack cover b Front block Fig 5 3 6 6 FRT H FRT Circuit Board Microphone and Microphone Cover FRT H FRT circuit board a 1 Disconnect the flat cable from microphone 2 Remove one screw D and then remove the FRT H FRT circuit board Microphone b and Microphone C...

Страница 80: ...ly 1 Insert the switch knob b on SWL3 H SWL3 circuit board between the knobs c of L cover 2 Pass the cable to be connected to the SWL3 H SWL3 circuit board through cable holder e under ground plate d and wire retaining slit f as shown in the figure so that the cable is laid out along the side case L and L cover as far as possible a SWL3 H SWL3 circuit board b Switch knob c Knobs of L cover d Groun...

Страница 81: ...at cable 5 Remove two screws D and then remove the SWL2 circuit board c Procedure and caution for reassembly Pass the cable to be connected to the SWL3 H SWL3 circuit board through the cable holder under ground plate and the wire retaining slit as shown in Fig 5 3 8 making sure that the cable is laid out along the side case L and L cover as far as possible Note Take great care when handling the LC...

Страница 82: ...90 in the direction of the arrow 3 Remove three screws B 4 Release the six tabs and then remove the LCD case U in the direction of the arrow The MR sheet f will detach at this time Take care not to lose it MR Circuit Board b 5 Disconnect the MR circuit board from the LCD circuit board g 6 Remove the MR circuit board in the direction of the arrow The MR circuit board is a film like board Do not ben...

Страница 83: ...ot to damage the flat cable h that extends from the disc cover Procedure and caution for reassembly 1 Reinstall the disc cover so that the hinge 1 of side case R fits into portion 2 at the inside top of disc cover and that the cover is not inclined Installing and inclined disc cover could damage the switch SW8062 inside the disc cover 2 Pass the flat cable extending from the disc cover through the...

Страница 84: ...rcuit board h 3 Remove the USB H USB circuit board from USB holder in the direction of the arrow Rear Cover c and EVF Unit d 4 Remove the hand strap from side case R g 5 Remove one screw F and one screw A 6 Disconnect the three flat cables and then remove the rear cover along with the EVF unit 7 Remove one screw A and then remove the EVF unit Hand Strap e 8 Remove screw A screw D and screw M and t...

Страница 85: ... 4 Disconnect the SHE H circuit board from accessory shoe a SHE H circuit board b Accessory shoe c AEL H circuit board d GYR H circuit board Fig 5 3 14 13 SHE Circuit Board in DZ MV550E 1 Disconnect the SHE circuit board a from AEL circuit board b 2 Disconnect the GYR circuit board c from SHE circuit board 3 Remove one screw G and then remove the SHE circuit board Fig 5 3 15 14 Accessory Shoe in D...

Страница 86: ...he frame d 5 Remove the AEL H AEL circuit board from MAN H MAN circuit board in the direction of the arrow Note Do not scratch the surface of IC2009 or IC2010 The surfaces of IC2009 or IC2010 are silicon substrate silicon wafer that is semi conducting Scratching them could cause fault in operation Procedure and caution for reassembly 1 Be sure to paste the two heat sink rubbers e on the MAN H MAN ...

Страница 87: ...ole d in frame before tightening the screws Note Take great care when handling the camera block The camera block contains the lens unit which is a precision component Subjecting the lens unit to any impact could result in a fault Fig 5 3 18 a Camera block b Frame c hook of camera frame d square hole in frame 17 Link Bracket 1 Remove two screws H and then remove the link bracket a Fig 5 3 19 a Link...

Страница 88: ...ews A and then remove the drive block a from the side case R b Note Take great care when handling the drive block The drive block contains the disc drive unit which is a precision component Do not subject the disc drive unit to any impact Doing so could cause a fault Fig 5 3 21 Bottom side a Drive block b Side case R Disassembly and Reassembly Disassembly ...

Страница 89: ...rcuit board from DRV R circuit board in disc drive unit Lock Unit d and Frame e 5 Remove one screw H and then remove the lock unit Note The disc drive unit is a precision component Take great care when handling it Do not subject the disc drive unit to any impact Doing so could cause a fault Procedure and caution for reassembly Be sure to paste the heat sink rubber f on the frame Neglecting to past...

Страница 90: ... the one flat cable 3 Release the two tabs and then remove the LCD circuit board Be careful not to deform LCD frame c at this time a LCD case B b LCD circuit board c LCD frame Fig 5 3 24 LCD Case B and LCD Circuit Board Fig 5 3 25 Assembling parts inside LCD frame c LCD frame d Mirror sheet e Light guide plate f Diffusion sheet g Prism sheets h LCD panel Note 1 Do not remove the mirror sheet d lig...

Страница 91: ... points of CCD image sensor terminals on SEN H circuit board Note 1 The lens unit crystal filter and CCD image sensor are precision components Take great care when handling them Adherence of dust foreign object fingerprint etc to them scratches or impact could cause a fault 2 Never use metal tweezers to handle the crystal filter Doing so could cause a fault Procedure and caution for reassembly 1 T...

Страница 92: ...rd a 1 Remove two screws D and then remove the GYR circuit board Lens Frame b and Lens Unit c 2 Remove two screws D and then remove the lens frame Caution 1 The lens unit is a precision component Take great care when handling it Do not allow any dust to adhere to it and do not subject it to damage or impact Doing so could cause a fault 2 Do not disassemble the lens unit Doing so could cause a faul...

Страница 93: ...ce data replacing fluorescent light etc c When performing adjustment using a C12 light balancing filter that is different from that used when the reference data was created d When deleting the folder containing the adjustment program from HDD Restrictions If the same model with normal camera block as the one to be adjusted is not available the reference data can be created by the following procedu...

Страница 94: ...rder is 37 mm When using a filter with a diameter of 46 mm use a step up rings for better workability Skylark connection jig Parts No TP14161 RS 232C cable 9 pin or 25 pin straight type Generally available AV S input output or output cable Accessory Parts No EW12521 DZ ACS1 AC adapter charger Accessory 2 Power cable for AC adapter charger Accessory 2 DC power cord Accessory Parts No EV11012 1 The ...

Страница 95: ...le the DVD video camera recorder completely and create reference data with only the adjustment cover removed see Fig 6 1 1 Do not attempt to create reference data with the DVD video camera recorder disassembled Doing so is very dangerous because the DVD video camera recorder incorporates high voltage circuits and a laser emitter block 1 Setting of light box 1 Use a light box whose color temperatur...

Страница 96: ...OD YEL To VIDEO IN COLOR MONITOR SKYLARK CONNECTION JIG AV S INPUT OUTPUT CABLE Fig 6 1 1 Connections when Creating Reference Data Adjustment Creating Reference Data Note 1 Always connect the Skylark connection jig before connecting the DC power cord to the DVD video camera recorder Connecting the Skylark connection jig after powering the DVD video camera recorder could cause a fault 2 Connect the...

Страница 97: ... executed 7 When reset is complete operate the joystick by the above procedure to set the items on menu screens as follows a Specify Demo Mode Off in Initial Setup menu Failing to specify Demo Mode Off will interfere with adjustment 8 Press the MENU button to restore the normal display Information The following table shows the menu status after the above settings The settings for Date Setup are no...

Страница 98: ...eated during storage Adjustment Creating Reference Data 6 1 6 Starting and Terminating Reference Data Creation Program Make sure that the connections are correct the power switch on DVD video camera recorder is set to VIDEO and the DC power supply for DSP R jig is turned on The reference data creation program will not start unless the connections for creating reference data are correct and the DVD...

Страница 99: ...is supplied to the reference data creating device or DSP R interface jig Clicking the OK button will finish the program After solving the problem restart the program When the communication port error dialog appears There was a mistake in selecting communication port Check the communication port Clicking the OK button will finish the program Select the communication port again after restart MANUAL ...

Страница 100: ...80E DZ MV580ESW DZ MV550E DZ MV550ESW Information The symbols in parentheses in the above model names show the destinations and are displayed only on packing box Refer to 2 5 Differences in Rating Labels and Difference in Function when checking the body of DVD video camera recorder to judge its destination 7 Click the ENTER button in MODEL SELECT screen and then proceed with the SETUP MENU screen ...

Страница 101: ... work perform the following procedure 1 Set the power switch of reference data creating device to OFF 2 Turn off the DC power supply of DSP R interface jig 3 Simultaneously press the Ctrl Alt and Delete keys on PC keyboard to restart the PC 4 After the PC restarts set the power switch of reference data creating device to VIDEO and turn on the DC power supply of DSP R interface jig again 5 Restart ...

Страница 102: ...HE FILTER dialog will appear during setup Remove the C12 light balancing filter from the lens of DVD video camera recorder and then click the OK button in REMOVE THE FILTER dialog After that the ATTACH THE FILTER dialog and REMOVE THE FILTER dialog may occasionally appear Reattach the C12 light balancing filter and remove it each time 5 When setup is complete the SETUP FINISHED dialog will appear ...

Страница 103: ...e to execute all items at the same time If you click the RETURN button on the SETUP MENU screen with an unfinished item the EXECUTE OTHER ITEMS dialog will appear Click the OK button in EXECUTE OTHER ITEMS dialog and then execute the unfinished items SETUP MENU screen MANUAL ADJUSTMENT PROGRAM for SERVICE STATION Matrix EXECUTE RETURN SETUP MENU White Balance Abs White Balance 8 9 10 ALL SETUP FIN...

Страница 104: ...nt Copy the map04w folder from the PC with which you performed adjustment Yes Yes No No Yes No Create the reference data referring to section 6 1 It is not necessary to create the reference data Does the map04w folder exist on HDD of PC with which you previously performed adjustment Yes No Create the reference data referring to section 6 1 No Yes Will you use the same C12 light balancing filteras ...

Страница 105: ...corporates high voltage circuits and a laser emitter block 1 Setting of light box 1 Use the same light box as when the reference data was created Its color temperature and illuminance are strictly controlled and free from flickering If the setting of color box is not appropriate the adjustment program may not operate normally 2 Setting and disassembly of DVD video camera recorder 1 Refer to 1 Adju...

Страница 106: ... SUPPLY 5V 1A SKYLARK CONNECTION JIG RS 232C CABLE POWER CABLE To AC OUTLET DC POWER CORD FRONT SECTION YEL To VIDEO IN AV S INPUT OUTPUT CABLE COLOR MONITOR To INPUT To OUTPUT TEL Adjustment Setups for Adjustment Note 1 Always connect the Skylark connection jig before connecting the DC power cord to the DVD video camera recorder Connecting the Skylark connection jig after powering the DVD video c...

Страница 107: ...ck mode switch to OFF After that operate the DVD video camera recorder while watching the LCD monitor screen 3 Press the MENU button to display the menu screen 4 Use the joystick to choose Initial Setup and then press the center of joystick 5 Use the joystick to choose Reset and then press the center of joystick The screen for verifying reset will appear 6 Use the joystick to choose ENTER and then...

Страница 108: ... may have to be set See the instruction manual of test equipment for details 1 Oscilloscope a Probe 10 1 b TIME DIV 10 or 20 µs except where some other designation is given c VOLTS DIV Change depending on the measurement object d TRIGGER SOURCE CH1 except where some other designation is given e AC DC GND AC 2 Vectorscope a SATURATION 75 Adjustment Setups for Adjustment ...

Страница 109: ...button on the COMMUNICATION PORT SETTING screen and then proceed with the MODEL SELECT screen Note If the dialogs on right appear perform the following troubleshooting When the power or connection error dialog appears A connection is incorrect or power is not turned on Make sure that all connections are correct and that power is supplied to the reference data creating device or DSP R interface jig...

Страница 110: ...played only on packing box Refer to 2 5 Differences in Rating Labels and Difference in Function when checking the body of DVD video camera recorder to judge its destination 7 Click the ENTER button in MODEL SELECT screen and then proceed with the ADJUST MENU screen Start of the adjustment program is now complete Refer to 6 3 Adjustment Procedure for subsequent operations If there is an error in mo...

Страница 111: ...oes not work perform the following procedure 1 Set the power switch of reference data creating device to OFF 2 Turn off the DC power supply of DSP R interface jig 3 Simultaneously press the Ctrl Alt and Delete keys on PC keyboard to restart the PC 4 After the PC restarts set the power switch of reference data creating device to VIDEO and turn on the DC power supply of DSP R interface jig again 5 R...

Страница 112: ...NT PROGRAM for SERVICE STATION LCD ADJUSTMENT MENU PLL EXECUTE RETURN CONNECTION LCD ADJUSTMENT MENU CONTRAST BRIGHT WHITE BALANCE Data Initialize Initial Data Write EXECUTE RETURN CONNECTION FILE MENU Original Data Backup Backup Data Write AUTO IRIS CONTROL SAMPLING PULSE MATRIX CHROMA GAIN AUTO FOCUS SPOT NOISE VIDEO LEVEL BURST LEVEL LCD PLL LCD BRIGHT LCD CONTRAST 1 LCD WHITE BALANCE EVF BL Ch...

Страница 113: ...ta backup disabled 2 EVF unit 3 1 Be sure to perform 4 9 2 EEPROM data backup and write before replacing the MAN H MAN circuit board 2 EEPROM data backup disabled refers to when the backup of EEPROM data from the MAN H MAN circuit board to be replaced could not be properly executed due to some fault such as the DVD video camera recorder not being turned on etc 3 When replacing the EVF unit be sure...

Страница 114: ... Autofocus Auto Iris Control Matrix Chroma Gain Spot Noise LCD PLL LCD Contrast 1 4 LCD Bright 4 LCD Contrast 2 4 LCD White Balance EVF BL DET Check EVF PLL EVF Contrast EVF Bright EVF White Balance 4 The following three items cannot be performed singly Be sure to perform these adjustments as a set with the three items and in the order stated LCD contrast 1 LCD bright LCD contrast 2 Major Componen...

Страница 115: ...eo Level Burst Level Sampling Pulse Autofocus Auto Iris Control Matrix Chroma Gain Spot Noise LCD PLL LCD Contrast 1 LCD Bright LCD Contrast 2 LCD White Balance EVF BL DET Check EVF PLL EVF Contrast EVF Bright EVF White Balance 6 3 3 Purpose of Adjustments and Incompleted Phenomenon Incompleted Phenomenon The picture becomes dark or whitish Diagonal beats and horizontal noise occur Focus is lost d...

Страница 116: ...EXECUTE button on ADJUST MENU screen to proceed with the DATA INITIALIZE MENU screen 3 Choose Initial Data Write on the DATA INITIALIZE MENU screen 4 Click the EXECUTE button on DATA INITIALIZE MENU screen to start writing of initial data The progress status can be confirmed using the PROGRESS STATUS dialog 5 When writing is complete the INITIALIZATION FINISHED dialog will appear Click the OK butt...

Страница 117: ...Note that clicking the RETURN button will restore the ADJUST MENU screen to the status before the adjustment was performed 5 When save is complete the ADJUSTMENT FINISHED dialog will appear Click the OK button in dialog to restore the ADJUST MENU screen ADJUST MENU screen VIDEO LEVEL ADJUSTMENT screen Fig 6 4 1 MANUAL ADJUSTMENT PROGRAM for SERVICE STATION MODEL NAME DATA INITIALIZE EXECUTE RETURN...

Страница 118: ... be sure to click the SAVE button Note that clicking the RETURN button will restore the ADJUST MENU screen to the status before the adjustment was performed 5 When save is complete the ADJUSTMENT FINISHED dialog will appear Click the OK button in dialog to restore the ADJUST MENU screen ADJUST MENU screen MANUAL ADJUSTMENT PROGRAM for SERVICE STATION MODEL NAME DATA INITIALIZE EXECUTE RETURN CONNE...

Страница 119: ...corder for at least one hour at normal temperature and then starting within 90 seconds after turning it on Unstable circuit operation will cause improper adjustment Preparation Cap the lens of DVD video camera recorder Procedure 1 Choose SAMPLING PULSE on the ADJUST MENU screen 2 Click the EXECUTE button on ADJUST MENU screen to start adjustment 3 When adjustment is complete the ADJUSTMENT FINISHE...

Страница 120: ...t adjustment 3 When adjustment is complete the ADJUSTMENT FINISHED dialog will appear Click the OK button in dialog to restore the ADJUST MENU screen If the AF ADJUSTMENT ERROR dialog appears click the OK button in dialog perform the following troubleshooting and then execute readjustment a Increase the illumination b Set the distance between the backfocus chart and lens surface precisely to 1500m...

Страница 121: ... still appears after the corrective action the lens unit may be faulty a Turn the light box off and then make sure that no surrounding light reflects on glass surface of light box If any surrounding light does reflect on it perform adjustment in a place where no surrounding light will affect the adjustment b Widen or shorten the distance between the light box and DVD video camera recorder ADJUST M...

Страница 122: ...ncing filter from the lens of DVD video camera recorder and then click the OK button in REMOVE THE FILTER dialog After that the ATTACH THE FILTER dialog and REMOVE THE FILTER dialog may occasionally appear Reattach the C12 light balancing filter and remove it each time 5 When adjustment is complete the ADJUSTMENT FINISHED dialog will appear Click the OK button in dialog to restore the ADJUST MENU ...

Страница 123: ...wn the button until the mark changes to a steady light 3 Press the STOP button on DVD video camera recorder 4 Insert the color bar chart into light box and point the DVD video camera recorder at the chart so that it fills the screen Adjustment Adjustment Procedure MANUAL ADJUSTMENT PROGRAM for SERVICE STATION MODEL NAME DATA INITIALIZE EXECUTE RETURN CONNECTION ADJUST MENU SAMPLING PULSE AUTO IRIS...

Страница 124: ...ck the button at approx 2 second intervals while checking any increase or decrease in vector or level 9 After step 8 is complete be sure to click the SAVE button Note that clicking the RETURN button will restore the ADJUST MENU screen to the status before the adjustment was performed 10 When save is complete the ADJUSTMENT FINISHED dialog will appear Click the OK button in dialog to restore the AD...

Страница 125: ...can easily be judged by capping the lens Use a CRT color monitor for this check Procedure 1 Choose SPOT NOISE on the ADJUST MENU screen 2 Click the EXECUTE button on ADJUST MENU screen to start adjustment When SPOT NOISE starts the DVD video camera recorder will automatically turn on again 3 When adjustment is complete the ADJUSTMENT FINISHED dialog will appear Click the OK button in dialog to res...

Страница 126: ... using the PROGRESS STATUS dialog 3 When the DVD video camera recorder has shifted to the test mode the LCD screen will be black and white see Fig 6 4 7 and the LCD ADJUSTMENT MENU screen will appear on the PC monitor screen ADJUST MENU screen MANUAL ADJUSTMENT PROGRAM for SERVICE STATION MODEL NAME DATA INITIALIZE EXECUTE RETURN CONNECTION ADJUST MENU SAMPLING PULSE AUTO IRIS CONTROL MATRIX CHROM...

Страница 127: ...s 4 After step 3 is complete be sure to click the SAVE button Note that clicking the RETURN button will restore the LCD ADJUSTMENT MENU screen to the status before the adjustment was performed 5 When save is complete the ADJUSTMENT FINISHED dialog will appear Click the OK button in dialog to restore the LCD ADJUSTMENT MENU screen LCD ADJUSTMENT MENU screen MANUAL ADJUSTMENT PROGRAM for SERVICE STA...

Страница 128: ...als while checking any increase or decrease in level A 4 After step 3 is complete be sure to click the SAVE button Note that clicking the RETURN button will restore the LCD ADJUSTMENT MENU screen to the status before the adjustment was performed 5 When save is complete the ADJUSTMENT FINISHED dialog will appear Click the OK button in dialog to restore the LCD ADJUSTMENT MENU screen Fig 6 4 8 Wavef...

Страница 129: ...vals while checking any increase or decrease in level B 4 After step 3 is complete be sure to click the SAVE button Note that clicking the RETURN button will restore the LCD ADJUSTMENT MENU screen to the status before the adjustment was performed 5 When save is complete the ADJUSTMENT FINISHED dialog will appear Click the OK button in dialog to restore the LCD ADJUSTMENT MENU screen LCD ADJUSTMENT...

Страница 130: ...rvals while checking any increase or decrease in level A 4 After step 3 is complete be sure to click the SAVE button Note that clicking the RETURN button will restore the LCD ADJUSTMENT MENU screen to the status before the adjustment was performed 5 When save is complete the ADJUSTMENT FINISHED dialog will appear Click the OK button in dialog to restore the LCD ADJUSTMENT MENU screen LCD ADJUSTMEN...

Страница 131: ...or decrease in level a 4 After step 3 is complete be sure to click the NEXT button and then proceed with the SUB BRIGHT RED ADJUSTMENT screen Note that clicking the RETURN button will restore the LCD ADJUSTMENT MENU screen to the status before the adjustment was performed 5 Use the same procedure as in step 3 to equalize levels c and d of the waveform 6 After step 5 is complete be sure to click th...

Страница 132: ...10 is complete be sure to click the SAVE button 12 When save is complete the ADJUSTMENT FINISHED dialog will appear Click the OK button in dialog to restore the LCD ADJUSTMENT MENU screen 13 Click the RETURN button in LCD ADJUSTMENT MENU to restore the ADJUST MENU screen SUB BRIGHT BLUE ADJUSTMENT screen MANUAL ADJUSTMENT PROGRAM for SERVICE STATION NEXT RETURN SUB BRIGHT BLUE ADJUSTMENT UP DOWN C...

Страница 133: ...t mode The progress status can be confirmed using the PROGRESS STATUS dialog 3 When the DVD video camera recorder has shifted to the test mode the viewfinder screen will be black and white see Fig 6 4 12 and the EVF ADJUSTMENT MENU will appear on the PC monitor screen ADJUST MENU screen EVF ADJUSTMENT MENU screen MANUAL ADJUSTMENT PROGRAM for SERVICE STATION MODEL NAME DATA INITIALIZE EXECUTE RETU...

Страница 134: ...reen 2 Click the EXECUTE button on EVF ADJUSTMENT MENU screen to proceed with the PLL ADJUSTMENT screen 3 Click the UP or DOWN button to flatten the waveform Click the button at intervals of approx 2 seconds while observing the movement of waveform 4 After step 3 is complete be sure to click the SAVE button Note that clicking the RETURN button will restore the EVF ADJUSTMENT MENU screen to the sta...

Страница 135: ...p 3 is complete be sure to click the SAVE button Note that clicking the RETURN button will restore the EVF ADJUSTMENT MENU screen to the status before the adjustment was performed 5 When save is complete the ADJUSTMENT FINISHED dialog will appear Click the OK button in dialog to restore the EVF ADJUSTMENT MENU screen EVF ADJUSTMENT MENU screen MANUAL ADJUSTMENT PROGRAM for SERVICE STATION EVF ADJU...

Страница 136: ... 3 is complete be sure to click the SAVE button Note that clicking the RETURN button will restore the EVF ADJUSTMENT MENU screen to the status before the adjustment was performed 5 When save is complete the ADJUSTMENT FINISHED dialog will appear Click the OK button in dialog to restore the EVF ADJUSTMENT MENU screen EVF ADJUSTMENT MENU screen MANUAL ADJUSTMENT PROGRAM for SERVICE STATION EVF ADJUS...

Страница 137: ...decrease level a 4 After step 3 is complete be sure to click the NEXT button and then proceed with the SUB BRIGHT RED ADJUSTMENT screen Note that clicking the RETURN button will restore the EVF ADJUSTMENT MENU screen to the status before the adjustment was performed 5 Use the same procedure as in step 3 to equalize levels c and d of the waveform 6 After step 5 is complete be sure to click the NEXT...

Страница 138: ...tage checked in 1 EVF BL DET Check High button when the check value is 5 V or Low button when it is 0 V 13 When BL DET is complete the ADJUSTMENT FINISHED dialog will appear Click the OK button in dialog to restore the EVF ADJUSTMENT MENU screen 14 Click the RETURN button in EVF ADJUSTMENT MENU to restore the ADJUST MENU screen SUB BRIGHT BLUE ADJUSTMENT screen SUB CONTRAST BLUE ADJUSTMENT screen ...

Страница 139: ...been assigned as service parts as of the date of issue of this manual FRT H FRT CIRCUIT BOARD Component Replacement SWL3 H SWL3 CIRCUIT BOARD Component Replacement 126 909 909 909 909 909 910 910 114 907 128 125 914 127 905 SW8062 904 904 904 122 905 905 SAF H SAF CIRCUIT BOARD Component Replacement Refer to R Block a Refer to LCD Unit 909 909 SWL2 CIRCUIT BOARD Component Replacement 111 112 108 9...

Страница 140: ...placement Refer to R Block 128 c b b 141 142 132 135 133 LCD CIRCUIT BOARD Component Replacement MR CIRCUIT BOARD Component Replacement 914 914 c 125 SW8062 904 904 904 122 139 917 917 915 115 Co po e t ep ace e t 905 905 122 909 ement Component Replace had not been assigned exploded views 1 R e W o 0 4 33 0 9 0 4 h h a 1 W 2A 3A A 3A A 3A 3A 3A 3A 3A 3A A 4A A A A A 1A 2B 3B B B B B B B 4B 4B 1B ...

Страница 141: ...4 904 120 904 904 904 904 904 121 906 117 116 103 101 102 107 904 901 901 901 DRF H DRF CIRCUIT BOARD Component Replacement 009 MAN H MAN Circuit Board Assembly Replacement 011 DISC DRIVE UNIT Unit Replacement 909 905 143 144 Refer to DZ MV550E Camera Block Refer to DZ MV580E Camera Block b b b SHE H CIRCUIT BOARD Component Replacement USB H USB CIRCUIT BOARD Component Replacement SHE CIRCUIT BOAR...

Страница 142: ...eplacement 909 905 143 144 d d USB CIRCUIT BOARD Component Replacement SHE CIRCUIT BOARD Component Replacement AEL CIRCUIT BOARD Component Replacement GYR CIRCUIT BOARD Component Replacement 909 909 909 601 140 9 149 107 9 N e 5 1 3 3 n A c 1 1 D m 2A 3A 4A 1A 2B 3B 4B 4 4 4 4 4 4 4 1B B 2C 2 2 2 2 3C C C C 3 3 4C 1C C 904 904 2D 3D 3 3 3D D D D 3 3 3 3 3 3 3 3 3 4D 20 0 1D 2E 3E E 4E 1E 2F 3F 4F ...

Страница 143: ...a Block 7 1 5 DZ MV550E DZ MV1000E UK Camera Block 917 917 915 141 142 132 135 133 139 125 LCD CIRCUIT BOARD Component Replacement MR CIRCUIT BOARD Component Replacement 913 909 909 603 604 602 SEN H CIRCUIT BOARD Component Replacement GYR H CIRCUIT BOARD Component Replacement 909 140 601 913 GYR CIRCUIT BOARD Component Replacement 909 909 909 601 140 ...

Страница 144: ...TRAP HAND 144 SHEET LCD MV550E 144 SHEET LCD MV550E AU MV550E SW 7 2 1 Mechanical Parts List 7 2 Replacement Parts List MECHANISM SECTION FOR DZ MV580E 009 PWB ASSY MAN H MV580E MV580E UK 009 PWB ASSY MAN H MV580E AU MV580W SW MV580E SWH 011 DVD DRIVE ASSY PC3RB 101 HEAT SINK 102 HEAT SINK 103 HEAT SINK 105 EVF ASSY 106 SHOE ASSY 107 HOLDER USB 108 CASE FRONT MV580E 108 CASE FRONT MV580E AU MV580E...

Страница 145: ... 7X4 906 SCREW 1 6X2 907 SCREW 1 7X4 909 SCREW 1 7X4 910 SCREW 1 7X4 911 SCREW M1 7W 912 SCREW M1 7 914 SCREW 2X5 915 SCREW 1 6X3 917 SCREW 1 7X4 ACCESSORIES FOR DZ MV550E ADPTOR AC CORD POWER MV550E MV550E SW CORD POWER MV550E SWH MV550E UK CORD POWER AU MV550E AU CORD AVS CORD DC REMOTE HAND SET DZ RM3WF CORD USB COVER LENS COVER LENS STRAP SHOLDER CAP LENS CD ROM SWIFT ...

Страница 146: ...THE UPDATED PARTS LIST FOR THIS MODEL IS AVAILABLE ON ESTA ...

Страница 147: ... CN8101 JK8101 PC CONNECTION SD IF CONT IC4106 PG1502 CARD INSERTION BLOCK POWER SWITCH DOOR SWITCH SPEAKER 19 20 1 12 16 17 TL1535 SP_OUT TL1536 SP_OUT 15 PG1501 42 PG7001 42 44 44 35 31 38 39 50 46 53 EVF DRIVER IC3701 21 23 21 23 PG7009 PG0151 LCD PANEL 53 55 40 43 45 TL3715 EVF G 4 37 38 4 37 38 PG0153 6 8 6 8 29 31 39 77 87 101 29 31 39 77 87 101 IC1403 GYRO DET IC1401 V_MOVE ACCESSORY SHOE I...

Страница 148: ...P FRONT MONITOR DET AMP Encord Data APC SLIDER MOTOR DATA STROBE ANALOG FRONT END DRIVE DSP SERVO DSP ATAPI ENCODER DECODER 4CH BRIDGE DRIVE SDRAM µP SRAM FLASH ROM SPINDLE DRIVE EJECT MOTOR DRIVE EEPROM DISC COVER SW 8cm DVD RAM DVD R DISC DISC SW M PG2302 PG2301 PG2002 ATAPI IF IC2006 MAGIC DRF H DRF MAN H MAN LOCK UNIT DISC DRIVE UNIT ...

Страница 149: ... 3 4 PG 7008 11 16 PG3401 15 10 24 97 3 4 22 23 Q3451 BACK LIGHT SW IC7001 8 82 83 102 119 24 97 82 83 PG7009 10 30 30 3 20 PG0151 10 3 20 PG0154 1 8 IC1403 GYRO DET CN1401 1 3 IC1401 V_MOVE 3 IC1402 H_MOVE 3 IC1801 REMOTE CONTROL RECEIVER 2 3 PG2031 28 43 30 33 38 41 25 26 30 33 38 41 25 26 PG2302 28 43 30 33 38 41 PG9701 28 43 25 26 30 33 38 41 3V 2 5V 5V EVF5V VDD 8 5V B U3V SYS3V VDD 8 5V 3V 3...

Страница 150: ... 7 22 23 IC9301 11 12 41 PG9702 5 6 25 26 28 43 PG2302 30 33 38 41 IC9501 IC9101 57 11 23 50 73 82 28 43 IC9502 IC9506 5 IC9601 IC9001 IC9002 4 5V SW 4 IC9005 IC9006 5 5 IC9007 5 16 17 32 34 44 49 64 IC9201 IC9353 IC9354 IC9417 8 8 4 EJECT 5V SW 5V SW PG9103 42 43 46 47 PG9401 3 4 5V 3V 5V EJECT 5V 3V 2 5V 5V 11 12 41 PG9001 42 43 46 47 5V 3V 3V 8 IC9503 3 DRF H DRF DRV R MOD HDM Refer to POWER1 L...

Страница 151: ...C 1 C Circuit Board Diagrams C 1 GYR H C 2 GYR GYR SIDE A PG1401 GYR SIDE B PATTERN No JD1175 3 GYR H SIDE A PG1401 GYR H SIDE B PATTERN No JD1176 5 ...

Страница 152: ...C 2 C 3 FRT H C 4 FRT FRT H SIDE A FRT H SIDE B PATTERN No JD1176 5 PD1801 FRT SIDE A FRT SIDE B PATTERN No JD1175 3 PD1801 ...

Страница 153: ...C 3 C 5 DRF H DRF C 6 SHE DRF SIDE A 70 1 36 35 DRF SIDE B PATTERN No JD1175 3 1 35 70 36 DRF H SIDE A 36 DRF H SIDE B PATTERN No JD1176 5 36 SHE SIDE A 1 20 40 21 SHE SIDE B PATTERN No JD1175 3 BA1801 ...

Страница 154: ... SWL3 H SWL3 SWL2 SHE H SIDE A CN0152 SHE H SIDE B PATTERN No JD1176 5 BA1801 C0153 SWL3 H SIDE A SWL3 H SIDE B PATTERN No JD1176 5 SWL3 SIDE A SWL3 SIDE B PATTERN No JD1175 3 SWL2 SIDE B PATTERN No JA2255 1 SWL2 SIDE A ...

Страница 155: ...C 5 C 9 USB H USB C 10 MR USB H SIDE A CN8101 USB H SIDE B PATTERN No JD1176 5 USB SIDE A 1 5 CN8101 USB SIDE B PATTERN No JD1175 3 MR PATTERN No JD1183 2 CN3401 ...

Страница 156: ... 2C 2C 2B B B B B B 2 2 2B B B 2B 2 2 2 2 2 2 2 2 2 2 2 2B B B 2A 2A 2 2 2 2 2 2 2 2A A 2 2A C 1C C B 1B B 1B B B 1B B B 1A LCD SIDE B PATTERN No JA2244 4 A B C A B C 1 2 3 4 1 2 3 4 1C 1C 1 1C 1B 1 1B B 1B B B 1B B B 1 1 1 1B B 1 1 1A 2C 2C 2C 2C C C 2B B B B B B B B B B 2A C 3C 3C C 3B B 3B B 3B 3A 4C 4B 4A 4A 4 4 ...

Страница 157: ...12 SEN H C 13 SAF H SAF SEN H SIDE A 14 8 1 IC1001 7 PG1002 SEN H SIDE B PATTERN No JD1176 5 SAF H SIDE A CN7004 CN8012 SAF H SIDE B PATTERN No JD1176 5 SAF SIDE A CN7004 CN8012 SAF SIDE B PATTERN No JD1175 3 ...

Страница 158: ...NDS336P RT1N144U T11 1 RD13UMB 1 MV580E MV550E Not Provided Provided 0 068 0 22 2 2 Not Provided 180k 8 2k 27k 27k 39k 10k 5 6k 180 120 Not Provided Not Provided 1 120 61 60 R7031 TL7041 TL6102 TL6101 TL3715 TL7028 TL7030 AEL H AEL SIDE B PATTERN No JA2237 5 TL3701 GND A B C D E F G H A B C D E F G H 1 2 3 4 1 2 3 4 1H 1H H 1H 1 1 1 1 1H H 1 1H H 1 2H 3H 4H 1G G G 1 1 1G G 1 1G G G 1G G G G G G G ...

Страница 159: ... B PATTERN No JA2226 4 61 80 83 97 102 78 35 25 30 1 36 70 40 60 120 1 10 14 17 24 12 56 62 1 3 5 7 14 10 TL6009 TL6006 TL6010 TL1536 TL1534 TL1535 TL0504 TL0511 TL1543 TL1547 TL0518 TL0520 GND TL0521 GND F0503 F0504 F0501 F0502 Note Voltage values are in REC status Model names MV580E and MV550E shown for voltage values include AU SW SWH and UK Information of MAN H MAN DRV R MOD and HDM Circuit Bo...

Страница 160: ...tatus Supplement Since the DVD disc drive is intermittently operated set to the reading status in which laser light is emitted from the pickup DRV R SIDE B PATTERN No JA2238 3 MOD SIDE A MOD SIDE B PATTERN No JA2238 3 Information of MAN H MAN DRV R MOD and HDM Circuit Boards If a fault is located on the MAN H MAN circuit board the entire circuit board must be replaced for servicing If there is a f...

Страница 161: ...m the pickup Information of MAN H MAN DRV R MOD and HDM Circuit Boards If a fault is located on the MAN H MAN circuit board the entire circuit board must be replaced for servicing If there is a fault in the DRV R MOD or HDM circuit board the entire disc drive unit must be replaced since these circuit boards are included in this unit Because of this servicing method this service manual does not inc...

Страница 162: ...N 15PIN 20PIN 4PIN 12PIN 8PIN 16PIN 22PIN 22PIN PG1801 PG7003 PG7008 PG3401 PG3402 PG3403 PG7001 PG2001 PG1501 PG9404 PG2301 PG9103 PG9701 PG9702 PG9301 PG9401 PG9404 PG9403 PG2302 PG2002 PG5001 CN8101 J6002 J6001 PG1502 PG0501 PG1503 PG1002 PG8017 CN8017 PG7004 PG7009 PG0151 PG0154 PG0153 CN0152 PG1401 CN7004 CN8012 PG8012 PG8011 PG7002 PG1301 PG1802 DISC COVER CARD INSERTION BLOCK POWER SWITCH S...

Страница 163: ...02 J6001 PG1502 PG0501 PG1503 PG7004 PG7009 PG0151 PG0154 PG0153 PG1401 CN7004 CN8012 PG7002 PG1302 PG1802 22PIN FRT LCD GYR SHE SAF MAN USB DRF DRV R AEL MR MOD HDM MICROPHONE LENS UNIT LCD PANEL LOCK UNIT DISC DRIVE UNIT SLID MOTOR SPINDLE MOTOR EXTERNAL MICROPHONE JACK DISC COVER CARD INSERTION BLOCK POWER SWITCH SPEAKER JK8101 PC CONNECTION TERMINAL REAR COVER ZOOM DISC EJECT REC BUTTON BATTER...

Страница 164: ... 1 3 1 3 1 3 0 0 1 3 1 3 1 3 3 1 0 1 3 3 1 0 3 1 0 0 3 0 4 8 4 8 0 0 GYR H GYR 5H DET V_GYRO H_GYRO MV580E To SHE H PG0154 MV550E To SHE PG0154 5H XP4501 CODE PART NAME ONE VOLTAGE PB OR REC MODE FRT H FRT 64 MO 1ZS LE LE 1ZS 64 MO 2SC5383T11 2SD2345 S DTC114TYE MA132WA To BTB AEL H AEL PG7003 To MICROPHONE ONE VOLTAGE PB OR REC MODE CODE PART NAME WB IR RECEIVER REMOTE CONT RECEIVER REC INDI Mode...

Страница 165: ...1C 2D 3D 4D 5D 6D 7D 8D 1D 2E 3E 4E 5E 6E 7E 8E 1E 2F 3F 4F 5F 6F 7F 8F 1F 4 3 2 1 A B C D E F A B C D E F 8 7 6 5 4 3 2 1 8 7 6 5 S 4 S 5 DRF H DRF S 6 SWL3 H SWL3 SWL3 H SWL3 To SWL2 CN8017 OFF QUICK MODE ON DRF H DRF To MAN H MAN PG2002 To DISC DRIVE UNIT DRV R PG9701 ...

Страница 166: ...D 6D 7D 8D 1D 2E 3E 4E 5E 6E 7E 8E 1E 2F 3F 4F 5F 6F 7F 8F 1F 4 3 2 1 A B C D E F A B C D E F 8 7 6 5 4 3 2 1 8 7 6 5 S 5 S 7 SHE H S 8 SHE SHE H To SHOE TERMINAL To EVF UNIT EVF_5V To GYR H PG1401 To BTB AEL H PG7009 C0153 0 01 SHE To EVF UNIT EVF_5V To GYR PG1401 To BTB AEL PG7009 ...

Страница 167: ...2F 3F 4F 5F 6F 7F 8F 1F 4 3 2 1 A B C D E F A B C D E F 8 7 6 5 4 3 2 1 8 7 6 5 S 6 S 9 USB H USB S 10 SAF H SAF S 11 MR USB H USB FLC181Z16SMMZ PC TERMINAL To MAN H MAN PG5001 SAF H SAF To SWL2 PG8012 To BTB AEL H AEL PG7004 0 3 2 3 2 0 3 2 3 2 REVERSE SW OPEN CLOSE SW REVERSE MR To LCD PG3403 ONE VOLTAGE PB OR REC MODE ...

Страница 168: ...3 1 5 0 7 1 3 1 5 0 7 1 3 1 5 0 7 1 3 1 5 0 7 0 3 2 2 5 2 0 4 0 1 7 2 8 0 0 3 2 0 0 0 0 0 0 0 0 0 0 3 2 0 1 3 2 0 1 3 2 0 3 5 0 3 5 0 3 5 0 3 5 0 4 0 0 3 5 4 0 1 2 LCD LCD DRIVER 5 6 LF LF LF LF LF LF AE N5 MP To LCD PANEL NECW008AT NECW008AT NECW008AT NECW008AT NECW008AT NECW008AT To MR CN3401 To BTB AEL H AEL PG7008 1 2 3 4 5 6 7 8 9 10 11 12 13 14 15 16 17 18 19 20 21 22 23 24 25 AE LF N5 MP 5 ...

Страница 169: ... 6F 7F 8F 1F 4 3 2 1 A B C D E F A B C D E F 8 7 6 5 4 3 2 1 8 7 6 5 S 8 S 13 SEN H PB 0 REC 0 7 15 0 10 5 0 0 7 0 PB 10 5 REC 10 5 PB 12 0 REC 10 0 13 3 0 14 7 9 8 10 5 10 5 7 5 8 2 10 5 0 0 10 0 32 0 PB 0 REC 0 15 7 SEN H 8B UN9212 8B CCD IMAGE SENSOR 47 10 To MAN H PG2001 2SC3930 2SC3930 CODE PART NAME ONE VOLTAGE PB OR REC MODE ...

Страница 170: ...15A 16A 17A 18A 19A 20A 21A 22A 19C 20C 21C 22C 24C 25C 26C 27C 28C 23C 30C 29C 31C 32C 33C 34C 36C 37C 38C 39C 40C 41C 42C 11C 5C 6C 7C 8C 10C 9C 12C 13C 14C 15C 16C 35C 17C 18C 1C 2C 3C 43C 4C 10B 11B 12B 13B 14B 15B 16B 17B 18B 19B EVF 1B 9B EVF 10B 19B BM10345R 336 N5 MV580E EVF 20B 33B AUD 1C 43C LENS DRIVE 1A 22A N5 H9 336 RT1N144U T11 1 UMH9N NDS336P CODE PART NAME ONE VOLTAGE PB OR REC MOD...

Страница 171: ... MV550E MV580E FOCUS ZOOM IRIS DRIVE 2A 7A 8A 9A 10A 18A 19A 5A 3A 17A 16A 4A 1A 6A 11A 20A 21A 22A 15A 14A 12A 13A BTB 1A 22A CODE PART NAME AE BQ LF N5 2SB1424R 2SC4617 2SC5383 T11 1F RT1N144U T11 1 MV580E 47k MV550E 27k MV580E 27k MV550E 39k MV580E 560p MV550E 0 068 MV580E 10k MV550E 8 2k MV580E 0 01 MV550E 0 22 MV580E 100k MV550E 180k MV580E 100 MV550E 120 MV580E 47k MV550E 27k 2 2k ONE VOLTAG...

Страница 172: ... 1 5 1 5 1 5 1 5 3 1 1 4 0 0 0 3 0 0 1 7 1 2 3 2 3 2 3 1 3 0 3 0 1 4 3 1 0 3 0 0 0 6 0 4 2 0 1 2 PB REC 2 2 PB REC 0 5 1 0 1 5 PB REC 1 2 1 3 3 4 PB REC 1 2 1 1 1 6 PB REC 3 5 1 2 1 7 PB REC 0 PB 0 REC 0 5 1 5 PB REC 3 7 1 0 3 1 1 7 0 7 2 2 1 3 0 7 2 2 1 3 4 0 4 0 4 0 1 6 2 2 4 0 1 6 2 2 4 7 4 7 2 3 1 7 4 0 0 0 0 0 0 0 2 3 AUD AEL H AEL 1C 2C 3C BTB 1C 3C 5C 6C 14C 15C 16C 17C 18C 19C 20C 21C 22C ...

Страница 173: ... 0 3 2 3 1 3 1 1 4 0 0 0 0 0 0 0 0 0 0 0 0 0 0 1 5 1 5 1 5 4 2 3 0 3 5 2 0 3 0 0 0 0 0 0 3 0 0 1 4 8 8 8 8 0 3 1 0 3 0 0 3 1 0 3 1 0 3 1 0 3 1 0 3 1 0 3 1 0 3 1 0 3 0 1 5 5 0 0 3 0 0 3 0 0 3 0 6 5 0 8 6 4 0 8 21B 20B 33B 23B 28B 27B 26B 25B 24B 32B 22B 30B 31B 29B EVF AEL H AEL N5 EVF DRIVER BTB 20B 33B 10B 9B 11B 8B 12B 7B 13B 6B 14B 5B 15B 4B 3B 16B 17B 2B 18B 1B 19B BTB 1B 19B N5 RT1N144U T11 1...

Страница 174: ... 3C 4C 1C 2D 3D 4D 1D 2E 3E 4E 1E 2F 3F 4F 1F 4 3 2 1 A B C D E F A B C D E F 4 3 2 1 S 13 S 18 SWL2 SWL2 To SWL3 H SWL3 PG8017 To SIDE CASE L To SAF H SAF CN8012 CENTER L UP LOW R JOYSTICK STOP EXIT MENU SELECT DISC NAVIGATION ...

Страница 175: ... VCC 2 2K 1 2VCC GND SP VCC SP VREF SP IC6103 AN2903FJQ V VIDEO AMP 64 GND1 63 CLPIN 62 TEST2 61 TEST1 60 HDIN 59 VDIN 58 VSEP IC 57 SYNC IN 56 RESET 55 BIN 54 GIN 53 RIN 52 VREG REG CLAMP CNTRST CNTRST CONT SIG C BLKL1 RMTL1 R CONT B CONT BRT COM BRT B BRT R BRT S H BRIGHT SUB BRIGHT COM BRIGHT POL SW POL SW GAMMA GAMMA 2 GAMMA 1 CNTRST SUB CNTRST SUB CNTRST CLAMP CLAMP M FILTER SYNC SEP V SEP 51...

Страница 176: ...47 Milano Italia ITALY Tel 39 02 487861 Tel 39 02 38073415 Servizio Clienti Fax 39 02 48786381 2 Email customerservice italy hitachi eu com HITACHI Europe AB Box 77 S 164 94 Kista SWEDEN Tel 46 0 8 562 711 00 Fax 46 0 8 562 711 13 Email csgswe hitachi eu com HITACHI EUROPE S A S Lyon Office B P 45 69671 BRON CEDEX FRANCE Tel 04 72 14 29 70 Fax 04 72 14 29 99 Email france consommateur hitachi eu co...

Отзывы: