background image

English 

93

E

diting

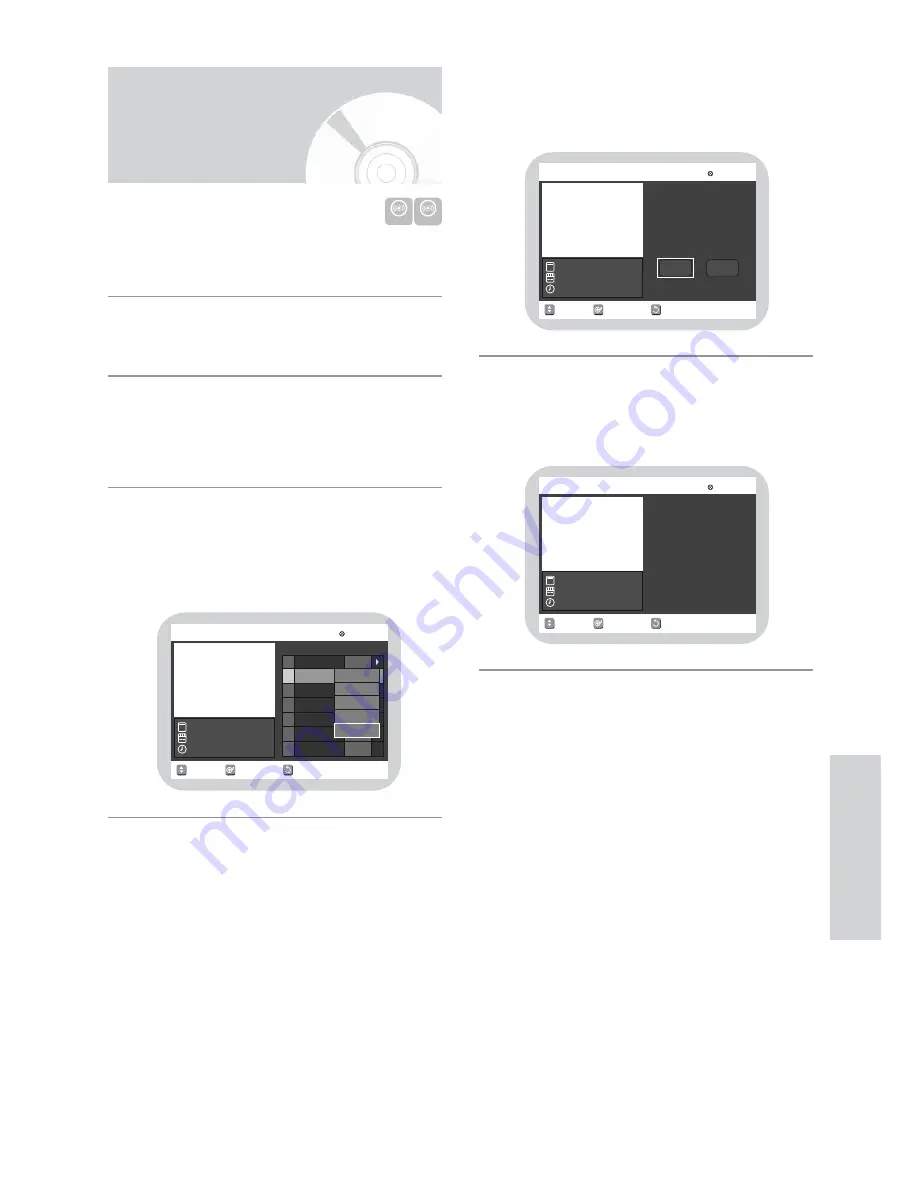
Press the MAIN MENU button when the disc is
stopped.

Press the 

34

button to select Playlist, and then press

the ENTER or 

1

button.

Press the 

34

button to select Edit Playlist, and then

press the ENTER or 

1

button, or press the

MENU/PLAY LIST button on the remote control.

• The Edit Playlist screen is displayed.

Press the 

34

button to select an entry (title) you

want to delete from the Playlist, and then press the
ENTER or 

1

button.

• The Edit Playlist menu is displayed:

Play, Rename, Edit Scene, Dubbing, Delete

4

3

2

1

DVD-RAM DVD-RW

RETURN

SELECT

MOVE

Edit Playlist

DVD-RAM(VR)

01 JUN/28/2004 02

02 JUN/28/2004 02

JUN/28/2004 02:14 AM

JUN/28/2004 02:14 AM

No. Title

Length Edit

4 Scenes

00:00:38

00:00:21

Play

Rename

Edit Scene

Dubbing

Delete

Deleting a Playlist Entry
from the Playlist

VR mode

Press the 

34

button to select Delete, and then press

the ENTER button.

• You will be prompted with the delete confirmation

message ‘Do you want to delete?’.

Press the 

21

buttons to select Yes, and then press

the ENTER button.

•  The screen returns to the Edit Playlist screen

automatically after the delete operation is finished.

6

5

RETURN

SELECT

MOVE

Edit Playlist

DVD-RAM(VR)

Yes

No

Do you want to delete?

JUN/28/2004 02:11 AM

JUN/28/2004 02:11 AM

2 Scenes

RETURN

SELECT

MOVE

Edit Playlist

DVD-RAM(VR)

Deleting...

(Please wait)

JUN/28/2004 02:11 AM

JUN/28/2004 02:11 AM

2 Scenes

Содержание DV-RF7U

Страница 1: ...chi Way Chula Vista CA 91914 3556 Service Hotline 1 800 HITACHI HITACHI CANADA LTD DIGITAL MEDIA DIVISION 2495 Meadowpine Blvd Mississauga Ontario L5N 6C3 CANADA Service Direct 1 800 HITACHI 1 800 448 2244 Model No DV RF7U Dear customer Thank you for purchasing this product For optimum performance and safety please read these instructions carefully Before connecting operating or adjusting this pro...

Страница 2: ...e expressly approved in the instruction manual The user could lose the authority to operate this equipment if an unauthorized change or modification is made RADIO TV INTERFERENCE This equipment has been tested and found to comply with the limits for a Class B digital device pursuant to Part 15 of the FCC Rules These limits are designed to provide reasonable protection against harmful interference ...

Страница 3: ...r pinched by items placed upon or against them paying particular attention to cords at plugs convenience receptacles and the point where they exit from the appliance 13 Outdoor Antenna Grounding If an outside antenna or cable system is connected to the video product be sure the antenna or cable system is grounded so as to provide some protection against voltage surges and built up static charges A...

Страница 4: ...ean with DVD RAM PD disc cleaner generally available Do not use cleaners or cloths for CDs to clean DVD RAM DVD RW DVD R discs DVD Video CD Wipe off dirt or contamination on the disc with a soft cloth Cautions on handling discs Do not write on the printed side with a ball point pen or pencil Do not use record cleaning sprays or antistatic Also do not use volatile chemicals such as benzene or thinn...

Страница 5: ...t It takes about 30 seconds for the unit to complete recording management information after recording finishes This product optimizes the DVD R for each recording Optimizing is carried out when you start recording after inserting the disc or turn on the unit Recording onto the disc may become impossible if optimizing is carried out too many times Playback may be impossible in some cases due to the...

Страница 6: ...h the cartridge to ensure correct operation DVD RAM discs have a Write Protect tab in order to avoid accidental erasure of recorded data With the Write Protect tab set to PROTECT you can play the disc but recording or erasing will not work Set the Write Protect tab to UNPROTECT to format the disc or erase data Ensure that the recording mode is set to VR mode Otherwise this product will not be able...

Страница 7: ...lock Set 26 Channel Set 27 Setting Up the Language Features 28 Setting Up the Audio Options 29 Setting Up the Display Video Options 30 Setting Up the Parental Control 31 Auto Channel Memory 32 Channel Add Delete 33 Guide Channel Setup 34 VCR Setting 35 Video Input 36 Front Display 37 Playback DVD Playback Before Playing 38 Playing a Disc 40 Using the Search Skip Functions 41 Slow Motion Play Step ...

Страница 8: ...ough DV jack 71 VCR Recording Basic VCR Recording 71 Special Recording Features 72 Record Speed 72 Dubbing to DVD or VCR 73 Editing Viewing the Menu Functions for a Disc 76 Viewing Disc Navigation Screen title list 78 Playing a Disc Navigation Entry 79 Renaming a Disc Navigation Entry 80 Deleting a Disc Navigation Entry 81 Locking a Disc Navigation Entry 82 Deleting any Section of Disc Navigation ...

Страница 9: ...ng digital camcorder content using DV input jack Record digital camcorder images onto DVD RAM DVD RW DVD R discs using the DV input jack IEEE 1394 4pin See page 71 Time Slip and Picture In Picture P in P Use the Time Slip function to play back the recorded images while a recording is proceeding DVD RAM only Use the P in P function to view the playback and recording screens at the same time High qu...

Страница 10: ...can record on the following types of discs If you want to repeatedly record on the same disc or you want to edit the disc after recording select a rewritable DVD RW or DVD RAM type disc If you want to save a recording without any changes choose a non rewritable DVD R Unlike a VCR the recorder automatically starts formatting when an unused disc is inserted This is required for the preparation of re...

Страница 11: ...ible only with DVDs With a simple and easy edit menu you can operate various edit functions such as delete dubbing rename lock etc on a recorded title Creating a playlist DVD RAM RW in VR mode With this recorder you can create a new playlist on the same disc and edit it without the change of the original recording To play your DVD on other DVD components finalizing may be necessary First finish al...

Страница 12: ...RECORD BUTTON STOP BUTTON SKIP FR BUTTON A PLAY BUTTON B F F SKIP BUTTON C DUBBING BUTTONS Description 1 When the indicator is on DVD is activated 2 DVD RAM is activated 3 DVD R or DVD RW is activated 4 Progressive Scan mode is working 5 When you watch SAP STEREO channel or play back Hi Fi VCR tapes STEREO indica tor lights 6 VCR is activated 7 DVD or CD media is loaded 8 Record function is workin...

Страница 13: ...TV CH DVD I C D F G H J K L M N O I 1 2 3 4 5 6 7 8 9 A B E P Q R S T U V W 1 DVD Button Press this when you use a DVD 2 POWER Button Press to turn the power on and off As to the indication of the Operate switch I shows ON and Í shows electrical power stand by 3 AUDIO Button Use this to access various audio functions on a disc DVD mode 4 SURROUND Button Gives surround sound effect even with only t...

Страница 14: ...sc that is being played A TV POWER Button B TV INPUT Button To switch the TV channel to that for external input C VCR Button Press this when you use the VCR D OPEN CLOSE Button To open and close the disc tray E VCR DUBBING Button Press this when you copy DVD to VCR F DISPLAY Button This will display current setting or disc status G DVD DUBBING Button Press this when you copy VCR to DVD H DVD CHANN...

Страница 15: ... is provided to call CATV system installer s attention to Article 820 40 of the National Electrical Code Section 54 of Canadian Electrical Code Part I that provides guidelines for proper grounding and in particular specifies that the cable ground shall be connected to the grounding system of the building as close to the point of cable entry as practical Connecting Setting Up Quick Overview Quick O...

Страница 16: ...ble To ANT INPUT ANT TV RF TO TV IN FROM ANT OUT RF Connections 16 English Step 1 Unpacking Step 2 Connecting the Antenna Cable There are several ways to connect your DVD Recorder VCR Select one of the following antenna connections that best suits you Method 1 Antenna DVD Recorder VCR TV No Cable box Method 2 Antenna Cable box DVD Recorder VCR TV Cable box with many scrambled channels Method 3 Ant...

Страница 17: ... not work check the TV connections and the TV input selection settings Step 3 Connecting the Video Cable Compared to standard interlaced video progressive scan doubles the amount of video beam lines fed to your TV resulting in a more stable flicker free and clearer image than interlaced video The progressive scan video output jack is used in progressive output mode This is only available with TVs ...

Страница 18: ...re that the disc has stopped completely before changing the mode If nothing is displayed on front panel display it is 525i 480i Mode You will enjoy high quality accurate color reproduction Make sure that the color coded connections match TheY PB and PR component output jacks of your DVD Recorder VCR must be connected to the exact corresponding component input jacks on your TV Otherwise red or blue...

Страница 19: ...Once 525p 480p video output mode is selected Video S Video and 525i 480i outputs are disabled Make sure that the left and right audio output jacks of your DVD Recorder VCR are connected to the left and right audio input jacks of your TV respec tively page 19 Note COMPONENT Pb Pr Y COMPONENT VIDEO OUT Y CB PB CR PR There are several ways to connect your DVD Recorder VCR Select the audio connections...

Страница 20: ...white red R L R AUDIO OUT L Method 3 Connecting to an AV amplifier with a digital input jack If your AV amplifier has a Dolby Digital or DTS decoder and a digital input jack only use this connection To enjoy Dolby Digital or DTS sound you must set up the audio settings See page 29 Subwoofer Center Rear L Rear R Front L Front R OPTICAL COAXIAL DIGIT DIGITAL ALAUDIO IN AUDIO IN or DIGITAL AUDIO OUT ...

Страница 21: ...he S Video jack and Video jack are both connected the S Video jack will have priority Line Selection will be automatically done Copy protected content cannot be recorded Note OUTPUT AUDIO AUDIO L R VCR DVD STB AUDIO VIDEO R L LINE IN 1 R L Step 5 Connecting External Devices Method 2 Connecting a Camcorder to the LINE IN 2 jacks You can also use the LINE IN 2 jacks on the front panel of the DVD Rec...

Страница 22: ...on the back of the remote Insert two AA batteries Make sure that the polarities and are aligned correctly Replace the battery cover If remote does not operate properly Check the polarity of the batteries Dry Cell Check if the batteries are dead Check if remote sensor is blocked by obstacles Check if there is any fluorescent lighting nearby Dispose of batteries according to local environmental regu...

Страница 23: ...on remote control Manufacturer Button on Manufacturer Button on remote control remote control Hitachi 1 SHARP 2 9 SONY 2 TOSHIBA 0 RCA 3 JVC CANCEL SANYO 4 MITSUBISHI ZENITH 5 MAGNAVOX VCR Plus PANASONIC 1 6 FUNAI TIMER PANASONIC 2 7 GOLDSTAR TIMESLIP SHARP 1 8 SAMSUNG P in P Result If your television is compatible with the remote control it will switch off It is now programmed to operate with the...

Страница 24: ...ol to return to the last MENU screen displayed or to exit the on screen MENU all together Press the RETURN or 2 button to return to the previous menu Press the MAIN MENU button to exit the MAIN menu Note 4 3 2 1 System Setup On Screen Menu Navigation On Screen Menu Navigation 24 Auto Clock Set 25 Manual Clock Set 26 Channel Set 27 Setting Up the Language Features 28 Setting Up the Audio Options 29...

Страница 25: ...ock Set using the 34 buttons then press the 1 or ENTER button You must have the antenna connected to set the Auto Clock See page 16 17 for Antenna Connections The clock will be automatically set when you turn off the recorder Select the sub menu Clock Data CH Time Zone or Daylight Saving using the 34 buttons then press the 1 or ENTER button Clock Data CH Select a channel that carries a time signal...

Страница 26: ... must be set correctly Open MENU Press the MAIN MENU button while the DVD or VCR is in Stop mode Select Setup Using the 34 buttons move the selection bar to Setup then press the 1 or ENTER to select Select Clock Set Use the 34 buttons to highlight Clock Set then press the 1 or ENTER button Select Manual Clock Set Move the highlight to Manual Clock Set then press the 1 or ENTER button The Clock Set...

Страница 27: ...en MENU With the DVD in Stop press the MAIN MENU button Select Setup Using the 34 buttons move the selection bar to Setup then press the 1 or ENTER button to select 2 1 Select Channel Set Using the 34 buttons move the selection bar to Channel Set then press the 1 or ENTER button to select Select Antenna Cable TV Move the selection arrow to Antenna Cable TV then press the 1 or ENTER button to selec...

Страница 28: ...red Language using 34 buttons then press the 1 or ENTER button Press the RETURN or 2 button to return to the previous menu Press the MAIN MENU button to exit the MAIN menu Note 5 Setting Up the Language Features RETURN SELECT MOVE EXIT Setup DVD VIDEO System Clock Set Channel Set Language Audio Video Parental Control Disc Menu Timer Rec Setup Title Menu RETURN SELECT MOVE EXIT DVD VIDEO Disc Menu ...

Страница 29: ...verts to PCM 2CH 48kHz audio Select PCM when using the Analog Audio Outputs 2 Bitstream Converts to Dolby Digital Bitstream 5 1CH Select Bitstream when using the Digital Audio Output Be sure to select the correct Digital Output or no audio will be heard DTS 1 Off Doesn t output digital signal 2 On Outputs DTS Bitstream via digital output only Select DTS when connecting to a DTS Decoder When DTS so...

Страница 30: ...ou want to see the total 16 9 ratio screen DVD supplies even though you have a TV with a 4 3 ratio screen Black bars will appear at the top and bottom of the screen 4 3 Pan Scan Select this for conventional size TV when you want to see the central portion of the 16 9 screen Extreme left and right side of movie picture will be cut off 16 9 Wide You can view the full 16 9 picture on your widescreen ...

Страница 31: ... 0 9 RETURN SELECT EXIT DVD VIDEO Disc Menu Timer Rec Setup Title Menu Parental Control NUMBER Select Password ON OFF using 34 buttons then press the 1 or ENTER button Select Rating Level you want using 34 buttons then press the 1 or ENTER button For example if you select up to Level 6 discs that contain Level 7 8 will not play Larger number indicates the program is more intended for adult use onl...

Страница 32: ... search for all available channels in the selected Tuner Band This procedure may take a few minutes to complete When finished the lowest channel found will be displayed Press ENTER button to stop or cancel scanning Press the RETURN or 2 button to return to the previous menu Press the MAIN MENU button to exit the menu Note 4 3 Auto Channel Memory Auto Channel Memory will automatically seek and stor...

Страница 33: ...lock Set Channel Set Language Audio Video Parental Control Disc Menu Timer Rec Setup Title Menu Select Channel Add Delete Move the selection bar to Channel Add Delete then press the 1 or ENTER button to select Select Channel to Add Delete Use the DVD CHANNEL buttons to tune in the channel number you wish to add or delete Use the numeric buttons to move to a channel directly If you use the 34 butto...

Страница 34: ...ress the RETURN button to return to the previous menu Press the MAIN MENU button to exit the MAIN menu Note 6 5 4 3 2 RETURN SELECT MOVE EXIT Channel Add Delete DVD VIDEO Disc Menu Timer Rec Setup Title Menu Add Delete Select Channel Channel is added 111 RETURN SELECT MOVE EXIT Channel Add Delete DVD VIDEO Disc Menu Timer Rec Setup Title Menu Add Delete Select Channel Channel is deleted 111 Guide ...

Страница 35: ...mount of time remaining on the tape when you press the DISPLAY button Select Auto Play Move the selection bar to Auto Play then press the 1 or ENTER button to select from the following options On The VCR will automatically begin playing a video tape when it is inserted as long as the safety tab of the cassette has been removed Off Auto play is disabled 5 4 3 RETURN SELECT MOVE EXIT DVD VIDEO Disc ...

Страница 36: ...o Play Auto Repeat Off On T120 Off On Video Input If you watch video through Line IN 2 you can choose Composite or Super S video Open MENU With the DVD Recorder VCR in stop or play mode press the MAIN MENU button Select Setup Using the 34 buttons move the selection bar to Setup then press ENTER to select 2 1 RETURN SELECT MOVE EXIT Setup DVD VIDEO System Clock Set Channel Set Language Audio Video ...

Страница 37: ...he following options Auto Dim Front Panel Display will dim automatically during power off Bright Front Panel Display will be bright all the time Dim Front Panel Display will be dim all the time Press the RETURN or 2 button to return to the previous menu Press the MAIN MENU button to exit the menu Note 4 Front Display RETURN SELECT MOVE EXIT Setup DVD VIDEO System Clock Set Channel Set Language Aud...

Страница 38: ...ard Quality 9 4GB 8 LP Long Playback 12 EP Extended Playback 1 XP Excellent Quality DVD RW AUDIO 5 4 7GB 2 SP Standard Quality VIDEO 4 LP Long Playback 6 EP Extended Playback 1 XP Excellent Quality DVD R AUDIO 5 4 7GB 2 SP Standard Quality VIDEO 4 LP Long Playback 6 EP Extended Playback Playback This section introduces basic functions of playback by disc type Before Playing STEREO NTSC DIGITAL SOU...

Страница 39: ...rk for some types of discs or when specific operations such as angle change and aspect ratio adjustment are being performed Information about the discs is written in detail on the box Please refer to this if necessary Do not allow the disc to become dirty or scratched Finger prints dirt dust scratches or deposits of cigarette smoke on the recording surface may make it impossible to use the disc fo...

Страница 40: ...le to DVD VIDEO DVD RAM DVD RW DVD R or audio CDs CD DA Do not move your DVD Recorder VCR while playing as this may cause damage to the disc Make sure to press the OPEN CLOSE button to open or close the disc tray Do not push the disc tray while it is being opened or closed as this may cause a product malfunction Do not place foreign materials on or in the disc tray Some functions may be performed ...

Страница 41: ... moves to the next chapter or track Slow Motion Play DVD VIDEO DVD RAM DVD RW DVD R During pause mode press the SEARCH 6 or 5 button on the remote Each time you press the 5 button 5 Slow X 1 8 5 Slow X 1 4 5 Slow X 1 2 Each time you press the 6 button 6 Slow X 1 8 6 Slow X 1 4 6 Slow X 1 2 2 1 To return to normal speed playback press the 1 button Step Motion Play DVD VIDEO DVD RAM DVD RW DVD R Dur...

Страница 42: ...ed from the beginning When the time set is less than a remaining time of a play list the next scene is played Manual Skip is not performed with respect to a still picture When a set time is less than a remaining of a scene a last title or a last track that is displayed currently a prohibition mark appears When the time set is less than the remaining time of the currently displayed track title or s...

Страница 43: ...isc is usually divided into chapters What s a title A title means usually a film contained on a DVD disc This may not work for some discs When an audio CD CD DA or an MP3 disc is inserted depend ing on the type the information display may not appear Regarding the DVD Video mode the Time Search function does not operate in some discs To make the screen disappear press the FUNCTIONS button again Not...

Страница 44: ...pear press the FUNCTIONS or RETURN button 3 2 1 Using Repeat Play For Audio CD MP3 Press the FUNCTIONS button during playback Repeat is highlighted Press the ENTER button Press the 34 button to select the Track or Disc you want to playback repeatedly For MP3 discs you can select Track Folder or Disc Press the ENTER button Repeat play allows you to repeat a track folder or the entire disc 4 3 2 1 P...

Страница 45: ...ER button at the point where you want the repeat play to start A and then press the ENTER button at the point where you want the repeat play to stop B The DVD Recorder VCR will play back the selected section repeatedly To return to normal playback Select Off on the Repeat item or press the CANCEL button on the remote control 4 3 2 1 Moving to a Scene Directly CHANGE MOVE DVD VIDEO 1 7 2 13 00 03 3...

Страница 46: ...your TV Some discs allow you to select languages from the disc menu only 2 1 NUMBER MOVE DVD VIDEO 1 7 2 13 00 05 08 Off Off 1 1 0 9 Off ENG d D 2CH Subtitle Chapter Title Time Repeat Angle Audio Zoom Selecting the Subtitle Audio Language CHANGE MOVE DVD VIDEO 1 7 2 13 00 07 25 Off Off 1 1 Off ENG d D 2CH Subtitle Chapter Title Time Repeat Angle Audio Zoom Virtual Surround This function allows you...

Страница 47: ...on Press the FUNCTIONS button during playback Use 34 to select Angle and use 21 button to select the desired camera angle This function is disc dependent and may not work with all DVDs This function does not work when a DVD has not been recorded with a multi camera angle system Note 2 1 Playback English 47 Changing the Camera Angle CHANGE MOVE DVD VIDEO 1 7 2 13 00 08 00 Off Off 1 1 Off ENG d D 2C...

Страница 48: ...otect or cartridge protect has been set 4 3 2 1 Marking with DVD R DVD RW VIDEO and DVD VIDEO discs The screen will display Bookmark in place of Marker if you are playing a DVD R DVD RW VIDEO and DVD VIDEO Up to 10 scenes can be marked Removing disc will delete all bookmarks The marker or bookmark numbers are attached in the order of time elapsed If new marker or book mark is added or the existing...

Страница 49: ...he ENTER button The screen will be enlarged to twice the normal size If you press the ENTER button again after the screen was enlarged to twice the normal size the screen size will be enlarged to four times the normal size To return to the normal size press the ENTER button repeatedly until the screen becomes of normal size 5 4 3 2 1 Playback English 49 Zooming In 1 Subtitle Chapter Title Time Rep...

Страница 50: ...ontains a dedicated menu system that allows you to select special functions for title chapter audio track subtitle film preview information on characters etc For DVD VIDEO disc Press the TOP MENU DISC NAVIGATION or MENU PLAY LIST button to enter the disc menu of the disc Move to the setup menu related to playback operation You can select audio language and subtitle etc provided by the disc Dependi...

Страница 51: ...ack the selected track song 9 button Play back the next track button Returns to the beginning of the current track when pressed during playback If you press this button within three seconds after playback starts the previous track will be played If you press this button after three seconds the current track will be replayed from the beginning Press and hold the 6 5 button Fast Play FF1 FR1 FF2 FR2...

Страница 52: ...press the 1 button during Intro play Normal Play will be performed from the track currently playing When Intro Play is completed Normal Play is performed Playlist The Playlist playback option allows you to select the order in which you want tracks to play The same can be used with a MP3 disc To change repeat mode Press FUNCTIONS during Play to highlight Repeat Mode Press ENTER when Repeat Mode is ...

Страница 53: ...ack English 53 To Program Tracks RETURN SELECT MOVE Music CD 01 TRACK 1 01 07 00 08 Play Option Normal Repeat off 01 TRACK 1 02 03 04 05 06 TRACK 2 TRACK 3 TRACK 4 TRACK 5 TRACK 6 5 14 7 25 6 02 5 51 11 56 7 38 Func RETURN SELECT MOVE Music CD 01 TRACK 1 01 07 00 08 Play Option Normal Repeat off 01 TRACK 1 02 03 04 05 06 TRACK 2 TRACK 3 TRACK 4 TRACK 5 TRACK 6 5 14 7 25 6 02 5 51 11 56 7 38 Func P...

Страница 54: ... to select clips menu and then press the ENTER button Returns to the Album screen The unit enters slide show mode Before the slide show can begin the photo interval slide show speed must be set Each time the ENTER button is pressed the picture rotates 90 degree clockwise Each time the ENTER button is pressed the photo is enlarged up to 4X Normal 2X 4X 2X Normal 4 Playback 54 English SELECT PHOTO M...

Страница 55: ...ng ENTER button Plays the selected track song or displays the files in the selected folder 3 2 1 2 1 RETURN button Moves to the folder to which the current song belongs 9 button Plays the next track button Returns to the beginning of the current track when it is pressed during playback If it is pressed again the DVD Recorder VCR plays back the previous track The same playback function can be used ...

Страница 56: ...he P in P button during playback of DVD disc The current disc is played back on the P in P screen located at the bottom of the screen Switching between the P in P and main screens Press the P in P button again The main and P in P screens will be switched 1 1 Note Deactivating P in P Press the P in P button again P in P will be deactivated 1 Playback 56 English Using P in P ...

Страница 57: ...ecord Safety Tab and Auto Play is turned on See pages 35 36 Stop Playback Press the STOP button on the remote control or on the front panel of the unit Press the DVD VCR button on DVD Recorder VCR or press the VCR button on remote control to choose VCR VCR will appear in the display Note 3 2 1 The Tracking adjustment removes the white lines that sometimes appear during playback because of slight d...

Страница 58: ...X 3X rewind 5X rewind 7X rewind Press the PLAY button to restore normal playback The SKIP FR button on the DVD Recorder VCR will deliver only the 5X speed Pressing the DISPLAY button will display the current VCR status counter record mode remaining tape on the screen Visual search can operate only during playback Noise appears on playback picture during visual search but this does not indicate a f...

Страница 59: ...on The VCR will rewind or fast forward searching for the 0 00 00 counter position and then automatically stop at that position 1 End search Use this feature when you want to search for a blank position to record a program on a cassette With the VCR in the stop or playback mode press the FUNCTIONS button The VCR will fast forward searching for a blank position and then automatically stop at that po...

Страница 60: ...nt maker s recorder cannot be unfinalized A DVD R disc cannot be unfinalized Note Recording 60 English Recording This section shows various DVD and VCR recording methods Before Recording Before Recording 60 Using VCR Plus codes to make timer recordings 62 Recording the current channel you are watching 63 Marking One Touch Recording OTR 64 Making a Timer Recording 64 Editing Timer Record List 66 De...

Страница 61: ...eated Playlist Unrecordable pictures Pictures with copy protection cannot be recorded on this DVD Recorder VCR When the DVD Recorder VCR receives a copy guard signal while recording recording stops and the message appears on the screen Concerning copy control signals Broadcasts that contain copy control signals may have one of the following three signal types Copy Free Copy Once and Copy Never If ...

Страница 62: ...remote in Stop mode the current screen directly changes into the VCR Plus code input screen Depending on the disc type the screen shown above may look different The actual time recorded may be longer than the program itself when television programs are recorded using VCR Plus The maximum number of programs that can be preset for the timer is 12 Note 7 6 5 Using VCR Plus codes to make timer recordi...

Страница 63: ... the PAUSE button to pause a recording in progress Press the PAUSE button again during pause to resume recording You can t change the recording mode and channel during recording Recording will stop automatically if there is not enough space for recording Up to 99 titles can be recorded onto a disc If the power is interrupted due to a power failure or other reasons the title being recorded will not...

Страница 64: ...na cable is connected 2 Check the remaining time of the disc 3 Check the date and time are correct Make sure the Clock has been set Setup System Setting before you proceed with a timer recording Press the TIMER button Scheduled Record List screen is displayed Using the MAIN MENU button 1 Press the MAIN MENU button 2 Press the 34 buttons to select Timer Rec and then press the ENTER or 1 button 3 Se...

Страница 65: ...uality SLP Super Long Play for maximum recording time 3 times SP Auto Auto mode Select when you want to set video quality automatically It depends on remaining time of VCR tape 2 Press the ENTER button will appear on the front panel It means that a timer recording is registered If you make a mistake Press the 21 buttons to select the item you want to change If the timer settings overlap The progra...

Страница 66: ... Pressing the TIMER button on remote control will also display the Timer Recording screen Press the ENTER button to confirm the edited setting 6 5 4 Recording 66 English Editing Timer Record List DVD RAM DVD RW DVD R RETURN SELECT MOVE EXIT Timer Record DVD RAM VR VCR Plus Record Timer Record Scheduled Record List SA Programming Disc Navigation Playlist Timer Rec Dubbing Setup Disc Manager Off RET...

Страница 67: ...lete confirm message such as Do you want to delete No 02 Press the 34 button to selectYes and then press the ENTER button The selected entry will be deleted from the list Press the MAIN MENU button after finishing the operation The menu screen will disappear 7 6 5 Recording English 67 DVD RAM DVD RW DVD R Deleting a Timer Recording Entry RETURN SELECT MOVE EXIT DVD RAM VR No Source To Date Start E...

Страница 68: ...ill start Even if timer preset time is reached during satellite link recording satellite link recording will have pri ority If satellite link recording has been set the fan will still rotate after the DVD Recorder VCR turns off Note 5 Connect a device on which reservation standby is possible such as a CS tuner to the LINE IN 1 jacks on the back of this DVD Recorder VCR You can then start recording...

Страница 69: ... feature only works with DVD RAM discs Pressing the P in P button will switch the images between the P in P and normal screens Note 2 1 Follow these directions to record onto a disc or a tape from External Devices Connect the Line out jack of your External Devices to the Line IN jack on the front or rear of your DVD Recorder VCR using Audio Video Cable Power on your DVD Recorder VCR and switch to ...

Страница 70: ... to select a program for chasing play During recording Press the Disc Navigation button Use the 34 buttons to choose a desired program and then press the ENTER button You can also select the program that is currently being recorded Make sure that Play has been chosen and then press the ENTER button Playback will start 3 2 1 1 To stop playback or recording 1 Press the STOP button Only the playback ...

Страница 71: ...progress by inserting a blank tape and pressing the REC button You can even add time in 30 minute increments up to 6 hours by pressing the REC button repeatedly see page 64 Be sure your videotape has a Record Safety Tab If the tab is missing you can cover the opening with a small piece of tape Warning Do not cover this opening unless you are sure you want to record over the tape Insert Tape Insert...

Страница 72: ... connected to TV using S Video or component video cable the playback screen on the video tape will not display during DVD recording You cannot record a different channel at the same time The DVD and VCR cannot start recording at the exact same time You must set one mode to start recording then the other Note 3 2 1 You can slow down the recording speed from SP to SLP in order to fit six hours of pr...

Страница 73: ...pe 1 Dubbing to DVD or VCR DVD RAM DVD RW DVD R RETURN SELECT MOVE EXIT Dubbing DVD RAM VR DVD VCR VCR DVD Disc Navigation Playlist Timer Rec Dubbing Setup Disc Manager If you want to dub from Dubbinglist choose Edit Dubbinglist To dub from Edit Dubbinglist you need to make a Dubbinglist To make and select a New Dubbinglist See pages 86 87 Choose Direct dubbing if you wish to dub all the contents ...

Страница 74: ... disc Dubbing will start from the scene you are now watching 3 Press the DUBBING button with the DVD disc stopped Dubbing will be performed from the scene following that you have been watching When DVD disc has played to the end the DVD Recorder VCR will stop automatically Press the STOP button to stop dubbing midway 3 RETURN SELECT MOVE Edit dubbinglist DVD RAM VR 01 JUN 28 2004 02 02 JUN 28 2004...

Страница 75: ...VD Recorder VCR will stop automatically Press the STOP button to stop dubbing midway When dubbing is complete the dubbing list will be cleared 5 4 RETURN SELECT MOVE VCR DVD DVD RAM VR No Start End Edit PLAY 01 00 25 31 00 27 09 02 Dubbing All 00 22 04 RETURN SELECT MOVE VCR DVD DVD RAM VR No Start End Edit PLAY 01 00 19 36 Dubbing All 00 19 36 Play Dubbing Delete 02 For immediate dubbing one butt...

Страница 76: ...g the Menu Functions for a Disc 76 Viewing Disc Navigation Screen title list 78 Playing a Disc Navigation Entry 79 Renaming a Disc Navigation Entry 80 Deleting a Disc Navigation Entry 81 Locking a Disc Navigation Entry 82 Deleting any Section of Disc Navigation Entry 83 Displaying a List of Scenes Scene Navigation 84 Skipping to a Desired Time and Playing Time Navigation 85 Creating a Playlist Ent...

Страница 77: ... Rec Setup Setup Timer Rec Dubbing Disc Navigation Playlist Disc Manager RETURN SELECT MOVE EXIT Setup DVD RAM VR System Clock Set Channel Set Language Audio Video Parental Control Disc Navigation Playlist Timer Rec Dubbing Setup Disc Manager Setup Timer Rec Dubbing Disc Navigation Disc Manager Disc Manager RETURN SELECT MOVE EXIT Setup DVD RW V System Clock Set Channel Set Language Audio Video Pa...

Страница 78: ...ame recording date recording time lock status recording mode 3 Recorded entry No 4 Recorded entry title 5 Recording duration i e playtime 6 Record list edit items 7 Button display Record List edit items Press the 34 button to select an entry to edit and then press the ENTER or 1 button Play Plays the selected entry Rename Renames the title of the selected entry Delete Deletes the selected entry fr...

Страница 79: ...s the ENTER button The selected entry title will be played back You can also play back a recorded program by pressing the FUNCTIONS button and using the title chapter or time items Note 4 Playing a Disc Navigation Entry DVD RAM DVD RW DVD R RETURN SELECT MOVE EXIT Disc Navigation DVD RAM VR Disc Navigation Disc Navigation Playlist Timer Rec Dubbing Setup Disc Manager RETURN SELECT MOVE Disc Naviga...

Страница 80: ...ter inputs Save Registers the character inputs Press the DIRECTION buttons to select Save and then press the ENTER button The changed title is displayed on the title item of the selected entry 6 5 4 Renaming a Disc Navigation Entry DVD RAM DVD RW DVD R RETURN SELECT MOVE Disc Navigation DVD RAM VR 01 JUN 28 2004 01 02 JUN 28 2004 01 JUN 28 2004 01 07 AM CH46 01 07 AM LP No Title Length Edit 00 00 ...

Страница 81: ...F in the protection menu Press the 21 button to selectYes and then press the ENTER button The screen for verifying deletion will appear and the program will be deleted Be careful since you cannot recover an entry once it is deleted from the Disc Navigation screen Note 5 4 RETURN SELECT MOVE Disc Navigation DVD RAM VR JUN 28 2004 01 09AM CH46 JUN 28 2004 01 09 AM LP Yes No Do you want to delete Rel...

Страница 82: ...ER button You will be prompted with the confirmation message Title Protection Press the 21 buttons to select On and then press the ENTER button The Lock icon on the information window for the selected entry changes to the locked status 5 4 RETURN SELECT MOVE Disc Navigation DVD RAM VR 01 My VIDEO 02 JUN 28 2004 01 JUN 28 2004 01 16 AM CH51 01 16 AM SP No Title Length Edit 00 00 01 00 00 03 03 JUN ...

Страница 83: ...ou want to delete Be careful since you cannot recover the section of title on Disc Navigation screen once it is deleted Press the 34 button to select Start and then press the ENTER button The image and time at the start point are displayed on the start window 6 Note 5 4 RETURN SELECT MOVE Disc Navigation DVD RAM VR 01 My VIDEO 02 JUN 28 2004 01 JUN 28 2004 01 16 AM CH51 01 16 AM SP No Title Length...

Страница 84: ... 01 16 AM Title No 05 Start Start RETURN SELECT MOVE Edit Title DVD RAM VR 00 03 50 End Delete Return 00 00 00 00 03 50 End Jun 28 2004 01 16AM CH51 Jun 28 2004 01 16 AM Title No 05 Start Start Do you want to delete Deleted part will not be restored Yes No Scene Navi allows you to display a list of the scenes recorded on DVD RAM disc using a DVD video camera recorder Scene Navi also allows you to ...

Страница 85: ... 29 2004 03 00 03 50 07 JUL 03 2004 0 00 00 07 00 05 10 JUN 28 2004 Play Rename Delete Edit Protection Scene Navi Time Navi Use the 2 1 buttons to select the desired scene and then press the ENTER button Each press of 2 1 will move the cursor in one minute units Playback will start from the selected scene To stop playback Press the STOP button The cursor will not move with a program whose recordin...

Страница 86: ...R New Playlist Edit Playlist Disc Navigation Playlist Timer Rec Dubbing Setup Disc Manager Creating a Playlist Entry DVD RAM DVD RW VR mode Select the start point of the section from which you want to create a new scene and then press the ENTER button Press the 34 button to select Start and then press the ENTER button The image and time at the start point are displayed on the Start window The yell...

Страница 87: ...Follow these directions to play or edit rename edit scene dubbing and delete the newly created playlist entries Press the MAIN MENU button when the disc is stopped Press the 34 button to select Playlist and then press the ENTER or 1 button Press the 34 button to select Edit Playlist and then press the ENTER or 1 button or press the MENU PLAY LIST button on the remote control The Edit Playlist scre...

Страница 88: ...in progress The screen returns to the Edit Playlist screen 2 1 6 5 RETURN SELECT MOVE Edit Playlist DVD RAM VR 01 JUN 28 2004 02 02 JUN 28 2004 02 JUN 28 2004 02 14 AM JUN 28 2004 02 14 AM No Title Length Edit 1 Scene 00 00 38 00 00 21 Play Rename Edit Scene Dubbing Delete Renaming Playlist Entries Follow these directions to rename a playlist entry i e edit the title of a playlist entry Press the ...

Страница 89: ...8 2004 02 02 JUN 28 2004 02 JUN 28 2004 02 14 AM JUN 28 2004 02 14 AM No Title Length Edit 1 Scene 00 00 38 00 00 21 Play Rename Edit Scene Dubbing Delete DVD RAM DVD RW VR mode Press the 34 button to select Edit Scene and then press the ENTER button The Edit Scene screen is displayed A Playing a Selected Scene Press the DIRECTION buttons to select the scene you want to play and then press the ENT...

Страница 90: ...4 Modify Play 03 00 00 01 00 00 00 05 02 00 00 21 00 00 01 04 01 RETURN SELECT MOVE Modify Scene DVD RAM VR 00 03 48 End Change Cancel 00 00 06 00 00 00 End Start Start Scene No 004 Title 5 13 JUN 28 2004 02 14 AM JUN 28 2004 02 14 AM Press the ENTER button at the end point of the scene Press the 34 buttons to select Change and then press the ENTER button The scene you wanted to modify is changed ...

Страница 91: ...00 01 04 01 Press the 34 button to select Start and then press the ENTER button The image and time at the start point are displayed on the Start window Select the end point of the section you want to add as a new scene Press the 34 button to select End and then press the ENTER button The image and time at the end point are displayed on the End window Press the 34 buttons to select Add and then pre...

Страница 92: ...LAY LIST button on the remote control The Edit Playlist screen is displayed Press the 34 button to select an entry title you want to dub to the VCR and then press the ENTER or 1 button The Edit Playlist menu is displayed Play Rename Edit Scene Dubbing Delete Press the 34 button to select Dubbing and then press the ENTER button The title you choose is played and dubbed to VCR tape 5 4 3 2 1 Dubbing...

Страница 93: ...M VR 01 JUN 28 2004 02 02 JUN 28 2004 02 JUN 28 2004 02 14 AM JUN 28 2004 02 14 AM No Title Length Edit 4 Scenes 00 00 38 00 00 21 Play Rename Edit Scene Dubbing Delete Deleting a Playlist Entry from the Playlist VR mode Press the 34 button to select Delete and then press the ENTER button You will be prompted with the delete confirmation message Do you want to delete Press the 21 buttons to select...

Страница 94: ...ist Timer Rec Dubbing Setup Disc Manager Disc Manager DVD RAM DVD RW DVD R Press the DIRECTION buttons to select Save and then press the ENTER button A disc name is given to the disc You may need to clear cartridge protection or unlock the protect before beginning editing Disc Protection Disc Protection allows you to protect your discs from disc format or program deletion due to unintended operati...

Страница 95: ...rtridge write protect tab should be set to the unprotect position The disc protection should also be cleared Press the MAIN MENU button with the disc stopped Press the 34 button to select Disc Manager and then press the ENTER or 1 button Press the 34 button to select Disc Format and then press the ENTER or 1 button You will be prompted with the confirmation message Do you want to format disc If yo...

Страница 96: ...or 1 button Press the 34 button to select Delete All Titles and then press the ENTER or 1 button You will be prompted with the confirmation message Do you want to delete all titles You cannot delete a protected entry If you want to delete a protected entry disable Protection for it on the Lock item Disc Protection When Protected or Cartridge Protection has been set or when a DVD RAM is used data c...

Страница 97: ...VD R disc with your DVD Recorder VCR it needs to be finalized before it can be played back on external devices Press the MAIN MENU button with the disc stopped Press the 34 button to select Disc Manager and then press the ENTER or 1 button Press the 34 button to select Disc Finalize and then press the ENTER or 1 button You will be prompted with the message Do you want to finalize disc If you selec...

Страница 98: ...Manager and then press the ENTER or 1 button Press the 34 button to select Disc Unfinalize and then press the ENTER or 1 button You will be prompted with the message Do you want to unfinalize disc If you selectYes you will be prompted again with the message Disc will be unfinalized Do you want to continue 3 2 1 RETURN SELECT MOVE EXIT Disc Manager DVD Video RW Disc Name Disc Format DVD V Disc Unfi...

Страница 99: ...nalize Unfinalize Mark DVD VIDEO RW DVD RW V Operation Same as Additional DVD Video recording protection and deletion are possible A DVD RW can be finalized or unfinalized in VR mode Finalize Unfinalize Mark DVD RW VR F DVD RW VR Operation Additional recording Additional recording deletion editing and deletion editing and protection are impossible protection are possible ...

Страница 100: ... Troubleshooting DVD VIDEO DVD RAM DVD RW DVD R 101 Troubleshooting 102 Problems and Solutions VCR 103 Specifications 104 Troubleshooting DVD VIDEO DVD RAM DVD RW DVD R 4 Troubleshooting 4 Problems and Solutions VCR 4 Specifications ...

Страница 101: ...e space Recording is available on DVD RAM DVD RW DVD R discs only If a program is copy protected you cannot record it Press the 6 and 5 buttons of your DVD Recorder VCR at the same time when the power is on All settings including password will revert to factory settings Do not use it if not absolutely required Note that this function is available only when there is no disc inserted Check whether t...

Страница 102: ...jitter temporarily but it is not a defect Sound languages and subtitle languages are disc specific Only the sound and subtitle languages contained on a DVD disc are available and displayed in the disc menu Check whether 480P is displayed on front panel Make sure to change the component video output using the Progressive button when the disc is stopped Point the remote control at the remote control...

Страница 103: ...ot see normal broadcasts Check the TUNER EXTERNAL setting Check the TV antenna connections Noise bars or streaks on playback Press the DVD CHANNEL 3 or 4 buttons to minimize this effect When the PAUSE button is pressed A still picture may have noise bars depending on the during playback the still picture condition of the tape Press the DVD CHANNEL 3 or 4 buttons during has severe noise bar streaks...

Страница 104: ...roadcasting 1 125 Audio Audio input jacks 1 2 Optical Coaxial digital audio output Output Video Video input jacks 1 2 S Video output 1 Y 1 0 Vp p C 0 286 Vp p at 75 Ω load Component outputs Y 1 0 Vp p Pb 0 70 Vp p Pr 0 70 Vp p at 75 Ω load Picture Compression format MPEG II Audio Compression format Dolby AC 3 256kbps DVD Recording time Max 6 hours using 4 7 GB disc XP 60 min SP 120 min LP 240 min ...

Страница 105: ...eccione entre las siguientes la conexión de antena más adecuada a sus necesidades Método 1 Antena Videograbadora con DVD Televisor Sin adaptador para cablevisión Método 2 Antena Adaptador para cablevisión Videograbadora con DVD Televisor Adaptador para cablevisión con muchos canales codificados Método 3 Antena Videograbadora con DVD Adaptador para cablevisión Televisor Adaptador para cablevisión c...

Страница 106: ...tándar Método 1 Conexión a una toma de entrada de vídeo Conecte un cable de vídeo amarillo entre la toma OUT amarilla de la videograbadora con DVD y la toma VIDEO IN amarilla del televisor o amplificador de audio vídeo Usted podrá disfrutar de imágenes de calidad normal Conecte los cables de audio blanco y rojo entre las tomas ANALOG AUDIO OUT de la videograbadora con DVD y las tomas AUDIO IN del ...

Страница 107: ...ponentes Y CB PB CR PR en el modo 525i 480i 1 Conecte cables de vídeo de componentes no suministrados entre las tomas COMPONENT VIDEO OUT de la videograbadora con DVD y las tomas COMPONENT VIDEO IN del televisor o amplificador de audio vídeo 2 Cerciórese de que el disco se haya parado completamente antes de cambiar el modo Si no aparece nada en el visualizador del panel frontal éste será el modo 5...

Страница 108: ...or 4 Español Memoria automática de canales La función de memoria automática de canales buscará y almacenará automáticamente todos los canales activos de su zona Abra MENÚ Con el DVD en el modo de parada presione el botón MAIN MENU Seleccione Configurac Utilizando los botones 34 mueva la barra de selección hasta Configurac y después presione el botón 1 o ENTER para seleccionar Seleccione Ajuste de ...

Страница 109: ...a 6 5 4 3 2 1 Presione el botón OPEN CLOSE Coloque suavemente un disco en la bandeja con la etiqueta encarada hacia arriba Presione el botón OPEN CLOSE para cerrar la bandeja del disco La videograbadora con DVD cerrará la bandeja del disco e iniciará automáticamente la reproducción del mismo Cuando utilice medios grabables DVD RAM DVD RW DVD R etc la reproducción automática no podrá iniciarse sin ...

Страница 110: ...ja del disco y el chasis cuando se cierre Después de haber conectado la alimentación se tardarán algunos segundos hasta que funcione el DVD Precauciones 6 Español Español Coloque marcas en las escenas que desee contemplar de nuevo a fin de poder iniciar la reproducción desde las posiciones marcadas Colocación de un marcador Presione el botón MARKER durante la reproducción Cuando aparezca la escena...

Страница 111: ...do inserte un videocasete que carezca de lengüeta de protección contra la grabación Inserción del videocasete VHS Inserte un videocasete VHS estándar en la videograbadora Cuando inserte el videocasete la alimentación se conectará automáticamente Reproducción del videocasete Presione el botón PLAY del mando a distancia o del panel frontal de la unidad El videocasete comenzará a reproducirse automát...

Страница 112: ...LAY Pausa En el modo de reproducción presione el botón PAUSE para obtener una imagen fija Avance por fotogramas En el modo de pausa presione el botón 9 SKIP para avanzar al fotograma siguiente Reproducción progresiva regresiva rápida En el modo de reproducción presione el botón 5 reproducción progresiva rápida o 6 reproducción regresiva rápida para reproducir a dos velocidades Búsqueda de imágenes...

Страница 113: ...emporizador Confirme el programa y si es necesario realice correcciones utilizando los botones 3421 y después presione el botón ENTER Usted podrá realizar la introducción directamente utilizando los botones numéricos Presione el botón POWER En el visualizador de la videograbadora se encenderá 7 6 5 4 3 2 1 Utilización de los códigos VCR Plus para realizar grabaciones con el temporizador Si presion...

Страница 114: ...con Navegación de disco DVD RAM DVD RW DVD R Elementos de edición de la lista de grabación Presione el botón 34 para seleccionar la introducción que desee editar y después presione el botón ENTER o 1 Reproducir Reproduce la introducción seleccionada Camb Nomb Cambia el nombre del título de la introducción seleccionada Eliminar Borra la introducción seleccionada de la lista Modificar Borra la secci...

Страница 115: ...egación de disco DVD RAM DVD RW DVD R Para borrar una introducción de la Navegación de disco realice lo siguiente Presione el botón MAIN MENU Presione el botón 34 para seleccionar la Navegación de disco y después presione el botón ENTER o 1 o presione el botón TOP MENU DISC NAVIGATION del mando a distancia Se visualizará la pantalla de la Navegación de disco Presione el botón 34 para seleccionar l...

Страница 116: ...ubject to the following two conditions 1 this device may not cause harmful interference and 2 this device must accept any interference received including interference that may cause undesired operation Responsible Party HITACHI AMERICA LTD HOME ELECTRONICS DIVISION 900 Hitachi way Chula Vista CA 91914 3556 Tel 619 591 5200 Hitachi has made every effort to assure you hours of trouble free operation...

Страница 117: ... FOR PARTS THE DURATION OF THE APPLICABLE EXPRESS WARRANTY CONTAINED ABOVE HITACHI SHALL NOT BE LIABLE TO THE PURCHASER OR TO ANY OTHER PERSON FOR ANY INCI DENTAL OR CONSEQUENTIAL DAMAGES OR LOSS OF PROFIT OF PRODUCT RESULTING FROM ANY DEFECT IN OR MALFUNCTION OR FAILURE OF THIS HITACHI PRODUCT SOME STATES DO NOT ALLOW LIMITATIONS ON HOW LONG AN IMPLIED WARRANTY LASTS OR THE EXCLUSION OF INCIDENTA...

Страница 118: ... Required 2 All repairs must be performed by a Hitachi Authorized Service Facility 3 This warranty is valid only in the U S A LIMITED WARRANTY Hitachi America Ltd Home Electronics Division Hitachi war rants this component in duration as stated below Register your product on line at hitachi com tv or mail this portion to the following address Attn Warranty Department Hitachi America Ltd Home Electr...

Страница 119: ...placement of video camera pickup element if the pick up element has been over exposed to an intense source of light 12 Batteries earphone antennas accessories and external parts such as cabinet and knobs WARRANTY DOES NOT COVER LES PRODUITS VIDÉO sont garantis contre tout défaut de matériel et de fabrication Toute panne attribuable à de tels défauts sera réparée sans frais pourvu que la panne se s...

Страница 120: ...product purchased outside Canada OR sold by any organization other than HITACHI CANADA LTD AVIS IMPORTANT Notre garantie ne couvre pas les produits achetés à l extérieur du Canada OU vendus par toute organisation autre que HITACHI CANADA LTD Register your product on line at Hitachi ca or mail to the address on this card Enregistrez votre produit en ligne à Hitachi ca ou par la poste à l adresse in...

Отзывы: