background image

14

Your Hisense TV comes with many TV setting features to allow you to customize the picture based on your viewing preference and 

environment. 

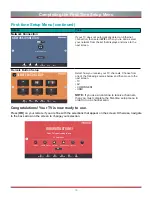
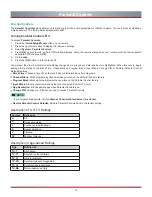
Accessing the Quick Setup Menu

You can press the [

Quick Setup menu

] button [ 

 ] and press the right arrow on the D-pad to view the full menu settings. 

The 

Settings

 menu consists of the following settings:

• 

Picture

• 

Sound

• 

Channel

• 

Network

• 

System

• 

About TV

Basic and Advanced TV Settings

Picture Menu


Picture Mode:

 If you’d like to configure the settings for your picture, then there are 

six types of picture modes available: 

Vivid

Standard

Theater

Energy Saving

Game

 and 

Sport

.

Once you choose the mode, you can adjust the picture based on the following 

settings:

 Brightness:

 Adjust the Brightness level to generate lighter or darker images.

 Contrast:

 Adjust the Contrast level to increase or decrease how bright images 

appear.

 Color:

 Adjust the color intensity of the picture for a more vibrant image.

 Aspect Ratio:

 Adjust the Aspect Ratio to stretch or zoom in on your picture. You 

can choose from the following settings: Auto, Direct, 1:1 PIXEL MAP, Panoramic, Cinema, Wide, Zoom or Normal.

 Backlight:

  This TV has a 

Dynamic Backlight Control

 setting that you can turn ‘On’ and set to high or low. The 

Backlight

 setting 

enables you to adjust how bright you want images to appear. In addition, an 

Eco Sensor

 setting is available that will enable the TV 

to automatically adjust the picture settings according to the amount of ambient light in your room. The 

Minimum Backlight

 setting 

enables you to adjust how low you want the backlight to be when you view content in a dark or well-lit room. This is a money-

saving feature because it reduces power consumption. 

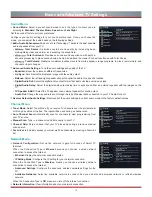
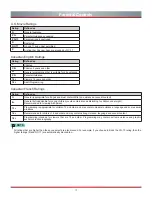
 Advanced Picture Settings:

 Adjust  advanced picture settings based on your viewing preference.

• 

Display:

 Adjust advanced picture settings in the component source.

• 

Overscan:

 Change the video size settings to slightly crop the edges of the displayed image.

• 

Tint:

 Adjust the colors from a green to magenta tint to view the natural skin tones of people on the screen.

• 

Sharpness:

 Adjust how sharp or soft edges of images appear.

• 

Noise Reduction:

 Improve how clear the picture appears by reducing noise.

• 

Film Mode:

 Turn off smooth motion and play video as 24 frames per second.

• 

Adaptive Contrast:

 Automatically darken dark areas and lighten light areas of images to see more details.

• 

Color Temperature:

 Select a preset color temperature.

• 

White Balance:

 Adjust the intensity of red, green and blue lights to view the true colors of all images in the picture.

• 

Color Tuner:

 Adjust the Hue, Saturation and Brightness of color settings.

 Restore Default Picture Settings:

 Restore all the picture settings in the current picture mode to the factory default values.

Settings

Picture
Sound
Channel
Network
System
About TV

Picture Mode

Standard

Brightness

50

Contrast

50

Color

50

Aspect Ratio

Auto

Backlight

Advanced Picture Settings

Restore Default Picture Settings

Содержание H5507

Страница 1: ... equipment is subject to the following two conditions 1 it is possible that this device doesn t cause any detrimental interference and 2 this device must take any kind of interference including that which may cause its malfunctioning NOTE ...

Страница 2: ...English ES A164908 ...

Страница 3: ...in part in any manner electronic or otherwise whether or not for a charge or other or no consideration without the prior written permission of Hisense Company Ltd Requests for permission to store reproduce transmit or distribute materials may be made to one of the following addresses USA Hisense USA Corporation PO Box 3289 Suwanee GA 30024 CANADA Hisense Canada Co Ltd 2283 Argentia Road Unit 16 Mi...

Страница 4: ...ither expressed or implied that the Application Service will be uninterrupted or error free including but not limited to vagaries of weather disruption of Service acts of God warranties of title local or regional limitations no infringement NOR IMPLIED WARRANTIES OF MERCHANTABILITY OR FITNESS FOR A PARTICULAR PURPOSE No advice or information given by Hisense providers affiliates or contractors or ...

Страница 5: ...onnecting speakers or other audio receivers 5 Connecting a digital sound bar to use ARC Audio Return Channel 6 Connecting Your TV to a Wired or Wireless Network 7 Connecting to a Wireless network 7 Connecting to a Wired Ethernet network 7 Using Your TV Remote Control 9 Shortcuts Instructions 11 Completing the First Time Setup Menu 12 Basic and Advanced TV Settings 14 Accessing the Quick Setup Menu...

Страница 6: ...vorites list 21 Viewing your Favorites list 21 Apps 22 Apps 22 Customizing the name of your TV 23 Media 23 Panels that appear on the Media screen 23 File formats that are supported 23 Browsing content 23 Viewing Pictures as a slideshow 23 Viewing video 24 Mirroring content from your device to the TV 24 Software updates for your TV 25 Quick Problem Solving Tips 26 ...

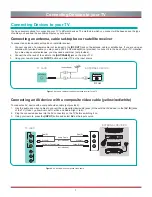
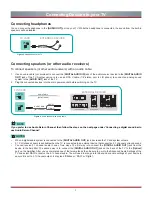
Страница 7: ...to the ANT CABLE jack on the side of TV 3 Using your remote press the INPUT button and select TV as the input source To connect an AV device with a composite video cable not provided 1 Use the audio and video cables to connect the composite video audio jacks of the external AV device to the AV IN jacks of the TV Video yellow Audio Left white and Audio Right red 2 Plug the connected devices into th...

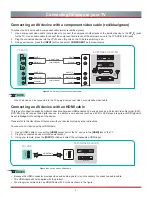
Страница 8: ...or the TV Use an audio cable to connect the component audio jacks of the external device to the TV AUDIO L R jacks 2 Plug the connected devices into the YPBPR and L R ports on the TV before switching it on 3 Using your remote press the INPUT button and select COMPONENT as the input source Figure 3 AV device with a component video cable Connecting an AV device with an HDMI cable This type of connec...

Страница 9: ...Audio Cable not included TV JACKS White L Red R Audio Cable not included Audio Cable not included If you prefer to use Audio Return Channel then follow the steps on the next page under Connecting a digital sound bar to use Audio Return Channel NOTE When a digital audio system is connected to the DIGITAL AUDIO OUT jack decrease the TV and system volume 5 1 CH channel audio is available when the TV ...

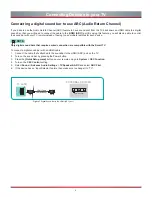
Страница 10: ...ound bars that require a wired connection are compatible with the Smart TV To connect a digital sound bar with an HDMI cable 1 Connect the cable that s attached to the soundbar to the HDMI ARC port on the TV 2 Turn on the sound bar by pressing the Power button 3 Press the Quick Setup menu button on your remote and go to System CEC Function 4 Turn on the CEC Control setting 5 Select Sound Advance A...

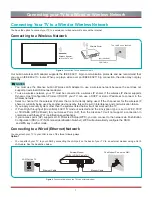
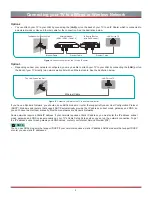
Страница 11: ...ess IP sharer supports Dynamic Host Configuration Protocol DHCP your TV can use a DHCP or static IP address to connect to the wireless network Select a channel for the wireless IP sharer that is not currently being used If the channel set for the wireless IP sharer is currently being used by another device nearby this will result in interference and communication failure If you apply a security sy...

Страница 12: ...u don t have to enter them manually Most home networks are Dynamic Networks Some networks require a Static IP address If your network requires a Static IP address you must enter the IP address subnet mask gateway and DNS values manually on your TV s Cable Setup Screen when you set up the network connection To get the IP address subnet mask gateway and DNS values contact your Internet Service Provi...

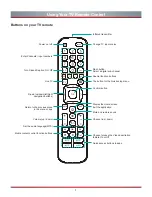
Страница 13: ... right navigation buttons Volume up down Set the audio language MTS Choose to leave the Video description feature On or Off Live TV Return to the previous place in the menu or app Mute and restore sound Infrared transmitter Change TV input source Channel up down Exit the application Turn Closed Caption On Off Special function buttons The button for the Quick setup menu Display the Home screen Conf...

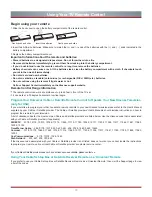
Страница 14: ...y for USA If you would like to program your other household remote controls to your new Hisense television please refer to the User s Manual supplied by your Cable or Satellite provider The Cable or Satellite providers User s Manuals should include instructions on how to program their remote to your television A list of Hisense codes for the most common Cable and Satellite providers are listed bel...

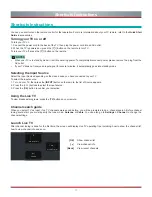
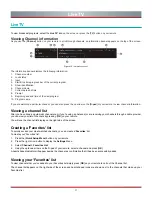
Страница 15: ...he Input Source depending on the video device you have connected to your TV To select the input source 1 Turn on your TV then press the INPUT button on the remote the list of Source appears 2 Press the buttons to select the input source 3 Press the OK button to confirm your selection Using the Live TV To view broadcast programs press the TV button on your remote Channel search guide When you selec...

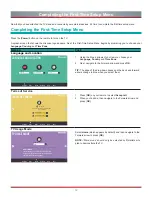
Страница 16: ... Next navigate to the Forward arrow and press OK TIP The edge of the drop down boxes and the back and forward arrows change to blue when you select them Terms of Service TERMS OF SERVICE Accept all Accept EULA Accept Terms of Serv Language Mode Terms Network Input Done The EULA and Terms must be accepted in order to continue 1 Press OK on your remote to select Accept all 2 When you re done then na...

Страница 17: ...ve TV Select how you receive your TV channels Choose from one of the following sources below and then move to the next screen TV AV COMPONENT HDMI NOTE If you use an antenna to receive channels then you must complete the first time setup menu in order to run a channel scan Congratulations Your TV is now ready to use Press OK on your remote if you are fine with the selections that appear on the scr...

Страница 18: ...enable the TV to automatically adjust the picture settings according to the amount of ambient light in your room The Minimum Backlight setting enables you to adjust how low you want the backlight to be when you view content in a dark or well lit room This is a money saving feature because it reduces power consumption Advanced Picture Settings Adjust advanced picture settings based on your viewing ...

Страница 19: ...Restore all of the audio settings in current audio mode to the factory default values Channel Menu Tuner Mode Select Tuner Mode if you receive TV channels over the air antenna or through a cable set top box The input will be used during a channel scan Auto Channel Scan Automatically scan for channels to view programming from your TV source Manual Scan Type in a channel to add it manually to your T...

Страница 20: ...ts App Restriction Block specific apps when Parental Controls is on Change PIN Change your PIN that you use to access Parental Controls If you want to change your parental control password first enter the new password then enter the same password again NOTE If you forget your password call the Hisense Consumer Electronics Care Center Restore Parental Control Defaults Restore Parental Control back ...

Страница 21: ... the HDMI CEC Control features do not work Depending on the connected HDMI device the HDMI CEC Control feature may not work Advanced Settings Access the Advanced Settings menu Menu Timeout Set the amount of time that you d like for the menu to display 5s 10s 20s 30s 60s or Off Use Mode Set the TV to use in Home or Store Mode Some models have a Store Mode with 4K Video Input Labels Edit the input l...

Страница 22: ...rental Control Defaults features Block Time Choose a time of day that you d like to start blocking certain programs Channel Block Block programs by channels when you turn on the Parental Controls feature Program Block Block certain programs when you turn on the Parental Control feature Input Block Block content from devices that are connected to certain TV ports App Restriction Block specific apps...

Страница 23: ...no violence or sexual content 8 General but inadvisable for young children could contain scenes disturbing to children under eight Recommended for viewing with parent 13 Programming is appropriate for children 13 and older and may contain moderate violence language and some sexual situations 16 Recommended for children 16 and older and may contain strong violence language and sexual content 18 Pro...

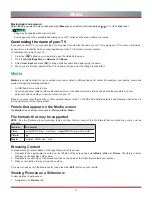
Страница 24: ... screen This design feature enables you to quickly access the app you d like to open 3 The navigation bar appear on the Home screen Press the buttons to select icons on the navigation bar 1 Indicators and Icons on the top of the Home screen You can always view the current time in the top right corner of the Home screen If your TV is connected to the Internet through a wireless connection or an Eth...

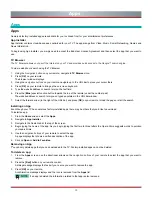
Страница 25: ...a cable provider you can view your list of channels by pressing OK on your remote You will see the channel list display on the right side of the screen Creating a Favorites list To quickly access your most watched channels you can create a Favorites list To create your Favorites list 1 Press the Quick Setup Menu button on your remote 2 Press the right arrow button to display the Settings Menu 3 Se...

Страница 26: ...s in the URL bar window 7 Select the forward arrow to the right of the URL bar and press OK on your remote to load the page or start the search Installing an App Even though your TV has numerous factory installed apps there may be others that you d like to download To install an app 1 From the Home screen select the Apps 2 Navigate to App Installer 3 Navigate to the Search tab at the top of the sc...

Страница 27: ...een and select Music Video or Picture The library of items displays on the right side of the screen 2 Navigate to the right side of the screen and click on the name of the folder that contains your content 3 Make your selection to play or view the content If you want to close out of the Media center then press the EXIT button on your remote Viewing Pictures as a Slideshow To view pictures in a sli...

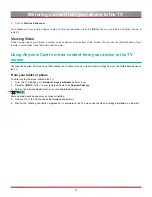
Страница 28: ...e TV screen The Hisense Anyview Cast is an app that enables you to share or cast a video audio or image from your Android based device to the TV From your tablet or phone To mirror content from your tablet to the TV 1 From the TV Settings go to Network Anyview Stream and turn it on 2 Press the INPUT button on your remote and select the Anyview Cast app 3 Turn on the wireless display function on yo...

Страница 29: ...rience therefore we recommend that you keep your TV connected to the Internet to automatically receive updates when they are available You can choose to receive updates automatically or check for software updates and install them manually Checking for the latest firmware To manually check for the latest firmware 1 Using your remote press the button 2 Press the right arrow on the D pad to view the ...

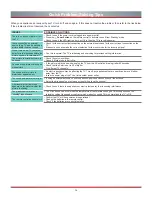
Страница 30: ...ute mode is set to On Sound but no picture or black and white picture If the picture is black and white unplug the TV from the AC outlet and replug it after 60 seconds Check that the Color is set to 50 or higher Try different TV channels The sound and or picture is distorted or appears wavy An electric appliance may be affecting the TV Turn off any appliances that are nearby and move it farther aw...

Отзывы: