HANGING THE FAN
1
2
3
4
5
06
|
hinkley.com
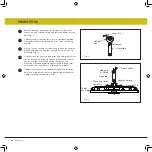
Fig. 1
Fig. 2
Downrod
Cross Pin
Hanger
Ball
Set Screw
Downrod
Hook-up
(3) Wires
Mounting Collar
Downrod Pin
Security Screws
Cotter Pin
Top of
Fan Body
Remove ball from downrod by loosening set screw in the
side of the ball. Slide ball down and remove ball pin; remove
ball. (Fig. 1)
Carefully support fan body (motor) in its styrofoam packing
with the mounting collar (where the wires come out) facing
upward.
Loosen the two security set screws and remove the downrod
pin and retaining clip from the coupling on top of the motor
assembly. (Fig. 2)
Carefully feed the electrical lead wires and safety cable from
the fan through the downrod. Thread downrod into coupler
until holes align. Insert downrod pin through holes in
mounting collar and downrod; clip cotter pin through small
hole in end of downrod pin to hold downrod in place.
Tighten security set screws against downrod using a large
flat blade screwdriver to ensure a tight fit against downrod.
Tighten nuts against mounting collar.
Safety Cable
Содержание SAWYER
Страница 1: ...36 SAWYER CEILING FAN INSTRUCTION MANUAL INDOOR OUTDOOR LED FAN LED WET ...
Страница 19: ...GLOBAL HEADQUARTERS 33000 Pin Oak Parkway Avon Lake Ohio 44012 T 440 653 5500 F 440 653 5555 hinkley com ...
Страница 20: ...MANUAL DE INSTRUCCIONES PARA VENTILADORES DE TECHO 36 SAWYER VENTILADOR LED INTERIOR EXTERIOR LED WET ...
Страница 38: ...GLOBAL HEADQUARTERS 33000 Pin Oak Parkway Avon Lake Ohio 44012 T 440 653 5500 F 440 653 5555 hinkley com ...
Страница 39: ...MANUEL D UTILISATION DU VENTILATEUR DE PLAFOND 36 SAWYER VENTILATEUR LED INTÉRIEUR EXTÉRIEUR LED WET ...
Страница 57: ...GLOBAL HEADQUARTERS 33000 Pin Oak Parkway Avon Lake Ohio 44012 T 440 653 5500 F 440 653 5555 hinkley com ...


