background image

User Manual of Digital Video Recorder 


165 

9.2.6


Configuring NAT Settings 

Two ways are provided for port mapping to realize the remote access via the cross-segment network, UPnP™ 

and manual mapping. 


UPnP

TM


Purpose: 

Universal Plug and Play (UPnP™) permits the device to discover the presence of other network devices on the 

network  seamlessly  and  establish  functional  network  services  for  data  sharing,  communications,  etc.  You  can 

use  the  UPnP™  function  to  enable  the  fast  connection  of  the  device  to  the  WAN  via  a  router  without  port 

mapping.   

Before you start: 

Enable the UPnP™ function of the router to which your device is connected. When the network working mode 

of the device is set as multi-address, the Default Route of the device should be in the same network segment as 

that of the LAN IP address of the router. 

Steps: 

1.


Enter the Network Settings interface. 

Menu > Configuration > Network 

2.


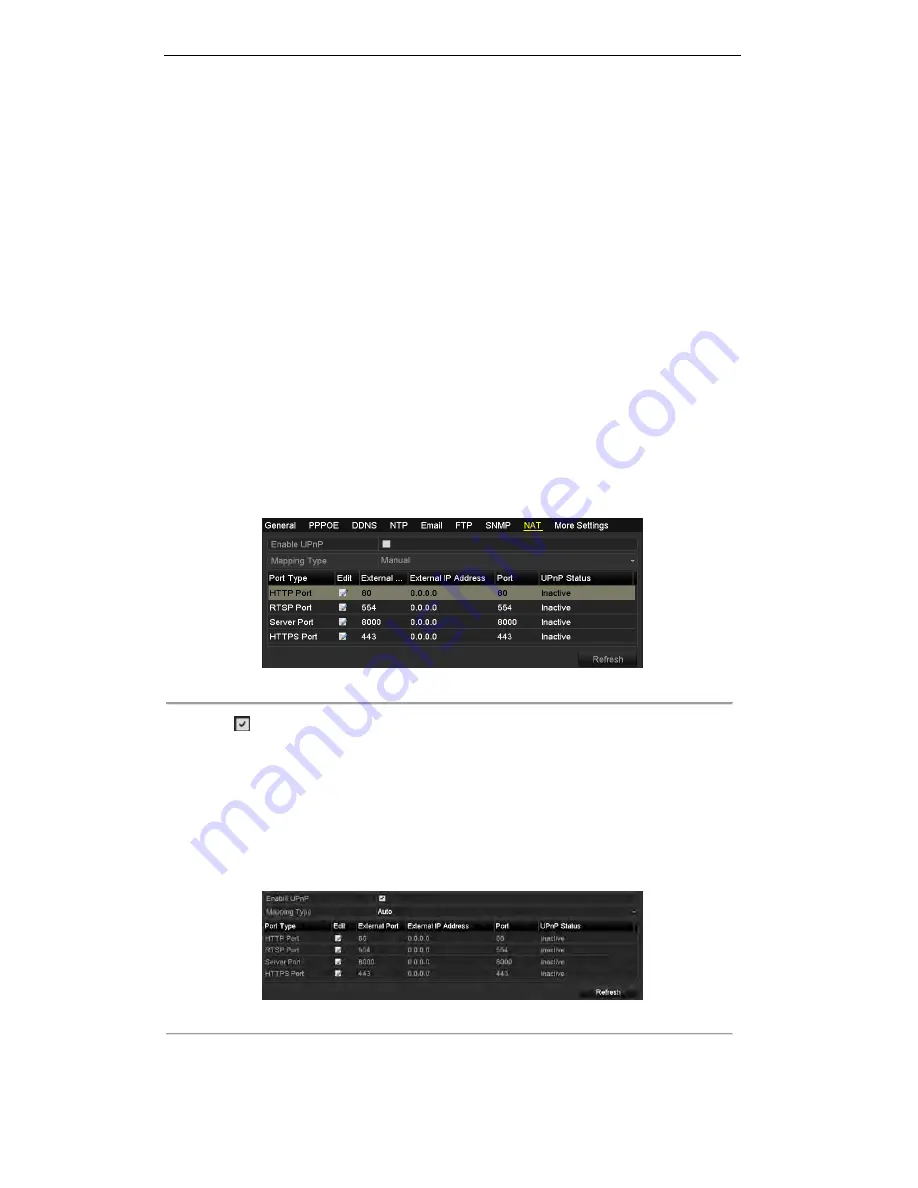
Select the 

NAT

 tab to enter the UPnP™ interface. 


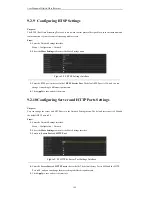
Figure 9. 23


UPnP™ Settings Interface 


3.


Check 


checkbox to enable UPnP™. 

4.


Select the Mapped Type as Manual or Auto in the drop-down list. 

Task1: Auto 

If  you  select  Auto,  the  Port  Mapping  items  are  read-only,  and  the  external  ports  are  set  by  the  router 

automatically. 

Steps: 

1)


Click 

Apply 

to save the settings. 

2)


You can click 

Refresh

 to get the latest status of the port mapping. 


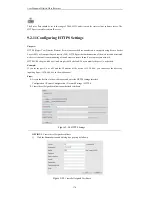
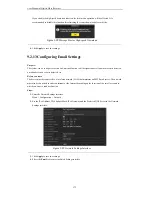
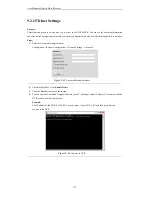
Figure 9. 24


UPnP™ Settings Finished-Auto


Task2: Manual 

Содержание DS-7208HWI-SV DS-7216HWI-SV

Страница 1: ...Digital Video Recorder User Manual UD 6L0202D1336A01 ...

Страница 2: ...LIMITATION THE IMPLIED WARRANTIES OF MERCHANTABILITY AND FITNESS FOR A PARTICULAR PURPOSE REGARDING THE HIKVISION SOFTWARE HIKVISION DOES NOT WARRANT GUARANTEE OR MAKE ANY REPRESENTATIONS REGARDING THE USE OR THE RESULTS OF THE USE OF THE HIKVISION SOFTWARE IN TERMS OF ITS CORRECTNESS ACCURACY RELIABILITY CURRENTNESS OR OTHERWISE THE ENTIRE RISK AS TO THE RESULTS AND PERFORMANCE OF THE HIKVISION S...

Страница 3: ...T Network DVR 8000HFI ST Series DS 8004 08 16HFI ST Network HDVR 8000HWI ST Series DS 8004 08 16HWI ST Network HDVR 7200HWI SV Series DS 7208 16HWI SV Network DVR This manual may contain several technically incorrect places or printing errors and the content is subject to change without notice The updates will be added into the new version of this manual We will readily improve or update the produ...

Страница 4: ...erence received including interference that may cause undesired operation EU Conformity Statement This product and if applicable the supplied accessories too are marked with CE and comply therefore with the applicable harmonized European standards listed under the Low Voltage Directive 2006 95 EC the EMC Directive 2004 108 EC the RoHS Directive 2011 65 EU 2012 19 EU WEEE directive Products marked ...

Страница 5: ...is properly secured to a rack or shelf Major shocks or jolts to the unit as a result of dropping it may cause damage to the sensitive electronics within the unit Use the device in conjunction with an UPS if possible Power down the unit before connecting and disconnecting accessories and peripherals A factory recommended HDD should be used for this device Improper use or replacement of the battery ...

Страница 6: ...io and video synchronization during composite stream encoding Support CABAC this feature is supported by analog cameras only Watermark technology Defog technology providing correct and natural image this feature is only supported by DS 9200 series DVR Local Monitoring Simultaneous HDMI VGA and CVBS outputs HDMI output and VGA output at up to 1920 1080P resolution Multi screen display in live view ...

Страница 7: ... VCA 8 recording time periods with separated recording types Pre record and post record for alarm motion detection recording and pre record time for schedule and manual recording Searching record files and captured pictures by events alarm input motion detection VCA Customization of tags searching and playing back by tags Locking and unlocking record files Local redundant recording and capture Sea...

Страница 8: ...e and network fault tolerance IPv6 is supported TCP IP protocol PPPoE DHCP DNS DDNS NTP SADP SMTP SNMP NFS and iSCSI are supported TCP UDP and RTP for unicast Auto Manual port mapping and automatically discovered by NAT Remote web browser access by HTTPS ensures high security Remote reverse playback by RTSP Support accessing by the platform by ONVIF Remote search playback download locking and unlo...

Страница 9: ...User Manual of Digital Video Recorder 8 SDK for Windows and Linux system Source code of application software for demo Development support and training for application system ...

Страница 10: ...onfiguring the Connected IP Cameras 38 Chapter 3 Live View 41 3 1 Introduction of Live View 42 3 2 Operations in Live View Mode 43 3 2 1 Front Panel Operation 43 3 2 2 Using the Mouse in Live View 44 3 2 3 Using an Auxiliary Monitor 45 3 2 4 Quick Setting Toolbar in Live View Mode 46 3 3 Adjusting Live View Settings 50 3 4 Channel zero Encoding 52 3 5 Manual Video Quality Diagnostics 53 3 6 User L...

Страница 11: ...e Record Files 87 5 9 2 Setting HDD property to Read only 89 Chapter 6 Playback 91 6 1 Playing Back Record Files 92 6 1 1 Playing Back by Channel 92 6 1 2 Playing Back by Time 94 6 1 3 Playing Back by Event Search 96 6 1 4 Playing Back by Tag 100 6 1 5 Smart Playback 104 6 1 6 Playing Back by Searching System Log 106 6 1 7 Playing Back External Files 107 6 1 8 Playing Back Frame Extracting Record ...

Страница 12: ...Settings 155 9 2 Configuring Advanced Settings 158 9 2 1 Configuring PPPoE Settings 158 9 2 2 Configuring DDNS Settings 158 9 2 3 Configuring NTP Server Settings 162 9 2 4 Configuring FTP Server Settings 163 9 2 5 Configuring SNMP Settings 164 9 2 6 Configuring NAT Settings 165 9 2 7 Configuring Remote Alarm Host Settings 167 9 2 8 Configuring Multicast Settings 168 9 2 9 Configuring RTSP Settings...

Страница 13: ...e Array 192 10 5 Upgrading Firmware 194 Chapter 11 HDD Management 196 11 1 Initializing HDDs 197 11 2 Managing Network HDD 199 11 3 Managing eSATA 202 11 4 Managing HDD Group 203 11 4 1 Setting HDD Groups 203 11 4 2 Setting HDD Property 204 11 5 Configuring Quota Mode 206 11 6 Configuring Frame Extracting Mode 208 11 7 Configuring Disk Clone 210 11 8 Checking HDD Status 212 11 9 Checking S M A R T...

Страница 14: ...e 231 13 4 2 Upgrading by FTP 231 13 5 Restoring Default Settings 232 Chapter 14 Others 233 14 1 Configuring RS 232 Serial Port 234 14 2 Configuring General Settings 235 14 3 Configuring DST Settings 237 14 4 Configuring More Settings 238 14 5 Managing User Accounts 239 14 5 1 Adding a User 239 14 5 2 Deleting a User 241 14 5 3 Editing a User 242 14 5 4 Changing Password of Admin 243 14 6 Logging ...

Страница 15: ...User Manual of Digital Video Recorder 14 Chapter 1 Introduction ...

Страница 16: ...order 15 1 1 Front Panel The front panels of the devices are shown in Figure 1 1 DS 9100 9000HFI ST DS 9100 9000HFI RT DS 9200HWI ST DS 9100 9000HWI ST DS 9100 9000HFI XT DS 8100 8000HFI ST DS 8100 8000HWI ST Figure 1 1 Front Panel 1 ...

Страница 17: ...200 9100 9000 series You can lock or unlock the panel by the key 4 DVD R W Slot for DVD R W Optional for DS 9100 9000HFI RT 5 Alphanumeric Buttons Switch to the corresponding channel in Live view or PTZ Control mode Input numbers and characters in Edit mode Switch channels in Playback mode The light of the button is blue when the corresponding channel is recording it is red when the channel is in ...

Страница 18: ...e PTZ Control mode it is used to adjust the iris of the PTZ camera 8 DIRECTION The DIRECTION buttons are used to navigate between different fields and items in menus In the Playback mode the Up and Down button is used to speed up and slow down recorded video The Left and Right button will select the next and previous record files In Live View mode these buttons can be used to cycle through channel...

Страница 19: ...it its content After you re done entering text you must hit the ENTER button to be able to move on to the next field DS 7200HWI SV Figure 1 2 Front Panel 2 Table 1 2 Description of Control Panel Buttons 2 No Name Function Description 1 POWER POWER indicator turns green when DVR is powered up 2 STATUS STATUS indicator lights in red when data is being read from or written to HDD 3 Tx Rx Tx Rx indict...

Страница 20: ...Power on off the device 2 DEV Enables Disables Remote Control 3 Alphanumeric Buttons Switch to the corresponding channel in Live view or PTZ Control mode Input numbers and characters in Edit mode Switch channels in Playback mode 4 EDIT Button Edit text fields When editing text fields it will also function as a Backspace button to delete the character in front of the cursor On checkbox fields press...

Страница 21: ...ons are used to navigate between different fields and items in menus In the Playback mode the Up and Down button is used to speed up and slow down recorded video The Left and Right button will select the next and previous record files In Live View mode these buttons can be used to cycle through channels In PTZ control mode it can control the movement of the PTZ camera The ENTER button is used to c...

Страница 22: ...ss the DEV button on the remote control 4 Enter the device ID in step 2 5 Press the ENTER button on the remote If the Status indicator on the front panel turns blue the remote control is operating properly If the Status indicator does not turn blue and there is still no response from the remote please check the following When the device ID is 255 the Status indicator is off when device is controll...

Страница 23: ... The operation of the mouse Table 1 4 Description of the Mouse Control Name Action Description Left Click Single Click Live view Select channel and show the quick set menu Menu Select and enter Double Click Live view Switch single screen and multi screen Click and Drag PTZ control pan tilt and zoom Tamper proof privacy mask and motion detection Select target area Digital zoom in Drag and select ta...

Страница 24: ...yboard 1 Figure 1 5 Soft Keyboard 2 Description of the buttons on the soft keyboard Table 1 5 Description of the Soft Keyboard Icons Icon Description Icon Description Number English letter Lowercase Uppercase Backspace Switch the keyboard Space Positioning the cursor Exit Symbols Reserved ...

Страница 25: ...User Manual of Digital Video Recorder 24 1 5 Rear Panel DS 9100 9000HFI ST DS 9200 9100 9000HWI ST DS 9100 9000HFI RT DS 9100 9000HFI XT DS 8100 8000HFI ST ...

Страница 26: ...7 AUDIO IN RCA for DS 9200 9100 9000 series BNC for DS 8100 8000 series connector for audio input 8 AUDIO IN for DS 9100 9000HFI ST RT XT 9200 9100 9000HWI ST series DB26 connector for audio input 9 RS 232 Interface Connector for RS 232 devices 10 VGA DB9 connector for VGA output Display local video output and menu 11 HDMI HDMI video output connector 12 eSATA Connects external SATA HDD DVD R W 13 ...

Страница 27: ...tem Description 1 VIDEO IN BNC connector for analog video input 2 VIDEO OUT BNC connector for video output 3 AUDIO IN RCA connector for audio input 4 USB Interface Connects USB mouse or USB flash memory devices 5 HDMI HDMI video output 6 VGA DB15 connector for VGA output Display local video output and menu 7 AUDIO OUT RCA connector for audio output 8 LAN Interface Network interface 9 RS 485 Interf...

Страница 28: ...ears on the monitor The row of icons at the bottom of the screen shows the HDD status X means that the HDD is not installed or cannot be detected Steps for other series 1 Check the power supply is plugged into an electrical outlet It is HIGHLY recommended that an Uninterruptible Power Supply UPS be used in conjunction with the device 2 Turn on the Power Switch on the rear panel and press the POWER...

Страница 29: ...tion 3 Click the Yes button Do not press the POWER button again when the system is shutting down If you disable the ID Authentication in General Settings interface Chapter 14 2 the dialog box for authentication does not pop up Rebooting the device In the Shutdown menu Figure 1 7 you can also reboot the device Steps 1 Enter the Shutdown menu by clicking Menu Shutdown 2 Click the Logout button to lo...

Страница 30: ...User Manual of Digital Video Recorder 29 Chapter 2 Getting Started ...

Страница 31: ...se the Start Wizard at that moment click Exit You can also choose to use the Start Wizard next time by leaving the Start wizard when device starts checkbox checked 2 Click Next on the Wizard window to enter the Login window Figure 2 2 Login Window 3 Enter the admin password By default the password is 12345 4 Optionally to change the admin password check the New Admin Password checkbox Enter the ne...

Страница 32: ...hich takes you to the Network Start Wizard window Dual NIC is not supported by DS 7200HWI SV series DS 9100 9000HFI ST RT XT DS 9200 9100 9000HWI ST DS 8100 8000HFI HWI ST DS 7200HWI ST Figure 2 4 Network Configuration 7 Click Next after you configured the network parameters which takes you to the Array Management ...

Страница 33: ...ure 2 6 HDD Management 9 To initialize the HDD click Init Initialization removes all the data saved in the HDD 10 Click Next to enter the IP Camera Management window only supported by HDVR series Figure 2 7 IP Camera Management 11 Click Search to search IP Camera Click Add to add IP Camera only supported by HDVR series 12 After finishing IP Camera settings click Next to enter the Record Settings w...

Страница 34: ...Digital Video Recorder 33 Click the icon and you can enable the continuous recording or motion Detection recording for all channels of the device Figure 2 8 Record Settings 13 Click OK to complete the wizard settings ...

Страница 35: ... Chapter 9 3 Checking Network Traffic and Chapter 9 4 Network Detection Steps 1 Enter the Camera Management interface Menu Camera Camera Figure 2 9 Main Menu In Analog Camera Management interface the status of analog cameras is displayed Clear the checkboxes and you can disable the corresponding analog cameras One more network camera can be added by disabling one analog camera 16 8 4 network camer...

Страница 36: ... Management 2 To add the online cameras 1 Select the IP Camera tab and the online cameras in the same network segment with the device will be displayed on the list You can click the button Refresh to refresh the information of the online cameras Figure 2 11 IP Camera Management 2 Click the icon on the list and the corresponding camera will be added automatically ...

Страница 37: ...ort user name and admin password and then click the button Add to add the camera manually The cameras added and not added are differently color coded When adding encoding device with multiple channels check the checkbox in the pop up window to select the channels to be added and click OK Figure 2 13 Selecting Multiple Channels 3 Import Export the configuration file of the IP cameras Import the con...

Страница 38: ...camera from the list 4 Click the Import button to import the IP cameras to the device 5 Click OK on the pop up message box after the importing process is complete The imported IP cameras will be displayed on the IP Camera Management interface Figure 2 15 Attention Importing Succeeded Export the configuration file of IP cameras to backup device Connect the backup device on which the configuration f...

Страница 39: ...he backup device 4 Click OK on the pop up message box after the exporting process is complete The configuration file of IP cameras will be displayed on a list Figure 2 17 Attention Exporting Succeeded 2 2 2 Configuring the Connected IP Cameras Editing the connected IP cameras Purpose The detailed information of the added IP cameras will be displayed on a list and you can configure the basic settin...

Страница 40: ...escription of the icons Add the online IP camera automatically Edit the basic parameters of the added IP camera Delete the added IP camera Get the live view of the added IP camera Upgrade the added IP camera Configuring the custom protocols Purpose Custom protocols can be set for the network cameras which are not configured with the standard protocols Steps 1 Click the button Protocol on the Custo...

Страница 41: ...68 1 55 554 ch1 main av_stream Protocol Name Edit the name for the custom protocol Enable Sub stream If the network camera does not support sub stream or the sub stream is not needed leave the checkbox empty Type The network camera adopting custom protocol must support getting stream through standard RTSP Transfer Protocol Select the transfer protocol for the custom protocol Port Set the port No f...

Страница 42: ...User Manual of Digital Video Recorder 41 Chapter 3 Live View ...

Страница 43: ... the live view window or in the lower left corner of the screen for each channel showing the status of the record and alarm in the channel so that you can know whether the channel is recorded or whether there are alarms occur as soon as possible Table 3 1 Description of Live View Icons Icons Description Alarm video loss tampering motion detection or sensor alarm Record manual recording continuous ...

Страница 44: ...cks the connection of the output interfaces to define the main and auxiliary output interfaces See the table below for the priority level of the main and aux outputs Table 3 2 Priorities of Outputs for DS 9200 9100 9000 8100 8000HWI ST DS 7200 Series HDMI VGA CVBS Main output Auxiliary output 1 HDMI VGA CVBS 2 HDMI VGA 3 CVBS Table 3 3 Priorities of Outputs for Other Models HDMI VGA CVBS Main outp...

Страница 45: ...layout by choosing from the drop down list Previous Screen Switch to the previous screen Next Screen Switch to the next screen Start Stop Auto switch Enable disable the auto switch of the screens Start Recording Start all day normal recording or motion detection recording for all channels Playback Play back the video of the selected channel Output Mode Set the video output mode to Standard Bright ...

Страница 46: ...lected from a drop down list Multi screen Switch different display layout options Layout options can be selected from a drop down list Next Screen When displaying less than the maximum number of cameras in Live View clicking this feature will switch to the next set of displays Playback Enter into Playback mode Output Mode Set the video output mode to Standard Bright Gentle or Vivid Main Monitor En...

Страница 47: ...n Capture PTZ Control Digital Zoom Image Settings Live View Strategy Information Close Instant Playback only shows the record in last five minutes If no record is found it means there is no record file during the last five minutes Digital Zoom function makes the camera zoom in on selected area thus to get a close view of the picture You can click and drag the mouse to select the area for zooming i...

Страница 48: ...k Default to restore the default settings and click Copy to copy the image settings to other analog channels For analog cameras connected to DS 9200 HWI ST series device the defog mode is available The defog function is useful in foggy environment and 3 types of defog modes are selectable Auto default Manual and Disable A correct and natural image will be provided with the defog function enabled F...

Страница 49: ...selected to enter the Live View Strategy menu You can set the live view performance to real time balanced or fluency This feature is only available for network cameras Figure 3 8 Live View Strategy Information icon can be selected to show the real time status of the network camera including the frame rate bitrate and resolution ...

Страница 50: ...User Manual of Digital Video Recorder 49 Figure 3 9 Information ...

Страница 51: ...s available in this menu include Video Output Interface Designates the output to configure the settings for The interfaces include HDMI depends on the model VGA Main CVBS and Spot Output Live View Mode Designates the display mode to be used for Live View Dwell Time The time in seconds to dwell between switching of channels when enabling auto switch in Live View Enable Audio Output Enables disables...

Страница 52: ...nd double click on the channel number to display the channel on the window means the channel will not be displayed You can also click to start live view of all channels in order and click to stop live view of all channels Click or to go to the previous or next page 4 Click Apply to save the setting You can also click and drag the camera to the desired window on the live view interface to set the c...

Страница 53: ... the image quality channel zero encoding is provided as an option for you Steps 1 Enter the Live View Settings interface Menu Configuration Live View 2 Click the Channel Zero Encoding tab Figure 3 12 Live View Channel Zero Encoding 3 Check checkbox to enable channel zero encoding 4 Configure the Frame Rate Max Bitrate Mode and Max Bitrate After you set the channel zero encoding you can get a view ...

Страница 54: ...al Manual Video Quality Diagnostics Figure 3 13 Video Quality Diagnostics 2 Check the checkboxes to select the channels for diagnostics 3 Click the button Diagnose and the results will be displayed on a list You can view the video status and diagnostics time of the selected channels Figure 3 14 Diagnostics Result Connect the analog signal to the device for the video quality diagnostics Three excep...

Страница 55: ... mode and if you want to do some operation you need to enter user name and password to log in again Steps 1 Enter the Shutdown menu Menu Shutdown Figure 3 15 Shutdown 2 Click Logout After you have logged out the system menu operation on the screen is invalid It is required a user name and password to login the system ...

Страница 56: ...User Manual of Digital Video Recorder 55 Chapter 4 PTZ Control ...

Страница 57: ...ps 1 Enter the PTZ Settings interface Menu Camera PTZ Figure 4 1 PTZ General 2 Choose the camera for PTZ setting in the Camera drop down list 3 Enter the parameters of the PTZ camera All the parameters should be exactly the same as the PTZ camera parameters Only PTZ Protocol can be configured for network cameras Example If the PTZ camera has a Baud rate as 115200 you should input 115200 in the Bau...

Страница 58: ...which contains information of pan tilt focus and other parameters You can customize the presets and the presets can be used with the event triggered action Steps 1 Enter the PTZ Control interface Menu Camera PTZ More Settings Figure 4 2 PTZ More Settings 2 Use the directional buttons on the PTZ control panel to steer the camera to the desired view 3 Check 4 Click the preset number to save the pres...

Страница 59: ...e PTZ Control interface Menu Camera PTZ More Settings 2 Check Figure 4 4 PTZ Call Preset 3 Choose the preset number Call a preset in live view mode Steps 1 Click the button in the lower right corner of the PTZ setting interface or press the PTZ button on the front panel or click the PTZ Control icon in the quick setting toolbar during the live view process to open the PTZ control panel in live vie...

Страница 60: ... the PTZ Control interface Menu Camera PTZ More Settings 2 Select patrol number 3 Click under Patrol option box to add key points for the patrol Figure 4 6 PTZ Add Key Point 4 Configure key point parameters such as the preset No duration of staying for one key point and speed of patrol The key point is corresponding to the preset The Preset determines the order at which the PTZ will follow while c...

Страница 61: ... the PTZ setting interface Steps 1 In the PTZ setting interface Menu Camera PTZ More Settings 2 Select the patrol number and then click to call the patrol 3 Click to stop it Figure 4 9 Calling Patrol Call a patrol in live view mode Steps 1 Open the PTZ control panel in live view mode 2 Click the Camera tab on the panel and select the channel for control on the camera list 3 Click the Patrol tab on...

Страница 62: ... Enter the PTZ Control interface Menu Camera PTZ More Settings 2 Choose pattern number in the option box Figure 4 11 PTZ Pattern 3 Click and use your mouse to drag the image or click the eight directional buttons in the control box under the image to move the PTZ camera The movement of the PTZ is recorded as the pattern 4 Click to save the pattern Repeat the above steps to save more patterns ...

Страница 63: ...tings 2 Select the pattern number 3 Click then the PTZ moves according to the pattern Click to stop it Figure 4 12 PTZ Calling Pattern Call a pattern in live view mode Steps 1 Open the PTZ control panel in live view mode 2 Click the Camera tab on the panel and select the channel for control on the camera list 3 Click the Pattern tab on the panel and then double click the pattern or click to select...

Страница 64: ...on on the panel and you can enter the PTZ Settings interface In PTZ control mode the PTZ panel will be displayed when a mouse is connected with the device If no mouse is connected the icon appears in the lower left corner of the window indicating that this camera is in PTZ control mode Figure 4 14 PTZ Panel Table 4 1 Description of the PTZ panel icons Icon Description Icon Description Icon Descrip...

Страница 65: ...User Manual of Digital Video Recorder 64 Stop the patrol or pattern movement Minimize windows Exit ...

Страница 66: ...User Manual of Digital Video Recorder 65 Chapter 5 Record and Capture Settings ...

Страница 67: ... not please install a HDD and click Init to initialize it Menu HDD General Figure 5 1 HDD General 2 Check the storage mode of the HDD 1 Click Advanced to check the storage mode of the HDD 2 If the HDD mode is Quota please set the maximum record capacity and maximum picture capacity For detailed information see Chapter 11 5 Configuring Quota Mode 3 If the HDD mode is Group you should set the HDD gr...

Страница 68: ... Record Capture Enabling redundant record or capture means you save the record and captured picture in the redundant HDD See Chapter 5 7 Configuring Redundant Recording Capture Record Audio Enable this feature to record the sound and disable it to record the video without sound Video Stream Main stream and sub stream are selectable for recording When you select sub stream you can record for a long...

Страница 69: ...Optionally you can click Copy to copy the settings to other analog channels if needed The interval is the time period between two capturing actions and the interval can be set as 1s 2s 3s 4s 5s 10min 30min 1h 12h and 24h You can configure all the parameters on this menu on your demand 5 Configure the overwrite mode of the HDD Menu Record Advanced Advanced Check checkbox to enable the overwrite mod...

Страница 70: ...Digital Video Recorder 69 The two way audio record can only be bound to the analog cameras The bound two way audio record will overlap the original audio input during the two way audio Figure 5 9 Two way Audio Record ...

Страница 71: ...ings Steps 1 Enter the Record Schedule interface Menu Record Schedule 2 Configure Record Schedule 1 Select Record Capture Schedule Figure 5 10 Record Schedule 2 Choose the camera you want to configure 3 Check checkbox to enable record schedule There are two ways to configure the record schedule Task 1 Edit the Schedule Steps 1 Click Edit 2 In the message box you can choose the day which you want t...

Страница 72: ...eriods can be configured for each day And the time periods cannot be overlapped each other Repeat the above steps2 5 to schedule recording capture for other days in the week If the schedule can also be set to other days click Copy Figure 5 12 Copy Schedule to Other Days The Holiday option is available when you enable holiday schedule in Holiday settings Refer to Chapter 5 6 Configuring Holiday Rec...

Страница 73: ... A motion and alarm and VCA Video Content Analysis triggered recording and capture you must configure the motion detection settings alarm input settings or VCA settings as well For detailed information refer to Chapter 8 1 Chapter 8 2 and Chapter 8 3 The VCA settings are only available to the smart cameras supporting the VCA function Figure 5 14 Draw the Schedule 1 2 Use the mouse to drag and draw...

Страница 74: ...e settings can also be used to other channels click Copy and then choose the channel to which you want to copy Click Apply in the Record Capture Schedule interface to save the settings Figure 5 16 Copy Schedule to Other Channels for DVR Series Figure 5 17 Copy Schedule to Other Channels for HDVR Series IP Camera is supported by HDVR series only ...

Страница 75: ...hapter you can follow the steps to schedule a record which triggered by the detected motion Steps 1 Enter the Motion Detection interface Menu Camera Motion Figure 5 18 Motion Detection 2 Configure Motion Detection 1 Choose camera you want to configure 2 Check checkbox to enable motion detection 3 Drag and draw the area for motion detection by mouse If you want to set the motion detection for all t...

Страница 76: ...the upper level menu 8 Click Apply in the Motion Detection interface to save the settings Exit the Motion Detection interface 3 Enter Record Capture Schedule settings interface Menu Record Schedule Record Capture Schedule For detailed information about record schedule settings refer to step 2 in Chapter 5 2 Configuring Record Capture Schedule You need to select the Type as Motion in record schedul...

Страница 77: ...ries unless otherwise stated as example to describe the following settings Steps 1 Enter the Alarm setting interface Menu Configuration Alarm Figure 5 22 Alarm Settings 2 Click Alarm Input tab Figure 5 23 Alarm Settings Alarm Input 1 Select Alarm Input No and configure alarm parameters 2 Edit the alarm name as desired and choose N O normally open or N C normally closed for alarm type 3 Check check...

Страница 78: ...ly in the Alarm Input interface to save the settings Repeat the above steps to configure other alarm input parameters If the setting can also be applied to other alarm inputs click Copy and choose the alarm input number Figure 5 26 Copy Alarm Input 3 Enter Record Capture Schedule settings interface Menu Record Schedule Record Capture Schedule For detailed information about record schedule settings...

Страница 79: ...User Manual of Digital Video Recorder 78 Figure 5 27 Record Schedule ...

Страница 80: ...apture Steps 1 Enter the Manual settings interface Menu Manual Or press the REC SHOT button on the front panel Figure 5 28 Manual Record for DVR Series Figure 5 29 Manual Record for HDVR Series IP Camera is supported by HDVR series only 2 Enable manual record 1 Select Record tab on the left bar 2 Click the status button before camera No to change to 3 Disable manual record Click the status button ...

Страница 81: ...isabling the continuous capture 1 Select Continuous Capture tab on the left bar Figure 5 32 Continuous Capture for DVR Series Figure 5 33 Continuous Capture for HDVR Series IP Camera is supported by HDVR series only 2 Click the status button before camera number to change to to enable continuous capture 3 Or click the status button to change to to disable continuous capture After rebooting all the...

Страница 82: ...apture schedule on holiday for that year The priority of holiday schedule is higher than any other schedule Steps 1 Enter the Record setting interface Menu Record 2 Choose Holiday on the left bar Figure 5 34 Holiday Settings 3 Enable editing holiday schedule 1 Click to enter the Edit interface Figure 5 35 Edit Holiday Settings 2 Check checkbox to enable the holiday schedule 3 Select Mode from the ...

Страница 83: ...ings 6 Click OK to exit the Edit interface 4 Enter Record Capture Schedule settings interface Menu Record Schedule Record Capture Schedule For detailed information about record schedule settings refer to step 2 in Chapter 5 2 Configuring Record Capture Schedule You need to select schedule type as Holiday or draw the schedule for the Holiday Figure 5 36 Edit Schedule Holiday Figure 5 37 Draw Schedu...

Страница 84: ...ively The storage mode of the HDD needs to be set as Group For details see Chapter 11 4 Managing HDD Group There should be at least another HDD which is in R W mode Steps 1 Enter HDD Information interface Menu HDD General Figure 5 38 HDD General 2 Select the HDD and click to enter the Local HDD Settings interface 1 Set the HDD property to Redundancy Figure 5 39 HDD General Editing 2 Click Apply to...

Страница 85: ...s 2 Select Camera you want to configure 3 Check checkbox to enable redundant recording and capture 4 Click Apply to save settings Repeat the above steps2 4 for configuring other channels If the setting can also be applied to other analog channels click Copy and then choose the channel s ...

Страница 86: ...rmation please refer to Chapter 11 4 Managing HDD Group 3 Select General in the left bar and click to enter editing interface 4 Configuring HDD group 1 Choose a group number for the HDD group 2 Click Apply and then in the pop up message box click Yes to save your settings 3 Click OK to back to the upper level menu Repeat the above steps3 4 to configure more HDD groups 5 Choose the channels of whic...

Страница 87: ...ose Group number in the drop down list of Record on HDD Group 3 Check the channels you want to save in this group 4 Click Apply to save settings After having configured the HDD groups you can configure the Recording and Capture settings by following the procedure provided in Chapter 5 2 5 7 ...

Страница 88: ... 9 1 Locking the Record Files Task 1 Lock File when Playback Steps 1 Enter the Normal Playback Event Playback Tag Playback interface For details see Chapter 6 1 2 Chapter 6 1 4 Figure 5 44 Playback 2 Click the button on the toolbar and the current record file in playback will be locked In multi channel playback mde click the button and all the record files related to the playback channels will be ...

Страница 89: ...nagement interface to unlock the selected record file Task 2 Lock File when Export Steps 1 Enter Export setting interface Menu Export Figure 5 46 Export Interface 2 Check the checkbox to select the channels 3 Select the record type file type and then specify the start end time for search 4 Click Search to show the results ...

Страница 90: ...ating that the file is locked 2 Click the icon to unlock the file and the file is not protected Figure 5 48 Unlocking Attention 5 9 2 Setting HDD property to Read only To edit HDD property you need to set the storage mode of the HDD to Group See Chapter 11 4 Managing HDD Group Steps 1 Enter HDD setting interface Menu HDD Figure 5 49 HDD General 2 Click to edit the HDD you want to protect ...

Страница 91: ...any files in a Read only HDD If you want to save files in the HDD change the property to R W If there is only one HDD and is set to Read only the device can t record any files Only live view mode is available If you set the HDD to Read only when the device is saving files in it then the file will be saved in next R W HDD If there is only one HDD the recording will be stopped ...

Страница 92: ...User Manual of Digital Video Recorder 91 Chapter 6 Playback ...

Страница 93: ...video files of a specific channel in the live view mode Channel switch is supported Instant playback by channel Choose a channel in live view mode using the mouse and click the button in the quick setting toolbar Only record files recorded during the last five minutes on this channel will be played back Figure 6 1 Instant Playback Interface Playback by channel Steps 1 Enter the Playback interface ...

Страница 94: ...Front Panel Press PLAY button to play back record files of the channel under single screen live view mode Pressing numerical buttons will switch playback to the corresponding channels during playback process Front panel operation is not supported by 7200HWI SV series 2 The playback starts from 5 minutes before by default ...

Страница 95: ...d then the video from the selected channels will be played back synchronously Up to 16 channels can be set for synchronous playback Click the Max Camera for Playback tab and you can play back the video from 16 channels at a time Click the Min Camera for Playback tab and you can play back the video from only one channel 6 1 2 Playing Back by Time Purpose The time bar indicates the time duration for...

Страница 96: ...n for that day is displayed as Otherwise it is displayed as The event triggered recordings will be displayed prior to the normal recordings on the calendar when both the two types of recordings are available in that day Figure 6 5 Playback Calendar In the Playback interface The toolbar in the bottom part of Playback interface can be used to control playing process Figure 6 6 Interface of Playback ...

Страница 97: ...anagement Digital Zoom Pause Play Reverse Stop Pause Play 30s backward 30s forward Slow forward Fast forward Previous day Next day Scaling up down time bar Process bar Full Screen Exit Frame extracting mode Normal playback 6 1 3 Playing Back by Event Search Before you start The event motion and alarm input triggered record schedule needs to be configured For details see Chapter 5 3 and Chapter 5 4...

Страница 98: ...igure 6 8 Event Playback Interface Motion The VCA event search is only available to the HDVR series 4 Click Search and the record files matching the search conditions will be displayed on a list Figure 6 9 Result of Video Search by Alarm Input ...

Страница 99: ... play time as 5 seconds the video plays back till 11 00 05 If there is only one channel is triggered by an alarm input clicking button takes you to Full screen Playback interface of this channel If several channels are triggered clicking button takes you to the interface Check checkbox to select one channel for playback or select multiple channels for synchronous playback For DVR series 4 ch 8 ch ...

Страница 100: ... Operation Button Operation Button Operation Button Operation Audio on Mute Adjust volume Start Stop clipping Capture Lock file Add default tag Add customized tag File management Digital Zoom Pause Play Reverse Stop Pause Play 30s backward 30s forward Slow forward Fast forward Previous event Next event Scaling up down time bar Process bar Full Screen Exit Frame extracting mode Event playback ...

Страница 101: ...yback Before you start 1 Enter the Normal Playback or Event Playback interface For details see Chapter 6 1 2 and Chapter 6 1 3 Figure 6 13 Interface of Playback by Time 2 Click the icon at the bottom of the interface to add the default tag Click the icon and input the tag name to add the customized tag Click the icon select the Tag tab and you can view edit and delete the added tag s Up to 64 tags...

Страница 102: ...Video Search by Tag 3 Select the channels from the list and specify the start time and end time for search 4 Optionally you can input the keyword of the tag name in the Keyword text field to narrow the search 5 Click Search and the tags matching the search conditions will be displayed on a list 6 Click button to play back the file You can click the Back button to back to the search interface ...

Страница 103: ... Playback by Tag Figure 6 18 Table 6 3 Detailed Explanation of Playback by tag Interface Button Operation Button Operation Button Operation Button Operation Audio on Mute Adjust volume Start Stop clipping Capture Lock file File management Digital Zoom Pause Play Reverse Stop Pause Play 30s backward 30s forward Slow forward Fast forward Previous tag Next tag Scaling up down time bar Process bar Ful...

Страница 104: ...User Manual of Digital Video Recorder 103 mode ...

Страница 105: ... the Smart in the drop down list on the top left side 3 Select a date in the calendar and select a camera in the camera list 4 Click the button to play Figure 6 19 Smart Playback Interface The indicates the start end time of the record represents normal recording manual or schedule represents event recording motion alarm motion alarm motion alarm VCA and represents the smart search result Playback...

Страница 106: ...gital Video Recorder 105 Table 6 4 Detailed Explanation of Smart Playback Button Operation Button Operation Button Operation Smart search Stop Pause play Play Process bar Scaling up down the time line Video type picture ...

Страница 107: ...aintenance Log Information Log Search Figure 6 20 Log Search Interface 2 Specify the start time and end time for search 3 Select the major type of the log from the drop down list 4 major types are selectable Alarm Exception Operation and Information 4 Check the checkboxes to select the minor type of the log for search 5 Click Search and the logs matching the search conditions will be displayed on ...

Страница 108: ...o result found will pop up Figure 6 22 Interface of Playback by Log 6 1 7 Playing Back External Files Purpose The record files stored in the external storage devices e g USB flash drives USB HDDs can be searched and played back Before you start Insert the external device s with available record files into the device Steps 1 Enter the Playback interface Menu Playback 2 Click and select to enter the...

Страница 109: ...g Back Frame Extracting Record Purpose If there are frame extracting record files existing in the HDD you can search and play back them In this section we use the interface of DS 9100HFI RT series as example to describe the following settings Frame extracting record is supported by DVR series only The frame extracting record is with low bitrate and the frame rate is 1 fps Steps 1 Enter the Playbac...

Страница 110: ...ord Playback Interface 2 Select the record type Normal Event and Tag from the drop down list and search the corresponding files For details see Chapter 6 1 2 Chapter 6 1 3 or Chapter 6 1 4 3 Play back the record files if available Figure 6 25 Frame Extracting Record Playback ...

Страница 111: ...o Single frame One click on button one click on the playback screen or Enter button on the front panel represents playback or reverse playback of one frame 6 2 2 Smart Search Purpose In order to locate motion detection or VCA events easily and accurately in the playback progress bar you can analyze a certain area scene dynamically and get all of the related motion detection or VCA events that occu...

Страница 112: ...e bottom of the screen Figure 6 28 Draw Area for Smart Search 3 Click and drag the mouse to draw area s for smart search Intrusion Detection Click the button and then specify 4 points to set a quadrilateral region for intrusion detection Only one region can be set Motion Detection Click the button and then click and draw the mouse to set the detection area manually You can also ...

Страница 113: ...he playback control toolbar to enter Digital Zoom mode 3 Click and drag the mouse to draw a red rectangle on the window in the lower right corner of the interface And then the image within it will be enlarged up to 16 times 4 Right click to exit the Digital Zoom mode Figure 6 29 Draw Area for Digital Zoom 6 2 4 Reverse Playback of Multi channel Purpose You can play back record files of multi chann...

Страница 114: ...iles of all the selected channels 3 Click the icon on the playback control toolbar and the record files will be played back reversely For DVR series up to 16 ch simultaneous reverse playback is supported While for Hybrid DVR series up to 16 ch with 704 576 resolution simultaneous reverse playback is supported up to 8 ch with 1280 720 resolution simultaneous reverse playback is supported up to 4 ch...

Страница 115: ...yback 2 Click and select to enter the Picture Playback interface Figure 6 31 Picture Playback Interface 3 Check checkbox to select the channel s and specify the start time and end time for search 4 Click Search to enter Search Result interface Up to 4000 pictures can be displayed each time 5 Choose a picture you want to view and click button You can click Back to return to the search interface ...

Страница 116: ...lbar in the bottom part of Playback interface can be used to control playing process Figure 6 33 Picture Playback Toolbar Table 6 5 Detailed Explanation of Picture playback Toolbar Button Function Button Function Button Function Button Function Play reverse Play Previous picture Next picture ...

Страница 117: ...User Manual of Digital Video Recorder 116 Chapter 7 Backup ...

Страница 118: ...the interface of DS 9000HFI RT series unless otherwise stated as example to describe the following settings Steps 1 Enter Normal Export interface Menu Export Normal 2 Select the channel s you want to back up and set the search conditions The start time and end time for search should be within the same day Figure 7 1 Quick Export Interface for DVR Series 3 Click the button Quick Export and the Expo...

Страница 119: ...ported automatically during record file export Figure 7 3 Checkup of Quick Export Result Using USB1 1 Click the button on the Export interface and you can view the video Click the button on the Export interface and you can delete the record file 7 1 2 Backing up by Normal Video Search Purpose The record files can be backed up to various devices such as USB devices USB flash drives USB HDDs USB wri...

Страница 120: ...terface You can click the button to play the record file if you want to view it Frame Extracting record mode is supported by the DVR series only Six different Record types are selectable Continuous Motion Alarm Motion Alarm Motion Alarm Command Triggered and Manual The command triggered record is configured by the platform when the device accessed via the platform Two different File types are sele...

Страница 121: ...e Export interface to start the backup process A prompt message will pop up after the backup process is complete Figure 7 7 Export Finished 5 The exported record files will be displayed in a list on the Export interface You can click to view the video or click to delete the record file The Player program player exe will be exported automatically during record file export Figure 7 8 Checkup of Expo...

Страница 122: ...ed Steps 1 Enter Event Export interface Menu Export Event Figure 7 9 Event Search for Backup 2 Select Alarm Input Motion or VCA from the drop down list as the event type select the channel and specify the start time and end time for search and then click the button Search to enter the Search Result interface Figure 7 10 Result of Event Search 3 Select the record file from the list and click the bu...

Страница 123: ...select all the record files directly to enter the Export interface The size of the currently selected files is displayed in the lower left corner of the window Figure 7 11 Event Details Interface Figure 7 12 Export by Event Using USB Flash Drive 4 Click the button Export on the export interface to start the backup process A prompt message will pop up after the backup process is complete Figure 7 1...

Страница 124: ...r program player exe will be exported automatically during record file export Figure 7 14 Checkup of Event Export Result Using USB Flash Drive 7 1 4 Backing up Video Clips Purpose You can also export the video clips directly during Playback using USB devices USB flash drives USB HDDs USB writer DVD R W or eSATA HDD Steps 1 Enter Playback interface and start the playback For details see Chapter 6 1...

Страница 125: ...rd file s 3 Click the button on the toolbar select Video Clip tab and you can view and export the video clips Figure 7 16 Clips Export Up to 30 items of video clips can be selected for backup at one time 4 Click the button Export to export the selected video clips to the backup device You can also click the button Export All to export all the video clips to the backup device ...

Страница 126: ...les are exported with pop up message Export finished Figure 7 18 Export Finished 5 After the backup is complete the exported record files will be displayed in a list on the Export interface The Player program player exe will be exported automatically during record file export Figure 7 19 Checkup of Video Clips Export Result Using USB Flash Drive ...

Страница 127: ...nter Playback interface and start the playback For details see Chapter 6 1 Figure 7 20 Interface of Playback by Time 2 In the playback process click the icon in the playback toolbar to capture the pictures 3 Click the button on the toolbar select Playback Capture tab and you can view and export the pictures captured when playback Figure 7 21 Captured Picture Export Interface ...

Страница 128: ...ter Picture Export interface Menu Export Picture Figure 7 22 Picture Search for Backup in DVR Series Figure 7 23 Picture Search for Backup in HDVR Series Picture search for backup of IP Camera is supported by HDVR series only 2 Set the search conditions and click the button Search to enter the search result interface Figure 7 24 Result of Picture Search 3 Check the checkboxes to select pictures an...

Страница 129: ...7 25 Export Pictures Using USB Flash Drive 4 Click the button Export on the Export interface to start the backup process A prompt message will pop up after the backup process is complete Figure 7 26 Export Finished 5 The exported pictures will be displayed in a list on the Export interface You can click to view the picture or click to delete the picture Figure 7 27 Checkup of Picture Export Using ...

Страница 130: ... HDDs and eSATA HDDs Figure 7 29 Management of USB Writers and DVD R W 2 Select a record file folder picture in the backup device click the icon and you can delete it Select a record file picture click the icon and then you can play and view the video picture For USB Flash Drives USB HDDs and eSATA HDDs Click the button New Folder and you can create a new folder in the backup device Click the butt...

Страница 131: ...Writers and DVD R W Click the button Erase and you can erase the files from a re writable CD DVD If the inserted device is not recognized you can perform the following steps Click the button Refresh Reconnect device Check for compatibility from vendor ...

Страница 132: ...r the working device and hot spare device Set a hot spare device Add a hot spare device on normal device Add the normal device on the hot spare device Start Finish Figure 7 30 Building Hot Spare System 7 4 1 Setting the Hot Spare Device The camera connection will be disabled when the device works in the hot spare mode After switching the working mode of the hot spare device to normal mode restore ...

Страница 133: ...ttings interface of the working device Menu Configuration Hot Spare 2 Set the working mode of the device as Normal Mode default 3 Check the checkbox of Enable input the IP address and administrator password of the hot spare device 4 Click the button Apply to connect the hot spare device to the working device Figure 7 32 Normal Mode Settings ...

Страница 134: ... spare device Figure 7 33 Link Working Device to Hot Spare Device 2 You can view the working status of the hot spare device on the Working Device Status list When the working device works properly the working status of the hot spare is displayed as No record Figure 7 34 Working Status of Hot Spare Device 1 When the working device gets offline the hot spare device will record the video of the IPCs ...

Страница 135: ...User Manual of Digital Video Recorder 134 function The record synchronization function can be enabled for up to 1 working device at a time Figure 7 36 Working Status of Hot Spare Device 3 ...

Страница 136: ...User Manual of Digital Video Recorder 135 Chapter 8 Alarm Settings ...

Страница 137: ...ings Interface 2 Set detection area and sensitivity Check checkbox to enable motion detection use the mouse to draw detection area s and drag the sensitivity bar to set sensitivity Figure 8 2 Set Detection Area and Sensitivity 3 Click to configure the motion detection settings Click Trigger Channel tab and select one or more channels which will start to record capture or become full screen monitor...

Страница 138: ...schedule of other days of a week You can also click the button Copy to copy an arming schedule to other days Click Apply to save the settings Time periods cannot be repeated or overlapped Figure 8 5 Set Arming Schedule of Motion Detection 5 Click Linkage Action tab to set alarm linkage actions of motion detection please refer to Chapter 8 7 Figure 8 6 Set Alarm Linkage Actions of Motion Detection ...

Страница 139: ...tion for another channel repeat the above steps or just click Copy in the Motion Detection interface to copy the above settings to it You are not allowed to copy the Trigger Channel action and motion detection settings to IP camera Figure 8 7 Copy Settings of Motion Detection ...

Страница 140: ...of the selected alarm input Check checkbox to enable the alarm input and click to configure the alarm settings Figure 8 9 Alarm Input Settings Interface 3 Select Trigger Channel tab and select one or more channels which will start to record capture or become full screen monitoring when an external alarm is input Click Apply to save the settings 4 Select Arming Schedule tab to set the channel s arm...

Страница 141: ...et PTZ linking parameters and click Apply to save the settings Click OK to complete the settings of the alarm input Please check whether the PTZ or speed dome supports PTZ linkage One alarm input can trigger presets patrol or pattern of more than one channel But presets patrols and patterns are exclusive Figure 8 11 Set PTZ Linking of Alarm Input 7 If you want to set alarm settings of another alar...

Страница 142: ...User Manual of Digital Video Recorder 141 Figure 8 12 Copy Settings of Alarm Input ...

Страница 143: ...HDVR series Steps 1 Enter the VCA Alarm interface and choose a camera for the VCA settings The connected IP camera should support the VCA function Figure 8 13 VCA Alarm Settings Interface 2 Check the checkbox of Enable VCA Alarm to enable the VCA alarm function 3 Click the icon to configure the VCA settings Select Trigger Channel tab and select one or more channels which will start to record captu...

Страница 144: ...py an arming schedule to other days Click Apply to save the settings Time periods cannot be repeated or overlapped Figure 8 15 Set Arming Schedule of VCA Alarm 5 Select Linkage Action tab to set alarm linkage actions of the VCA alarm please refer to Chapter 8 7 6 Select PTZ Linking tab set PTZ linkage of the VCA alarm and click Apply to save the settings Please check whether the PTZ or speed dome ...

Страница 145: ... arming schedule of the channel Select Arming Schedule tab to set the channel s arming schedule Choose one day of a week and up to eight time periods can be set within each day Set up arming schedule of other days of a week You can also use Copy to copy an arming schedule to other days Click Apply to save the settings Time periods cannot be repeated or overlapped Figure 8 18 Set Arming Schedule of...

Страница 146: ...ant to set video loss handling method for another channel repeat the above steps or just click Copy in Video Loss interface to copy the above settings to it Copying video loss settings to IP camera is not supported Figure 8 19 Copy Settings of Video Loss ...

Страница 147: ...pering Drag the sensitivity bar and choose a proper sensitivity level Use the mouse to draw an area you want to detect video tampering 3 Click to configure the video tampering settings Set arming schedule and alarm linkage actions of the channel 1 Click Arming Schedule tab to set the channel s arming schedule 2 Choose one day of a week and up to eight time periods can be set within each day Set up...

Страница 148: ...click OK to complete the video tampering settings of the channel 5 If you want to set up linkage actions of video tampering detection alarm for another channel repeat step two and three or just click Copy on Video Tampering Detection Settings interface to copy the above settings to it You cannot copy the video tampering settings to IP channels Figure 8 22 Copy Settings of Video Tampering ...

Страница 149: ...occurs when the hot spare device is disconnected for the hot spare device the exception occurs when the working device is offline Input Output Video Standard Mismatch and Video Signal Exception are not supported by IP cameras of HDVR series Array Exception is only supported by DS 9100 9000HFI RT series Hot Spare Exception is only supported by HDVR series Steps 1 Enter Exceptions interface and hand...

Страница 150: ...User Manual of Digital Video Recorder 149 3 Set the alarm linkage actions For details see Chapter 8 7 4 Click Apply to save the settings Figure 8 24 Exception Settings Interface ...

Страница 151: ...d you will be taken back to the Live View interface You must select during Trigger Channel settings the channel s you want to make full screen monitoring Audible Warning Trigger an audible beep when an alarm is detected Notify Surveillance Center Sends an exception or alarm signal to remote alarm host when an event occurs The alarm host refers to the PC installed with Remote Client The alarm signa...

Страница 152: ... 2 Set arming schedule of the alarm output Click to set the arming schedule of alarm output Choose one day of a week and up to 8 time periods can be set within each day Time periods cannot be repeated or overlapped Figure 8 26 Set Arming Schedule of Alarm Output 3 Repeat the above steps to set up arming schedule of other days of a week You can also click Copy to copy an arming schedule to other da...

Страница 153: ...User Manual of Digital Video Recorder 152 Figure 8 27 Copy Settings of Alarm Output ...

Страница 154: ...e alarm can be cleared only by clicking Clear button in the following interface Steps Select the alarm output you want to trigger or clear and make related operations Menu Manual Alarm Click Trigger Clear button if you want to trigger or clear an alarm output Click Trigger All button if you want to trigger all alarm outputs Click Clear All button if you want to clear all alarm output Figure 8 28 C...

Страница 155: ...User Manual of Digital Video Recorder 154 Chapter 9 Network Settings ...

Страница 156: ...perate device over network Steps 1 Enter the Network Settings interface Menu Configuration Network Figure 9 1 Network Settings Interface for DS 9200HWI ST DS 9100HFI ST RT XT HWI ST DS 8100HFI HWI ST Figure 9 2 Network Settings Interface for DS 9000HFI ST RT XT HWI ST DS 8000HFI HWI ST Figure 9 3 Network Settings Interface for DS 7200HWI SV ...

Страница 157: ...x of Enable DHCP to automatically obtain an IP address and other network settings from that server The valid value range of MTU is 500 9676 4 After having configured the general settings click Apply to save the settings Working Mode There are two 10M 100M 1000M NIC cards provided by the device and it allows the device to work in the Multi address Load Balance and Net Fault tolerance modes Multi ad...

Страница 158: ...Mode The two NIC cards use the same IP address and you can select the Main NIC to LAN1 or LAN2 By this way in case of one NIC card failure the device will automatically enable the other standby NIC card so as to ensure the normal running of the whole system Figure 9 6 Net Fault tolerance Working Mode ...

Страница 159: ...nable PPPoE 4 Enter User Name and Password for PPPoE access The User Name and Password should be assigned by your ISP Figure 9 8 PPPoE Settings Interface 5 Click Apply to save and exit the interface 6 After successful settings the system asks you to reboot the device to activate the new settings and the PPPoE dial up is automatically connected after reboot You can go to Menu Maintenance System Inf...

Страница 160: ...rver DynDNS PeanutHull NO IP and HiDDNS IPServer Enter Server Address for IPServer and other fields are read only The Server Address should be the IP address of the PC that runs IPServer Figure 9 10 IPServer Settings Interface DynDNS 1 Enter Server Address for DynDNS e g members dyndns org 2 In the Device Domain Name text field enter the domain obtained from the DynDNS website 3 Enter the User Nam...

Страница 161: ...he Server Address of the HiDDNS server By default www hik online com will be automatically available in the Server Address field when HiDDNS is selected 2 Enter the Device Domain Name You can register the device domain name in the HiDDNS server first and then enter the name to the Device Domain Name in the device you can also enter the domain name directly on the device to create a new one If a ne...

Страница 162: ...vice Domain Name Device Name Task 1 Access the Device via Web Browser Open a web browser and enter http www hik online com alias in the address bar Alias refers to the Device Domain Name on the device or the Device Name on the HiDDNS server Example http www hik online com dvr If you mapped the HTTP port on your router and changed it to port No except 80 you have to enter http www hik online com al...

Страница 163: ...the Network Settings interface Menu Configuration Network 2 Select the NTP tab to enter the NTP Settings interface Figure 9 18 NTP Settings Interface 3 Check checkbox to enable NTP 4 Configure the following NTP settings Interval Time interval between the two synchronizing actions with NTP server The unit is minute NTP Server IP address of NTP server NTP Port Port of NTP server 5 Click Apply to sav...

Страница 164: ... and Alternate FTP Server are selectable 4 Check checkbox to enable the FTP server When both two FTP servers are enabled and configured properly once the preferred FTP server fails the alternate FTP server will be used until the preferred FTP server resumes work 5 Configure the FTP settings for preferred and alternate FTP server including FTP protocol server address port user name password and the...

Страница 165: ...6 Click Apply to save and exit the interface Please make sure the remote FTP server has been started up before setting the FTP parameters 9 2 5 Configuring SNMP Settings Purpose You can use SNMP protocol to get device status and parameters related information Steps 1 Enter the Network Settings interface Menu Configuration Network 2 Select the SNMP tab to enter the SNMP Settings interface Figure 9 ...

Страница 166: ... of the router to which your device is connected When the network working mode of the device is set as multi address the Default Route of the device should be in the same network segment as that of the LAN IP address of the router Steps 1 Enter the Network Settings interface Menu Configuration Network 2 Select the NAT tab to enter the UPnP interface Figure 9 23 UPnP Settings Interface 3 Check chec...

Страница 167: ...der the same router the value of the port No for each device should be unique Figure 9 25 External Port Settings Dialog Box 2 Click Apply to save the settings 3 You can click Refresh to get the latest status of the port mapping Figure 9 26 UPnP Settings Finished Manual Manual Mapping If your router does not support the UPnPTM function perform the following steps to map the port manually in an easy...

Страница 168: ...value in the External Source Port textfield and other required information Each item should be corresponding with the internal or external device port including server port http port RTSP port and https port Figure 9 28 Setting Virtual Server Item The above virtual server setting interface is for reference only it may be different due to different router manufactures Please contact the manufacture...

Страница 169: ...figuring Multicast Settings Purpose The multicast can be configured to realize live view for more than 128 cameras through network A multicast address spans the Class D IP range of 224 0 0 0 to 239 255 255 255 It is recommended to use the IP address ranging from 239 252 0 0 to 239 255 255 255 Steps 1 Enter the Network Settings interface Menu Configuration Network 2 Select the More Settings tab to ...

Страница 170: ...change it according to different requirements 4 Click Apply to save and exit the menu 9 2 10Configuring Server and HTTP Ports Settings Purpose You can change the server and HTTP ports in the Network Settings menu The default server port is 8000 and the default HTTP port is 80 Steps 1 Enter the Network Settings interface Menu Configuration Network 2 Select the More Settings tab to enter the More Se...

Страница 171: ...reates a secure channel over an insecure network HTTPS URLs begin with https and use port 443 by default You can modify the port No as desired Example If you set the port No as 445 and the IP address of the device is 192 0 0 64 you can access the device by inputting https 192 0 0 64 445 in the web browser Steps 1 Access the device via the web browser and enter the HTTPS settings interface Configur...

Страница 172: ...ble the HTTPS function The HTTPS Port should be set to the range of 1 65535 9 2 12Configuring High speed Download Settings Purpose You can enable the High speed Download function to widen the outgoing bandwidth of the device In this way you can speed up the download of record files through web browser or CMS software If you enable the high speed download function the local menu operation will be a...

Страница 173: ...ent is detected a motion detection event is detected etc Before you start The device must be connected to a local area network LAN that maintains an SMTP mail server The network must also be connected to either an intranet or the Internet depending on the location of the email accounts to which you want to send notification Steps 1 Enter the Network Settings interface Menu Configuration Network 2 ...

Страница 174: ...t TCP IP port used for SMTP is 25 Enable SSL optional Check the checkbox to enable SSL if required by the SMTP server Sender The name of sender Sender s Address The Email address of sender Select Receivers Select the receiver Up to 3 receivers can be configured Receiver The name of user to be notified Receiver s Address The Email address of user to be notified Enable Attached Pictures Check the ch...

Страница 175: ...he web browser Steps 1 Enter the Advanced settings interface Configuration Remote Configuration Network Settings Advanced Figure 9 43 Advanced Settings Interface 2 Check the checkbox of the Enable Virtual Host 3 Click the Save button to save the setting 4 Enter the IP camera management interface of HDVR The Connect column appears on the right most side of the camera list Configuration Remote Confi...

Страница 176: ... the Advanced settings interface Configuration Remote Configuration Network Settings Advanced Figure 9 45 Advanced Settings Interface 2 Check the checkbox of the Enable Telnet 3 Click the Save button to save the setting 4 You can open the Command Prompt window in your PC and input telnet IP Address to connect with the DVR as shown in the figure below Example The IP address of the DVR is 192 0 0 64...

Страница 177: ...n real time information of device such as linking status MTU sending receiving rate etc Steps 1 Enter the Network Traffic interface Menu Maintenance Net Detect Figure 9 47 Network Traffic Interface 2 You can view the sending rate and receiving rate information on the interface The traffic data is refreshed every 1 second ...

Страница 178: ...ction Interface for DS 7200HWI SV Series Figure 9 49 Network Detection Interface for Other Series Dual NIC is not supported by DS 7200HWI SV series We use the interface of DS 9100HFI ST series unless otherwise stated as example to describe the following settings 3 Select a NIC to test network delay and packet loss 4 Enter the destination address in the text field of Destination Address 5 Click Tes...

Страница 179: ...raffic interface Menu Maintenance Net Detect 2 Click the Network Detection tab to enter the Network Detection interface 3 Select the backup device from the drop down list of Device Name Click Refresh if the connected local backup device cannot be displayed When it fails to detect the backup device please check whether it is compatible with the device You can format the backup device if the format ...

Страница 180: ...cribe the following settings Steps 1 Enter the Network Traffic interface Menu Maintenance Net Detect 2 Click the Network Detection tab to enter the Network Detection interface 3 Click Status to get the network status Figure 9 53 Checking Network Status If the network is normal the following message box pops out Figure 9 54 Network Status Checking Result If the message box pops out with other infor...

Страница 181: ...e Menu Maintenance Net Detect 2 Click the Network Stat tab to enter the Network Statistics interface Figure 9 56 Network Stat Interface 3 View the bandwidth of IP Camera bandwidth of Remote Live View bandwidth of Remote Playback bandwidth of Net Receive Idle and bandwidth of Net Send Idle The bandwidth of IP Camera is only displayed in HDVR series The value of the bandwidth is subject to the actua...

Страница 182: ...User Manual of Digital Video Recorder 181 Chapter 10 RAID Configuration ...

Страница 183: ...f redundancy and performance is required The DS 9000 9100HFI RT is capable of realizing RAID settings supporting RAID 0 RAID 1 RAID 5 and RAID 10 Before you start Please install the HDD s properly and it is recommended to use the same enterprise level HDDs including model and capacity for array creation and configuration so as to maintain reliable and stable running of the disks Introduction The D...

Страница 184: ...enter the One touch Array Configuration interface As the default array type is RAID 5 at least 3 HDDs must be installed in you device Figure 10 3 One touch Array Configuration 3 Edit the array name in the Array Name text filed and click OK start array configuration If you install 4 HDDs or above for one touch configuration a hot spare disk will be set by default It is recommended to set hot spare ...

Страница 185: ...face 7 After the initialization of the virtual disk is complete the virtual disk will be displayed in the HDD Information interface Menu HDD General For operation guide of initializing the virtual disk please refer to Chapter 11 1 Initializing HDDs For configuring hot spare disk manually please refer to steps 12 15 of Chapter 10 1 2 10 1 2Manually Creating Array and Virtual Disk Purpose You can ma...

Страница 186: ...rray Name set the RAID Level to RAID 0 RAID 1 RAID 5 or RAID 10 select the Physical Disk that you want to configure array If you choose RAID 0 at least 2 HDDs must be installed If you choose RAID 1 2 HDDs need to be configured for RAID 1 If you choose RAID 5 at least 3 HDDs must be installed If you choose RAID 10 4 6 8 HDDs need to be configured for RAID 10 4 Click OK to create array ...

Страница 187: ...ting at most 8 virtual disks Figure 10 10 Create Virtual Disk Interface 7 Edit the name of the virtual disk set the capacity for the virtual disk and select the initialization type for the virtual disk You can also click the Information of Array Capacity area to set the remaining capacity of the array for the disk It is recommended to create one virtual disk of an array At least 100GB capacity mus...

Страница 188: ...ual Disk tab to enter the Virtual Disk interface The successfully created virtual disk will be listed on the interface Figure 10 11 Virtual Disk Interface 10 Enter the HDD Information interface Menu HDD General and the virtual disk will be displayed For operation guide of initializing the virtual disk please refer to Chapter 11 1 Initializing HDDs If you adopt foreground initialization the virtual...

Страница 189: ...User Manual of Digital Video Recorder 188 Figure 10 14 Hot Spare Disk ...

Страница 190: ...ray rebuilding 10 2 1Automatically Rebuilding Array Purpose When the virtual disk is in Degraded status the device can start rebuilding the array automatically with the hot spare disk to ensure the high security and reliability of the data Before you start The hot spare disk needs to be configured Steps 1 Enter the Array Settings interface When the status of the array is Disk Loss the hot spare di...

Страница 191: ...17 Array Settings Interface Figure 10 18 Virtual Disk Interface 2 Click the icon on the Array Settings interface to rebuild the array At least one available physical disk should exist for rebuilding the array Figure 10 19 Rebuild Array Interface 3 Select the available free physical disk and click OK to confirm to rebuild the array 4 The Do not unplug the physical disk when it is under rebuilding m...

Страница 192: ... disk is under foreground initialization the repairing cannot be done Steps 1 Enter the Virtual Disk interface Menu HDD RAID Virtual Disk Figure 10 20 Virtual Disk Interface 2 Click to repair the virtual disk After successfully repairing the following message box will pop up Click OK to finish the settings Figure 10 21 Repairing Virtual Disk Successfully The disk shows again in the HDD Information...

Страница 193: ...terface Menu HDD RAID Virtual Disk Figure 10 23 Virtual Disk Interface 2 Select a virtual disk and click to delete the virtual disk Figure 10 24 Confirm Virtual Disk Deletion 3 In the pop up message box click Yes to confirm the virtual disk deletion Deleting virtual disk will cause to delete all the data saved in the disk 10 4 2Deleting the Array If all the virtual disks under an array have been d...

Страница 194: ...re 10 25 Array Settings Interface 2 Select an array and click to delete the array Figure 10 26 Confirm Array Deletion 3 In the pop up message box click Yes to confirm the array deletion Deleting array will cause to delete all the data in the array ...

Страница 195: ...ding the version maximum physical disk quantity maximum array quantity auto rebuild status etc Menu HDD RAID Firmware Figure 10 27 Firmware Interface 2 You can click Upgrade to upgrade the firmware Local upgrade and FTP upgrade are available Since the upgrading process of the firmware is the same as that of the device firmware you can refer to Chapter 13 4 for detailed information Please contact t...

Страница 196: ...User Manual of Digital Video Recorder 195 Figure 10 28 Upgrade the Firmware ...

Страница 197: ...User Manual of Digital Video Recorder 196 Chapter 11 HDD Management ...

Страница 198: ...initialized before it can be used with your device If there is uninitialized HDD existed in the device the following message box pops up when the device starts up Figure 11 1 Message Box of Uninitialized HDD Click Yes to initialize it immediately or you can perform the following steps to initialize the HDD s Steps 1 Enter the HDD Information interface Menu HDD General Figure 11 2 HDD Information I...

Страница 199: ...mal Initializing the HDD will erase all data on it The HDDs which are free of working for a long time can be enabled to sleep thus to decrease the power consumption of the device and extend the life of the HDDs Click Menu HDD Advanced Figure 11 6 Enable HDD Sleeping Check the checkbox of Enable HDD Sleeping by default and the HDDs which are free of working for a long time will be set to sleep Unch...

Страница 200: ...twork HDD Steps 1 Enter the HDD Information interface Menu HDD General Figure 11 7 HDD Information Interface 2 Click Add to enter the Add NetHDD interface Figure 11 8 Adding NetHDD Interface 3 Add the allocated NetHDD 4 Select the type to NAS or IP SAN 5 Configure the NAS or IP SAN settings Add NAS disk 1 Enter the NetHDD IP address in the text field ...

Страница 201: ...k Up to 8 NAS disks can be added Figure 11 9 Add NAS Disk Add IP SAN 1 Enter the NetHDD IP address in the text field 2 Click Search to search the available IP SAN disks 3 Select the IP SAN disk from the list shown below 4 Click OK to add the selected IP SAN disk Up to 1 IP SAN disk can be added Figure 11 10 Add IP SAN Disk 6 After having successfully added the NAS or IP SAN disk return to the HDD ...

Страница 202: ...User Manual of Digital Video Recorder 201 If the added NetHDD is uninitialized please select it and click Init for initialization Figure 11 11 Initialize Added NetHDD ...

Страница 203: ...kup Refer to Backup using eSATA HDDs in Chapter 7 1 2 Backing up by Normal Video Search for operating instructions Record Capture Use the eSATA for record capture Refer to the following steps for operating instructions Figure 11 12 Set eSATA Usage 4 When the eSATA usage is selected to Record Capture enter the HDD Information interface Menu HDD General 5 Edit the property of the selected eSATA or i...

Страница 204: ...D Advanced Storage Mode 2 Set the Mode to Group as shown below Reboot the device to activate the new settings Figure 11 14 Storage Mode Interface for DVR Series Figure 11 15 Storage Mode Interface for HDVR Series IP Camera is supported by HDVR series only 3 Click Apply and the following Attention box will pop up Figure 11 16 Attention for Reboot 4 Click Yes to reboot the device to activate the cha...

Страница 205: ...be set to redundancy read only or read write R W Before setting the HDD property please set the storage mode to Group refer to step1 4 of Chapter 11 4 1 Setting HDD Groups A HDD can be set to read only to prevent important recorded files from being overwritten when the HDD becomes full in overwrite recording mode When the HDD property is set to redundancy the video can be recorded both onto the re...

Страница 206: ...to R W Read only or Redundancy 4 Click OK to save the settings and exit the interface 5 In the HDD Information menu the HDD property will be displayed in the list At least 2 hard disks must be installed on your device when you want to set a HDD to Redundancy and there is one HDD with R W property ...

Страница 207: ...Storage Mode Settings Interface 3 Select a camera for which you want to configure quota In HDVR series device you can select IP Camera 4 Enter the storage capacity in the text fields of Max Record Capacity GB and Max Picture Capacity GB Figure 11 21 Configure Record Picture Quota 5 You can copy the quota settings of the current camera to other cameras if required Click Copy to enter the Copy Camer...

Страница 208: ...with the same quota settings You can also click the checkbox of Analog or IP Camera to select all cameras 7 Click OK to finish the Copy settings and back to the Storage Mode interface 8 Click Apply to save the settings The device must be rebooted to activate the changes If the quota capacity is set to 0 then all cameras will use the total capacity of HDD for record and picture capture ...

Страница 209: ...must be rebooted to activate the change Figure 11 24 Storage Mode Settings Interface 3 Drag to adjust the storage percentages of normal record frame extracting record and picture according to actual requirements 4 You can edit the bitrate of the camera and the Allowed Record Time and Extended Record Time will change accordingly Allowed Record Time The total recording time that is allowed when usin...

Страница 210: ...Video Recorder 209 The estimation of the record time is only for reference If you change the storage capacity of the device e g a new HDD is connected or a HDD is removed you have to configure the frame extracting mode again ...

Страница 211: ... M A R T detection see Chapter 11 9 The disk clone function is not supported by 9100HFI RT 9000HFI RT 7200HWI SV Series For 9100HFI XT 9000HFI XT Series the disk clone is only available when the RAID function is disabled Steps 1 Enter the HDD Advanced Setting interface Menu HDD Advanced 2 Click the Disk Clone tab to enter the Disk Clone Settings interface Figure 11 25 Disk Clone Settings Interface...

Страница 212: ...he clone source disk 4 Check the checkbox of the HDD to be cloned in the Clone Source list 5 Click the Clone button and a message box pops up Figure 11 27 Message Box for Disk Clone 6 Click the Yes button to continue You can check the clone progress in the HDD status Figure 11 28 Check Disk Clone Progress ...

Страница 213: ... status of each HDD which is displayed on the list Figure 11 29 View HDD Status 1 If the status of HDD is Normal or Sleeping it works normally If the status is Uninitialized or Abnormal please initialize the HDD before use And if the HDD initialization is failed please replace it with a new one Checking HDD Status in HDD Information Interface Steps 1 Enter the System Information interface Menu Mai...

Страница 214: ...T series Steps 1 Enter the S M A R T Settings interface Menu Maintenance HDD Detect S M A R T Settings 2 Select a HDD to view its S M A R T information list If you want to use the HDD even when the S M A R T checking is failed you can check the checkbox before the Continue to use this disk when self evaluation is failed item 3 Three self tests of S M A R T are provided including Short Test Expande...

Страница 215: ...r Detection interface Menu Maintenance HDD Detect Bad Sector Detection Figure 11 32 Bad Sector Detection 2 Select a HDD and choose Full Detection or Key Area Detection as the detection type 3 Click Detect to start detecting Figure 11 33 Bad Sector Detecting 4 You can click Pause to pause the detection and click Resume to resume the detection 5 If there is error information about the HDD you can cl...

Страница 216: ...from the drop down list 3 Click the checkbox s below to select the HDD error alarm type s The alarm type can be selected to Audible Warning Notify Surveillance Center Send Email and Trigger Alarm Output Please refer to Chapter 8 7 Setting Alarm Linkage Actions Figure 11 34 Configure HDD Error Alarm 4 When the Trigger Alarm Output not supported by DS 7200 series is selected you can also select the ...

Страница 217: ...User Manual of Digital Video Recorder 216 Chapter 12 Camera Settings ...

Страница 218: ... 2 Select the camera to configure OSD settings 3 Edit the Camera Name in the text field 4 Configure the Display Name Display Date and Display Week by checking the checkbox 5 Select the Date Format Time Format and Display Mode Figure 12 1 OSD Configuration Interface 6 You can use the mouse to click and drag the text frame on the preview window to adjust the OSD position 7 Copy Camera Settings 1 If ...

Страница 219: ...o network cameras is not available 2 Select the camera s to be configured with the same OSD settings You can also check checkbox to select all cameras 3 Click OK to finish the Copy settings and back to the OSD Configuration interface 8 Click Apply to apply the settings ...

Страница 220: ... 4 Use the mouse to draw a zone on the window The zones will be marked with different frame colors Up to 4 privacy mask zones can be configured and the size of each area can be adjusted 5 The configured privacy mask zones on the window can be cleared by clicking the corresponding Clear Zone1 4 icons on the right side of the window or click Clear All to clear all zones Figure 12 4 Set Privacy Mask ...

Страница 221: ...ttings 12 3 Configuring Video Parameters Steps 1 Enter the Image Settings interface Menu Camera Image Figure 12 5 Image Settings Interface for Analog Camera Connected to DS 9200 HWI ST Series Figure 12 6 Image Settings Interface for Analog Camera Connected to Other Series ...

Страница 222: ...nalog cameras four modes are selectable Standard Indoor Dim Light and Outdoor While for IP cameras only Customize is supported 4 Adjust the image parameters according to actual needs The parameters are including Brightness Contrast Saturation Hue Sharpness and Denoising You can also click Default to restore the default settings Sharpness Denoising and restoring default settings are not supported b...

Страница 223: ...User Manual of Digital Video Recorder 222 Chapter 13 Device Management and Maintenance ...

Страница 224: ...mation interface to view the device name model serial No firmware version and encoding version Figure 13 1 Device Information Interface 13 1 2Viewing Camera Information Steps 1 Enter the System Information interface Menu Maintenance System Info 2 Click the Camera tab to enter the Camera Information interface to view the status of each camera IP Camera is supported by HDVR series Figure 13 2 Camera...

Страница 225: ...ord Information Steps 1 Enter the System Information interface Menu Maintenance System Info 2 Click the Record tab to enter the Record Information interface to view the recording status and encoding parameters of each camera IP Camera is supported by HDVR series Figure 13 4 Record Information Interface for DVR Series ...

Страница 226: ...s function is not available for DS 7200 series Steps 1 Enter the System Information interface Menu Maintenance System Info 2 Click the Alarm tab to enter the Alarm Information interface to view the alarm information Figure 13 6 Alarm Information Interface 13 1 5Viewing Network Information Steps 1 Enter the System Information interface ...

Страница 227: ... interface to view the network information Figure 13 7 Network Information Interface 13 1 6Viewing HDD Information Steps 1 Enter the System Information interface Menu Maintenance System Info 2 Click the HDD tab to enter the HDD Information menu to view the HDD status free space property etc Figure 13 8 HDD Information Interface ...

Страница 228: ...and exported at any time Steps 1 Enter the Log Search interface Menu Maintenance Log Information Log Search Figure 13 9 Log Search Interface 2 Specify the search conditions for the log search including the Start Time End Time Major Type and Minor Type 3 Click Search to start searching log files 4 The matched log files will be displayed on the list shown below Up to 2000 log files can be displayed ...

Страница 229: ... related video files if available Figure 13 11 Log Details 6 If you want to export the log files select the log and click Export to enter the Export interface 7 You can also export all the log files stored in the HDD Enter the Log Export interface Menu Maintenance Log Information Log Export Figure 13 12 Log Export Interface Check checkbox to select the disk and click Export to enter the export int...

Страница 230: ...o export the log files to the selected backup device You can click New Folder to create new folder in the backup device or click Format to format the backup device before log export Please connect the backup device to device before operating log export The log files exported to the backup device are named by exporting time e g 201307291054411logBack txt ...

Страница 231: ... the same parameters Steps 1 Enter the Import Export Configuration File interface Menu Maintenance Import Export Figure 13 14 Import Export Config File 2 Click Export to export configuration files to the selected local backup device 3 To import a configuration file select the file from the selected backup device and click Import After the import process is completed you must reboot the device Afte...

Страница 232: ...file from the backup device 5 Click Upgrade to start upgrading 6 After the upgrading is complete reboot the device to activate the new firmware 13 4 2Upgrading by FTP Before you start Configure PC running FTP server and device to the same Local Area Network Run the 3rd party TFTP software on the PC and copy the firmware into the root directory of TFTP Steps 1 Enter the Upgrade interface Menu Maint...

Страница 233: ...e Menu Maintenance Default Figure 13 17 Restore Default Settings 2 Click OK to restore the default settings Except the network parameters including IP address subnet mask gateway MTU NIC working mode default route and server port all other parameters of the device will be restored to factory default settings ...

Страница 234: ...User Manual of Digital Video Recorder 233 Chapter 14 Others ...

Страница 235: ... be the same as the device s when connecting with the PC serial port Transparent Channel Connect a serial device directly to the device The serial device will be controlled remotely by the PC through the network RS 232 serial port is not available for DS 7200HWI SV series Steps 1 Enter the RS 232 Settings interface Menu Configuration RS 232 Figure 14 1 RS 232 Settings Interface 2 Configure RS 232 ...

Страница 236: ...utput Standard Select the CVBS output standard to NTSC or PAL which must be the same with the video input standard VGA Resolution Select the VGA output resolution which must be the same with the resolution of the monitor screen HDMI Resolution Select the HDMI resolution which must be the same with the resolution of the monitor screen Resolution Select the resolution for the VGA and HDMI output whi...

Страница 237: ...ect the system time Mouse Pointer Speed Set the speed of mouse pointer 4 levels are configurable Enable Wizard Enable disable the Wizard when the device starts up Enable Password Enable disable the use of the login password 4 Click Apply to save the settings ...

Страница 238: ... Enter the General Settings interface Menu Configuration General 2 Choose DST Settings tab Figure 14 4 DST Settings Interface You can check checkbox before the Auto DST Adjustment item Or you can manually check the Enable DST checkbox and then you choose the date of the DST period ...

Страница 239: ... menu inactivity E g when the time is set to 5 Minutes then the system will exit from the current operation menu to live view screen after 5 minutes of menu inactivity Enable HDMI VGA Simultaneous Output The operation and settings on VGA output and HDMI output cannot be achieved respectively when this function is enabled This function is not available for 9100 9000 8100 8000HWI ST 7200HWI SV serie...

Страница 240: ...nterface Menu Configuration User Figure 14 6 User Management Interface 2 Click Add to enter the Add User interface Figure 14 7 Add User Menu 3 Enter the information for new user including User Name Password Level and User s MAC Address Level Set the user level to Operator or Guest Different user levels have different operating permission Operator The Operator user level has permission of Local Log...

Страница 241: ...it is configured and enabled it only allows the remote user with this MAC address to access the device 4 Click OK to save the settings and go back to the User Management interface The added new user will be displayed on the list Figure 14 8 Added User Listed in User Management Interface 5 Select the user from the list and then click the button to enter the Permission Settings interface Figure 14 9...

Страница 242: ...g settings for RS 232 and RS 485 ports Remote Video Output Control Sending remote control panel signal Two way Audio Realizing two way radio between the remote client and the device Remote Alarm Control Remotely arming notify alarm and exception message to the remote client and controlling the alarm output Remote Advanced Operation Remotely operating HDD management initializing HDD setting HDD pro...

Страница 243: ... Select the user to be deleted from the list Figure 14 11 Delete a User 3 Click to delete the selected user 14 5 3Editing a User Steps 1 Enter the User Management interface Menu Configuration User 2 Select the user to be edited from the list Figure 14 12 Edit a User 3 Click to enter the Edit User interface ...

Страница 244: ... MAC address If you want to change the password of the user check checkbox to enable changing the password 5 Click OK to save the settings and exit the menu 14 5 4Changing Password of Admin Steps 1 Enter the User Management interface Menu Configuration User Figure 14 14 Change Password 2 Select the admin user and click to change the password ...

Страница 245: ...Manual of Digital Video Recorder 244 Figure 14 15 Change Password 3 Enter the old password check checkbox enter new password and confirm password on the menu 4 Click OK to save the settings and exit the menu ...

Страница 246: ...s 1 Enter the Shutdown interface Menu Shutdown Figure 14 16 Shutdown Menu 2 Click to log out or Click to shut down the device or Click to reboot the device After you have logged out the system menu operation on the screen is invalid It is required a user name and password to log in to the system ...

Страница 247: ...User Manual of Digital Video Recorder 246 Chapter 15 Appendix ...

Страница 248: ...transceiver modem over Ethernet and in plain Metro Ethernet networks DDNS Dynamic DNS is a method protocol or network service that provides the capability for a networked device such as a router or computer system using the Internet Protocol Suite to notify a domain name server to change in real time ad hoc the active DNS configuration of its configured hostnames addresses or other information sto...

Страница 249: ...t is solved by the step 1 to step 3 If it is solved finish the process If not please contact the engineer from our company to do the further process There is an audible warning sound Di Di Di Didi after a new bought device starts up Possible Reasons a No HDD is installed in the device b The installed HDD has not been initialized c The installed HDD is not compatible with the device or is broken do...

Страница 250: ...era Camera IP Camera 2 Verify the following parameters are the same with those of the connected IP devices including IP address protocol management port user name and password 3 Verify the whether the bandwidth is enough 1 Select Menu Maintenance Net Detect Network Stat 2 Check the usage of the access bandwidth and see if the total bandwidth has reached its limit 4 Check if the fault is solved by ...

Страница 251: ...d reboot the device there is black screen with the mouse cursor Connect the HDVR with the monitor before startup via VGA or HDMI interface and manage the IPC to connect with the device locally or remotely the status of IPC displays as Connected And then connect the device with the CVBS and there is black screen either Possible Reasons After connecting the IPC to the HDVR the image is output via th...

Страница 252: ...tween the pickup and camera is connected well impedance matches and compatible 2 Verify the setting parameters are correct Select Menu Record Parameters Record and set the Stream Type as Audio Video 3 Verify the audio encoding standard of the camera is supported by the HDVR HDVR supports G722 1 and G711 standards and if the encoding parameter of the input audio is not one of the previous two stand...

Страница 253: ...om our company to do the further process No record file found in the device local HDD and the prompt No record file found pops up when you search the record files Possible Reasons a The time setting of system is incorrect b The search condition is incorrect c The HDD is error or not detected Steps 1 Verify the system time setting is correct Select Menu Configuration General General and verify the ...

Страница 254: ...normal recording and event recording on the calendar when playback Chapter 6 1 2 10 Support thumbnail display on the process bar when playback Chapter 6 1 1 Chapter 6 1 2 11 Support volume adjusting of selected camera when playback Chapter 6 1 1 Chapter 6 1 4 12 Support searching and playing back of record files triggered by VCA alarm Chapter 6 1 3 13 Support smart playback of VCA event in 16 time...

Страница 255: ...8 1536 DS 2CD7254F EZH V5 1 0 build 131202 2048 1536 DS 2CD8254FWD EIZ V5 1 0 build 131202 1920 1080 DS 2CD754FWD E I V5 1 0 build 131202 1920 1080 DS 2CD7254FWD EIZH V5 1 0 build 131202 1920 1080 DS 2CD7253F EZH DS 2CD753F E I V5 1 0 build 131202 1600 1200 DS 2CD853F E V5 1 0 build 131202 1600 1200 DS 2CD8153F E DS 2CD8253F E I V5 1 0 build 131202 1600 1200 DS 2CD7153 E V5 1 0 build 131202 1600 1...

Страница 256: ...0 build 131202 1280 960 DS 2CD2412 I V5 1 0 build 131202 1280 960 DS 2CD2512 I V5 1 0 build 131202 1280 960 DS 2CD2612 IS V5 1 0 build 131202 1280 960 DS 2CD2712 IS V5 1 0 build 131202 1280 960 DS 2CD2010 I V5 1 0 build 131202 1280 960 DS 2CD2110 I V5 1 0 build 131202 1280 960 DS 2CD2210 I V5 1 0 build 131202 1280 960 DS 2CD2310 I V5 1 0 build 131202 1280 960 DS 2CD2410 I V5 1 0 build 131202 1280 ...

Страница 257: ...6 DS 2CD4032FHWD DS 2CD4132FHWD I DS 2CD4332FHWD IS V5 1 0 build 131202 2048 1536 DS 2CD4332FHWD I V5 1 0 build 131202 2048 1536 DS 2CD4012FWD DS 2CD4112FWD I DS 2CD4212FWD IS DS 2CD4312FWD IS V5 1 0 build 131202 2048 1536 DS 2CD4026FWD SDI V5 1 0 build 131202 2048 1536 DS 2CD4212FWD I V5 1 0 build 131202 2048 1536 DS 2CD6412FWD V5 1 0 build 131202 2048 1536 DS 2CD6233F V5 1 0 build 131202 2048 15...

Страница 258: ...6 2472 DS 2CD9152 iDS 2CD9152 V3 5 0 build131012 2560 1920 DS 2CD9152 H V3 5 0 build130814 2592 2048 iDS 2CD9152 H V3 5 0 build130814 2592 2048 iDS 2CD9282 V3 5 0 build130810 3296 2472 DS 2CD9131 K V3 5 1 build130905 2048 1536 DS 2CD9152 HK V3 5 1 build130905 2592 2048 DS 2CD966 B DS 2CD966 V B V3 1 0 build120423 1360 1024 DS 2CD976 B DS 2CD976 V B V3 1 0 build120423 1600 1200 DS 2CD976 C DS 2CD97...

Страница 259: ...72 DS 2DM1 772 V4 1 6 build 130422 1280 720 DS 2DF1 77A DS 2DF1 570A DS 2DF1 573A DS 2DF1 57A V4 1 6 build 130422 1280 720 DS 2DF1 5734D DS 2DF1 574D V4 1 6 build 130422 1280 960 DS 2DM1 574D DS 2DM1 5734D V4 1 6 build 130422 1280 960 DS 2DF1 774D V4 1 6 build 130422 1280 960 DS 2DM1 774D V4 1 6 build 130422 1280 960 DS 2DF1 584D V4 1 6 build 130422 1920 1080 DS 2DF1 784D V4 1 6 build 130422 1920 ...

Страница 260: ... SATA DS 6504HFI SATA V1 0 1 build130607 704 576 DS 6508HFI DS 6516HFI V1 0 1 build130607 704 576 DS 6508HFI SATA DS 6516HFI SATA V1 0 1 build130607 704 576 DS 6501HCI DS 6502HCI DS 6504HCI V1 0 1 build130607 704 576 DS 6501HCI SATA DS 6502HCI SATA DS 6504HCI SATA V1 0 1 build130607 704 576 DS 6508HCI DS 6508HCI SATA V1 0 1 build130607 704 576 DS 6516HCI DS 6516HCI SATA V1 0 1 build130607 704 576 ...

Страница 261: ...C 1280 1024 ARECONT AV8185DN 65172 1600 1200 AV1305M 65175 1280 1024 AV2155 65143 1600 1200 AV2815 65220 1920 1080 AV3105M 65175 1920 1080 AV5105 65175 1920 1080 AXIS M1114 5 09 1 1024 640 M3011 ONVIF compatibility 5 21 704 576 Only AXIS is supported M3014 ONVIF compatibility 5 21 1 1280 800 P3301 ONVIF compatibility 5 11 2 768 576 Only AXIS is supported P3304 ONVIF compatibility 5 20 1440 900 Onl...

Страница 262: ...081 A1 7852 1920 1080 IX30DN ACFZHB3 1 8 2 20120327 2 9080 A1 7852 2048 1536 SAMSUNG ONVIF compatibility SNB 5000P V3 10_130416 1280 1024 SANYO VCC HD2300P 2 03 02 110318 00 1920 1080 VCC HD2500P 2 02 02 110208 00 1920 1080 VCC HD4600P 2 03 02 110315 00 1920 1080 SONY SNC CH220 1 50 00 1920 1080 SNC RH124 ONVIF compatibility 1 79 00 1280 720 SNC EP580 ONVIF compatibility 1 53 00 1920 1080 SNC DH22...

Страница 263: ...User Manual of Digital Video Recorder 262 IP Camera Manufacturer or Protocol Model Version Max Resolution Sub stream Audio F3206 MG 1 6 02c045 1920 1080 F531E LM 1 6 18P10 640 480 0301001031218 ...

Страница 264: ...User Manual of Digital Video Recorder 263 ...

Отзывы: