background image

100  Getting Connected

10.4  Windows Live™

Windows Live™

 gives you full Internet experience on your device. It helps you to find information, pursue 

your interests, and get in touch with friends and family on the Internet easier.

Windows Live™ offers the following key features:

• 

Live Se

arch Bar

, which lets you search for information on the Web.

• 

Live Messenger

, the next generation of MSN Messenger Mobile.

• 

Live Mail

, the next generation of Hotmail.

• 

Live Contacts

, your address book for storing Live Mail, Live Messenger and Hotmail contacts.

Set up Windows Live™

The first time you use Windows Live™, sign in by using your Windows Live ID, which is your Windows Live Mail 
or Hotmail address, and password.

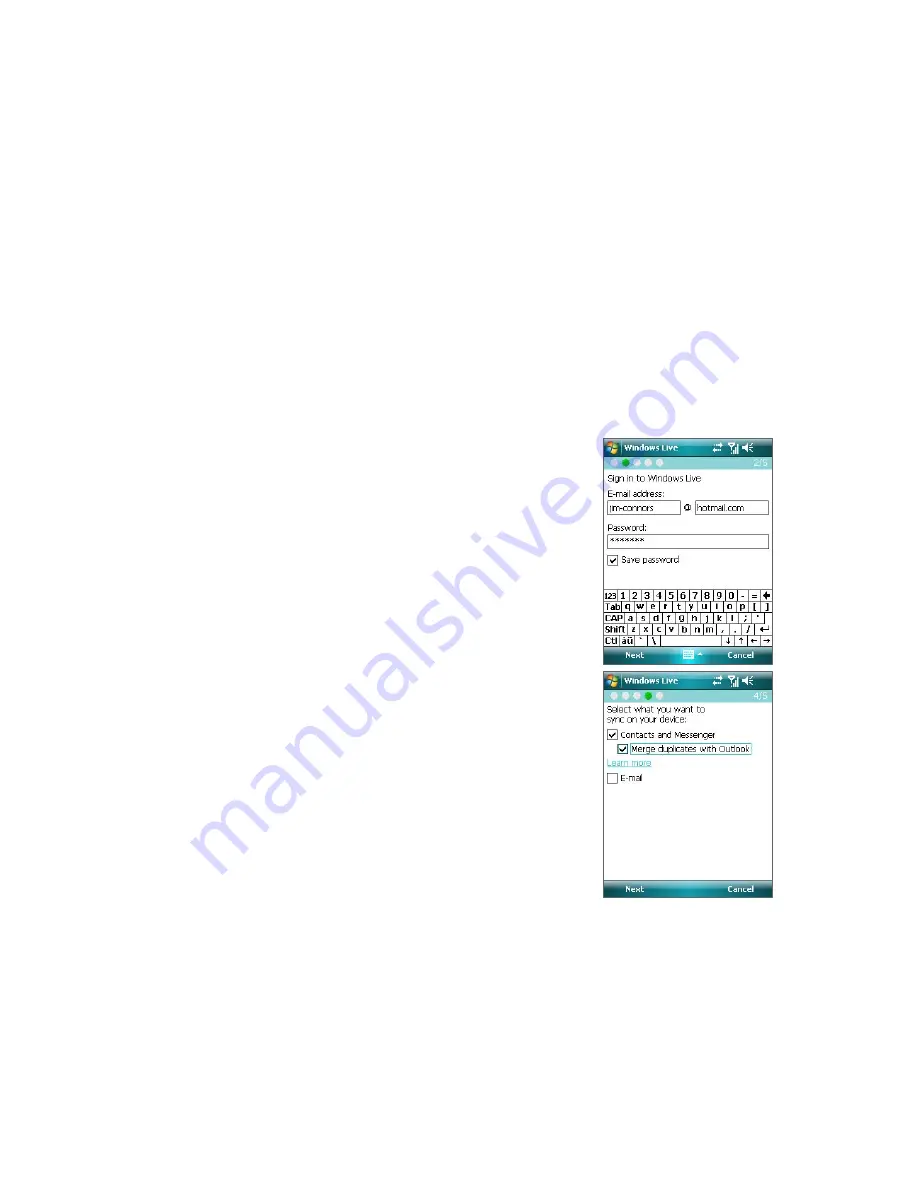
To set up Windows Live for the first time

1. 

Tap 

Start > Programs > Windows Live

.

2. 

Tap 

Sign in to Windows Live

.

3. 

On the next screen, tap the links to read the Windows Live™ 
Term of Use and the Microsoft Privacy Statement. After 
reviewing them, tap 

Accept

.

4. 

Enter your Windows Live™ Mail or Hotmail address and 
password, select the 

Save password

 checkbox, then tap 

Next

.

5. 

Choose whether or not to show Windows Live™’s search bar 
and applications on the Today screen then tap 

Next

.

6. 

Choose what information you want to sync online with your 
device.

If you sync 

Contacts and Messenger

, your Windows 

Live contacts will be added to the contact list and to Live 
Messenger on your device.

If you sync 

E-mail

, your Windows Live Mail or Hotmail inbox 

messages will be downloaded to your device.

7. 

Tap 

Next

.

8. 

After synchronization is complete, tap 

Done

.

Содержание PDA Phone

Страница 1: ...DA User Manual ...

Страница 2: ...Macromedia Netherlands B V Macromedia Flash Macromedia Flash Macromedia Flash Lite and Reader are trademarks and or registered trademarks of Macromedia Netherlands B V or Adobe Systems Incorporated Copyright 2007 JATAAYU SOFTWARE P LTD All Rights Reserved Copyright 2007 Dilithium Networks Inc All Rights Reserved Copyright 2007 Tao Group Limited All Rights Reserved Licensed by QUALCOMM Incorporated...

Страница 3: ...TH THE USE OF THE WEATHER INFORMATION DATA OR DOCUMENTATION Limitation of Damages TO THE MAXIMUM EXTENT PERMITTED BY APPLICABLE LAW IN NO EVENT SHALL HTC OR ITS PROVIDERS BE LIABLE TO USER OR ANY THIRD PARTY FOR ANY INDIRECT SPECIAL CONSEQUENTIAL INCIDENTAL OR PUNITIVE DAMAGES OF ANY KIND IN CONTRACT OR TORT INCLUDING BUT NOT LIMITED TO INJURY LOSS OF REVENUE LOSS OF GOODWILL LOSS OF BUSINESS OPPO...

Страница 4: ...y don t come in contact with the battery or its connectors as it may lead to short circuit during operation Do not use a battery that appears damaged deformed or discolored or the one that has any rust on its casing overheats or emits a foul odor Always keep the battery out of the reach of babies and small children to avoid swallowing of the battery Consult the doctor immediately if the battery is...

Страница 5: ... These include fueling areas below deck on boats fuel or chemical transfer or storage facilities and areas where the air contains chemicals or particles such as grain dust or metal powders ROAD SAFETY Vehicle drivers in motion are not permitted to use telephony services with handheld devices except in the case of emergency In some countries using hands free devices as an alternative is allowed SAF...

Страница 6: ...antenna performance and the battery life General Precautions Heed service markings Except as explained elsewhere in the Operating or Service documentation do not service any product yourself Service needed on components inside these compartments should be done by an authorized service technician or provider Damage requiring service Unplug the product from the electrical outlet and refer servicing ...

Страница 7: ...ructions and should use a mounting accessory recommended by the manufacturer Avoid unstable mounting Do not place the product with an unstable base Use product with approved equipment This product should be used only with personal computers and options identified as suitable for use with your equipment Adjust the volume Turn down the volume before using headphones or other audio devices Cleaning U...

Страница 8: ...er 36 2 5 Using Block Recognizer 37 2 6 Using Transcriber 37 2 7 Searching Information 38 Chapter 3 Using Phone Features 39 3 1 Using the Phone 40 3 2 Making a Call 41 3 3 Receiving a Call 43 3 4 Smart Dialing 44 3 5 Additional Dialing Information 45 Chapter 4 Setting Up Your Device 47 4 1 Basic Settings 48 4 2 Personalizing the Today Screen 50 4 3 Customizing Phone Services 52 4 4 Protecting Your...

Страница 9: ...g With Company E mail and Meeting Appointments 77 8 1 Synchronizing Your Device with the Exchange Server 78 8 2 Working With Company E mail 79 8 3 Managing Meeting Requests 82 8 4 Finding Contacts in the Company Directory 83 8 5 E mail Security 84 Chapter 9 Working With Documents and Files 87 9 1 Microsoft Office Word Mobile 88 9 2 Microsoft Office Excel Mobile 88 9 3 Microsoft Office PowerPoint M...

Страница 10: ...124 11 5 MP3 Trimmer 127 Chapter 12 Managing Your Device 129 12 1 Adding and Removing Programs 130 12 2 Using Task Manager 130 12 3 Resetting Your Device 131 12 4 Managing Memory 132 12 5 Windows Update 133 12 6 Battery Saving Tips 134 Chapter 13 Using Other Applications 135 13 1 Voice Speed Dial 136 Appendix 139 A 1 Specifications 140 A 2 Regulatory Notices 142 A 3 Additional Safety Information 1...

Страница 11: ...1 1 Getting to Know Your Device and Accessories 1 2 The Battery and the Storage Card 1 3 Starting Up 1 4 The Today Screen 1 5 TouchFLO 1 6 Programs 1 7 Settings Chapter 1 Getting Started ...

Страница 12: ...iece Listen to a phone call from here Touch Screen TALK Press to answer an incoming call or dial a number NAVIGATION Control ENTER Press this multi directional control up down left or right to move through menus and program instructions carry out the selection by pressing the center button END Press to end a call or to return to the Today screen Back panel 2 0 M E G A P I X E L S C A M E R A 2 0 M...

Страница 13: ...ht panel Storage Card Slot Cover Remove the back cover and then pry open the slot cover to install the microSD card for storing data CAMERA Press to launch the Camera See Chapter 11 for details Stylus Bottom panel Sync Connector Earphone Jack Connect the supplied USB cable to synchronize information or plug in the AC adapter to recharge the battery You can also connect the supplied USB stereo head...

Страница 14: ... and a Send End button Press the Send End button to pick up a call or put a call on hold press and hold the button to end the call 4 One to two Splitter Adapter Lets you connect the supplied AC adapter and mini USB stereo headset to your device at the same time 5 Stylus An extra stylus pen is provided 6 Pouch Acts as a protective carrying case for your device 7 microSD card with adapter Provides 1...

Страница 15: ...ries Battery performance depends on many factors including network configuration signal strength the temperature of the environment in which you operate your device the features and or settings you select and use items attached to connecting ports and your voice data and other program usage patterns Battery life estimates approximations Standby time Up to 250 hours Talk time Up to 3 5 hours Media ...

Страница 16: ...ially charged Before you start using your device it is recommended that you charge the battery Some batteries perform best after several full charge discharge cycles You can charge the battery in two ways Charging the device s battery by connecting the power adapter Connecting your device to a PC via the provided USB Sync cable Note Only the AC adapter and USB cable provided with your device shoul...

Страница 17: ... the battery Turn off your device Install the microSD card 1 Remove the back cover 2 Use your thumb or finger to pry open the cover that houses the storage card slot To open the slot cover easier pry it open from both ends 3 Flip your device so that the touch screen faces upward 4 Hold open the slot cover with one hand Slot cover storage card slot 5 Insert the microSD card into the storage card slot...

Страница 18: ... has the following orientation modes Portrait and Landscape To change the orientation tap Start Settings System tab Screen and select the orientation you want To smooth the edges of screen fonts for many programs on the ClearType tab select the Enable ClearType check box To increase the readability or to see more content on the screen on the Text Size tab adjust the text size by moving the slider ...

Страница 19: ...re some of the status icons that you may see on the device Icons that appear in this area Vibration mode Sound on Sound off Icons that appear in this area Battery charging Battery full Battery very low Icons that appear in this area Data connection is active but idle Data connection is active and transmitting data Maximum signal strength No signal Phone is turned off No phone service Searching for...

Страница 20: ...nformation for the current screen View and change settings Access more programs Open a recently used program Open a program The items displayed in the Start menu can be customized by tapping Start Settings Personal tab Menus Switch to the Today screen Quick Menu The Quick Menu located at the top right corner of the Today screen shows the currently running programs You can quickly switch between ru...

Страница 21: ...t a tab and then press ENTER The Home tab Home displays the current day date and local time When you have new incoming messages and calls it shows you the number of new e mails text messages and missed calls If you have set up the alarm it also shows the Alarm icon Number of new e mails Touch this icon to view your e mails Number of new text messages Touch this icon to view your text messages Alar...

Страница 22: ...then touch the area that shows the error message to download weather data You can also customize weather settings through the following steps 1 Touch the area that shows the city name 2 On the Select City screen select Menu Weather Options 3 You can enable or disable the following options Download weather data automatically When this check box is selected weather information will automatically be ...

Страница 23: ...your favorite program Note To replace a shortcut you need to delete it first and then add a shortcut to your favorite program or setting The Sound tab Sound lets you quickly set the device volume and change the ring tone of your device Tap to change the ring tone Automatic Silent Vibrate Normal Tap the sound mode icon to set the device to Normal Silent Vibrate or Automatic mode Touch the Ringtone ...

Страница 24: ...and videos Note Touch Cube is displayed in portrait view only To be able to open Touch Cube make sure your display is set to portrait mode Touch Cube To open Touch Cube Slide your finger upward starting from the bottom of the touch screen where it shows a logo image To close Touch Cube To close Touch Cube and return to the screen prior to opening Touch Cube slide your finger downward on the touch sc...

Страница 25: ...nchronizing your device with the Exchange Server see Chapter 8 Select an empty slot to add a favorite contact Open Call History See Chapter 3 for details Select a contact to access the contact card and make a phone call or send messages Open the Phone program See Chapter 3 for details Delete favorite contacts Open Contacts See Chapter 6 for details When you add a favorite contact and there is no p...

Страница 26: ...st file list message list calendar appointments list and more Note Finger scrolling and panning works in both portrait and landscape modes To use finger scrolling Slide your finger downward to scroll up the screen Slide your finger upward to scroll down the screen When finger scrolling up and down slide anywhere within this area To scroll towards the left slide your finger to the right To scroll towa...

Страница 27: ...e are scrollbars shown on the screen To continuously pan 1 Drag your finger towards the boundary and hold The Web page document or message that you are viewing then continuously pans Vertical boundary Horizontal boundary 2 Release your finger to stop panning Enhanced features TouchFLO provides enhanced features when you use E mail and Contacts applications on the device To navigate to the previous o...

Страница 28: ...acts When you open the Contacts list the Random Access bar allows you to quickly scroll through the list Random Access bar On the Random Access bar tap a letter or scroll to a letter to contacts beginning with that letter TouchFLO settings You can enable or mute the finger scrolling and panning sound Tap Start Settings System tab TouchFLO then select or clear the Enable sound when finger scrolling...

Страница 29: ...uments Help See Help topics for the current screen or program Programs screen Icon Description Games Play two pre installed games Bubble Breaker and Solitaire ActiveSync Synchronize information between your device and a PC or the Exchange Server Adobe Reader LE View PDF Portable Document Format files on your device Bluetooth Explorer Search for other Bluetooth devices that have file sharing enable...

Страница 30: ... Resend SMS messages that failed delivery Voice Recorder Record your voice play it back then send it via e mail or beaming You can also set the recorded voice as your ring tone Voice Speed Dial Record voice tags so that you can dial a phone number or launch programs simply by speaking a word Windows Live Use this mobile version of Windows Live to find information on the Web It also lets you sign i...

Страница 31: ...e you can see basic information such as the Windows Mobile version and type of processor used on your device You can also specify a name for your device Backlight Set the backlight timeout and adjust brightness Certificates See information about certificates that are installed on your device Clear Storage Tap this icon only when you need to remove all your data and files from the memory and reset ...

Страница 32: ...een Change the screen orientation re calibrate the screen and change the screen text size Task Manager Stop running programs and set the Exit button to end programs immediately when you tap the button For more information see Using Task Manager in Chapter 12 TouchFLO You can enable or mute the finger scrolling and panning sound See TouchFLO settings in this chapter for details Windows Update Updat...

Страница 33: ...on 2 2 Using the On screen Keyboard 2 3 Using Touch Keypad or Touch Keyboard 2 4 Using Letter Recognizer 2 5 Using Block Recognizer 2 6 Using Transcriber 2 7 Searching Information Chapter 2 Entering and Searching Information ...

Страница 34: ...nel Keyboard Input Selector arrow Input Panel icon Icon Input method Icon Input method On screen Keyboard Touch Keyboard Letter Recognizer or Block Recognizer Touch Keypad Transcriber Note Some text input methods may not be available in certain language versions of the device 2 2 Using the On screen Keyboard The on screen Keyboard is available when text entry is possible You can enter text by tapp...

Страница 35: ...t key Input mode key Space key Enter key Back key Symbol key Candidate word list in XT9 mode Candidate word list in XT9 mode Shift key Input mode key Space key Enter key Back key Symbol key To type lowercase letters tap the keys on the keypad or keyboard To type a single uppercase letter tap the Shift key and then tap the corresponding key To type all uppercase letters tap the Shift key twice To c...

Страница 36: ...tings Personal tab Input 2 Select Touch Keypad or Touch Keyboard in Input method and then tap Options Language Select your input language The keyboard layout will change according to your selection Turn on one touch symbol entry The default setting for this option is ON so that you can enter only one symbol at a time the Symbol pad will be closed after you input a symbol To enter symbols continuou...

Страница 37: ... 2 Tap the Input Selector arrow and tap Transcriber The Transcriber introductory screen appears 3 Position the cursor where you want text to appear 4 Use the stylus to write anywhere on the screen The handwriting will be converted to text shortly after you lift the stylus from the screen To enter punctuation and symbols Transcriber comes with an on screen keyboard that provides an easy way to add ...

Страница 38: ...1 Tap Start Programs Search 2 In the Search for field you can Enter the file name word or other information you want to search for Tap the down arrow icon and from the list select one item that you have looked for before 3 In the Type field you can tap the down arrow icon and select a data type from the list to help narrow your search 4 Tap Search The system then starts searching the matched files in ...

Страница 39: ...3 1 Using the Phone 3 2 Making a Call 3 3 Receiving a Call 3 4 Smart Dialing 3 5 Additional Dialing Information Chapter 3 Using Phone Features ...

Страница 40: ...unction is turned off To resume call function Turn on the phone function by tapping the Phone button again on the Comm Manager screen The icon indicates the phone function is turned on Flight mode Another way to turn off the phone function is to switch your device to Flight mode To enable Flight mode When you enable Flight mode it turns off all wireless radios on your device which include the phone...

Страница 41: ... simply touch the keys with your finger or tap the keys using the stylus to enter the phone number 3 Press the TALK button on your device to place the call Tip If you tap a wrong number tap Delete to erase each subsequent digit of a number To erase the entire number tap and hold Delete Make a call from Contacts Tap Contacts on the Today screen or tap Start Contacts then do one of the following Pres...

Страница 42: ... of call types 3 Finger scroll to the desired contact or phone number and tap Call One touch Speed Dial Use Speed Dial to call frequently used numbers with a single tap For example if you assign a contact to the location 2 in Speed Dial you can simply tap and hold the key on the Phone screen to dial the contact s number To create a Speed Dial entry Before you can create a Speed Dial entry the numb...

Страница 43: ...pt the new call you can choose to switch between the two callers or set up a conference call between all three parties 1 Tap Answer to take the second call and put the first one on hold 2 To end the second call and return to the first call tap End or press END on the device To switch between two calls Tap Swap To set up a conference call 1 Either put a call on hold and dial a second number or accept...

Страница 44: ...d a phone number from the saved contacts on your device To find a contact name You can just enter the first letter of a contact s first name or surname Smart Dialing will search for the letter starting from the first character of a contact name as well as from the character that appears after a space dash or underscore in a contact name For example if you tap number 2 which is associated with a b ...

Страница 45: ...ble Smart Dialing check box Select the Automatically expand selected contact check box to enable a contact s name and phone number to be displayed when the contact is selected in the matching list Select the Enable drag scroll check box to scroll in the matched list by dragging Select the Enable double click for dialing check box to make a voice call by double tapping the item in the matched list ...

Страница 46: ...46 Using Phone Features ...

Страница 47: ...4 1 Basic Settings 4 2 Personalizing the Today Screen 4 3 Customizing Phone Services 4 4 Protecting Your Device Chapter 4 Setting Up Your Device ...

Страница 48: ... tab select your region from the list Note This does not change the Operating System language of your device 3 The region you select determines which options will be available on the other tabs 4 To customize settings further tap the appropriate tabs and select the desired options Display settings To adjust screen brightness On the Today screen tap the Launcher tab of HTC Home and then tap the Bac...

Страница 49: ...sound you want to use Tip You can use wav mid mp3 wma or other types of sound files that you downloaded from the Internet or copied from your PC as ring tones For a complete list of supported audio file formats for ring tones see Specifications in the Appendix To use your sound files as ring tones copy them first to the Windows Rings folder on your device then select the sound from the Ring tone l...

Страница 50: ... background image on the Today screen 1 Tap Start Settings Personal tab Today 2 Select the Use this picture as the background check box and tap Browse to view a list of your picture files 3 Tap the file name of the picture you want to use 4 Tap OK To display owner information Having owner information displayed on the Today screen makes it easier for someone to return your device to you if it is lost...

Страница 51: ...an also create folders and shortcuts to appear on the Start menu Using Windows Explorer on your PC navigate to the Windows Start Menu folder of your device then create the folders and shortcuts that you want You will see the added items on your device after you synchronize For information about synchronizing your device with the computer see Chapter 5 To change the Start Menu display size The Larg...

Страница 52: ... of the Phone screen one of these icons will be shown ON your location can be detected OFF your location cannot be detected except by 911 Network Service Choose whether to restrict your device to phone calls from your home network only TTY Mode Allow the use of a TTY teletypewriter device with the device for users who are visually or hearing impaired Time Synchronization Choose whether or not to s...

Страница 53: ... more secure you can set your device to prompt for a password every time the device is turned on or when your device has been idle after a specified amount of time To set a device password 1 Tap Start Settings Personal tab Lock 2 elect the Prompt if device unused for check box and in the box to the right select how long your device must be idle before a password is required In the Password type bo...

Страница 54: ...t encrypted them There is no separate step for you to take to read these files Important If Encrypt files on your storage cards is or was enabled before then backup all files from the storage card before using Clear Storage hard reset or updating the ROM system software Otherwise you will no longer be able to access the encrypted files on the storage card Use ActiveSync or Windows Mobile Device Ce...

Страница 55: ...Windows Mobile Device Center on Windows Vista 5 3 Setting Up ActiveSync on Windows XP 5 4 Synchronizing With Your Computer 5 5 Synchronizing via Bluetooth 5 6 Synchronizing Music and Video Chapter 5 Synchronizing Information With Your Computer ...

Страница 56: ...mation between them using Bluetooth For more information about setting up a Bluetooth partnership see Chapter 10 For information about synchronizing through Bluetooth see Synchronizing via Bluetooth later in this chapter Try to synchronize frequently in order to keep information up to date in both your device and your computer Note You can also synchronize Outlook e mail contacts calendar and task...

Страница 57: ...lick Start All Programs Windows Mobile Device Center on your Windows Vista computer On Windows Mobile Device Center you can do the following Click Mobile Device Settings to change synchronization settings When you click Pictures Music and Video ___ new pictures video clips are available for import a wizard guides you to tag and transfer photos from your device to the Photo Gallery on your Windows ...

Страница 58: ...To synchronize your device with your PC clear the Synchronize directly with a server running Microsoft Exchange check box then click Next 3 Select the information types that you want to synchronize then click Next 4 Select or clear the Allow wireless data connections check box according to your preference 5 Click Finish When you finish the wizard ActiveSync synchronizes your device automatically N...

Страница 59: ...t your device will synchronize properly with both PCs set up the second PC using the same synchronization settings you used on the first PC Outlook e mail can be synchronized with only one computer Troubleshoot sync connection problem When the PC is connected to the Internet or a local network in some cases the PC may disconnect the connection with your device in favor of the Internet or network c...

Страница 60: ... music and video with your device Other than selecting the Media information type to be synchronized all media synchronization settings must be set in Windows Media Player Before media can be synchronized you must do the following Install Windows Media Player Version 11 on the PC Windows Media Player 11 works only in Windows XP or later versions Connect your device to the PC with a USB cable If yo...

Страница 61: ...6 1 Contacts 6 2 Calendar 6 3 Tasks 6 4 Notes 6 5 Voice Recorder Chapter 6 Organizing Contacts Appointments Tasks and Other Information ...

Страница 62: ...e contacts after you have set up Windows Live on your device Add new contacts To add a contact on your device 1 Tap Start Contacts 2 Tap New select Outlook Contact and enter the contact information 3 In the File as field choose how you want the contact name to appear in the contact list 4 To add a photo of the contact tap Select a picture then select the picture file or tap Camera to take a photo of...

Страница 63: ...everal ways to find a contact when your contact list is long 1 Tap Start Contacts 2 Do one of the following Begin entering a contact name in the provided text box until the contact you want is displayed Use the alphabetical index displayed at the top of the contact list Filter the list by categories In the contact list tap Menu Filter then tap a category you ve assigned to a contact To show all co...

Страница 64: ...ion to Yes If there is a time frame for the appointment select the start and end dates and time 5 Specify the type of category for your appointment so that it can be grouped with other related appointments Tap Categories then select a preset category Business Holiday Personal or Seasonal or tap New to create your own category 6 When finished tap OK to return to the calendar Notes All day events do ...

Страница 65: ...ar to schedule meetings via e mail with contacts who use Outlook or Outlook Mobile 1 Tap Start Calendar 2 Schedule a new appointment or open an existing one and tap Edit 3 Tap Attendees then tap Add Required Attendee or Add Optional Attendee and add the contacts whom you want to invite You can specify if an attendee is required or optional only if your device is connected to a Microsoft Exchange 2...

Страница 66: ... Simply tap the Tap here to add a new task box enter a subject and tap the Enter button on the on screen keyboard If the task entry box is not available tap Menu Options and select the Show Tasks entry bar check box To change the priority of a task Before you can sort tasks by priority you need to specify a priority level for each task 1 Tap Start Programs Tasks 2 Tap the task you want to change t...

Страница 67: ...Selector arrow is not displayed tap the Input Method icon 4 When finished tap OK to return to the note list Notes To select handwritten text tap and hold next to the writing As soon as dots appear and before they form a complete circle quickly drag across the writing If a letter crosses three ruled lines it is treated as a drawing rather than text To draw in a note 1 Tap Start Programs Notes 2 In t...

Страница 68: ...nother folder to save voice recordings by tapping beside the folder name on the top left of the screen and then in the menu choose the folder where to save future recordings To play back a voice recording On the Voice Recorder screen select a voice recording then tap Ti s Tap to increase the volume tap to decrease the volume Tap to toggle between muting and unmuting the volume To send the voice re...

Страница 69: ...7 1 Messaging 7 2 Text Messages 7 3 Setting Up Personal E mail Accounts 7 4 Using E mail Chapter 7 Exchanging Messages ...

Страница 70: ...reen or Tap Menu Tools Options while you re in a message list Account Picker screen To automatically add a signature in outgoing messages You can automatically add your name and other information as your signature in outgoing SMS and e mail messages by following these steps Tip You need to specify your signature for each type of messaging accounts 1 Tap Start Messaging then tap Menu Options 2 Tap ...

Страница 71: ...The contact card of your selected contact is then displayed Touch the item that shows Send text message Select from Contacts a Tap Start Contacts b Slide your finger upward on the touch screen to scroll down the contact list See Finger scrolling and finger panning in Chapter 1 for more details on finger scrolling c Touch the contact s name to open his or her contact card d On the contact card touch t...

Страница 72: ...il type 6 Enter your e mail address and password for your e mail account and select Login To customize download and format settings Before you tap Finish when setting up your POP3 or IMAP4 e mail account you can tap Review all download settings to choose download options message format and other settings Options Description Automatic Send Receive You can select a time interval for connecting to th...

Страница 73: ...e mail Select from Contacts a Tap Start Contacts b Slide your finger upward on the touch screen to scroll down the contact list See Finger scrolling and finger panning in Chapter 1 for more details on finger scrolling c Touch the contact s name to open his or her contact card d On the contact card touch the item that shows Send e mail 2 If you have several e mail accounts the Account Picker screen wi...

Страница 74: ...n when you open an incoming message To read the whole message Finger scroll to the end of the message and tap Get the rest of this message or Tap Menu Download Message The message will be downloaded the next time you tap Menu Send Receive to send and receive e mail Note If your company is running Microsoft Exchange Server 2007 the message downloads immediately without waiting until the next time y...

Страница 75: ...u Send Receive 6 If images do not immediately appear on the message tap Internet pictures blocked then tap Download Internet pictures 7 Tap Menu and choose whether to reply or forward the message 8 Enter your response then tap Send Tip E mail can contain hyperlinks to Web pages Download messages The manner in which you download messages depends on the type of e mail account you have To send and re...

Страница 76: ...nt 3 Keep tapping Next until you see Message format and Message download limit on the screen 4 Under Message format select HTML or Plain text 5 Under Download size limit select the desired email size 6 Tap Finish To automatically receive attachments on Outlook e mails 1 Tap Start ActiveSync 2 Tap Menu Options 3 Tap E mail Settings then select Include file attachments To automatically receive attac...

Страница 77: ... Device with the Exchange Server 8 2 Working With Company E mail 8 3 Managing Meeting Requests 8 4 Finding Contacts in the Company Directory 8 5 E mail Security Chapter 8 Working With Company E mail and Meeting Appointments ...

Страница 78: ... Server name and tap Next 6 Enter your user name password and domain and tap Next Tip To change the rules for resolving synchronization conflicts tap Advanced 7 Select the items that you want to sync with the Exchange Server 8 To change synchronization settings of an information type for example E mail select the type of information and tap Settings 9 Tap Finish Note If you synchronized e mails wi...

Страница 79: ...before Direct Push can be enabled Requirement The Direct Push feature works for your device only if your company is using Microsoft Exchange Server 2003 Service Pack 2 SP2 with Exchange ActiveSync or higher version To enable Direct Push via Comm Manager 1 Tap Start Programs Comm Manager or tap Start Settings Connections tab Comm Manager 2 On the Comm Manager screen tap the DirectPush button The bu...

Страница 80: ...ment only if you have a Microsoft Outlook account that synchronizes with Microsoft Exchange Server 2007 or later Exchange Server must also be set up to allow access to SharePoint document libraries or internal file servers Search for e mails on the Exchange Server You can access messages that are not available on your device by searching your Microsoft Exchange Server mailbox The search results wi...

Страница 81: ...lear Flag Remove the flag to unmark the message Note E mail message reminders are displayed on your device if the messages are flagged with reminders and synchronized from the Exchange Server Out of office auto reply Outlook Mobile allows you to retrieve and change your out of office status Just like desktop Outlook E mail Outlook Mobile automatically sends an auto reply message when you re not av...

Страница 82: ...me of the requested meeting by tapping View your calendar If the time of the meeting conflicts with your other appointments a Scheduling Conflict status appears on top of the e mail 3 Choose whether or not to edit your response e mail before sending then tap OK 4 If you accepted the meeting request it will automatically be added as an appointment in Calendar on your device To view the list of meet...

Страница 83: ...change Server 1 Synchronize with Exchange Server if you have never done so 2 Do any of the following In Contacts tap Menu Company Directory In a new e mail message tap the To box or tap Menu Add Recipient then tap Company Directory In a new meeting request using Calendar tap Attendees and then tap Company Directory at the top of the list 3 Enter the part or full contact name and tap Search In the ...

Страница 84: ...e However to read an encrypted message you need a valid certificate to decrypt it To individually sign and encrypt a new message 1 Tap Start Messaging Outlook E mail 2 Tap Menu New to create a new message 3 Tap Menu Message Options 4 From the Security list select whether to encrypt only sign the message only or do both 5 Tap OK To verify the digital signature on a signed message you receive 1 Open...

Страница 85: ...es individually if you do not choose to sign or encrypt all outgoing e mail For information about signing and encrypting individual messages see To individually sign and encrypt a new message Set Permissions on an E mail Message Another way of protecting your e mail messages is to send messages with restricted permissions using Information Rights Management IRM Note This works only with a Microsof...

Страница 86: ...86 Working With Company E mail and Meeting Appointments ...

Страница 87: ... Microsoft Office Word Mobile 9 2 Microsoft Office Excel Mobile 9 3 Microsoft Office PowerPoint Mobile 9 4 Adobe Reader LE 9 5 Copying and Managing Files 9 6 ZIP Chapter 9 Working With Documents and Files ...

Страница 88: ... support some features of Microsoft Word such as revision marks and password protection Some data and formatting may be lost when you save the document on your device To see a complete list of features that are not supported in Word Mobile see Help on your device 9 2 Microsoft Office Excel Mobile Microsoft Office Excel Mobile makes it easy for you to open and edit Excel workbooks and templates cre...

Страница 89: ...o advance to the next slide 4 To navigate between slides tap Next or Previous or tap Go to Slide and tap the slide you want to view If the presentation is set up as a timed slide show slides will advance automatically Notes If you have zoomed in to see a slide in more detail you cannot navigate to another slide until you zoom out Tapping Next or Previous may play an animation on a slide rather tha...

Страница 90: ...n a PDF file you want to view 2 Tap Tools Find Text 3 Enter the text to be searched 4 Choose search parameters such as Match case Whole word Backwards and tap Find Note Adobe Reader LE offers you the following advance features It displays a bookmark pane for the PDF files that contain bookmarks Tap the bookmarks to go to a specific section page within the file It supports password protected PDF fil...

Страница 91: ... a file from your PC to your device a On your PC navigate to the folder that contains the file you want to copy b Right click the file then click Copy c Right click the destination folder under Mobile Device then click Paste Copying a file results in separate versions of a file on your device and PC Because the files are not synchronized changes made to one file will not affect the other If you want ...

Страница 92: ...ZIP This feature allows you to save memory and increase the storage capacity of your device by compressing files in the conventional ZIP format You can view and extract archive files received from various sources You can also create new zip files on your device Start ZIP and Open zip files You can use ZIP to either archive files or open an existing archive file on your device Each time you start Z...

Страница 93: ...age card 3 Tap Save 4 Tap Menu Action Add 5 Double tap the folder that contains the files you want to archive 6 Select files by doing one of the following Tap to select a file To select several files tap and hold on the screen then select Multi Select Mode Select files by tapping each file Tap a selected file to deselect it To select all files tap and hold on the screen then tap Select All 7 Tap Add...

Страница 94: ...94 Working With Documents and Files ...

Страница 95: ...10 1 Comm Manager 10 2 Connecting to the Internet 10 3 Internet Explorer Mobile 10 4 Windows Live 10 5 Bluetooth 10 6 Using Your Device As a Modem Wireless Modem Chapter 10 Getting Connected ...

Страница 96: ...luetooth Tap Settings Bluetooth to configure Bluetooth on your device See Bluetooth in this chapter for details 3 Tap to disconnect active data connections You cannot reconnect a data connection in Comm Manager 4 Tap to launch Wireless Modem 5 Tap to toggle between enabling or disabling the phone Tap Settings Phone to set the ring tone and other phone settings See Chapter 4 for details 6 Tap to to...

Страница 97: ...h Tips To view help information for any screen tap the Help icon on the Connections screen To modify your connection settings tap Manage existing connections on the Connections screen and complete the connection wizard Work network connection A Virtual Private Network VPN connection allows you to access your company network through your device s Internet connection Whereas a proxy connection lets ...

Страница 98: ... tap Use Default Tip To go to your Home page tap Menu Home To transfer favorites from your PC You can transfer the favorites you have stored on your PC to your device by synchronizing the Internet Explorer favorites on your PC with your device 1 In ActiveSync on your PC on the Tools menu click Options and select Favorites 2 In Internet Explorer on your PC click Favorites Add to Favorites and save ...

Страница 99: ...hold the picture and tap Save Image 2 Do one of the following To save the picture in My Pictures on your device tap Yes To save the picture in another location such as a storage card tap Save As To delete temporary Internet files Your device temporarily stores Web pages that you frequently visit or have visited recently to speed up the display of these Web pages when you access them You may want t...

Страница 100: ... Hotmail address and password To set up Windows Live for the first time 1 Tap Start Programs Windows Live 2 Tap Sign in to Windows Live 3 On the next screen tap the links to read the Windows Live Term of Use and the Microsoft Privacy Statement After reviewing them tap Accept 4 Enter your Windows Live Mail or Hotmail address and password select the Save password checkbox then tap Next 5 Choose whet...

Страница 101: ...op version which include the following Instant messaging via text and voice Multiple conversations Add emoticons Contact list with presence Send and receive files including photos Change status display name View contacts by online status groups and more Send messages even when a contact is offline Note Before you can use Windows Live Messenger your device must be connected to the Internet For informa...

Страница 102: ...a Windows Live ID or any other e mail address Tip You can fill in other information about the contact if desired This is not absolutely necessary if you will communicate with the contact only through Windows Live Messenger or Live Mail 4 Tap OK 5 Follow the remaining instructions to add the new contact to your Windows Live contact list 10 5 Bluetooth Bluetooth is a short range wireless communicati...

Страница 103: ...reated the devices can recognize the partnership and exchange information without entering a passcode again To accept a Bluetooth partnership 1 Ensure that Bluetooth is turned on and in visible mode 2 Tap Yes when prompted to establish a partnership with the other device 3 Enter a passcode the same passcode that is entered on the device requesting the partnership to establish a secure connection T...

Страница 104: ...2 Next set Bluetooth on your computer to visible mode create a Bluetooth partnership then enable your computer to receive Bluetooth beams If your computer has Windows Vista or Windows XP SP2 and your computer s Bluetooth adapter is supported by your Windows version do the following steps a On your computer open Bluetooth Devices from the Control Panel then click the Options tab b For Windows Vista...

Страница 105: ...ile sharing on your device 1 Tap Start Settings Connections tab Bluetooth FTP tab 2 Select the Enable Bluetooth Explorer check box This makes the Bluetooth device folder visible in the File Explorer 3 Select the Enable File Sharing check box You can use the default Bluetooth shared folder or tap Browse to use another folder as your shared folder To use Bluetooth Explorer 1 Bluetooth Explorer is in...

Страница 106: ...em 2 Tap Menu Start 3 The next thing to do is to add your device as a modem onto your notebook Add your device as a modem to your notebook After you tap Menu Start on the Wireless Modem screen of your device your notebook will automatically detect that your device has been connected The Found New Hardware dialog box will then appear on your computer To add your device as a modem to a Windows Vista...

Страница 107: ...USB Modem to complete then tap Close To add your device as a modem to a Windows XP notebook 1 In the Found New Hardware dialog box select Install from a list or specific location Advanced and click Next 3 Select Search for the best drivers in these locations 4 Insert the Getting Started Disc into your CD drive Select the Include this location in the search check box Click Browse and choose the CD ...

Страница 108: ... on your notebook To set up a modem dial up connection in a Windows Vista notebook 1 On your notebook click Start Control Panel 2 Double click Network and Sharing Center 3 On the left hand panel of the Network and Sharing Center click Set up a connection or network 4 Click Set up a dial up connection then click Next 5 Enter the following information dial up phone number 777 your user name and pass...

Страница 109: ...a dial up connection in a Windows XP notebook 1 On your computer click Start Settings Control Panel 2 Double click Network Connections 3 Click File New Connection 4 In the New Connection Wizard click Next 5 Click Connect to the Internet then click Next 6 Select Set up my connection manually then click Next 7 Select Connect using a dial up modem then click Next 8 Select the USB modem that you previ...

Страница 110: ...your notebook using your device as a modem tap Menu Start in Wireless Modem of your device then do the following steps to connect to the Internet 1 If Wireless Modem has not yet been activated on your device select the type of connection USB or Bluetooth then tap Menu Start 2 On a Windows Vista notebook click Start Connect to select the name of the dial up connection then tap Connect On a Windows ...

Страница 111: ...Getting Connected 111 4 The Connect dialog box then opens Click Dial to dial up and connect to the Internet To end the modem session On the Wireless Modem screen tap Done or tap Menu Stop ...

Страница 112: ...112 Getting Connected ...

Страница 113: ...11 1 Camera 11 2 Camera Album 11 3 Pictures Videos 11 4 Windows Media Player Mobile 11 5 MP3 Trimmer Chapter 11 Experiencing Multimedia ...

Страница 114: ...ure mode To change the capture mode Current capture mode Tap to change the capture mode You can also press NAVIGATION right or left to change the capture mode The available capture modes of the camera are as follows Photo Captures standard still images Video Captures video clips with or without accompanying audio Contacts Picture Captures a still image and gives you the option to immediately assig...

Страница 115: ...n controls and indicators are displayed for a few seconds only and are then hidden from the Camera screen To bring up the on screen controls and indicators again simply touch or tap the screen or press NAVIGATION up down left right 1 Mode Switching control Tapping the left right arrow on the screen allows you to switch the capture mode 2 Remaining information indicator In Photo Contacts Picture Pi...

Страница 116: ...nd capture size The following table is a summary Capture mode Capture size setting Zoom range Photo 2M 1600 x 1200 No zooming available 1M 1280 x 960 1 0x to 2 0x Large 640 x 480 1 0x to 2 0x Medium 320 x 240 1 0x to 4 0x Small 160 x 120 1 0x to 8 0x Video Medium 176 x 144 1x and 2x Small 128 x 96 1x and 2x Contacts Picture Large 480 x 640 1 0x to 2 0x Medium 240 x 320 1 0x to 4 0x Picture Theme D...

Страница 117: ...ce White balance settings include Auto Daylight Night Incandescent and Fluorescent 4 Brightness Tapping the minus plus icon decreases or increases the brightness level 5 Self timer Tap to set the Self timer to 2 seconds 10 seconds or Off when in the Photo or Contacts Picture mode When you press the CAMERA or ENTER button to capture a still image it starts to count down and then captures a still im...

Страница 118: ...s or video clips Time Stamp Photo Sports and Burst modes Choose whether or not to include the shooting date and time on captured photos Quality Select the JPEG image quality level for all captured still images Choose from Basic Normal Fine and Super Fine Metering Mode Select a metering mode to allow the camera to measure the amount of light and calculate the best fit exposure value before capturing...

Страница 119: ... IMAGE or VIDEO followed by a sequential number for example IMAGE_001 jpg You may also choose to name files using either the current Date or Date Time as the prefix Note If you set the Camera to save captured photos to a storage card the prefix cannot be selected Captured photos will be named using the convention IMAGnnnn jpg wherein nnnn is the counter which is the DCIM Digital Camera Images naming...

Страница 120: ...xample if you are in Photo mode only still images will be shown in Camera Album To view video clips switch first to Video mode before tapping Opened from still image capture mode Opened from video capture mode Touch to go to Camera mode Tip If you have a lot of images in your device scroll up or down by sliding your finger upward or downward on the touch screen To view an image On the main Camera A...

Страница 121: ... from right to left or Go back to the previous image by sliding your finger from left to right To rotate the image With your finger make a half circle motion on the screen Slide your finger clockwise to rotate the image 90 degrees clockwise or Slide your finger counter clockwise to rotate the image 90 degrees counter clockwise To zoom in or out of an image With your finger make a full circle motion o...

Страница 122: ...he thumbnail of the video clip you want to play back Windows Media Player then plays back the clip Tip You can also select a video clip and tap Play to play back the clip in Windows Media Player To close Camera Album Go back to the main Camera Album screen and touch or When you open Camera Album from the Camera mode touching takes you back to the Camera program 11 3 Pictures Videos Pictures Videos...

Страница 123: ...s menu Select a media file and then tap Menu to choose from a list of options that you can do with the selected media file You can send the selected media file via one of your messaging accounts or beam it to another device If you selected a picture you can associate it to a contact set it as your Today screen background send it to your Windows Live Space account and more You can also view the ima...

Страница 124: ...ts Supported File Extensions Windows Media Audio WAV MP3 MIDI AMR Narrow Band AMR Wide Band AAC AAC and eAAC MPEG4 audio QCELP wma wav mp3 mid midi rmi amr awb aac mp4 m4a mp4 m4a qcp To open Windows Media Player Mobile Tap Start Programs Windows Media About the controls The following are available controls on the Windows Media Player Mobile Play Pause Full screen Visit WindowsMedia com Tap and dr...

Страница 125: ...l then see the name of your device or Storage Card if you have inserted one on your device Click Finish 4 On the left panel of Windows Media Player right click the name of your device then click Set Up Sync Note To set up media synchronization on a storage card right click Storage Card in the left panel of Windows Media Player then click Set Up Sync 5 On the Device Setup dialog box select Sync thi...

Страница 126: ... hold the item that you want to play such as a song album or artist name then tap Play Tips To play a media file that is stored on your device but is not in a library on the Library screen tap Menu Open File Tap and hold the item that you want to play such as a file or a folder then tap Play To play a media file from the Internet or a network server tap Menu Library then tap Menu Open URL Playlist...

Страница 127: ... mark in point then drag the right handle to mark the end time mark out point Mark in Mark out For more precise marking you can also tap these controls to step backward forward one step and mark it Title Duration Playback time To trim the MP3 file 1 Tap Start Programs MP3 Trimmer 2 Tap Open to find the MP3 file in the device 3 On the MP3 Trimmer screen use the stylus to adjust the Mark in point and ...

Страница 128: ...128 Experiencing Multimedia ...

Страница 129: ...12 1 Adding and Removing Programs 12 2 Using Task Manager 12 3 Resetting Your Device 12 4 Managing Memory 12 5 Windows Update 12 6 Battery Saving Tips Chapter 12 Managing Your Device ...

Страница 130: ...w and stop running programs configure the Exit button and enable the Quick Menu on the Today screen To open Task Manager Tap the Quick Menu button on the top right corner of the Today screen to open the Quick Menu and then tap the Options icon or Tap Start Settings System tab Task Manager To switch back to a running program Tap the program name in the Quick Menu or On the Task Manager screen tap t...

Страница 131: ... list tap the Exclusive tab select the check box of that program then tap Remove To remove a program from the exclusive list In the Running tab tap and hold the program name in the list and then tap Remove from Exclusive or In the Exclusive tab select the program name and tap Remove To sort running programs in the Quick Menu 1 Tap the Advanced tab 2 Select Program name or Memory usage to sort runn...

Страница 132: ...ring the device storage and reset all settings back to factory default settings is to use the Clear Storage feature You will lose all your data and files on the device storage when you use Clear Storage so make sure to do a backup first 1 Tap Start Settings System tab Clear Storage 2 Enter 1234 then tap Yes 12 4 Managing Memory To see how much memory is available for use tap Start Settings System ...

Страница 133: ...l be asked if you want to use your current data plan to check for updates Select or clear the Use my data plan to check for and download updates check box and tap Next 4 Tap Finish To check for updates 1 Tap Start Settings Systems tab Windows Update 2 Tap Check Now Note Windows Mobile updates may not be available at all times You can check the Windows Mobile Web site for update information To chan...

Страница 134: ...y power For optimum conservation specify 3 minutes or less Use the AC adapter to plug your device into external power whenever possible especially when using a storage card or when using a modem or other peripherals Adjust the backlight settings For more information see To set the backlight to dim after a time delay in Chapter 4 Turn Bluetooth off when you are not using it Make your device visible ...

Страница 135: ...13 1 Voice Speed Dial Chapter 13 Using Other Applications ...

Страница 136: ...f the item Select the desired phone number Tap the Record button to start recording 5 When you create a voice tag for the item you can do one of the following Tap the Record button to rebuild the voice tag Tap the Play button to play the voice tag Tap the Delete button to delete the voice tag Tip To ensure voice recognition accuracy please record your voice in a quiet place Create a voice tag for ...

Страница 137: ...e program automatically Note If the system cannot recognize your voice tag please speak clearly and reduce the surrounding noise then try again To view and test the voice tags you have created 1 Tap Start Settings Personal tab Voice Speed Dial 2 The Voice Tag tab displays a list that contains all the voice tags you have created Select an item in the list and you can do one of the following Tap the...

Страница 138: ...138 Using Other Applications ...

Страница 139: ...Appendix A 1 Specifications A 2 Regulatory Notices A 3 Additional Safety Information ...

Страница 140: ...hours Talk time Up to 3 5 hours Media playback time Up to 8 hours WMV up to 12 hours WMA AC Adapter Voltage range frequency 100 240V AC 50 60 Hz DC output 5V and 1A Display LCD Type 2 8 TFT LCD with backlight LEDs touch sensitive screen Resolution 240 x 320 with 65 536 colors Alignment Portrait and Landscape Phone Functionality CDMA2000 1xEVDO 1xRTT and IS 95A B voice or data Mode Dual band 800 an...

Страница 141: ...trol ENTER button Two phone functions TALK and END Volume Slider CAMERA button POWER button RESET button LEDs The left LED shows Green and Amber lights for CDMA standby message and network status as well as for notification and battery charging status The right LED shows a flashing Blue light when the Bluetooth system is powered up and ready to transmit Bluetooth radio signal and an Amber light fo...

Страница 142: ...ipment on and off the user is encouraged to try to correct the interference by one or more of the following measures Reorient or relocate the receiving antenna Increase the separation between the equipment and receiver Connect the equipment into an outlet on a circuit different from that to which the receiver is connected Consult the dealer or an experienced radio or television technician for help ...

Страница 143: ...d T marks are recommended by the Alliance for Telecommunications Industries Solutions ATIS The U and UT marks are referenced in Section 20 19 of the FCC Rules The HAC rating and measurement procedure are described in the American National Standards Institute ANSI C63 19 standard For information about hearing aids and digital wireless phones FCC Hearing Aid Compatibility and Volume Control http www...

Страница 144: ...mmended that no part of the human body be allowed to come too close to the antenna during operation of the equipment IC Statement Operation is subject to the following two conditions 1 This device may not cause interference and 2 This device must accept any interference including interference that may cause undesired operation of the device Important Note IC Radiation Statement This equipment comp...

Страница 145: ...he left on the product or on its box indicates that this product must not be disposed of or dumped with your other household waste You are liable to dispose of all your electronic or electrical waste equipment by relocating over to the specified collection point for recycling of such hazardous waste Isolated collection and proper recovery of your electronic and electrical waste equipment at the ti...

Страница 146: ...by inattention to automobile traffic or other pedestrian hazards Using The Phone Function Of Your Pocket PC While Driving Is Extremely Dangerous Talking on or using your device while driving is extremely dangerous and is illegal in some states Remember safety comes first Check the laws and regulations on the use of phones in the areas where you drive Always obey them If you must use the phone funct...

Страница 147: ...g devices see FCC Hearing Aid Compatibility HAC Regulations for Wireless Devices OTHER MEDICAL DEVICES If you use any other personal medical device consult the manufacturer of your device to determine if it is adequately shielded from external RF energy Your physician may be able to assist you in obtaining this information HOSPITALS AND HEALTH CARE FACILITIES Turn your device OFF in health care fa...

Страница 148: ...ollow the directions below could result in serious bodily injury and or property damage due to battery liquid leakage fire or rupture DO NOT use or store this equipment in a place where it will be exposed to high temperatures such as near an open flame or heat emitting equipment DO NOT drop your device or subject it to severe shock When not using lay down the unit to avoid possible damage due to i...

Страница 149: ...ble battery please request the repair center to recycle the battery in accordance with RBRC standards When disposing of the battery by yourself please call RBRC at 800 822 8837 for proper disposal tips Never touch any fluid that might leak from the built in battery Such liquid when in contact with the eyes or skin could cause injury to the skin or eyes Should the liquid come into contact with the ...

Страница 150: ...ands Always unplug the AC adapter charger from the power source before attempting any cleaning Always use a soft cloth dampened with water to clean the equipment after it has been unplugged Handling the cord on this product or cords associated with accessories sold with this product will expose you to lead a chemical known to the State of California to cause birth defects or other reproductive har...

Страница 151: ...4 Calendar search 38 Calibration 18 Camera capture modes 114 controls 115 file formats 115 icons 115 overview 29 settings 117 specifications 140 Clear Storage 132 Clock Alarms 31 48 Comm Manager 29 32 96 Company Directory 83 Conference call 43 Contacts 29 62 Contacts Picture capture mode 114 Contacts search 38 Cookies 99 Copy files between device and PC 91 files to storage card 91 media files from PC t...

Страница 152: ...cel Mobile 88 MP3 Trimmer 30 PowerPoint Mobile 89 Text Messages Retry 30 WModem 30 Word Mobile 88 ZIP 92 Put call on hold 43 Q Quick menu 20 Find contact Company Directory 83 on device 63 Finger panning 26 Finger scrolling 26 Forward e mail 75 G Games 29 GIF animation 123 H Hard reset 132 Help 29 Help search 38 Home 21 Home page Internet Explorer 98 HTC Home 21 I Input methods Block Recognizer 37 ...

Страница 153: ...2 Clock Alarms 31 48 49 Customer Feedback 31 Device Information 31 Encryption 31 54 Error Reporting 31 External GPS 32 Key Lock 32 Memory 32 132 Power 18 32 134 Regional Settings 32 48 Remove Programs 32 130 Screen 18 32 48 Task Manager 32 130 TouchFLO 28 32 Shortcuts 23 25 Smart Dialing 44 SMS 71 Soft reset 131 Sound 23 Sounds Notifications 50 Speakerphone 43 Specifications 140 Speed Dial 42 Spor...

Страница 154: ...gram 137 overview 30 136 Voice tag create for phone number 136 for program 136 make call or launch program 137 Volume 41 W Weather 21 Web pages layout 99 text size 99 Windows Live 30 100 Windows Live Messenger 29 101 Windows Media Player Mobile file formats 124 menus 125 overview 30 playlists 126 troubleshoot 127 Windows Mobile Device Center 56 Windows Update 32 133 Word Mobile 29 Z ZIP create arch...

Отзывы: