


During initial running-in, newly machined
surfaces will be in contact with each other and
these surfaces will wear-in quickly. Running in
precautions till 1000 km will reduce initial wear
of engine components and increase its service life.
Flooded Engine
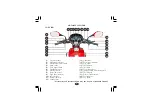
î
Steering-
check for smooth action for easy
maneuverability.
î
Fitting & fasteners-
check & tighten if
necessary.
î
Air suction valve
-make sure all tube
connections are secured properly
(page 47)
.
î
i3s System
-make sure that i3s system is
functional properly
(page 14).
If the engine fails to start after repeated
attempts, it may be flooded with excess fuel.
To clear a flooded engine, turn the ignition
switch “OFF” and turn the choke lever to
“OFF”. Close the throttle fully and crank the
engine several times with the kick starter. Turn
the ignition switch “ON” and start the engine
without using choke.
Running in
During first 1000 km, do not operate the
motorcycle at more than 65 km/hr speed in top
gear, 45 km/hr in third gear, 30 km/hr in
second gear and 15 km/hr in first gear. Avoid full
throttle operation.
î
i3s Switch
-make sure whether the i3s
switch is in “ON” or “OFF” position
(page 13).
î
Side stand indicator-
make sure that the
side stand is up. If it is in down position the
side stand indicator
(page 15)
will glow on
the speedometer panel.
RIDING
î
When the motorcycle attains a moderate
speed, close the throttle, press the clutch
nd
lever and shift to gear by
depressing the
2
gearshift pedal
.
î
After the engine has been warmed up, the
motorcycle is ready for riding.
î
Slowly release the clutch lever and at the
same time, gradually increase engine speed
by opening the throttle. Coordination of the
throttle and clutch lever will assure a smooth
positive start.
î
While the engine is idling, press the clutch
lever and depress the gearshift pedal
to shift
st
into 1
(low)
gear.
Recommended shifting speed
st
1
0-20 km/hr
nd
2
15-30 km/hr
rd
3
20-40 km/hr
th
4
30 km/hr and above
î
The sequence is repeated progressively to
rd
th
shift 3 and 4 (top gear).
21