


While driving, if the engine is kept idling (while
waiting in a traffic signal ), the engine will cut off
in 5 secs. (The vehicle should be in neutral at
less then 2000 r/min with clutch
lever/throttle
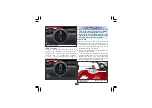
Driving with i3s Switch in “ON” position:
Keep the i3s switch (1) to “ON” position. Turn
the Ignition key to “ON” position. The i3s
indicator (2) on the speedometer console will
glow for 2 seconds and turn “OFF”. Start the
vehicle and allow the engine to run in neutral
gear position with the r/min less than 2000
r/min. The engine will cut off in 30 secs. After
the first stop start every subsequent stop will be in 5
secs. In this condition, the engine can be
restarted either with kick or electric start only.
Initial Activation of the i3s system:
While driving in a traffic jam/or very dense
traffic where the vehicle has to encounter a
stop and go situation, the i3s switch can be
changed to “OFF” position. Once this is done,
the i3s system will not work and the vehicle
will be in normal operating conditions as other
vehicles and no special functions will be
performed.
Driving with i3s Switch in “OFF” position:
Is in released position) By pressing the clutch
lever, the engine will start again and gear can
be engaged to move the vehicle.
NOTE
î
During electric or clutch start, the engine will
cut-off
î
If the battery voltage is low, the i3s system will
not work. The i3s indicator on the
speedometer console will start to blink, if the
r/min is less than 2000 r/min and the i3s
indicator goes off if the r/min is more than
2000 r/min. The vehicle will be in normal
operating conditions as other vehicles and no
special functions will be performed.
(1) if engine reaches 900 r/min
(2) if the relay is engaged for more than 5
seconds.
î
If the vehicle is driven without battery or with
the dead battery, the i3s system will not
work. The i3s indicator on the speedometer
console will start to glow continuously. The
vehicle will be in normal operating
conditions as other vehicles and no special
functions will be performed.
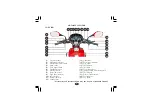
(2) i3s indicator
2
NOTE
î
Use choke during cold conditions.
î
The engine will stall if the i3s switch is in
“ON” position during warmup.
14