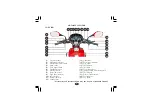
HERO Super Splendor Скачать руководство пользователя страница 11

(1) Fuel valve

(5) Main stand

(3) Gear shift pedal

(4) Rider foot rest

(2) Carburetor

(6) Side stand

(11) Tail/Stop lamp


women pillion step

(8)   Pillion foot rest

(7)   Side stand switch

(9)   Saree guard with 

(10) Reflex reflector

(15)  Front turn signal lamp

(12)  Rear grip

(14)  Clutch lever

(13)  Side cover left

*Accessories and features shown may not be part of standard fitment.

MOTORCYCLE VIEWS 

8

LEFT SIDE VIEW

12

10

11

15

1

2

5

6 7

9

3

4

8

14

13

Содержание Super Splendor

Страница 1: ...any fine machine proper care and maintenance are essential for trouble free operation and optimum performance Your Authorised Hero MotoCorp dealer will be glad to provide further information or assis...

Страница 2: ...THE TIME OF ITS PRINTING APPROVAL AND THE ACCURACY OR CORRECTNESSOFTHESAMEISNOTUNDERTAKENORGUARANTEED Hero MotoCorp Ltd RESERVES THE RIGHT TO MAKE CHANGES IN ITS CONTENTS AT ANY TIME WITHOUT NOTICE A...

Страница 3: ...MENT PROCESS 18 16 TYRES 18 PRE RIDE INSPECTION 20 RIDING 21 BRAKING PARKING UTILITY BOX 22 15 15 ANTI THEFT TIPS 5 TIPS FOR HEALTHY ENVIRONMENT 6 23 TOOL KIT FIRST AID KIT 25 24 STARTING THE ENGINE R...

Страница 4: ...Engine No XXXXECYZXYYYYY Model Super Splendor VIN Engine Variants XXXXEC Y Z X YYYYY Engine Description Year of Manufacturing Assembly Plant Month of Manufacturing Serial Number MBL XXXXEW Y Z X YYYY...

Страница 5: ...old Idle speed Front Suspension Rear Suspension 0 95 litre at disassembly and 0 75 litre at draining 13 litres Minimum 1 0 litre Usable reserve 157 ml 6 72 kW 9 BHP 7000 r min 52 4x57 8 mm 9 1 1 124 7...

Страница 6: ...indicator Side stand indicator 3 350 67 20 3 000 42 14 2 769 36 13 1 500 30 20 1 095 23 21 0 913 21 23 MF Battery ETZ 4 12V 3Ah 94 W 5000 r min Electric Start i3s indicator 12V 1 7W Fuse 15A 20A Trans...

Страница 7: ...eping throttle in the close position Respect road signs and obey traffic rules for your own safety and that of others on the road page50 51 To make yourself more visible wear bright reflectiveclothing...

Страница 8: ...d keep it in your motorcycleatalltimes 5 Accessories Make sure that the accessory does not obscure any lamps reduce ground clearance limitsuspensiontravelorsteering travel affectyourridingpositionorin...

Страница 9: ...essories can upset or deteriorate your motorcycle s running condition Genuine engine oil Hero 4T Plus SAE 10W 30 SL grade JASO MA2 engine oil recommended by Hero MotoCorp and make sure you change it e...

Страница 10: ...nal switch 6 Headlamp switch 7 Passing switch 8 Rear view mirror 9 High beam indicator 10 i3s indicator 11 Neutral indicator 14 Turn signal indicator 19 Ignition switch with steering lock 20 Throttle...

Страница 11: ...women pillion step 8 Pillion foot rest 7 Side stand switch 9 Saree guard with 10 Reflex reflector 15 Front turn signal lamp 12 Rear grip 14 Clutch lever 13 Side cover left Accessories and features sho...

Страница 12: ...al 3 Rider foot rest 8 Air suction valve 6 Oil filler cap 9 Utility box 7 Starter motor 10 Front suspension 12 Visor 13 Battery compartment inside 14 Rear turn signal lamp 15 Rear shock absorber 11 He...

Страница 13: ...indicator Hi Beam indicator Side stand indicator Tripmeter knob Tripmeter Fuel gauge Indicates riding speed Shows accumulated distance traveled Flashes when turn signal switch is operated Light glows...

Страница 14: ...and Passing Switch can be operated Fuel Gauge and Pass lamp will be functional Keycannotberemoved Engine cannot be started and no electrical systemwillbefunctional Keycanberemoved Keycanberemoved Key...

Страница 15: ...agedingear 6 ClutchSwitch 1 Electricstarterswitch RIGHTHANDLEBARCONTROLS Ensurestarterswitch 1 isoperatedwhenthe vehicle is in neutral gear If the vehicle is engaged in gear press the clutch lever bef...

Страница 16: ...ter switch continuously more than 5 seconds as continuous cranking ofenginewilldrainthebattery CAUTION 1 Electric starter switch 2 i3s Switch i3s idlestopstartsystem Starting Warmuptheengine Keep the...

Страница 17: ...innormaloperatingconditionsasother vehicles and no special functions will be performed Drivingwithi3sSwitchin OFF position Is in released position By pressing the clutch lever the engine will start ag...

Страница 18: ...and Ignition Switch ON an indicator lamp glowsinthespeedometerpanel ON Position At ON fuel will flow from fuel tank to the carburetor OFF Position At OFF fuel cannot flow from the tank to the carburet...

Страница 19: ...the tank There should be no fuel 4 infillerneck 5 Tolock positionthecapbackontheopening with the arrow mark D on the cap facing towards the front of the motorcycle then press gently The key springs ba...

Страница 20: ...arlier Starttheengine letitidlefor3 5minutes Stop the engine park the motorcycle on itsmainstandonlevelground Add the specified oil by removing the oil filler cap 1 and filling till the upper level ma...

Страница 21: ...of the oil window with the motorcycle in an upright position and that there are no oilleaks CAUTION Running the engine with excessive oil can cause spark plug fouling loss in performance Engine oil is...

Страница 22: ...Rider only Rider and Pillion 19 1 Air pressure gauge Rear 2 75x18 4PR 2 75x18 6PR Front Over inflation Under inflation will affect the performance CAUTION Replace tyres immediately when the wear indic...

Страница 23: ...checkconditionandpressure page 18 Drive chain check condition and slackness page35 Adjustandlubricateifnecessary Clutch check for smooth operation Adjustfreeplay page3 4 Front and rear brakes check o...

Страница 24: ...e the motorcycleatmorethan65km hrspeedintop gear 45 km hr in third gear 30 km hr in secondgearand15km hrinfirstgear Avoidfull throttleoperation i3s Switch make sure whether the i3s switch is in ON or...

Страница 25: ...Sudden acceleration braking or turning may cause loss of control For your safety exercise extreme caution when braking accelerating or turning When descending a long steep slope use engine braking pow...

Страница 26: ...rection and slide the cover back and release thekeyafterproperseating TOOLKIT FIRSTAIDKIT Kit consists of following tool Spanner 14 x 17 1 No Pin spanner 1 No Wrench sparking plug 1 No Tool bag 1 No 1...

Страница 27: ...ter press the clutch lever and pushthestarterswitch STARTING THE ENGINE Turnthefuelvalve ON 2 Turn the ignition switch ON 1 Select neutral position check N indicator glows on instrument cluster with i...

Страница 28: ...ing from engineexhaust Let the engine and exhaust system cool beforetouching To reduce the possibility of a fire or explosion becarefulwhenworkingaround petrol or batteries Use only nonflammable solve...

Страница 29: ...echnicallyqualified Inspect maintainspecifiedtorque Note 4 Inspectforanyplayintherearsuspensionmountingbushes replaceifnecessary I INSPECT C CLEAN R REPLACE A ADJUST L LUBRICATE T TOP UP Replace engin...

Страница 30: ...gine Oil Strainer Screen Engine Oil Centrifugal Filter Oil Circulation Electric Starter WHICHEVER COMES FIRST ITEMS DURING FREE SERVICE PERIOD SERVICE st 1 nd 2 rd 3 th 4 th 5 AFTER FREE SERVICE ONCE...

Страница 31: ...nd 2 rd 3 th 4 th 5 AFTER FREE SERVICE ONCE IN EVERY 6000 9000 12000 15000 DAYS KM Note 1 500 750 Rear Suspension I I I I I I I I I I I I I I A I I I I I I I I I I I I I I I A I A I I I I I I I I I L...

Страница 32: ...2 3 5 1 Kick starter pedal 2 Clutch cable 3 Muffler 4 Rider foot rest 5 Right crankcase cover Reinstall the centrifugal filter cover right crankcase cover kick start pedal clutch cable Fill the crank...

Страница 33: ...d Make sure that the spark plug gap is 0 8 0 9 mm using a wire type feeler gauge If adjustment is necessary bend the side electrode carefully Make sure the plug washerisingoodconditions Withtheplugwas...

Страница 34: ...ment 9 Element Holder The air cleaner element should be cleaned by blowing moisture free pressurized air Startcleaningbydirectingtheairnozzle 10 inside the element and cleaning it by rotating theeleme...

Страница 35: ...ster 4 FreePlayAdjustment A Decreasefreeplay B Increasefreeplay 2 Boot 3 Locknut 4 Adjuster 4 A B 32 O 45 50 mm CAUTION Never blow air initially from outside to inside as the fine dust particles may g...

Страница 36: ...ththeindexmark 4 ontheleftcrankcase cover In this position the piston will either be on the compression or exhaust stroke 5 6 5 Adjusting screw 6 Lock nut piston is at Top dead center and both the inl...

Страница 37: ...dlespeed please followtheinstructionsgivenhereunder Warm up the engine and park the motorcycleonthemainstand Adjustidlespeedwiththethrottlestopscrew 1 IDLESPEED 1400 100R MIN 1 2 A B 1 Throttle stop s...

Страница 38: ...y areas Turn the engine OFF park the motorcycle onitsmainstandandshiftthetransmissionto neutral Removeholecap 2 morefrequentmaintenancewillbenecessary Drive chain slack 3 should be adjusted to allow a...

Страница 39: ...stment Park the motorcycle on its main stand with the transmission in neutral and the ignition switchin OFF position Loosen the rear axle nut 1 and sleeve nut 2 1 Rear axle nut 36 1 Drive chain 2 Hole...

Страница 40: ...inatevery2000km Refer to Maintenance Schedule on page27 DRIVECHAINSLIDER 1 Drivechainslider 2 Wearlimit CUTOUT 2 1 Chain slack Check rear brake pedal free play andadjustasnecessary page39 Checkthedriv...

Страница 41: ...ves before the brake starts to take hold Free play 2 should be 10 20 mm atthetipofthebrakelever Checkthechainslider 1 forwear Thechain slider must be replaced if the or wear limit is reached For repla...

Страница 42: ...for freewheelrotationwhenreleased thefinaladjustmenthasbeenmade Make sure that the cut out on the adjusting nutisseatedonthebrakejointpin 4 after If adjustment is necessary turn the rear brakeadjustin...

Страница 43: ...anceFree MFBattery ETZ 4 12V3Ah 40 Brake wear indicators to the brake arm 2 moves towards a referencemark 3 onthebrakepanel 4 If the arrow aligns with the reference mark on full application of the bra...

Страница 44: ...is not necessary to check the battery electrolyte level or add distilled water as the battery is a Maintenance Free sealed type If battery seems weak and or electrolyte is leaking causing hard starti...

Страница 45: ...Batteryinstallation Reinstall in the reverse order of removal Be sure to connect the positive terminal first thenthenegative terminal Check all bolts and other fasteners are secure Fuse Box 1 Locatio...

Страница 46: ...ry pre set However in case of adjustment required please follow the steps asgivenbelow Adjust the headlamp beam vertically by the loosening bolt move the headlamp unit forward backward for correct foc...

Страница 47: ...thefrontwheelofftheground Spoke Castwheelversion Remove the speedometer cable 1 by pressingthetab 2 pullingcableout 44 1 1 Headlamp adjusting bolt SUSPENSION Inspection Checkthefrontforksbylockingthef...

Страница 48: ...5 Remove the axle nut 7 Remove the axle remove the wheel Disconnect the brake cable 3 from the brake arm 4 and brake panel 5 by removingthefrontbrakeadjustingnut 6 1 Speedometer cable 2 Tab 3 Front br...

Страница 49: ...the brake panel 5 by removing Remove the axle nut 8 and pull out the rearaxle 9 Remove the wheel 8 Axle nut 9 Rear axle 8 9 46 1 Rear brake adjusting nut 2 Rear brake rod 3 Brake arm 4 Brake stopper a...

Страница 50: ...ed petrol can contaminate the catalyst metals making the catalytic converterineffective Keeptheenginetunedup AIR SUCTION VALVE 1 1 Air suction valve 47 After installing the wheel apply the brake sever...

Страница 51: ...No spark Consult Authorised Hero MotoCorp Workshop Check spark plug for fouling Improper electrode gap Replace spark plug adjust Spark plug gap 0 6 0 7 mm Loose contact Check for poorly connected Or...

Страница 52: ...attery Ok Ok Check bulbs Fuse wrong wattage Replace fuse Weak Fused Feeble horn sound or no light Replace bulbs 4 ELECTRICAL SYSTEM Ok Check connections Loose Secure connections Consult Authorised Her...

Страница 53: ...se signs as theyhelpavoidaccidents TheirviolationcanbepenalisedundertheMotorVehicleAct Mandatory Speed Limit No Hand Craft No Pedestrians No Right Turn No U Turn Overtaking Prohibited No Parking Lengt...

Страница 54: ...ant information about road directions are maps of specific destinations On highways they provide information about the location of public telephones restaurants hospitals parking petrol pumps resting...

Страница 55: ...paid service should be availed within 90 days from the date of previous serviceoraspertherecommendedschedule whicheverisearlier c Super Splendor Hero MotoCorp s If any is observed in vehicle only pro...

Страница 56: ...ve manufacturersanddirectlyhandledbythemonly Decision regarding warranty settlement shall be taken by and the same shall be final and Hero MotoCorp bindingonallconcern 3 To normal wear tear components...

Страница 57: ...omes the property of the company and no scrap rebate will be given for it The warranty period on the battery being repaired replaced shall commence from the date of sale of the original battery as sta...

Страница 58: ...applicable in India and shall remain valid for a period of 3 years or 30000 kms whichever occursearlier fromthedateofvehiclepurchase c The emission warranty shall be applicable only to those vehicles...

Страница 59: ...ey Peace of mind CONSEQUENTIAL DAMAGES ON USING NON GENUINE PARTS Clutch Plate Reduced life Engine knocking Higher emission level Poor performance Improper sealing Leads to leakage and smoky exhaust M...

Страница 60: ...failure Poor engine performance Frequent stalling of engine Higher emission level Affects fuel efficiency Poor engine performance Poor braking efficiency Discs Drumwearout resultinginsubsequentrepairc...

Страница 61: ...O 367 368 FirstFloor Sector 34A Chandigarh 160022 India Tel 91 172 2623773 2623774 2623775 E mail chandigarh heromotocorp com HeroMotoCorpLtd KapoorTowers PlotNo 284 15 B RajpurRoad Dehradun 248001 I...

Страница 62: ...heromotocorp com HeroMotoCorpLtd D NO 54 11 18E 2ndFloor SaiOddesseyBuilding OppExecutiveClub NearNH 5 HeroMotoCorpLtd 3 6 289 3rdFloor KareemManzil Hyderguda Hyderabad 500029 India Tel 91 40 2322373...

Отзывы: