background image

1

July 2014

The Henny Penny open fryer is a basic unit of food processing equip-

ment. This unit is used only in institutional and commercial food 

service operations.

As of August 16, 2005, the Waste Electrical and Electronic Equipment direc-

tive went into effect for the European Union. Our products have been evalu-

ated to the WEEE directive. We have also reviewed our products to determine 

if they comply with the Restriction of Hazardous Substances directive (RoHS) 

and have redesigned our products as needed in order to comply. To continue 

compliance with these directives, this unit must not be disposed as unsorted 

municipal waste. For proper disposal, please contact your nearest Henny Penny 
distributor.

As in any unit of food service equipment, the Henny Penny open fryer 

does require care and maintenance. Requirements for the maintenance 

and cleaning are contained in this manual and must become a regular 

part of the operation of the unit at all times.

Should you require outside assistance, call your local independent dis-

tributor in your area, or call Henny Penny Corp. at 1-800-417-8405 or 

1-937-456-8405.

SECTION 1: INTRODUCTION

1-1

INTRODUCTION

1-2

PROPER CARE

1-3

ASSISTANCE

Содержание GVE-071

Страница 1: ...ONLINE AT WWW HENNYPENNY COM OPERATOR S M A N U A L REGISTER WARRANTY ONLINE AT WWW HENNYPENNY COM SPLIT FULL VAT ELECTRIC OPEN FRYER MODEL GVE 071 GVE 072 GVE 073 GVE 074 Read instructions before operating the appliance ...

Страница 2: ......

Страница 3: ...nuous mass production of food such as in a factory setting During use the units airborne A weighted emission sound pressure is below 70 db A All repairs must be performed by the manufacturer its service agent or similarly qualified persons in order to avoid a hazard Always use strain relief Install the provided power cord with the ground wire dimensioned to fail last If the supplied power cord or ...

Страница 4: ......

Страница 5: ...t Up Procedures 16 3 5 Cooking with Dedicated Display 17 3 6 Cooking with Multi Product Display 18 3 7 Change from Breakfast to Lunch Lunch to Breakfast 18 3 8 Change from Multi Product Display to Dedicated Display 19 3 9 Change from Dedicated Display to Multi Product Display 19 3 10 Change from Multi Product Display to Multi Product Display with Different Setpoint Temperatures 19 3 11 Quick Filte...

Страница 6: ...ettings 31 4 2 AIF Clock 33 4 3 Deep Clean Mode 34 4 4 Fryer Setup 38 Section 5 LEVEL 2 PROGRAMMING 39 5 1 Advanced Product Settings 39 5 2 E Log error code log 40 5 3 Password 41 5 4 Alert Tone 41 5 5 Filter Aftr 42 5 6 Filter Time 42 Section 6 TROUBLESHOOTING 43 6 1 Troubleshooting Guide 43 6 2 Error Codes 45 ...

Страница 7: ...products as needed in order to comply To continue compliance with these directives this unit must not be disposed as unsorted municipal waste For proper disposal please contact your nearest Henny Penny distributor As in any unit of food service equipment the Henny Penny open fryer does require care and maintenance Requirements for the maintenance and cleaning are contained in this manual and must ...

Страница 8: ...sult in death or serious injury DANGER INDICATES AN IMMINENTLY HAZARDOUS SITUATION WHICH IF NOT AVOIDED WILL RESULT IN DEATH OR SERIOUS INJURY The instructions in this manual have been prepared to aid you in learning the proper procedures for your equipment Where information is of particular importance or is safety related the words NOTICE CAUTION or WARNING are used Their usage is described below...

Страница 9: ...drain valve to drain oil from vat Shows direction to turn the yellow handle to open the fill valve to pump oil into vat OR OR Hot Surface Symbols Equipotential Ground Symbol Waste Electrical and Electronic Equipment WEEE Symbol Shock Hazard Symbols 1 4 SAFETY CONT ...

Страница 10: ...op of the fryer lid 5 Cut and remove the metal bands holding the fryer to the pallet Do not remove shipping brace from right side of fryer until unit is in final location as damage to fryer could result Remove filter drain pan from fryer before removing fryer from pallet or damage to the unit could result Figure 1 6 Remove the fryer from the pallet Take care when moving the fryer to prevent person...

Страница 11: ...can be moved away with only a slight loss of efficiency To avoid fire and ruined supplies the area under the fryer should not be used to store supplies To prevent severe burns from splashing hot oil position and install fryer to prevent tipping or movement Restraining ties may be used for stabili zation For proper operation the open fryer should be level from side to side and front to back Using a...

Страница 12: ...r to local electrical codes for correct ground ing earthing procedures or in absence of local codes with The National Electrical Code ANSI NFPA No 70 the current edition In Canada all electrical connections are to be made in accordance with CSA C22 1 Ca nadian Electrical Code Part 1 and or local codes To avoid electrical shock this appliance must be equipped with an ex ternal circuit breaker which...

Страница 13: ...available in the rear fryer frame for securing the cable restraint to the fryer The cable restraint does not prevent the fryer from tipping The supply power cords shall be oil resistant sheathed flexible cable no lighter than ordinary polychloroprene or other equivalent synthetic elastomer sheathed cord It should be an insulated copper conductor rated for 600 volts and 90o C For runs longer than 5...

Страница 14: ...8a July 2014 2 9a DIMENSIONS Casters adjustable up to 1 562 in 40mm ...

Страница 15: ...46 425 in 1180 mm Adjustable Up 800 in 20 mm Weight 243 lbs 110 kg Crated Width 21 70 in 551 mm Depth 36 13 in 918 mm Height 53 60 in 1361 mm Weight 298 lbs 135 kg Electrical Volts 220 380 Phase 3 Hertz 50 kW 14 Amps 24 3 Wire 3NG Oil Capacity Per split vat 10 lbs or 9 0 kg 2 9b DIMENSIONS 8b ...

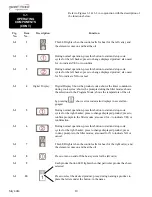
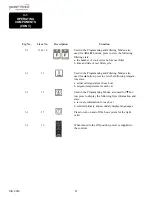
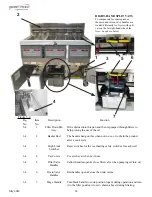
Страница 16: ...9 July 2014 3 1 OPERATING COMPONENTS Figure 3 1 Figure 3 2 1 2 6 4 5 7 3 8 9 13 11 12 14 10 15 16 SECTION 3 OPERATION ...

Страница 17: ...essing shows error codes also displays in several lan guages 3 1 5 During normal operation press this button to start and stop cook cycles for the right basket press to change displayed product press to confirm prompts in the filter modes also used for to indicate YES or confirmation 3 1 6 During normal operation press this button to start and stop cook cycles for the right basket press to change ...

Страница 18: ... used for button press to view the following tempera ture stats a actual oil temperature in each vat b setpoint temperature for each vat 3 1 13 Used in the Programming Modes also used for but ton press to display the following fryer information and stats a recovery information for each vat b selected primary and secondary display languaages 3 1 15 Press to turn on and off the heat system for the r...

Страница 19: ...4 4 Vat Covers Covers the vat when not in use 3 4 5 Filter Valve Handles Yellow handles open close filter valve when pumping oil into vat 3 4 3 4 6 7 Drain Valve Handles Purge Handle Red handles open close the drain valves Turn black handle to cook position open during operation and turn it to the filter position closed shown above during filtering 1 2 3 4 Figure 3 4 5 7 6 RIGHT HAND SPLIT VATS To...

Страница 20: ...РУССКИИ Press to continue with the other set up items which include ZONE USA EUROPE CHINA OTHER TEMP FORMAT F or C TIME FORMAT 12 HR or 24 HR ENTER TIME Time of day use product buttons to change ENTER TIME AM or PM DATE FORMAT US or INTERNATIONAL ENTER DATE Today s date use product buttons to change FRYER TYPE GAS or ELEC VAT TYPE FULL or SPLIT CONTROL POSITION 1 2 3 4 position left to right DAYLI...

Страница 21: ... avoid severe burns when pouring hot oil into vat Oil and all metal parts that are in contact with the oil are extremely hot and take care to avoid splashing 2 Oil Capacities Full size vats 19 3 quarts 37 8 lbs 18 3 liters 16 5 kg Split vats 10 quarts 18 7 lbs 9 5 liters 8 5 kg All vats have 2 level indicator lines inscribed on the rear wall of the vat in which the upper most line shows the oil at...

Страница 22: ...or X button and holding it for 5 seconds The control then shows EXIT MELT YES NO Press button for YES and vat heats continuously until the set point temperature is reached Do not bypass the Melt Cycle unless enough oil has melted to completely cover all of the elements If the Melt Cycle is bypassed before all elements are cov ered excessive smoking of oil or a fire will result DO NOT OVERLOAD OR P...

Страница 23: ... alarm sounds and display shows PULL 5 Press the timer button under PULL to stop the alarm and lift basket from vat 6 If a Quality Timer hold timer has been programmed the hold time starts automatically when the user presses the timer button to end the cook cycle While the quality timer counts down the display shows the three digit product abbreviation followed by Qn where n is the number of minut...

Страница 24: ...r PULL to stop alarm Display then shows or if a quality timer hold time has been programmed the display shows the timer counting down see step 6 Section 3 5 This procedure is basically changing the product being cooked in a vat with a dedicated display Breakfast to Lunch 1 Press product button for ex 2 Display shows 3 Press and hold a timer button or for 5 seconds and then FR FRIES shows in displa...

Страница 25: ...ds until control beeps 2 Release the timer button and display shows indicating the change has been made to the Multi product Display Mode Only products programmed for this set point temperature will be able to be selected for cooking 1 Press a product button for ex 2 The display shows FR FRIES if the set point of the vat matches the product or the display shows if it doesn t 3 Press and hold a tim...

Страница 26: ...isplay shows OPEN DRAIN Turn red drain handle to open drain and the display shows DRAINING and oil drains from the vat To avoid overfilling the drain pan drain only 1 vat at a time The drain pan holds 1 full vat or 2 split vats of oil Overfilling the drain pan may cause slippery floors which may result in personal injury 5 Display shows VAT EMTY followed by CONFIRM Check that drain is clear and va...

Страница 27: ... select units for solid shortening Perform step 10 if purge valve is available otherwise continue to step 3 12 10 Display shows OPEN PURGE VALVE followed by CONFIRM IMPORTANT Leave purge valve in closed position if more vats need filtered Press button and leave purge handle in the filter closed position repeat above steps Once all vats have been filtered open purge valve press button 3 11 QUICK FI...

Страница 28: ... QUICK FILTER 4 Press and release button and display shows 2 MAINT FILTER 5 Press button for YES and display shows DRAIN PAN READY Make sure drain pan and cover are in place and press button Display shows MNT FLTR YES NO NOTE Purge valves are available on select units for solid shortening Perform step 6 if purge valve is available otherwise continue to step 7 6 Display shows CLOSE PURGE VALVE foll...

Страница 29: ...ete display shows CLOSE DRAIN Turn red drain handle to close drain and then display shows IS POT FILLED followed by YES NO 12 Once vat is full press button and CLOSE RETURN VALVE followed by CONFIRM shows in display Using yellow handle close return valve press and then display shows OPEN DRAIN Turn red handle to open drain display shows RINSING and oil drains from vat rinsing the vat When rinsing ...

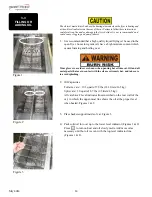
Страница 30: ...el of oil in vat and add fresh if necessary until oil is level with the top indicator line on rear wall of vat 18 Press to turn on heat and continue cooking 1 Open center door unlatch drain pan stop and pull the drain pan assembly from under fryer 2 Unlatch lid on discard shuttle and open lid Roll discard shuttle under fryer Figures 2 23 3 Open drain using the appropriate red drain handle and drai...

Страница 31: ...re 1 This pan could be hot Use protective cloth or glove or severe burns could result If the filter pan is moved while full of oil use care to prevent splashing or burns could result 2 Lift the pan cover from the drain pan Figure 2 3 Lift the crumb basket from the drain pan Wipe the oil and crumbs from the crumb basket Clean the crumb basket with soap and water then thoroughly rinse with hot water...

Страница 32: ...discard pad Figure 5 6 Remove the bottom screen from pan and clean thoroughly with soap and water Rinse thoroughly with hot water Figure 6 7 Wipe the oil and crumbs from the drain pan Figure 7 Figure 5 Figure 7 Figure 6 3 14 CHANGING THE FILTER PAD CONT ...

Страница 33: ...er tube with cold oil 9 Push the filter pan assembly back underneath the fryer making sure the filter tube on the pan makes a good connection with the fitting underneath the fryer Figure 9 10 Make sure the drain pan stop is engaged and the fryer is now ready for normal operation Figure 9 The basket rest on the rear shroud of the fryer should be removed and cleaned periodically Use protective glove...

Страница 34: ...he controls revert back to normal operation Cook Cycles Remaining before Filtering 1 Press and release either or and the left display shows COOKS REMAIN and the right display shows the number of cook cycles before the next auto filter For example REMA IN 3 6 means after 3 more cook cycles on left vat controls ask the operator if they are ready to filter or not But 6 more cook cycles remain on the ...

Страница 35: ...X button to exit from the Information Mode 1 FILTER STATS Press button to select Filter Stats and then press and to select the day you want to view the stats Then press or buttons to view the fol lowing stats FILTERED Number of times filtered FLT BPSD Number of times filtering was skipped FLT AVG Average number of cook cycles between filters 2 REVIEW USAGE Press button to select Review Usage and p...

Страница 36: ... Time and day last Cook Cycle was started STARTED 10 25A AUG 11 Actual Elapsed cook Time Real seconds ACTUAL TIME 7 38 Programmed cook Time PROG TIME 3 00 Max Temp during Cook Cycle MAX TEMP 327 F Min Temp during Cook Cycle MIN TEMP 313 F Avg Temp during Cook Cycle AVG TEMP 322 F Heat On percentage during Cook Cycle HEAT ON 73 Ready Was fryer Ready before start READY YES 3 19 INFORMATION MODE CONT...

Страница 37: ...o change this product or press the X button to choose another product 6 If button was pressed press and release a product button and the flashing letter changes to the first letter under the product button that was pressed For example if is pressed the flashing letter changes to an A Press the same button again and the flashing letter changes to a B Press it again and the flashing letter changes t...

Страница 38: ...his time When the timer counts down to 2 30 the alarm sounds After the alarm time is set press button and DUTY 2 shows in the display and a second alarm can be programmed Quality Time 4 Press button until QUAL TMR is displayed along with preset holding time Press product buttons to adjust holding time up to 2 hours 59 minutes AIF Disable 5 Press button until AIF DISABLE shows in the display along ...

Страница 39: ...y be programmed for Satur days and a final set of four blocking periods may be programmed for Sundays 1 Press and hold and buttons until LEVEL 1 shows in the display followed by ENTER CODE 2 Enter code 1 2 3 4 first 4 product buttons PRODUCT and SELECTN show in the displays 3 Press button once and AIF CLOCK show in the displays 4 Press button and use and buttons to scroll through ENABLE and DISABL...

Страница 40: ...he right side X button to exit out of AIF Clock programming mode Put on protective gear Be sure to use all approved safety equipment including apron face shield and gloves Never begin Deep Clean process until you re wearing all safety gear Hot oil or water can cause severe burns 1 Cover adjoining vats to avoid accidentally contaminating oil with fryer Deep Clean solution Do not cook product in an ...

Страница 41: ... 25 mm above the top fill line Then press button and display shows START CLEAN YES NO 9 Press button display shows CLEANING and a countdown timer Heat regulates to 195 F 91 C for this step for one hour Add water as needed during cleaning process to keep solution 1 in 25 mm above the top fill line To stop the cleaning cycle early press X button The display shows QUIT DEEP CLN YES NO Press the butto...

Страница 42: ...ele ments This produces scratches on the surface of the element causing breading to stick and burn Do not use steel wool other abrasive cleaners or cleaners sanitizers contain ing chlorine bromine iodine or ammonia chemicals as these will deteriorate the stainless steel material and shorten the life of the unit Do not use a water jet pressure sprayer to clean unit or component damage could result ...

Страница 43: ...YES NO To avoid burns make sure all water and cleaning solution has been removed from the vat 18 Pull drain pan from under fryer and empty using the 1 2 gal 2 liter pitcher and pouring it into a heat resistant bucket for disposal 19 Thoroughly dry the vat with a towel press the button and display shows CLOSE DRAIN Turn red drain valve handle to close drain and controls return to normal operation S...

Страница 44: ...ons to change the operation display to FRANCAIS CAN FREN ESPANOL PORTUG DEUTSCHE SVEN SKA РУССКИИ Press to continue with the other set up items which include ZONE USA EUROPE CHINA OTHER TEMP FORMAT o F or o C TIME FORMAT 12 HR OR 24 HR ENTER TIME Time of day use product buttons to change ENTER TIME AM OR PM DATE FORMAT US OR INTERNATIONAL ENTER DATE Today s date use product buttons to change FRYER...

Страница 45: ...button to change this product or press the X button to choose another product Load Compensation Load Compensation Reference Full Heat PC Factor 6 If button was pressed LD COMP shows in the display along with the load compensation value This automatically adjusts the time to account for the size and temperature of the cooking load Press the product buttons to change this value of 0 to 20 7 Press bu...

Страница 46: ...he current product to return to the PRODUCT SELECTN step Press X button a second time to exit PROD COMP mode 1 Press and hold and buttons until LEVEL 2 shows in the display followed by ENTER CODE 2 Enter code 1 2 3 4 first 4 product buttons PROD and COMP show in the displays 3 Press button and E LOG shows in the display 4 Press right button and A plus the present date time flashes on the display a...

Страница 47: ...o be changed press right button and MODIFY YES NO shows in the display Press right button to change the 4 digit password for the Set Up Mode using the product buttons 6 Once new password is entered CONFIRM PASSWORD shows in the display Press button to confirm or press X to choose another password 1 Press and hold and buttons until LEVEL 2 shows in the display followed by ENTER CODE 2 Enter code 1 ...

Страница 48: ...cycles before the controls suggest filtering 0 to 99 4 Once set press button to confirm This is the amount of time fryer sits idle until filter is suggested 1 Press and hold and buttons until LEVEL 2 shows in the display followed by ENTER CODE 2 Enter code 1 2 3 4 first 4 product buttons PROD and COMP show in the displays 3 Press button 5 times and FLTR TIME shows in the display along with the idl...

Страница 49: ...he same time until level 3 is displayed enter password 11221122 and enter 3 levels of programming 2 Use the UP DWN button loop menu to select Special Programming 3 Using the UP DWN button Loop menu select SP 17 User Polish Enabled Then select YES 4 Set the polishing time the default is 15 minutes 5 Exit Menu ...

Страница 50: ... error E 22 All power cords not plugged in Unit has 2 power cords make sure both are plugged in have heat circuit checked Control error code E 10 Open high limit circuit Allow heating elements to cool 15 20 minutes and reset high limit by pressing down and releasing raised side of the switch for the vat that is not operating switches are located behind right door if high limit does not reset high ...

Страница 51: ...e Filter paper or pad clogged Tighten all filter line connections Change filter paper or pad Bubbles in oil during entire filtering process Filter pan not completely engaged Filter pan clogged Damaged O ring on filter line receiver on fryer Make sure filter pan return line is pushed completely into the receiver on the fryer Clean pan and change paper or pad Change O ring Control error code E 31 El...

Страница 52: ...e temperature probe should be checked E 10 High limit Allow heating elements to cool 15 20 minutes and reset high limit by pressing down and releasing raised side of the switch for the vat that is not operating switches are located behind right door if high limit does not reset high limit must be replaced E 15 Drain switch Make sure drain handle is completely turned to the close position if E 15 p...

Страница 53: ...e the control board replaced E 47 Analog converter chip or 12 volt supply failure Turn switch to OFF then back to ON if E 47 persists have the PC board replaced E 48 Input system error Turn switch to OFF then back to ON have control PC board replaced if E 48 persists E 54C Temperature input error Turn switch to OFF then back to ON have control PC board replaced if E 54C persists E 70C Drain valve ...

Страница 54: ......

Страница 55: ...ny Penny Corporation P O Box 60 Eaton OH 45320 1 937 456 8400 1 937 456 8402 Fax Toll free in USA 1 800 417 8417 1 800 417 8434 Fax www hennypenny com FM05 Henny Penny Corp Eaton Ohio 45320 Revised 3 26 19 ...

Отзывы: