background image

22

QC-300 Series User’s Guide

LCD Screen functions

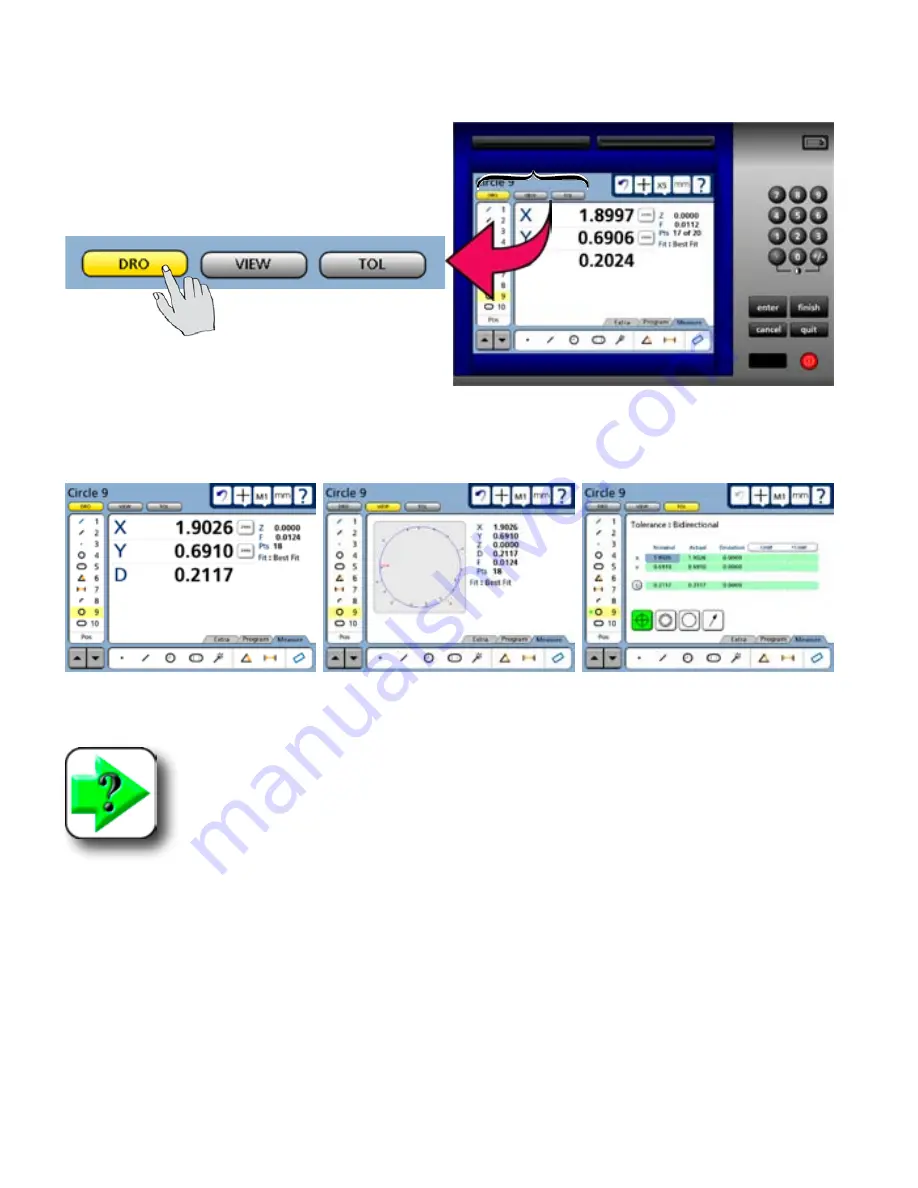
The LCD functions are used to select the screen that 

will be presented on the color touch LCD, generally 

in support of the next operator activity

Touch a button to select the desired screen.

  • 

DRO    Displays the digital readout

  • 

VIEW   Displays the selected feature’s data cloud

  •  TOL    Displays the tolerance screens for entering and editing tolerances

NOTE

Details regarding the use of the three basic screen types are distributed throughout the 

remainder of this user guide.

DRO screen

View screen

Tol screen

LCD Screen functions

Содержание ND 1300

Страница 1: ...English en 2 2010 ND 1300 QUADRA CHEK QC 320 Operating Instructions Optical Edge Detection and Crosshair Systems ...

Страница 2: ......

Страница 3: ...QC 300 Series User s Guide Optical Edge Detection Systems QC 320 QC 321 QC 323 QC 324 QC 320E QC 321E QC 323E QC 324E ...

Страница 4: ...onic mechanical photocopying recording or otherwise without prior written permis sion of Metronics Inc Requests to Metronics Inc for permission should be addressed to the Technical Services Department Metronics Inc 30 Harvey Road Bedford New Hampshire 03110 Limit of liability and disclaimer of warranty While this guide was prepared with great care Metronics makes no representations or warranties w...

Страница 5: ...wer is connected CAUTIONS IMPORTANT INFORMATION The exclamation point icon indicates important information regarding equipment operation or maintentance or a situation or condition that can lead to equipment malfunction or damage Do not proceed until the information is read and thoroughly understood NOTE The note icon indicates additional or supplementary information about an activity or concept S...

Страница 6: ...as been dropped or the exterior has been damaged The QC 300 exhibits degraded performance or indicates a need for service some other way Cleaning the enclosure Use only a cloth dampened with water and a mild detergent for cleaning the exterior surfaces Never use abrasive cleaners and never use strong detergents or solvents Only dampen the cloth do not use a cleaning cloth that is dripping wet Inst...

Страница 7: ...l footswitch 9 Connecting the optical edge detector inputs 9 Connecting optional CNC outputs 10 Warranty registration form 11 Repackaging for shipment 11 Chapter 3 User Interface Introduction 13 Measurement functions 14 Selecting a measurement type 14 Accessing programming functions 15 Sending data to a computer from the Extra tab 16 CNC and other Extra tab functions 18 Extra tab functions 18 Spac...

Страница 8: ...rt recording a program 30 Select a probe 30 Create part skew and datum references 31 Measuring a part skew 31 Create a datum zero point 32 Probing a datum zero point 32 Constructing a datum zero point 33 Measure a feature 35 Measuring a circle 35 Apply tolerances to a feature measurement 37 Print a report 39 Stop program recording 40 Running the program 41 Chapter 5 Probes Probes 44 Edge detector ...

Страница 9: ...Leveling the part optional 53 Skewing the part 54 Creating a datum zero point 55 Probing a datum zero point 55 Constructing a datum zero point 56 Probing and measuring features 58 Probing with Measure Magic 58 Probing specific feature types 59 Probing a single specific feature type 59 Probing multiple specific feature types 59 Probing process 60 Supported feature types 60 Backward forward annotati...

Страница 10: ...nes constructed from a point and a line 80 Line constructed from a distance 80 Lines constructed from a point and a circle 81 Line constructed from a point and a slot 82 Line constructed from a point and a rectangle 82 Lines constructed from a point and an arc 83 Lines constructed from two lines 84 Line constructed from a line and a distance 85 Lines constructed from a line and a circle 85 Lines c...

Страница 11: ...ne and a slot 107 Distance constructed from two distances 107 Distances constructed from two circles 108 Distances constructed from a slot and a circle 109 Distances constructed from a rectangle and a circle 109 Distances constructed from an arc and a circle 110 Distance constructed from two slots 111 Distances constructed from a slot and an arc 111 Distances constructed from a rectangle and an ar...

Страница 12: ...electing a tolerance type 127 Selecting a specific tolerance 128 Entering nominal limit or tolerance values 128 Omitting a tolerance category 129 Tolerance types 130 Bidirectional 130 Points 130 Lines 130 Circles and arcs 131 Slots and rectangles 131 True position 132 Points and lines 132 Circles and arcs 132 MMC LMC Material condition 133 MMC Circles and arcs 133 LMC Circles and arcs 134 Runout 1...

Страница 13: ...ams 146 Editing existing steps 146 Editing program settings 146 Editing tolerances 148 Editing user prompt messages 149 Inserting or appending new program steps 150 Running programs 152 Saving and retrieving programs 153 Saving programs 153 Retrieving programs 153 Deleting programs 155 Chapter 9 Communication Connecting to a computer 157 Sending data to a computer 158 Connecting a printer 159 Prin...

Страница 14: ... privileges until the power is cycled 170 Hiding setup parameters from unauthorized personnel 170 Limiting access to program functions 170 Saving and loading settings 171 Encoders screen 172 Selecting an axis to configure 172 Specifying encoder resolution 172 Specifying encoder type 172 Selecting reference marks 173 None 173 Manual 173 Single 173 Absolute 173 Setting a new machine zero reference 1...

Страница 15: ...ture measurement 191 Locking features to their original datums 192 Specifying signed distances 192 Enabling and configuring point filtration 192 Enabling point filtration 193 Specifying a filtration error limit 193 Specifying a filtration standard deviation range 193 Specifying the minimum percentage of retained points 193 Crosshair timeout delay 194 Crosshair delay restart distance 194 Display sc...

Страница 16: ...6 Miscellaneous screen 207 Return to DRO threshold 207 Touchscreen calibration rows and columns 207 Calibrating the touchscreen 208 Touch screen cursor 208 Touch screen repeat delay 208 Touch zone size 209 Screen brightness 209 Showing the Extra tab 209 Buttons screen 210 Selecting button functions 210 Selecting button responses 211 Selecting button logic 211 Joystick screen 212 Enabling joystick ...

Страница 17: ...ymptoms probable causes and solutions 220 No image is visible on the LCD screen 220 Values displayed on the LCD screen are incorrect 220 Reports are not printed or are incomplete 222 Reports are printed incorrectly 222 Optical edge detection is not working properly 223 Data cannot be transmitted to a computer 224 Getting help from your distributor 224 Chapter 12 Reference Material Product specific...

Страница 18: ...Contents 12 QC 300 Series User s Guide Chapter 13 Product Options List of product options 229 ...

Страница 19: ... com plete measurement sequences Sequences can be as simple as measuring a line or can be expanded to include skew adjustment datuming the measurement of mul tiple features tolerancing and printing reports of measurement results Programs can include the CNC motion control option to fully automate program execution increase thoughput and simplify operator tasks The intuitive interface will be fa mi...

Страница 20: ...med by the user All front panel keys provide tactile sensory feedback and key press operations can be configured to generate an audible sound Speaker and external speaker jack outputs are provided that can be adjusted for quiet or noisy environ ments Ear phones can be plugged into the external speaker jack to facilitate silent opera tion in quiet environments Wide keys LCD ON OFF Command keys Nume...

Страница 21: ... can be adjusted and secured in any convenient position Rubber feet on the bottom prevent slip ping when the system is not permanently bolted to a work surface using the bolt holes provided in the mounting stand Jacks are provided for optional optical edge detection inputs and for an optional foot switch All the op tional accessories for the QC 300 are shown in detail at the rear of this guide in ...

Страница 22: ...4 QC 300 Series User s Guide ...

Страница 23: ...rton and packaging materials in case future return shipment becomes necessary Inspect the components listed below for shipping damage The contents of the carton includes QC 300 instrument Mounting stand and hardware Power cord Warranty registration card Shipments of other optional equipment in separate cartons might include Optical cables and press clip Plexiglas cable holder RS 232 serial cable C...

Страница 24: ...r will create a tripping hazard Connect the 3 wire power plug to only a 3 wire grounded outlet Never connect 2 wire to 3 wire adapters to the power cord or remove the third ground wire to fit the plug into a 2 wire electrical outlet Modifying or overriding the third wire ground creates a safety hazard and should not be permitted DANGEROUS VOLTAGE Always disconnect the power cord from the source of...

Страница 25: ...ers Axis encoders are attached to interface connectors on the rear of the QC 300 Many encoder interfaces are available to match the wide variety of encoders that can be used with the QC 300 The type of axis encoder connectors will vary depending on the application En coder inputs are specified as analog or TTL at the time of purchase and cannot be changed in the field 1 Verify that the QC 300 is o...

Страница 26: ...nnect a computer COM port to the QC 300 RS 232 se rial port using a standard straight through serial cable Metronics part number 11B12176 Make sure the cable connectors are tight but do not overtighten the connector screws 3 Apply power to the computer and then the QC 300 The default QC 300 settings for communication over the RS 232 serial port are shown here Baud rate 1200 Parity None Data bits 7...

Страница 27: ...shair icon and the reference cable connector is marked with a light bulb icon Attach all cables securely to the appropriate connections 2 Secure the sensor cable to the comparator screen using the plastic mounting plate provided Place the mounting plate under the comparator s chart clips so the small hole in the plate is positioned over a lit portion of the com parator screen 3 Clean the collectin...

Страница 28: ...le The optical inputs must be configured later in QC 300 Magnifications setup screen Please refer to Chapter 10 Setup for details regarding optical edge detector setup Connecting optional CNC outputs The optional CNC joystick and amplifier outputs are connected at the CNC output connector on the rear of the QC 300 1 Verify that the QC 300 and CNC amplifier are off Connect the CNC amplifier and joy...

Страница 29: ...ory or equivalent It is not necessary to ship the base when shipping the QC 300 for repair CAUTION The original packaging must be duplicated and the LCD must be inserted face up to prevent damage to the LCD screen Pay special attention to the following instructions 1 Connect any loose mounting hardware to the QC 300 instrument 2 Repackage the foam and cardboard carton inserts as originally shipped...

Страница 30: ...12 QC 300 Series User s Guide ...

Страница 31: ... screen The hardware software interface is divided into the function areas listed and shown below Measurement functions LCD ON OFF or delete features Command buttons and wide keys Number keys Feature list System functions Screen functions Printing reports and sending data Command wide keys Feature list Command buttons Number keys System functions Measure functions Printing reports and sending data...

Страница 32: ...tab to display icons for the different measure types Touch a measure icon to select the desired measure type In some cases such as when selecting circles and slots related measure types will also be presented as shown in this example of touching the circle icon to display the arc measure type NOTE Details regarding performing measurements and the use of measurement tools are provided in Chapter 6 ...

Страница 33: ...mpleted program steps are shown in the feature list Run a program Run a program Record a program Stop recording Open edit mode Open edit mode Copy a program Include user message Select a drive Goto here Used to define locations for CNC program moves Copy to drive Additional CNC functions that can be included in programs are contained in the Extra tab shown later in this chapter in Chapter 6 Progra...

Страница 34: ... port always corresponds to the information displayed in the DRO screen The information types are shown in the upper left corner of the screen and are Current position no feature selected Feature measurement feature selected NOTE Touching an icon for an inap propriate data type produces no result For example touching the diameter icon when a circle feature is selected in the feature list sends dia...

Страница 35: ...owever a complete data set can be sent for a feature from the Extra tab by touching the required series of icons in succession The transmission of data to the serial port from the Extra tab can be included in programs like any other measurement tolerancing or reporting activity A complete data set for the selected circle is sent to a computer by touching each data icon in succession Measurement Fu...

Страница 36: ...ed Optical edge detector probe calibration probe teach Teaching the edge detector calibrates it to correctly recognize dark to light transitions edges on the comparator screen A teach calibration should be performed after each startup whenever the part or magnification level changes or when the light conditions on the comparator change Edge calibration is described in detail in Chapter 5 Probes an...

Страница 37: ...motion The Stop motion function is included in the Extra tab of systems with the CNC option to stop all stage motion When the user touches the Stop mo tion function motion is toggled on or off Goto feature The Goto feature function is included in the Extra tab of systems with the CNC option When the user touches the Goto function the stage is moved to position the probe over the feature currently ...

Страница 38: ...lue into a measurement data field tolerance data field communication data field or a setup data field Finish Completes a measurement tolerancing or setup session Cancel Removes the last point from a measurement deletes a feature from the feature list or removes the last character from a data field Quit Cancels a measurement in progress ends a setup session without saving new settings and ends a pr...

Страница 39: ...oo many entries to be displayed simultaneously the arrow keys at the bottom of the list are used to scroll up or down to display all the entries When recording playing or editing programs the program steps are shown in the feature list NOTE Details regarding the use of the feature list are distributed throughout the remainder of this user guide Feature list Selected measurements can be viewed or t...

Страница 40: ...or activity Touch a button to select the desired screen DRO Displays the digital readout VIEW Displays the selected feature s data cloud TOL Displays the tolerance screens for entering and editing tolerances NOTE Details regarding the use of the three basic screen types are distributed throughout the remainder of this user guide DRO screen View screen Tol screen LCD Screen functions ...

Страница 41: ...rams and setup data fields Numbers are entered into data fields in the conventional manner and can be erased when necessary by back spacing over them using the Cancel button NOTE Details regarding the use of number keys are distributed throughout the remainder of this user guide Number keys LCD Screen Functions and Number Keys ...

Страница 42: ... or feature list activity step The Undo function only erases the last step sequences of steps cannot be erased using undo Probe The Probe function provides access to the available measurement probe types Touching the Probe button shows the drop down list of available probes Probe types can include crosshair and optional optical edge detector probes Auto enter optical edge detection Points are ente...

Страница 43: ...ifications Touch the desired magnifi cation to select it Unit of measure The Unit of measure function toggles the linear unit of mea sure between metric and English Touch the mm in button to toggle the units of measure Touch the Magnification button to select a magnification from the drop down list Touch the Probe button to select a probe type from the drop down list System Functions Touch the mm ...

Страница 44: ...o can provide a valid supervisor password NOTE Detailed descriptions of all setup functions and tools are contained in Chapter 10 Setup Printing reports and sending data Measurement data shown on the DRO screen or contained in the feature list can be printed in reports over the USB port or sent to a computer over the RS232 serial port In either case the printing of reports and the transmission of ...

Страница 45: ...all feature measurement data and resume operation without turning the LCD off If the operator presses the Enter key to delete feature data the system will ask for confirmation If confirmation is given the feature data and datums will be permanently deleted CAUTION Delete feature data only when you have saved the data in a report transmitted it to a computer file or are sure that you no longer need...

Страница 46: ...28 QC 300 Series User s Guide ...

Страница 47: ...eries of required points will be indicated by a green arrow that moves over the part outline in the Part View win dow The user need only probe locations indicated by the arrow to complete measurements The demonstration will show measurements being performed on a manual stage using a manual crosshair probe However the same measurements could also be performed using optional optical edge detection D...

Страница 48: ...s will also be displayed and the Program tab will be shown in red to indicate that programming is in progress Select a probe To select a new probe 1 Select a new probe type by touching the Probe button The probe choices will be shown in the probe drop down list 2 Touch the desired probe button The probe drop down list will close and the new probe button will be displayed In this example the straig...

Страница 49: ...quent feature measurements are automatically compensated to eliminate mis alignment errors Measurement data in the DRO will reflect measurements of a perfectly aligned part Measuring a part skew To skew the part 1 Touch the Skew Level Mea sure icon 2 Perform the skew alignment by probing 2 or more points well distributed along the entire length of the desired part reference edge Press the Enter ke...

Страница 50: ...rom parent features Probing a datum zero point The datum zero point can sometimes be created directly by probing a point Simple probing is often pos sible when the part is precisely aligned in the stage To probe a datum zero point 1 Touch the measure point icon Probe the desired point for the datum zero and then press the Finish key In this example the lower left corner of the QC Quicky slide is p...

Страница 51: ... application In this example after the part skew is performed a datum zero point is created at the intersection of the X axis along the bottom of the part skew axis and the Y axis along the left side of the part To construct the datum zero point 1 Touch the Measure Line icon Probe two or more points well distributed along the left side of the part and then press the Finish button The line feature ...

Страница 52: ...cted touch the X and Y axis Zero buttons to zero the values and establish a datum zero at the probed point The point will then be shown in blue in the feature list NOTE More information regarding creating datums and constructions is contained in Chapter 6 Measuring ...

Страница 53: ...s contained in Chapter 6 Measuring More information regarding the use of crosshair or optional edge detection probes is contained in Chapter 5 Probes Measuring a circle To measure a circle using crosshairs 1 Select the manual crosshair probe 2 Touch the measure circle icon and probe a minimum of three points evenly distributed around the perimeter of the circle Four points were probed in this exam...

Страница 54: ...ies User s Guide 3 Press the Finish key to com plete the feature measurement and store the feature in the fea ture list The feature and probed points can be reviewed in detail by touching the View button if desired ...

Страница 55: ...touch the Tol screen button to display the tolerance screen 2 Touch the desired toler ance type icon button to select a tolerance type In this example the position tolerance type is se lected 4 Select a specific position tolerance Touch the Tolerance menu title and then select the specific toler ance from the drop down menu The true position tolerance is selected in this example Applying Tolerance...

Страница 56: ...ass fail results are indicated by green and red colors in the tolerance screen and in the feature list Pass is indicated by green fail is indicated by red in the tolerance screen Any tolerance failure will be indicated by a red mark next to the feature in the feature list A green mark will be displayed in the feature list when all tolerance tests pass NOTE More information regarding tolerances is ...

Страница 57: ... 2 Verify that the report content and printer formatting are specified correctly in the Print setup screen described in Chapter 9 Communication and Chapter 10 Setup 3 Press the Print key while displaying the Current Position in the Video or DRO screen NOTE More information regarding reports of feature measurement data and QC 300 system settings are contained in Chapter 9 Communication and Chapter ...

Страница 58: ...he program title will be shown on the left side of the screen The program is now saved and can be edited or run on new parts 2 Touch the Edit icon button to review or modify program steps The list of steps will be shown in the feature list Select a step to review its contents 3 Touch the Stop icon button and then the Measure tab to leave the record mode and return to the mea sure mode of operation...

Страница 59: ...ick Start Running the program To run a program touch the Pro gram tab to display the program screen select the desired program and then touch the Run icon to run the selected program Saving an Running Programs ...

Страница 60: ...42 QC 300 Series User s Guide ...

Страница 61: ...escribed in this chapter with references to material in Chapter 10 Setup The measurement construction and creation of features is explained in Chapter 6 Measuring Probe descriptions 44 Edge detector probes 44 Crosshair probes 44 Preparing to use probes 46 System and part condition 46 Selecting a magnification 46 Lighting 46 Calibration 47 Edge detector calibrations 47 Edge teach 47 Distance cal 47...

Страница 62: ...point entry When manual point entry is used to measure features a point is stored in a temporary memory location when the edge is crossed This point is replaced with a new point each time a new edge is crossed The most recent point is entered as part of a measurement when the Enter key is pressed Crosshair probes Crosshair probes must be positioned precisely over part features to collect feature d...

Страница 63: ...asure setup screen Refer to Chapter 10 Setup for details The crosshair Timeout delay is shown on the DRO as an ani mated dot revolving clockwise around the probe icon button The delay is restarted before the point is entered if the stage is moved again before the delay period is over NOTE The amount of stage movement must be equal to or greater than the Crosshair Dis tance specified in the Measure...

Страница 64: ...presumed to be clean and properly mounted Selecting a magnification Touch the Magnification button to display a drop down list of magnifications then touch the desired magnification to select it Lighting Adjust part illumination to achieve the best contrast between light and dark areas and to optimize the view of the part This is important for all probes but especially important for edge detection...

Страница 65: ...our system and your measurement applications and can include Edge teach Distance calibration Cross calibration Edge teach Edge teach is a basic edge recognition calibration required by all edge detector systems The edge teach should be performed at startup and when lighting part magnification or other conditions change The edge teach process is performed using the tools in the Magnifications setup...

Страница 66: ...ginning of a measurement session when lighting changes when magnification changes or when other measurement conditions change To teach the edge detector enter setup select the Magnifications screen and touch the Teach but ton Follow instructions dis played on the screen to complete the Teach operation 3 To measure position the edge detector close to the first target edge then touch the desired mea...

Страница 67: ...hanges or when other measurement conditions change To teach the edge detector enter setup select the Magnifications screen and touch the Teach but ton Follow instructions dis played on the screen to complete the Teach operation 3 To measure touch the desired measure icon button 4 move the edge probe across the first target edge and then press the Enter key to collect the point 5 Move to the next t...

Страница 68: ...ow the crosshair timeout delay as a dot moving clockwise around the crosshair button until the delay is complete and the dot is positioned at 12 00 When the de lay is complete the point will be entered 3 Move to the next target point Use the Cancel key to erase points collected unintentionally Manual point entry To probe using crosshairs and manual point entry 1 Select the manual point entry cross...

Страница 69: ...ctivities 52 The measurement process 52 Establishing the measurement reference 53 Leveling the part optional 53 Skewing the part 54 Creating a datum zero point 55 Probing and measuring features 58 Probing with Measure Magic 58 Probing specific feature types 59 Probing process 60 Probing with crosshairs and video edge detection 60 Probing specific feature types 60 Constructing features 70 Point con...

Страница 70: ...ed in the remaining pages of this section NOTE Tools and controls for probing features and conducting measurements are discussed in Chapter 3 User Interface and Chapter 5 Probes Establishing a measurement reference Probing and measuring Press the Finish key to conclude a feature measurement Press the Quit key to cancel a feature measurement Touch a measure icon to begin a feature measurement Press...

Страница 71: ... zero Reference features are presented in the feature list in blue other features are presented in black Leveling the part optional When the surface plane of the part is not orthogonal to the measurement axis small cosine errors can be generated during the measuring process These errors can be minimized or eliminated by leveling the part CAUTION Leveling is optional in most well maintained systems...

Страница 72: ...tures list in blue Skewing the part When the part is misaligned twisted in the X Y plane errors can be generated during the measurement process These errors can be eliminated by creating a skew alignment for the part The skew alignment includes a precise measurement of the part misalignment Once the misalignment is known to the system subsequent feature measure ments are automatically compensated ...

Страница 73: ...an or polar sys tems The datum zero point can be positioned in any location that satisfies the measurement requirements of the user and can be created by probing a point or by constructing a point from parent features Probing a datum zero point The datum zero point can sometimes be created directly by probing a point Simple probing is more often possible when the part is precisely aligned in the s...

Страница 74: ...measurement applications that require feature constructions to create a datum zero point However the concept illustrated by the following example and the construction techniques described later in this chapter can be used to construct a datum zero point for any measurement application In this example after the part skew is performed a datum zero point is constructed at the intersection points of t...

Страница 75: ...oint icon and then touch each of the two lines in the feature list to checkmark them 4 Press the Finish key to complete the point construction 5 While the constructed point is selected touch the Zero buttons of the X and Y axes to define the point s location as the zero datum Select the View window to see the zero datum at the intersection of the X and Y axes Establishing a Measurement Reference ...

Страница 76: ...ure data collected by part probing and automatically determines the feature type Measure Magic supports the following feature types in the QC 300 Points Lines Circles Arcs Slots When Measure Magic is used and more than the minimum number of points required to define a feature type are collected the feature type can be changed manually by the user if the wrong feature type is as signed To probe a f...

Страница 77: ...re a single circle When a specific measure function is used to probe the feature the feature type cannot be changed once it is added to the feature list Probing multiple specific feature types To probe a series of features of a specific type touch the desired measure icon touch the multiple measure ment icon probe points on each feature pressing the Finish key to conclude each feature measurement ...

Страница 78: ... 300 Points Slots Lines Rectangles Arcs Distances Circles Angles Features can be probed manually or semi automatically as part of a program NOTE Manual probing is discussed in Chapter 5 Probes Semi automatic probing is dis cussed in Chapter 8 Programming Touch the desired measure icon Probe and enter features then press Finish to complete measurements Results are displayed in the DRO and View wind...

Страница 79: ...ard annotation is used the system automatically displays the feature after the last required point is entered It is not necessary to press the Finish key to conclude forward annotation measurements NOTE Users can toggle between backward and forward annotation in the Measure setup screen Please refer to Chapter 10 Setup for more information regarding backward and forward annotation Probing with cro...

Страница 80: ...sible that the wrong feature type will be assigned If the wrong feature type is assigned it can easily be changed by selecting the correct feature from a menu of alternatives in the DRO window Measurement results are shown in the Feature list View window and DRO window The feature graphic in the View window shows the feature and the points used to define it Errors are shown as whiskers connect ing...

Страница 81: ...hm from a menu in the DRO window Please refer to Chapter 12 Reference Materials for details regarding the fitting algorithms Measurement results are shown in the Feature list View window and DRO window The feature graphic in the View window shows the feature and the points used to define it Errors are shown as whiskers connecting the probed points to the feature The maximum errors are shown in red...

Страница 82: ...re shown as whiskers con necting the probed points to the feature The arc will be shown with data point form errors in blue and the greatest two opposing form errors in red Measurement results are shown in the Feature list View window and DRO window The DRO window shows the number of points used the radius and diameter of the arc the coordinate location of the center of the arc and the form error ...

Страница 83: ...egarding the fitting algorithms The View window shows the feature and the points used to define it Errors are shown as whiskers con necting the probed points to the feature The circle will be shown with data point form errors in blue and the greatest two opposing form errors in red Measurement results are shown in the Feature list View window and DRO window The feature graphic in the View window s...

Страница 84: ...n erroneous slot measurements When the slot is probed as described above Measure Magic will assign the correct feature However occasionally Measure Magic will assign the wrong feature type to the data If the wrong feature type is assigned it can easily be changed by selecting the correct feature from a menu of alternatives in the DRO window Measurement results are shown in the Feature list View wi...

Страница 85: ...n erroneous rectangle measurements When the rectangle is probed as described above using Measure Magic Measure Magic will assign the slot feature However the slot feature can easily be changed to a rectangle by selecting the rectangle feature from a menu of alternatives in the DRO window Measurement results are shown in the Feature list View window and DRO window The feature graphic in the View wi...

Страница 86: ...asure a distance Measurement results are shown in the Feature list View window and the DRO window The View window shows the fea ture and the points used to define it The DRO window shows the number of points used the X and Y axis displacements and the dis tance vector between features ...

Страница 87: ...e included angle The View window shows the feature and the points used to define it The DRO window shows the number of points probed the coordinate location of the angle and the angle orientation to the skew axis The included angle is shown as the default measurement result however the angle type can easily be changed by selecting the desired angle type from a menu of alternatives in the DRO windo...

Страница 88: ...en it becomes desirable to perform new operations with the original while retaining a copy To construct a point from an existing point 1 Touch the Measure Point icon 2 Touch the desired point in the Features list 3 Press the Enter key 4 Press the Finish key The new point feature will be constructed over the original point Point constructed from a point and a line The point will be constructed wher...

Страница 89: ...rpendicular from the arc center to the line To construct a point from an arc and a line 1 Touch the Measure Point icon 2 Touch the desired arc feature 3 Press the Enter key 4 Touch the desired line feature 5 Press the Enter key 6 Press the Finish key The first intersect point or perpendicular point of the arc and line will be constructed Alternative point constructions can be selected from the dro...

Страница 90: ...of the line Anchor point The intersection of the line and the perpendicular from the datum to the line To construct a point from a line 1 Touch the Measure Point icon 2 Touch the desired line feature 3 Press the Enter key 4 Press the Finish key The midpoint of the line will be constructed Alternative point constructions can be selected from the drop down menu in the DRO window Midpoint End point 1...

Страница 91: ...e feature 5 Press the Enter key 6 Press the Finish key The intersection point or virtual intersection point of the lines will be constructed Points constructed from a distance The start and end points of the distance will be constructed To construct points from a distance 1 Touch the Measure Point icon 2 Touch the distance feature 3 Press the Enter key 4 Press the Finish key The start point of the...

Страница 92: ...on 2 Touch the point feature 3 Press the Enter key 4 Touch the distance feature 5 Press the Enter key 6 Press the Finish key An offset point feature will be constructed Point constructed from a circle A point feature will be constructed at the center of a circle To construct a point from a circle 1 Touch the Measure Point icon 2 Touch the circle feature 3 Press the Enter key 4 Press the Finish key...

Страница 93: ...rpendicular from the circle center to the line To construct a point from an circle and a line 1 Touch the Measure Point icon 2 Touch the desired circle feature 3 Press the Enter key 4 Touch the desired line feature 5 Press the Enter key 6 Press the Finish key The first intersect point or perpendicular point of the circle and line will be constructed Alternative point constructions can be selected ...

Страница 94: ...The midpoint of the congruent portion of the two circles To construct a point from two circles 1 Touch the Measure Point icon 2 Touch the first circle feature 3 Press the Enter key 4 Touch the second circle feature 5 Press the Enter key 6 Press the Finish key The first intersect point of the two circles will be constructed Alternative point constructions can be selected from the drop down menu in ...

Страница 95: ... constructed at the center of a rectangle To construct a point from a slot 1 Touch the Measure Point icon 2 Touch the rectangle feature 3 Press the Enter key 4 Press the Finish key A point feature will be constructed at the center of the rectangle Point constructed from an angle A point feature will be constructed at the apex of the angle To construct a point from an angle 1 Touch the Measure Poin...

Страница 96: ...structed at the center of the arc Point constructed from multiple features The geometric center point of multiple features can be constructed from any combination and any number of points slots rectangles circles and arcs To construct a point from multiple features 1 Touch the Measure Point icon 2 Touch a feature 3 Press the Enter key 4 Repeat steps 2 and 3 for all features 5 Press the Finish key ...

Страница 97: ... icon 2 Touch the desired line in the Features list 3 Press the Enter key 4 Press the Finish key The new line feature will be constructed over the original line Line constructed from two points The line feature will be constructed between the two points To construct a line from two points 1 Touch the Measure Line icon 2 Touch the first point Feature 3 Press the Enter key 4 Touch the second point F...

Страница 98: ...re 3 Press the Enter key 4 Touch the line feature 5 Press the Enter key 6 Press the Finish key The perpendicular line will be constructed The alternative parallel line construction can be selected from the drop down menu in the DRO window Line constructed from a distance The line feature will be constructed over a distance feature To construct a line from a distance 1 Touch the Measure Line icon 2...

Страница 99: ...le Tangent line 2 The line from the point to the second tangent of the circle To construct a line from a point and a circle 1 Touch the Measure line icon 2 Touch the point feature 3 Press the Enter key 4 Touch the circle feature 5 Press the Enter key 6 Press the Finish key The two point line will be constructed Alternative line constructions can be selected from the drop down menu in the DRO windo...

Страница 100: ...re 5 Press the Enter key 6 Press the Finish key The line will be constructed to the center of the slot Line constructed from a point and a rectangle The line will be constructed from the point to the center of the rect angle To construct a line from a point and a rectangle 1 Touch the Measure line icon 2 Touch the point feature 3 Press the Enter key 4 Touch the rectangle feature 5 Press the Enter ...

Страница 101: ...c Tangent line 2 The line from the point to the second tangent of the arc To construct a line from a point and an arc 1 Touch the Measure line icon 2 Touch the point feature 3 Press the Enter key 4 Touch the arc feature 5 Press the Enter key 6 Press the Finish key The two point line will be constructed Alternative line constructions can be selected from the drop down menu in the DRO window Two poi...

Страница 102: ...line of a specified length perpendicular to bisector 1 The user will be prompted for the length To construct a line from two lines 1 Touch the Measure line icon 2 Touch the first line feature 3 Press the Enter key 4 Touch the second line feature 5 Press the Enter key 6 Press the Finish key The bisector 1 line will be constructed Alternative line constructions can be selected from the drop down men...

Страница 103: ...ne and a circle Two line constructions can be made from a line and a circle Perpendicular line The line from the center of the circle to the line perpendicular to the line Parallel line The line through the center of the circle parallel to the line To construct a line from a line and a circle 1 Touch the Measure Line icon 2 Touch the line feature 3 Press the Enter key 4 Touch the circle feature 5 ...

Страница 104: ...l be constructed The alternative parallel line construction can be selected from the drop down menu in the DRO window Lines constructed from a line and an arc Two line constructions can be made from a line and an arc Perpendicular line The line from the center of the arc to the line perpendicular to the line Parallel line The line through the center of the arc parallel to the line To construct a l...

Страница 105: ... a line and a rectangle Two line constructions can be made from a line and a slot Perpendicular line The line from the center of the slot to the line perpendicular to the line Parallel line The line through the center of the slot parallel to the line To construct a line from a line and a slot 1 Touch the Measure Line icon 2 Touch the line feature 3 Press the Enter key 4 Touch the slot feature 5 Pr...

Страница 106: ...Tangent line 2 The second line tangent to both circles on the opposite side To construct a line between two circles 1 Touch the Measure line icon 2 Touch the first circle feature 3 Press the Enter key 4 Touch the second circle feature 5 Press the Enter key 6 Press the Finish key The two point line will be constructed Alternative line constructions can be selected from the drop down menu in the DRO...

Страница 107: ... on the same side Tangent line 2 The second line tangent to the circle and arc on the opposite side To construct a line between a circle and an arc 1 Touch the Measure line icon 2 Touch the circle feature 3 Press the Enter key 4 Touch the arc feature 5 Press the Enter key 6 Press the Finish key The two point line will be constructed Alternative line constructions can be selected from the drop down...

Страница 108: ... the slot and circle on the same side Tangent line 2 The second line tangent to the slot and circle on the opposite side To construct a line from a slot and a circle 1 Touch the Measure Line icon 2 Touch the circle feature 3 Press the Enter key 4 Touch the slot feature 5 Press the Enter key 6 Press the Finish key The two point line will be constructed Alternative line constructions can be selected...

Страница 109: ...y 4 Press the Finish key The extracted line of the slot will be constructed Line constructed from two slots The line feature will be constructed from the center of one slot to the center of the other To construct a line from two slots 1 Touch the Measure Line icon 2 Touch the first slot feature 3 Press the Enter key 4 Touch the second slot feature 5 Press the Enter key 6 Press the Finish key The l...

Страница 110: ...e rectangle and circle on the same side Tangent line 2 The second line tangent to the rectangle and circle on the opposite side To construct a line from a rectangle and a circle 1 Touch the Measure Line icon 2 Touch the rectangle feature 3 Press the Enter key 4 Touch the circle feature 5 Press the Enter key 6 Press the Finish key The two point line will be constructed Alternative line construction...

Страница 111: ... on the same side Tangent line 2 The second line tangent to the slot and arc on the opposite side To construct a line from a slot and an arc 1 Touch the Measure Line icon 2 Touch the slot feature 3 Press the Enter key 4 Touch the arc feature 5 Press the Enter key 6 Press the Finish key The two point line will be constructed Alternative line constructions can be selected from the drop down menu in ...

Страница 112: ...the rectangle and arc on the same side Tangent line 2 The second line tangent to the rectangle and arc on the opposite side To construct a line from a rectangle and an arc 1 Touch the Measure Line icon 2 Touch the rectangle feature 3 Press the Enter key 4 Touch the arc feature 5 Press the Enter key 6 Press the Finish key The two point line will be constructed Alternative line constructions can be ...

Страница 113: ... feature 5 Press the Enter key 6 Press the Finish key The two point line will be constructed Lines constructed between two rectangles The line feature will be constructed from the center of one rectangle to the center of the other To construct a line between two rectangles 1 Touch the Measure Line icon 2 Touch the first rectangle feature 3 Press the Enter key 4 Touch the second rectangle feature 5...

Страница 114: ...Tangent line 2 The second line tangent to both arcs on the opposite side To construct a line between two arcs 1 Touch the Measure Line icon 2 Touch the first arc feature 3 Press the Enter key 4 Touch the second arc feature 5 Press the Enter key 6 Press the Finish key The two point line will be constructed Alternative line constructions can be selected from the drop down menu in the DRO window Two ...

Страница 115: ...e center line of the rectangle will be constructed Line constructed from multiple features The best fit line through the center of multiple features can be con structed from any combination and any number of points slots circles and arcs To construct a line from multiple features 1 Touch the Measure Line icon 2 Touch a feature 3 Press the Enter key 4 Repeat steps 2 and 3 for all features 5 Press t...

Страница 116: ...ch the Measure Distance icon 2 Touch the desired distance 3 Press the Enter key 4 Press the Finish key The new distance feature will be constructed over the original distance Distances constructed from two points The distance feature will be constructed between the two points To construct a distance from two points 1 Touch the Measure Distance icon 2 Touch the first point Feature 3 Press the Enter...

Страница 117: ...ss the Enter key 4 Touch the line feature 5 Press the Enter key 6 Press the Finish key The new distance feature will be constructed Distances constructed from a point and a rectangle The distance feature will be constructed from the point to the center of the rectangle To construct a distance from a point and a rectangle 1 Touch the Measure Distance icon 2 Touch the point feature 3 Press the Enter...

Страница 118: ...rthest distance The distance between the point and farthest circle circumference To construct a distance between a point and a circle 1 Touch the Measure Distance icon 2 Touch the point feature 3 Press the Enter key 4 Touch the circle feature 5 Press the Enter key 6 Press the Finish key The distance between the point and circle center will be constructed Alternative distance constructions can be s...

Страница 119: ...nd the cen ter of the slot To construct a distance from a point to a slot 1 Touch the Measure Distance icon 2 Touch the point Feature 3 Press the Enter key 4 Touch the slot Feature 5 Press the Enter key 6 Press the Finish key The new distance feature will be constructed between the point and the slot Constructing Features ...

Страница 120: ...arthest distance The distance between the point and farthest arc circumference To construct a distance between a point and a arc 1 Touch the Measure Distance icon 2 Touch the point feature 3 Press the Enter key 4 Touch the arc feature 5 Press the Enter key 6 Press the Finish key The distance between the point and arc center will be constructed Alternative distance constructions can be selected fro...

Страница 121: ...eature will be constructed over the line Distance constructed from a line and a rectangle The distance feature will be constructed between the center of the line and the center of the rectangle To construct a distance from a line to a rectangle 1 Touch the Measure Distance icon 2 Touch the line Feature 3 Press the Enter key 4 Touch the rectangle Feature 5 Press the Enter key 6 Press the Finish key...

Страница 122: ...endicular distance from the first line in the features list to the farthest point of the second Distances from virtual line extensions will be shown if the first line in the features list is not long To construct a distance between two lines 1 Touch the Measure Distance icon 2 Touch the first line feature 3 Press the Enter key 4 Touch the second line feature 5 Press the Enter key 6 Press the Finis...

Страница 123: ...r distance from the line to the farthest point of the circle Distances from virtual line extensions will be shown if the line is not long To construct a distance between a line and a circle 1 Touch the Measure Distance icon 2 Touch the line feature 3 Press the Enter key 4 Touch the circle feature 5 Press the Enter key 6 Press the Finish key The center distance will be constructed Alternative dista...

Страница 124: ... The perpendicular distance from the line to the farthest point of the arc Distances from virtual line extensions will be shown if the line is not long To construct the distance between a line and an arc 1 Touch the Measure Distance icon 2 Touch the line feature 3 Press the Enter key 4 Touch the arc feature 5 Press the Enter key 6 Press the Finish key The center distance will be constructed Altern...

Страница 125: ... feature will be constructed between the line and slot Distances from virtual line extensions will be shown if the line is not long Distance constructed from two distances The sum of distances feature will be constructed from two distance features To construct a distance from two distance features 1 Touch the Measure Distance icon 2 Touch the first distance Feature 3 Press the Enter key 4 Touch th...

Страница 126: ...e circumferences Max distance The maximum distance between the two circle circumferences To construct the distance between two circles 1 Touch the Measure Distance icon 2 Touch the first circle feature 3 Press the Enter key 4 Touch the second circle feature 5 Press the Enter key 6 Press the Finish key The center distance will be constructed Alternative distance constructions can be selected from t...

Страница 127: ... Finish key The distance feature will be constructed between the slot and the circle Distances constructed from a rectangle and a circle The distance feature will be constructed between the centers of the rect angle and the circle To construct a distance from a rectangle and a circle 1 Touch the Measure Distance icon 2 Touch the rectangle Feature 3 Press the Enter key 4 Touch the circle Feature 5 ...

Страница 128: ...c and circle circumferences Max distance The maximum distance between the arc and circle circumferences To construct the distance between an arc and a circle 1 Touch the Measure Distance icon 2 Touch the arc feature 3 Press the Enter key 4 Touch the circle feature 5 Press the Enter key 6 Press the Finish key The center distance will be constructed Alternative distance constructions can be selected...

Страница 129: ...ey 6 Press the Finish key The distance feature will be constructed between the two slots Distances constructed from a slot and an arc The distance feature will be constructed between the centers of the slot and the arc To construct a distance from a slot and an arc 1 Touch the Measure Distance icon 2 Touch the slot Feature 3 Press the Enter key 4 Touch the arc Feature 5 Press the Enter key 6 Press...

Страница 130: ...Press the Enter key 6 Press the Finish key The distance feature will be constructed between the rectangle and the arc Distances constructed from a slot and a rectangle The distance feature will be constructed between the centers of a slot and a rectangle To construct a distance from a slot and a rectangle 1 Touch the Measure Distance icon 2 Touch the slot Feature 3 Press the Enter key 4 Touch the ...

Страница 131: ... two rectangles To construct a distance between two rectangles 1 Touch the Measure Distance icon 2 Touch the first rectangle Feature 3 Press the Enter key 4 Touch the second rectangle Feature 5 Press the Enter key 6 Press the Finish key The distance feature will be constructed between the two rectangles Constructing Features ...

Страница 132: ...wo arc circumferences Max distance The maximum distance between the two arc circumferences To construct the distance between two arcs 1 Touch the Measure Distance icon 2 Touch the first arc feature 3 Press the Enter key 4 Touch the second arc feature 5 Press the Enter key 6 Press the Finish key The center distance will be constructed Alternative distance constructions can be selected from the drop...

Страница 133: ...on 2 Touch the desired circle 3 Press the Enter key 4 Press the Finish key The new circle feature will be constructed over the original circle Circles constructed from two lines A wire gage circle will be constructed between the two lines The user will be prompted for the circle radius To construct a circle from two lines 1 Touch the Measure Circle icon 2 Touch the first line feature 3 Press the E...

Страница 134: ...ircle icon 2 Touch the circle feature 3 Press the Enter key 4 Touch the distance feature 5 Press the Enter key 6 Press the Finish key The offset circle will be constructed Circle constructed from two circles The circle will be constructed as an average of the two parent positions and sizes To construct a circle from two circles 1 Touch the Measure Circle icon 2 Touch the first circle feature 3 Pre...

Страница 135: ... will be used to construct the new circle feature When more than three parent features are used the circle can be constructed using the fitting algorithm of the user s choice To construct a circle from multiple features 1 Touch the Measure Circle icon 2 Touch a feature 3 Press the Enter key 4 Repeat steps 2 and 3 for all features 5 Press the Finish key The best fit circle through the entire collec...

Страница 136: ...sired arc 3 Press the Enter key 4 Press the Finish key The new arc feature will be constructed over the original arc Arc constructed from an arc and a distance An offset arc will be constructed from arc and distance parent features An arc equal to the parent arc will be constructed offset the amount equal to the parent distance To construct an arc from an arc and a distance 1 Touch the Measure Arc...

Страница 137: ...an be useful when it becomes desirable to perform new operations with the original while retaining a copy To construct an angle from an existing angle 1 Touch the Measure Angle icon 2 Touch the desired angle 3 Press the Enter key 4 Press the Finish key The new angle feature will be constructed over the original angle Constructing Features ...

Страница 138: ...e angle included between the lines 360 minus 360 degrees minus the angle included between the lines To construct angles from two lines 1 Touch the Measure Angle icon 2 Touch the first line feature 3 Press the Enter key 4 Touch the second line feature 5 Press the Enter key 6 Press the Finish key The interior angle will be constructed Alternative angle constructions can be selected from the drop dow...

Страница 139: ... metric or English units of measure The following feature types can be created Points Lines Distances Rectangles Circles Arcs Slots Creating a point To create a point 1 Touch the measure point icon and then touch the data entry icon The data entry box will be dis played 2 Enter the feature data in the fields provided and press Finish Creating Features ...

Страница 140: ...entry icon The data entry box will be dis played 2 Enter the feature data in the fields provided and press Finish Creating a circle To create a circle 1 Touch the measure circle icon and then touch the data entry icon The data entry box will be dis played 2 Enter the feature data in the fields provided and press Finish ...

Страница 141: ...try icon The data entry box will be displayed 2 Enter the feature data in the fields provided and press Finish Creating a slot To create a slot 1 Touch the measure slot icon and then touch the data entry icon The data entry box will be dis played 2 Enter the feature data in the fields provided and press Finish Creating Features ...

Страница 142: ...eating a rectangle To create a rectangle 1 Touch the measure slot icon the measure rectangle icon and then touch the data entry icon The data entry box will be displayed 2 Enter the feature data in the fields provided and press Finish ...

Страница 143: ...robe a circle with only three points the circularity will be perfect and the circle will always pass a form tolerance test CAUTION The QC 300 uses a best fit algorithm to estimate the size position orientation and form of geometric features While the best fit yields very useful information the results do not necessarily reflect how well the parts will fit together and perform their function For ex...

Страница 144: ... the tolerance screen 127 Selecting a tolerance type 127 Selecting a specific tolerance 128 Entering nominal limit or tolerance values 128 Omitting a tolerance category 129 Tolerance types 130 Bidirectional 130 True position 132 MMC 133 LMC 134 Runout 135 Roundness 135 Concentricity 135 Straightness 135 Parallelism 136 Perpendicularity 136 Angle 136 Width 137 ...

Страница 145: ... In the following example a true position tolerance is applied to a circle feature Selecting a feature Touch the desired feature in the feature list to select it Displaying the tolerance screen Touch the Tol screen button to display the tolerance screen Selecting a tolerance type Touch the desired tolerance type button to select a tolerance type In this example the position tol erance type is sele...

Страница 146: ... a new values using the number keys Error and Deviation values are generated as soon as the Nominal and Tol Dia values are entered Pass fail results are indicated by green and red colors in the tolerance screen and in the feature list Pass is indicated by green fail is indicated by red in the tolerance screen Any tolerance failure will be indicated by a red square next to the feature in the featur...

Страница 147: ...ted To omit a category select the Nominal data field remove any data by repeatedly pressing the Cancel key and press the Enter key In this example the Diameter category is omitted Touch the category to select a Nominal field repeatedly press the Cancel key then press Enter Applying Tolerances to Features ...

Страница 148: ... axes The bidirectional tolerance compares the measured location of a point to the nominal location of the feature s center point Enter the nominal values into the X Y and Z axis data fields provided Enter the allowed limits into the Limit data fields as ranges or as absolute lim its Touch the Limit data fields to toggle between ranges or absolute limits Lines The tolerance screen for lines is use...

Страница 149: ...ields provided Enter the allowed limits into the Limit data fields as ranges or as absolute limits Touch the Limit data fields to toggle between ranges or absolute limits Slots and rectangles The tolerance screens for slots and rectangles are identical and are used to specify the acceptable deviation from nominal positions in the X and Y axes and from the nominal length and width The bidirectional...

Страница 150: ...ircles and arcs are identical and are used to specify the acceptable deviation from the nominal feature position and from the nominal diameter The true position tolerance compares the measured location of the center point of the circle or arc to the nominal center point and compares the measured diameter to the nominal diameter Touch the D diameter or r radius choice field in the DRO screen to tog...

Страница 151: ...of a bore is larger than MMC but within the acceptable tolerance range a position tolerance bonus is generated for the bore and its acceptable location is given more flexibility However if a bore is within the position tolerance diameter no position bonus is gener ated and the bore must be located exactly as specified Touch the Boss or Bore choice field to specify the feature type as a Boss or a B...

Страница 152: ... for the bore and its acceptable location is given more flexibility However if a bore is within the position tolerance diameter no position bonus is generated and the bore must be located exactly as specified Touch the Boss or Bore choice field to specify the feature type as a Boss or a Bore Enter the nominal values into the X and Y axis and D diam eter data fields provided Enter the allowed Tol D...

Страница 153: ...able deviation from a perfect circle or circle segment Enter the acceptable form deviation into the Tol Zone data field Concentricity Concentricity tolerances can be applied to circles and arcs The toler ance entry screens are identical and are used to specify the accept able position deviation from a circle or arc concentric to a Reference feature Enter the acceptable position deviation into the ...

Страница 154: ... lines and are used to specify the acceptable deviation from a line perfectly perpendicular to a Reference feature Enter the acceptable perpendicularity deviation value into the Tol Zone data field and then enter the number of the reference feature for the Perpendicularity tolerance into the Ref Feature data field Angle Angle tolerances can be applied to lines and angles The tolerance screens are ...

Страница 155: ...eptable deviation from a nomi nal length The length can be specified as a vector length L or as separate X Y and Z lengths Enter the allowed width lim its into the Limit data fields as ranges or as absolute limits Touch the Limit data fields to toggle between ranges or ab solute limits Tolerance Types ...

Страница 156: ...138 QC 300 Series User s Guide ...

Страница 157: ...med on a part by the operator and stored by the system for playback later on other identical parts Using the programming capabilities of the QC 300 greatly increases productivity by compressing the many manual steps required to measure tolerance and report part dimensions into a few semi automated steps which are little more than operator responses to system prompts Programs can be Created recorde...

Страница 158: ... shown When other programs already exist all the program tool icons will be shown Touch the record icon to begin recording a program The pro gram title entry screen will be displayed Touch the Program tab to display the record icon when no other programs exist or to display all the programming icons when other programs do exist Touch the record icon to display the title entry screen ...

Страница 159: ...racters Char acters can be upper or lower case and can be separated by spaces Touch the sym or int l control keys to enter symbol or interna tional characters Press the Finish key to enter the new program name and begin re cording the program The DRO screen will be displayed The system is now ready to re cord all datum measurement tolerance and reporting activities Perform all the datum measure me...

Страница 160: ...subsequent measurements Measure the skew and left side and then construct a zero datum point at the intersection of the two lines Measure a feature include a message Feature measurements are described in Chapter 6 Measuring In this example the largest hole in the QC Quickie slide is measured First create a message that prompts the user to measure the hole Press the Finish key to complete the messa...

Страница 161: ...position tolerance and touch the DRO button to return to the DRO screen Report results Measurement results can be printed over the USB port or transmitted to a computer over the RS232 se rial port Parameters governing reports and data transmissions are configured in the Print setup screen described in Chapter 9 Communication and in Chapter 10 Setup Result reporting is included in a program by simp...

Страница 162: ...e Stop icon to stop recording the program The program title will be shown The program is now saved and can be edited or run on new parts Touch the Measure tab to return to the measure mode of opera tion Touch the Program tab and then touch the Stop icon the new program name will be shown Touch the Measure tab to return to the DRO ...

Страница 163: ...fixturing is used a measurement reference and datum must be created for the first part by the user thereafter the system will perform measurement reference and datum measurements automati cally for each part Permanent The part fixturing is permanently attached this is a dedicated fixture The system retains the measurement reference and datum as part of the program no user interaction is required t...

Страница 164: ...ion before continuing Touch OK to clear the current feature list and begin editing the selected program Editing program settings Program settings are contained in the initial two program steps and include units of measure part fixturing program loop count probing characteristics and magnification With the exception of the loop counter which determines the number of program executions these setting...

Страница 165: ...d perform the required edits Select the first step to edit units fixturing loop count or probing characteristics Select the second step to edit magnification 3 Press the Finish key to save the changes and return to the program list The first two steps contain program settings Editing Programs ...

Страница 166: ...pter 7 Tolerancing To edit tolerances 1 Touch the Program tab the program title and the Edit icon Program steps will be displayed 2 Touch the desired feature and then touch the Tol button to display the tolerance screen 3 Edit tolerances and then press the Finish key to save the changes and return to the program list Touch the Program tab select a program and touch the Edit icon settings will be d...

Страница 167: ...ch the desired message icon and then touch the message text to display the text entry screen 3 Edit the message and then press the Finish key to save the changes and return to the program list Touch the Program tab select a program and touch the Edit icon settings will be displayed and touch the text to display the text entry screen Select a message Editing Programs ...

Страница 168: ...steps touch the last step Then touch the Record icon A message will ask you to confirm your intention To continue touch Yes In this example steps will be inserted after the message 3 The QC 300 will begin recording and the DRO will be displayed Perform the new mea surement steps In this example a line is measured Touch the Program tab select a program and touch the Edit icon settings will be displ...

Страница 169: ...Stop icon The new program steps will be displayed at the insertion point 5 Press the Finish key to save the changes and return to the program list Editing Programs Touch the Program tab and then press the Stop icon to complete the addition of new steps ...

Страница 170: ...e current position To run a program 1 Touch the Program tab to display the program screen touch a program title to select the desired program and then touch the Run icon to run the selected program During execution after the datum is established text and the green run time arrow will guide the operator through the program measure ment steps When the program is finished the feature data will be sho...

Страница 171: ... Program tab to display the program screen touch a program title to select the desired program and then touch the Copy icon to save the selected program to the USB drive A Retrieving programs To retrieve programs 1 Touch the Program tab to display the program screen touch drive letter to select the USB drive A and then touch the Copy icon The program will be added to the program list Touch the Pro...

Страница 172: ...t the desired program and touch the Copy icon The selected program will be copied to the local drive C Touch the drive letter again to shown the contents of the local drive and return to the local drive touch the Copy icon Select a program ...

Страница 173: ...tention to delete the program To delete a program 1 Touch the Program tab to display the program screen touch a program title to select the desired program and press the Cancel key to delete the program Then touch the Yes button to confirm your inten tion Touch the Program tab select a program and press Cancel and confirm your intention Deleting Programs ...

Страница 174: ...156 QC 300 Series User s Guide ...

Страница 175: ...able Metronics part number 11B12176 Make sure the cable connectors are tight but do not overtighten the connector screws 3 Apply power to the computer and then the QC 300 The default QC 300 settings for communication over the RS 232 serial port are shown here Baud rate 1200 Parity None Data bits 7 Stop bits 1 EOC Delay 0 EOL Delay 0 4 Launch the computer application that will be used to communicat...

Страница 176: ...int setup screen 2 Verify that the desired data is specified in the Print Button choice field None Select or Report can be specified In this example the Re port is specified 3 Verify that the Serial Device is specified in the Destination field In this example the communication will be with a computer so the Serial port is specified 4 Verify that the desired report is specified in the Report Type s...

Страница 177: ... format ting is configured in the Print setup screen discussed in Chapter 10 Setup Pre Line ASCII control character or string for printer control before printing a line Post Line ASCII control character or string for printer control after printing a line Pre Form ASCII control character or string for printer control before printing a form Post Form ASCII control character or string for printer con...

Страница 178: ...splay the setup menu then display the Print setup screen 2 Verify that the desired data is specified in the Print Button choice field None Select or Report can be specified In this example the Report is specified 3 Verify that the Serial Device is specified in the Des tination field In this example the file will be printed to a USB printer so the USB Printer is specified 4 Verify that the desired ...

Страница 179: ...161 9 Communication Printing QC 300 system settings To print a report of the QC 300 setup parameters 1 Touch the question mark Icon and display the setup menu 2 Press the Print key Printing Reports ...

Страница 180: ...162 QC 300 Series User s Guide RS232 connector pin designations Pin No Description Direction 2 Data in Input 3 Data out Output 7 Signal ground Reference 8 Power on Output always high ASCII Code table ...

Страница 181: ...n 169 Supervisor screen 170 Encoders screen 172 Squareness screen 175 SLEC screen 176 NLEC screen 181 Magnifications screen 186 Measure screen 191 Display screen 195 Print screen 202 Ports screen 204 Clock screen 205 Sound screen 206 Miscellaneous screen 207 Buttons screen 210 Joystick screen 212 Digital positioner screen 214 Probe path screen 215 Edge values screen 217 Hardware screen 218 CAUTION...

Страница 182: ...setup menu screens Certain software upgrades are performed Accessing and using the Setup Menu QC 300 operating parameters are entered into the system using touch screen selections and keys located on the front panel The configuration process is facilitated by a simple menu structure of setup functions that can be quickly navigated on the large color LCD display The setup screens and functions are ...

Страница 183: ... the password if another setup editing session is required Touch the Keep Privileges choice field to toggle the Keep Privileges parameter from No to Yes 4 Views of the Setup can be locked so that the supervisor password is required to see the setup parameter settings Touch the Lock Setup choice field to toggle the Lock Setup parameter from No to Yes then delete the password from the Password field...

Страница 184: ...er more choices to the user In all cases selections are made by repeatedly touching the choice field to cycle through all the available parameter set ting choices In this example the RS232 Port Parity choices are shown by repeatedly touching the Parity choice field Entering and deleting setup data Some setup parameters must be entered as numeric values into setup data fields To enter setup data to...

Страница 185: ...ter and advancing to the next step Press the Enter key to store the highlighted value and advance to the next setup field Leaving the setup menu Press the Finish key to conclude the setup session Accessing and Using the Setup Menu ...

Страница 186: ...scribes a setup task and refers to pages where detailed instructions are presented A variety of optional setup steps can be performed after the minimum setup to specify display reporting and other parameters These optional and all other setup parameters and screens are described in detail in the remainder of this chapter Familiarize yourself with the methods of accessing and using the Setup menu d...

Страница 187: ...r that best satisfies the ap plication or the user s prefer ences The subse quent use of setup screens will probably be in frequent and will address part requirement or hardware changes Language screen The Language screen contains selections for chang ing the lan guage of text dis played on the LCD in cluded in transmit ted data and printed on reports Specifying the displayed language Touch the de...

Страница 188: ...il the power is cycled Setup editing privileges can be retained until the QC 300 power is cycled eliminating the need to reenter the password if another setup editing ses sion is required To retain setup privileges touch the Keep Privileges to toggle the Keep Privileges parameter from No to Yes Hiding setup parameters from unauthorized personnel Views of the Setup can be locked so that the supervi...

Страница 189: ...ading settings System settings can be saved to storage devices or loaded from storage devices attached to the USB port by connecting the USB storage device and touching the Save Settings or Load Settings button Supervisor Screen ...

Страница 190: ...gure Selections are made by repeatedly touching the Axis choice field to cycle through all the available measure ment axes In this example the measurement axis choices X Y and Z are cycled by repeatedly touching the Axis choice field Specifying encoder resolution Encoder resolution is entered into the Resolution data field using the numeric keys on the front panel Specifying encoder type Encoder t...

Страница 191: ...ter in this chapter Single You will be prompted to move the stage to cross encoder reference marks on each axis each time the system is powered The reference mark crossing points of each encoder are used to determine the machine zero position The machine zero location can be changed at any time using the Machine Zero Set function described later in this chapter Absolute Selecting Absolute referenc...

Страница 192: ...erent XY position SLEC and NLEC correction values will no longer be valid Reversing the encoder count direction Encoder count direction for each axis is toggled between normal and reversed by repeatedly touching the Reversed choice field Enabling axis error messages Encoder error messages for each axis can be displayed on the LCD These messages are enabled or disabled by repeatedly touching the En...

Страница 193: ...tage with one edge along the X axis 2 Measure the angle of the square calibration artifact ideally 90 degrees 3 Select the Observed Angle data field enter the measured angle using the number keys and press the Enter key to highlight the Standard Angle field 4 Enter the actual angle of the square calibra tion artifact obtained from the artifact s certifica tion document into the Standard Angle data...

Страница 194: ...tion for individual non linearities that could be present over small portions of the entire range SLEC error correction can result in more accurate measurements but requires more time and effort to set up If an overall nonlinearity exists without significant individual errors across the scale LEC can be applied as an overall correction method However if an encoder is thought to have significant in...

Страница 195: ...e displayed with zeros in the Standard Observed and MZ Offset fields when this step is com plete 3 The length of the calibration standard should cover as much of the axis range of motion as possible Measure the standard and enter the Standard certified and Observed measured values into the corresponding data fields 4 Touch the Enabled choice field to toggle error correction On SLEC Screen ...

Страница 196: ...end of segment 0 on the diagram are 40 and 40 and are entered into the Standard and Observed data fields for station 1 When the procedure is complete and setup data are entered correction values will be calculated for the encoder based on the standard and observed values at the end of the segments The procedure for configur ing the SLEC error correction is diagrammed and explained below 1 Cycle th...

Страница 197: ...d is toggled to Off and erase any existing data in all the data fields using the methods described earlier in this chapter Sta tion 0 should be displayed with zeros in the Standard Observed and MZ Offset fields when this step is complete SLEC Screen ...

Страница 198: ...correspond ing data fields for each segment This example shows measurements across 150 mm on the X axis and the SLEC screens for entering the six seg ments of standard and observed data to provide error correction Reminder Segments are straight lines on the deviation graph Only the beginning and end points of each straight line segments must be entered into SLEC data fields 8 Touch the Enabled cho...

Страница 199: ...e entire range of X Y measurement to minimize or eliminate the inaccuracies mentioned earlier acf Files When no acf file is used the calibration grid values are assumed to be ideal When grid certification values are available an acf file can be created easily using a word processor application The format of the acf file is shown here with an example 3 X 3 grid and corresponding example acf file Cr...

Страница 200: ...ating from features The process of calibrating from features is shown by this chart and described below In most cases this method is performed in the field 1 Make sure that NLEC is disabled Enabled checkbox is cleared 2 Define the grid The grid size and cell size data entry fields are shown at the bottom of the NLEC setup screen Enter the grid size in terms of the number of X and Y grid points and...

Страница 201: ... X1 Y1 and proceed from left to right and from bottom to top Be sure that the X and Y values at the lower left corner of the grid are zero 6 Delete the skew and zero datum features from the feature list 7 Return to the NLEC setup screen 8 Touch the Calibrate from Features button A message will show the resulting machine zero offset change If the change seems rea sonable touch OK 9 Enable NLEC erro...

Страница 202: ... tom of the NLEC setup screen Enter the grid size in terms of the number of X and Y grid points and then enter the cell size in terms of the distance between points 3 Load an acf file of certified values if desired Insert a USB drive into the USB port containing the nlec acf file at the root of the drive and the touch the Import Export but ton A pop up window will display the Import Export choices...

Страница 203: ...ntil all the desired calibration values have been adjusted 10 Enable NLEC error correction Calibrating NLEC by importing an existing NLEC correction text file The process of calibrating by importing an existing NLEC file is shown by this chart and described below This process is generally used by distributors and OEMs that have cre ated NLEC txt Files for the stage using a QC 5000 1 Plug a USB dri...

Страница 204: ...h the New button The next higher ID number and default button label will be added The button label can be changed to any three digit alphanumeric character string by touching the Button Label data field and deleting or entering characters using the keyboard screen or the front panel keys Use the Cancel key to delete characters Use the Finish key to complete and store the new label Deleting magnifi...

Страница 205: ...en and to press the Enter key Follow the instructions provided in the upper left corner of the screen to complete the calibration 3 When the teach calibration is complete use the edge detector probe to measure a few edges to verify that the teach calibration was successful Edge calibrations for difficult measurements The distance calibration is performed to teach the edge detector probe to accurat...

Страница 206: ...ls Check the fiber optic cables and light sensors before using the edge detector probe Light levels transmit ted by the sensor and reference cables are displayed on the optical edge detection Install screen as shown Adjust the light levels by moving the sensors To evaluate light levels 1 Touch the Install button The Screen and Reference light levels will be displayed 2 Position the edge detector p...

Страница 207: ...below To perform parcentric calibra tions 1 Zero any existing Parcentric and Parfocal X and Y offsets by selecting each magnification and entering zero values into the Offset X and Offset Y data fields 2 Select the highest optical magnification 3 Focus the circle artifact image 4 Measure the circle artifact and create a zero datum point at the center of the circle feature in the DRO screen This wi...

Страница 208: ...the circle artifact at the new magnification and enter the X and Y positions of the new circle feature shown in the DRO into the Par centric Offset X and Y fields of the Magnification setup screen 8 Repeat steps 5 through 7 for the remaining magnifications Enter the X and Y values of the circle at the new magnification into the X and Y Parcentric Offset data fields ...

Страница 209: ... collected in a feature measurement to the minimum shown in the corresponding Min data field For example when forward annotation is used and the Min Circle value is 3 the circle measurement will automatically be completed when 3 points have been col lected No user interaction will be required to store the measurement data in the feature list Touch the Annotation choice field to toggle the choice b...

Страница 210: ...s Specifying signed distances Distance measurements result in X Y and L vector displacements The Y axis displacements can be shown as signed or absolute positive only values When signed values are specified axis displacements from right to left and from top to bottom are negative To specify signed distances touch the Distances choice field to toggle the choice to Signed Enabling and configuring po...

Страница 211: ...tandard deviation range is determined by the value of Sigma For example a Sigma of 2 0 produces a Standard deviation range that includes 95 5 of the total population For most measurements a Sigma of 2 or more can be applied However measurements that include a large number of aberrant points might benefit from a lower Sigma Touch the Sigma data field and enter the desired value Specifying the minim...

Страница 212: ...sed to accommodate more relaxed probing To specify Crosshair Timeout touch the Crosshair Timeout data field and enter the desired delay in seconds Crosshair delay restart distance As explained above automatic point entry is delayed until the stage has been motionless for a short time to ensure that the crosshair is located where the user intended However the delay is restarted again from the begin...

Страница 213: ...put The table below il lustrates how the display is governed by the display resolution setting Encoder input Display resolution Displayed value 1 567 0 0001 1 5670 1 567 0 001 1 567 1 567 0 01 1 57 1 567 0 1 1 6 1 567 1 2 NOTE Display resolution should never be higher than the encoder resolution Specifying display resolutions that are higher than encoder resolutions can lead to misleading displays...

Страница 214: ... spec ify the display of angular units of measurement The display choice can be toggled between degrees minutes and seconds or in decimal degrees and will be retained across power cycles Touch the Angular Units choice field to toggle be tween degrees minutes and seconds and decimal degrees Time formats The Time Format choice field is used to spec ify the display of time The display choice can be t...

Страница 215: ...ayed again when the measurement is complete In the Dual View mode the last screen used for a measurement will be used again for the current mea surement When the measurement is complete the screen displayed before the measurement was initiated will be displayed again Touch the Display Mode Switching choice field to toggle the dis play mode between Single View and Dual View Display Screen ...

Страница 216: ...functions on separate Extra tabs Touch the Configure Extra Menu button to display the configuration window Available Extra tab functions for your system and Extra tab editing controls are shown in the configuration window NOTE Extra tab functions are different for different QC 300 systems For example Extra tab functions for a video edge detection QC 300 system will be slightly different than those...

Страница 217: ...ification level changes or when the light conditions on the comparator change Joystick motor speed The Joystick motor speed function is included in the Extra tab of systems with the CNC option to adjust the joystick control of motor speed When the user touches the Joystick motor speed function the joystick control of motor speed is toggled between fast and slow Axis lock The Axis lock function is ...

Страница 218: ...off Stop motion The Stop motion function is included in the Extra tab of systems with the CNC option to stop all stage motion When the user touches the Stop mo tion function motion is toggled on or off Goto feature The Goto feature function is included in the Extra tab of systems with the CNC option When the user touches the Goto function the stage is moved to position the probe over the feature c...

Страница 219: ...reating report headers Two columns of three text headers can be created for the top left and right sides of reports as shown in this example To create a header 1 Touch the desired header field The text entry window will be displayed 2 Enter the text header and press the Enter button when finished Display and Header Screens ...

Страница 220: ...standard report of all feature data or a tolerance report of only features that have tolerances applied will be printed or transmitted Specifying a data destination Feature measurement data can be sent to the USB port for printing to the RS232 serial port for transmis sion to a computer or to the USB drive as a text file Touch the Destination choice field to cycle through the destination choices R...

Страница 221: ...aracters can be added to the beginning and end of line and form data streams to accommodate the requirements of receiving systems and programs To add RS232 control characters touch the desired data field and enter the ASCII character number using the number keys Use the decimal point key to separate ASCII characters NOTE An ASCII character chart is provided in Chapter 9 Communication Selecting a U...

Страница 222: ...f 7 bits and 8 bits Stop bits Touch the Stop Bits choice field to toggle between 1 and 2 stop bits at the end of the data word Parity Touch the Parity choice field repeatedly to cycle to the desired parity error checking Choices include None Odd and Even EOC delay A delay can be inserted at the end of each character to satisfy the communication requirements of receiv ing systems Touch the EOC data...

Страница 223: ...for setting the date and time included in data transmissions and printed on reports To change a date or time value touch the desired choice or data field and enter the desired value Touch and enter numbers Touch and cycle through choices Ports and Clock Screens ...

Страница 224: ... to call atten tion to point entries The sound is generated each time the Enter button is pressed to enter a point as part of a measurement Touch the Volume data field and enter a number to ad just the loudness of all sounds from 1 very soft to 10 loud Enter a zero to mute all sounds ...

Страница 225: ...age threshold motion using the number keys NOTE Entering a zero disables this function Touchscreen calibration rows and columns Touchscreen calibration measures touch pressure at points displayed on a matrix of rows and columns The number of touch points included in the calibration is defined by specifying the number of rows and columns in the matrix An example of a 4 row 4 column matrix is shown ...

Страница 226: ...hen press the Finish key to complete the calibration The touchscreen pressure calibration value will be shown in the Touchscreen Pressure data field Touch screen cursor A green cross mark cursor can be displayed on the touchscreen briefly to indicate the touch point as visual feedback for the user Touch the Show Touch Screen Cursor choice field to toggle the choice between Yes and No Touch screen ...

Страница 227: ... enter the new value using the number keys CAUTION Increasing the touch zone size significantly might cause interference between adjacent fields Screen brightness The LCD display brightness can be adjusted to accommodate different ambient lighting conditions To adjust brightness touch the Screen Brightness Level data field and enter the desired value min 0 max 100 Showing the Extra tab The Extra t...

Страница 228: ...button functions Button functions include No Assignment Nothing happens Enter Enters data point Finish Completes a measurement Cancel Erases the last measurement point or erases a character Quit Quits a measurement Axis Lock Engages CNC axis lock prevents diagonal motion Speed toggle Toggles the joystick speed between fast and slow Go to Here Performs CNC move to the selected feature Part Follow E...

Страница 229: ... deactivated when the button is pressed and released again Configure any of the button responses as momentary level based by checking the button s Level box Clear the Level box to configure the button response as toggle Selecting button logic All button logic is either active high or active low Configure each button to match the CNC amplifier input requirement by checking the Active High box for p...

Страница 230: ...oise The default values are expressed as percentages of total motion and will satisfy the requirements of most environments however these values can be increased or decreased by selecting the deadband field and entering the desired value Specifying axis direction The direction of motion controlled by the joystick on an axis is reversed to accommodate different joystick and system hardware by check...

Страница 231: ...near example Expo 60 At first increased Joystick displacements do not cause the axis velocity to increase much but then as the Joystick displacement continues to increase the axis velocity increases at a higher and higher rates When the joystick is at 50 the axis velocity is 20 When the joystick is at 80 the axis velocity is 25 When the joystick is at 100 the axis velocity is 100 Select an axis Ex...

Страница 232: ...velocity field and entering the desired percentage of maximum axis velocity Specifying axis acceleration The axis acceleration controlled by the digital positioner is specified by selecting an axis field and entering the desired percentage of maximum axis acceleration Specifying a digital positioner counter debounce An area of digital positioner inactivity is specified around the current rest posi...

Страница 233: ...il the end of the specified search distance is reached If no edge is recognized within the approach and search distances an error message is displayed NOTE In general the best probing accuracy is obtained at lower probing veloci ties However since the system is ac curate at higher velocities the major velocity consideration is related to the torque required to perform high acceleration and deceler...

Страница 234: ...l in the event that the target data point is not found where it was expected The search distance should be large enough to make the system less sensitive to acceptable target position variations and small enough to produce an error message when the target is outside acceptable position variations To specify the approach and search distances 1 Select the Approach Distance field and enter the approa...

Страница 235: ...dequate for the vast majority of applications but can be replaced with higher values in noisy environments Debouncing edges To specify optical edge debounce time and distance 1 Select the Debounce time field and enter the debounce time in seconds 2 Select the Debounce distance field and enter the de bounce time in the the appropriate unit of measure Viewing current edge detector values The current...

Страница 236: ...rdware screen The Hardware screen contains fields that describe the software and hardware configuration of your system This information will be essential to Metronics tech nical support personnel if your system is upgraded or repaired ...

Страница 237: ...r factory product support technician Since most problems experienced in the field will have simple causes and equally simple solutions sub stantial time and expense can be saved by performing some straightforward troubleshooting of configura tion settings and hardware connections prior to calling the distributor or factory for assistance As you re troubleshooting list the steps that you use to ide...

Страница 238: ...t or backlighting is out of adjustment Possible solution 1 Readjust the backlighting using the decimal point or key 2 Adjust the brightness level in the Miscellaneous setup screen Values displayed on the LCD screen are incorrect Probable cause 1 The axis encoder is not connected or is malfunctioning Possible solutions 1 Connect the axis encoder cable firmly to the QC 300 2 Replace the axis encoder...

Страница 239: ... to compensate encoder inaccuracies Possible solutions 1 Perform LEC SLEC or optional NLEC error correction in the corresponding error screen 2 Error correction was performed but not enabled Enable error correction in the LEC SLEC or optional NLEC setup screen Probable cause 8 Edge detection is not calibrated Possible solution 1 Perform a Teach operation or a Distance Cal using the Magnifications ...

Страница 240: ... Probable cause 3 The printed report setup is incorrect Possible solution 1 Correct the report setup in the Print setup screen Probable cause 4 The printer is not supported Solution 1 Contact Metronics for a list of supported printers Reports are printed incorrectly Probable cause 1 The printed report setup is incorrect Possible solution 1 Correct the report setup in the Print setup screen Probabl...

Страница 241: ...les Probable cause 2 Edge detection is not calibrated Possible solution 1 Perform a Teach operation or a Distance Cal using the Magnifications Setup screen Probable cause 3 Edge detector and crosshair probes are not cross calibrated Possible solution 1 Perform a Cross Cal using the Magnifications Setup screen Probable cause 4 Multiple system magnifications are not calibrated to be parcentric Possi...

Страница 242: ...l port settings in the Port setup screen Probable cause 3 The wrong control characters are specified Possible solution 1 Correct the control characters to reflect the requirements of the receiving software in the Print setup screen Getting help from your distributor Performing the simple troubleshooting listed on the previous pages solves most problems experienced with the QC 300 If a problem pers...

Страница 243: ...Hz to 63 Hz Environmental Temperature 0 C to 45 C 32 F TO 113 F non condensing Humidity 90 rh maximum Altitude 2000 meters 6 562 ft maximum Installation Category II Dimensions Enclosure W x H x D 29 2 cm x 19 1 cm x 7 0 cm 11 5 x 7 5 x 2 75 Base W x H x D 25 4 cm x 5 1 cm x 19 8 cm 10 x 2 x 7 8 Enclosure weight 1 6 kg 3 5 lbs Base weight 3 2 kg 7 lbs LCD Size color 17 2 cm 6 8 inch x 12 9 cm 5 1 i...

Страница 244: ...by other external switching devices to fa cilitate remote operation in conjunction with other devices in a larger semi automated system CAUTION Never apply power to the footswitch wires Applying power to the connector wires or wiring the switch connector in any way other than shown by this diagram can cause serious damage the QC 300 and void the product warranty Footswitch and keypad connector ...

Страница 245: ... 232 connector wiring The RS 232 wiring is shown by the table below Pin No Description Direction 2 Data in Input 3 Data out Output 7 Signal ground Reference 8 Power on Output always high RS 232 connector Connector wiring ...

Страница 246: ...e within the data cloud in the position that minimizes the sum of the squared form errors Form errors are inside and outside the circle Maximum inscribed circle First a least squares best fit circle is estimated then the data is iteratively processed to position a perfect circle through 3 points on the inside of the data cloud The maximum inscribed circle position encloses the maximum diameter of ...

Страница 247: ...et adapter for mounting the QC 300 on vertical surfaces must be ordered together Taltech WinWedge for inputing serial data directly from the QC 300 into any PC application Contact the Metronics sales group by phone at 603 622 0212 or by e mail at sales metronics com to order QC 300 options Foot switch w 8 ft cable 11B12816 Serial cable 11B12176 Taltech WinWedge software 54 775 005 QC arm mounting ...

Страница 248: ...230 QC 300 Series User s Guide ...

Страница 249: ...ion 47 Squareness of the measuring system 175 Touchscreen 208 Cancel 20 Category omitting a tolerance 129 Characters RS 232 control 203 Symbols acf files 181 2 Wire 6 2 Wire to 3 wire adapters 6 3 Wire 6 3 Wire adapters 6 A About screen 169 Absolute reference marks 173 Acceleration axis 214 Adding video magnifications 186 Alignment skew 31 Altitude specification 225 Angle Constructions 119 Toleran...

Страница 250: ...Arc 123 Circle 122 Datum zero point 32 Line 122 Point 121 Rectangle 124 Slot 123 Creating features 121 Creating programs 139 Cross calibration 47 Crosshair and edge probe offset 188 Crosshair delay restart distance 194 Crosshair probes 1 43 44 50 Crosshairs and optical edge detection 61 Crosshair timeout delay 45 194 Cursor 208 D Data Destination 202 Printing feature measurement 160 Required to co...

Страница 251: ...rical wiring and connections 6 Encoder Count direction 174 Resolution 172 Type 172 Encoders 7 ENC tests 225 Enter 20 Entering and deleting setup data 166 Entry automatic point 48 50 Entry manual point 48 49 50 Environmental specifications 225 EOC delay 204 EOL delay 204 Error Correction 47 Messages 174 Essential setup requirements 168 Export results 29 Extra tab 16 199 F Feature Constructing 70 Go...

Страница 252: ...LEC linear error correction 176 LEC or SLEC which is right for me 176 Leveling the part optional 53 Lighting 46 Light levels 46 188 Lightning 7 Limit filtration error 193 Limiting access to program functions 170 Line constructions 79 Lines 60 63 130 132 List feature 21 LMC tolerances 133 Loading settings 171 Lock Axis 18 199 Programs 165 170 Logic button 211 M Machine zero reference 174 Magnificat...

Страница 253: ...ions for the QC 300 229 Original datums 192 Overview 1 P Page lines per 202 Parallelism tolerances 136 Parallel port configuration 222 Parameter choices 166 Parcentric calibrations 189 Parity 157 204 Part condition 46 Part fixturing 145 Part level 1 Part misalignment 54 Pass fail results 38 128 Password 165 170 Permanent part fixturing 145 Perpendicularity tolerance 136 Point Constructing a datum ...

Страница 254: ...40 Run 15 41 Saving and retrieving 153 Editing 146 Functions 170 Q QC 300 Mounting the 229 Version information 224 QC Quickie slide 29 Quit 20 R Radix for numeric displays 196 Range filtration standard deviation 193 Rate baud 157 Recording Program 140 Stop program 40 Rectangles 60 67 131 Reference Cable connector 9 Create part skew and datum 31 Datum 31 Features 228 Marks 173 Material regarding QC...

Страница 255: ... 166 Tolerance 37 128 Sending data to a computer 26 158 Sensor cable 9 Separators column 203 Serial cable 224 Serial port 158 Settings saving and loading 171 Setup 24 26 163 Setup Parameter choices 166 Privileges 170 Requirements minimum 168 Screens and functions 164 Shipment 11 Signed distances 192 Single view mode 197 Skew Alignment 54 55 Measure a 142 Measuring a part 31 Part 29 31 Slec segment...

Страница 256: ...C 134 Parallelism 136 Perpendicularity 136 Report 29 Runout 135 Roundness 135 Screen 127 Straightness 135 True position 132 Width 137 Tools programming 15 Touchscreen Calibration rows and columns 207 Cursor 208 Repeat delay 208 Zone size 209 Transients 7 Troubleshooting list 219 224 True position tolerance 132 Types Report 202 Tolerance 130 U Unauthorized personnel 170 Undo 24 Unit of measure 24 1...

Страница 257: ...DR JOHANNES HEIDENHAIN GmbH Dr Johannes Heidenhain Straße 5 83301 Traunreut Germany 49 8669 31 0 49 8669 5061 E mail info heidenhain de www heidenhain de 734 904 00 A 02 2 2010 ...

Отзывы: