background image

10 


Cut the Flue to the Correct Length 


Take a tape measure, screw driver and screws, together with the external wall plate outside to where the flue is 

now protruding. Slide the wall plate over the exposed flue and secure in place with the screws provided. Now 

measure the distance between the outside wall and the wall plate. This is the amount of flue that must be 

cut 

off 

to create the correct flue length. Remove the wall plate and remove the appliance from the opening cavity. 


Ensure that this dimension is checked very carefully as removal of too much material will result in the flue being rendered useless. 


Once the flue has been cut to the correct length, check that it is oriented correctly by ensuring the cover plate 

screw hole is top dead centre and then fied to the fire (see diagram below). Pull the fire into place and fit the 

tension fings (see page 9). 


With the appliance in posion and secured, take the wall plate outside and fit to 

the exposed flue terminal.  The rear face of the wall plate should be sealed with proprietary sealing compound 

or mortar. The wall plate should also be screwed to the wall using the fings (screws/rawl-plugs) provided. 

This installaon 

DOES NOT 

require the burner tray to be removed from the firebox. Thread the cables from the 

FRONT 

base of the fire at the two posions le and right. The cable can be pulled through the firebox at each 

side.  Thread these cables 

UP


through the eyelets and then through the hole and down through the slot at the 

top/rear of the appliance to lock.  


With the 

UNCUT FLUE FITTED 

to the appliance, the fire can be pulled into posion, temporarily, while the flue 

length required is confirmed. 

Use the cardboard sleeve supplied in the packaging of the flue to line the outer 

brick flue hole. The flue can then be pushed through the hole to check fit and alignment without causing any 

damage to the flue  or terminal.


Содержание F-0710X1 series

Страница 1: ...d is aware of any cleaning or maintenance requirements THERMES BALANCED FLUE ROOM SEALED GAS FIRE Model numbers F 0710X1 MANUAL for use on Natural Gas G20 at a supply pressure of 20 mbar in GB I E Model numbers F 0710X2 SLIDE for use on Natural Gas G20 at a supply pressure of 20 mbar in GB I E X denotes trim type P XX1560 ISSUE 6 THESE INSTRUCTIONS ARE TO BE LEFT WITH THE CUSTOMER AFTER INSTALLATI...

Страница 2: ...la on 8 Preparing the gas supply for the appliance 8 Fixing the Appliance and the Flue 9 Connec ng the appliance to the gas supply 11 Appliance Data Informa on 12 Removal of glass panel 13 Checking Opera on of Appliance 14 Comple ng the Installa on 15 Cleaning Instruc ons 16 Service Instruc ons 17 User Instruc ons 19 Coal Layout Instruc ons 20 Product Fiche 22 Spare Parts List 23 Manufacturer s Co...

Страница 3: ...is efficiency value can be used for SAP Standard Assessment Procedure for energy ra ng of UK dwellings Ven la on No purpose made ven la on is required for this appliance This appliance must only be installed on to a suitable hearth with a minimum thickness of 12mm The appliance must not be installed directly onto carpet of other combus ble floor materials The fireplace surround back panel must have a ...

Страница 4: ...inal on the same wall 1500mm N Horizontally from a terminal on the same wall 300mm In addi on the terminal should not be nearer than 300mm to an opening in the building fabric formed for the purpose of accommoda ng a built in element such as a window frame or door frame The reference to external corners does not apply to building protrusions not exceeding 450mm such as disused chimneys on external...

Страница 5: ...n of the flue pipe as it should be installed correctly see marking on flue DO NOT CUT THE FLUE YET ONCE THE APPLIANCE CAN BE PLACED IN POSITION THE FLUE LENGTH CAN BE CHECKED BEFORE CUTTING REPLACEMENT FLUES WILL BE CHARGED FOR IF THE FLUE IS CUT INCORRECTLY FLUE CUTTING INFORMATION IS ON PAGE 8 OF THESE INSTRUCTIONS Figure 3 shows the inner brickwork removed to accept the appliance Note centre of t...

Страница 6: ...Ensure that the template is fixed to the wall at the correct height allowing for the hearth height a er its installa on Mark out the cut out for the inner brickwork and the flue centre line Using a core drill is the quickest and easiest method to produce the hole required for the flue in the outer wall Alterna vely a hammer and cold chisel can be used however care should be taken not to damage brickw...

Страница 7: ...d installa on of the appliance Figure 4 Seal the Gap behind the back panel Hearth Mounted installa ons using rebated mantel If a gap exists between the rear of the back panel and the wall due to mantel rebate this gap should be sealed with bonding or similar to prevent heat from accumula ng in this area and affec ng mantel shelf temperatures Combus ble Shelf This appliance may be fi ed below a surro...

Страница 8: ...n the room where the appliance is to be installed The customer should be informed that the glass panel on this appliance gets extremely hot when in use 3 The user must be made aware to keep the area immediately in front of the appliance clear of combus bles items This does not include the floor covering however such covering should be fixed 4 The user must ensure that the ceramic fuel bed is maintai...

Страница 9: ...em Supplied as standard This appliance is best installed with the cable fi ng system which is supplied in the standard fi ng pack The fi ng system comprises two 2 eyebolts and two 2 fixing cables the appliance is secured with the clamping nipples on each side Simply drill and fit the eyebolts in the posi ons shown on the template This diagram shows the details of the holes required to secure the eyelet...

Страница 10: ...he tension fi ngs see page 9 With the appliance in posi on and secured take the wall plate outside and fit to the exposed flue terminal The rear face of the wall plate should be sealed with proprietary sealing compound or mortar The wall plate should also be screwed to the wall using the fi ngs screws rawl plugs provided This installa on DOES NOT require the burner tray to be removed from the firebox T...

Страница 11: ...od of assembly of the terminal guard The guard should be secured to the wall using the screws and rawl plugs provided Connec ng the Appliance to the Gas Supply In all installa on condi ons the gas connec on should be provided using 8mm O D copper tubing The relevant knock out entry point should be removed to allow the gas supply to enter the appliance No soldered joints should be used with the fire...

Страница 12: ...27m 3 hr Input Low Rate Slide Control Gross 2 7kW 0 26m 3 hr Ba ery Type Electronic Igniter AA Wall Depth Min 290 mm Wall Depth Max 624 mm NOx Class Class 3 Pilot Slide Control P XX1314 Pilot Manual Control P XX1313 Efficiency Class Class 1 Fire Depth 186mm The wall depth is calculated as the distance from the front face of the back panel surface to the outside face of the exterior wall ...

Страница 13: ...e replacing the glass ensure that the seal around the top and two sides of the firebox is in good condi on and is securely affixed to the appliance If the seal is damaged of loose then it should be replaced reaffixed before the glass is replaced This seal is important and if damaged the appliance should not be operated The glass panel should be undamaged If the glass panel is broken or cracked it shoul...

Страница 14: ... to the HIGH posi on Allow the appliance to run for a minimum period of 5 minutes Next check that the inlet pressure to the appliance is at 20 mbar 1 mbar SLIDE CONTROL UNITS Push down the control lever fully to the IGN posi on and hold The spark generator should spark con nuously ensure the spark is being generated correctly at the pilot assembly Con nue with this procedure un l the air is purged...

Страница 15: ...e glass and the ceramics Explain how they should be cleaned and make the customer aware of the health and safety warning detailed later in these instruc ons Explain to the customer that the ceramics are fragile and must be treated with great care explain that the ceramics are not covered by the warranty because of their fragility Also explain that small hairline cracks will appear in the surface o...

Страница 16: ...hs or cleaning solu ons these may scratch the surface Trim and Front Bars There are a variety of trim and fret op ons which may have been supplied with your appliance and these are normally a plated material on a steel substrate It is important that no abrasive cleaners or chemical agents are used in the cleaning of these components It is recommended that all these surfaces are cleaned with a clea...

Страница 17: ...aged or scratched in anyway Remove the glass and fuel effect components put in a suitable loca on where they cannot be damaged Disconnect the gas supply from the restrictor elbow Slide Control models only Disconnect the pushrod retaining screw from the top of the rod Remove the screws securing the burner tray to the firebox note that some screws are located within the combus on chamber Re assemble t...

Страница 18: ... burner tray in to the firebox see previous page Replacement of the Pilot 1 Remove the two 2 screws from the underside of the tray to release pilot 2 Undo the pilot gas supply from the base of the pilot 3 Remove the thermocouple nut from the back of the valve 4 Remove the two 2 screws securing the microswitch see diagram 5 Remove the igniter lead from the base of the igniter 6 The pilot assembly ca...

Страница 19: ...the HIGH se ng turn the control knob an clockwise to the flame symbol 6 It is also possible to adjust the control knob between the and the flame symbols to achieve a mid se ng 7 To turn the fire off press the knob slightly and turn to the IGN symbol for pilot only or symbol to turn off SLIDE CONTROL OPERATION 1 Push the control lever down fully to the IGN symbol The spark generator should cause a repe ...

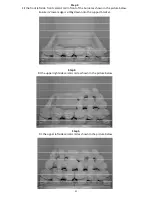
Страница 20: ...you are not fi ng the part correctly These instruc ons can also be followed to remove or reinstall the fuel bed a er cleaning This is a procedure that can be undertaken by the customer as required and the frequency will be depend upon use See page 13 for glass panel removal and installa on Step 1 Fit the fuel bed into the appliance as shown in the picture below Step 2 Fit the front right side ceram...

Страница 21: ...front of the burner as shown in the picture below Ensure its lower edge is si ng down onto the support bracket Step 4 Fit the upper right side ceramic rail as shown in the picture below Step 5 Fit the upper le side ceramic rail as shown in the picture below ...

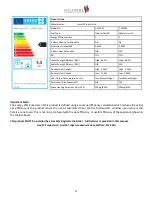
Страница 22: ...d in this manual Hearth Products Ltd Unit 14 Tollgate Industrial Estate Stafford ST16 3SU Product Fiche Manufacturer Hearth Products Ltd Model No F 071XX1 F 071XX2 Energy Efficiency Class C C Direct Heat Output kW 3 3kW 3 3kW Indirect Heat Output kW N A N A EEI 77 77 Useful Energy Efficiency NCV High 86 2 High 86 2 Useful Energy Efficiency NCV N A N A Nominal Heat Output High 3 3kW High 3 3kW Nominal Hea...

Страница 23: ...ue to our policy of con nual product improvement some diagrams and small details may not be accurate however if there is any concern or ma er of understanding that you feel needs to be clarified please contact us directly Our contact details are shown below Hearth Products Ltd Unit 14 Tollgate Industrial Estate Stafford ST16 3SU Www hearthproducts co uk Tel 01785 225401 Fax 01785 225501 Email info h...

Отзывы: