background image

BPro

®

BT (Connect to PC Version) Operator Manual

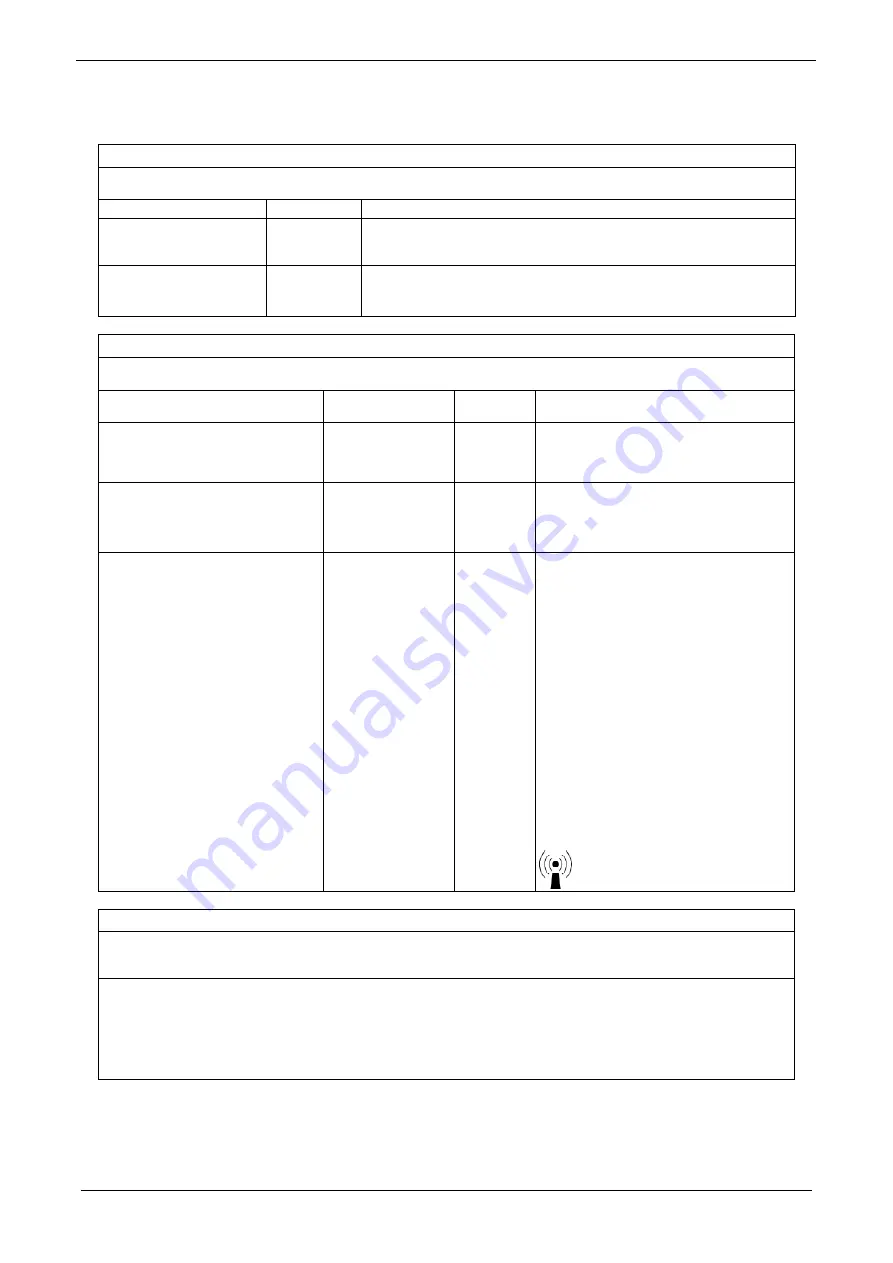
Manufacturer’s EMC Declaration

36

15 Manufacturer’s EMC Declaration

Manufacturer’s Declaration — Electromagnetic emissions

The BPro

®

BT is intended for use in the electromagnetic environment specified below. The customer or the user of the BPro

®

BT

should ensure that it is used in such an environment.

Emissions test

Compliance

Electromagnetic environment (guidance)

RF emissions:
CISPR 11

Group 1

The BPro

®

BT uses RF energy only for its internal functions. Therefore, RF

emissions are very low and are not likely to cause any interference to nearby
electronic equipment.

RF emissions: CISPR 11

Class B

The BPro

®

BT is suitable in all establishments, including domestic

establishments and those directly connected to public low-voltage power supply
network that supplies buildings used for domestic purposes.

Manufacturer’s Declaration — Electromagnetic Immunity

The BPro

®

BT is intended for use in the electromagnetic environment specified below. The customer or the user of the BPro

®

BT

should ensure that it is used in such an environment.

Immunity test

IEC 60601 test level

Compliance
level

Electromagnetic environment (guidance)

Electrostatic discharge (ESD): IEC
61000-4-2

±6 kV contact
±8 kV air

±6 kV
±8 kV

Floors should be wood, concrete, or ceramic
tile. If floors are covered with synthetic
material, the relative humidity should be at
least 30%.

Magnetic field power frequency: 50/60
Hz

Magnetic field:
IEC 61000-4-8

3 A/m

3 A/m

Power frequency magnetic fields should be at
levels characteristic of a typical location in a
typical commercial or hospital environment.

Portable and mobile communications
equipment should be used no closer to any
part of the BPro

®

BT, including cables, than the

recommended separation distance, d,
calculated from the equation applicable to the
frequency of the transmitter, as follows:

Conducted RF:
IEC 61000-4-6

3 V

RMS

:

150 kHz to 80 MHz

Not
applicable

Not applicable

Radiated RF:
IEC 61000-4-3

3 V/m:
80 MHz to 2.5 GHz

3 V/m

d

= (3.5/3)

P

meters for 80 MHz to 800 MHz

d

= (7/3)

P

meters for 800 MHz to 2.5 GHz

where

P

is the maximum output power rating

of the transmitter in watts (W).

Field strengths from fixed RF transmitters, as
determined by an electromagnetic site survey

a

,

should be less than the compliance level in
each frequency range

b

.

Interference may occur in the vicinity of
equipment marked with the following symbol:

Manufacturer’s declaration — electromagnetic immunity

NOTE 1: At 80 MHz and 800 MHz, the higher frequency range applies.
NOTE 2: These guidelines may not apply in all situations. Electromagnetic propagation is affected by absorption and reflection
from structures, objects and people.

a

Field strengths from fixed transmitters, such as base stations for radio (cellular/cordless) telephones and land mobile radios,

amateur radio, AM and FM radio broadcast and TV broadcast cannot be predicted theoretically with accuracy. To assess the
electromagnetic environment due to fixed RF transmitters, an electromagnetic site survey should be considered. If the measured
field strength in the location in which the BPro

®

BT is used exceeds the applicable RF compliance level above, the BPro

®

BT

should be observed to verify normal operation. If abnormal performance is observed, additional measures may be necessary,
such as reorienting or relocating the BPro

®

BT.

b

Over the frequency range of 150 kHz to 80 MHz, field strengths should be less than 3 V/m.

Содержание BPro BT

Страница 1: ...BPro BT Radial Pulse Wave Acquisition Device Connect to PC Version Operator s Manual IMPORTANT Please read this operator s manual carefully before using the BPro BT ...

Страница 2: ...t with Healthstats International Pte Ltd Healthstats assumes no responsibility or liability whatsoever for any incidental or consequential damages or loss of anticipated benefits or profits or loss or impairment of data arising from the use of this product BPro and BProSOft are either registered trademarks or trademarks of Healthstats International in Singapore and other jurisdictions Caution Fede...

Страница 3: ...tarting BP session 15 8 1 Taking calibration readings 15 8 2 Starting BP session in Auto mode 15 8 3 Starting BP session in Manual mode 18 8 4 Events to be mindful of during a BP session 19 8 5 Removing the BPro BT 20 8 6 Prematurely terminating a BP session Use with Care 20 9 Device Configuration Mode 21 9 1 Pairing and Default Select to PC BPROSOFT Mode 21 9 2 Default Select to CABLE ONLY Mode 2...

Страница 4: ...isplayed stored and printed The MC3100 oscillometric blood pressure monitor or another commercially available health care oscillometric blood pressure monitor which has attained regulatory compliance i e FDA CE may be used as the BP calibrator This manual focuses on the BPro BT radial pulse wave acquisition device For information on the use of the MC3100 oscillometric blood pressure monitor or ano...

Страница 5: ...protection against electrical shock 3 See accompanying documents or see instructions for use 4 Caution 5 Date of manufacture 6 Manufacturer 7 Authorized representative in the European Community 8 Dispose of this product and used batteries in accordance with the national regulations for the disposal of electrical products 9 Lot number 10 PN Part number 11 SN Serial number 12 Temperature limitation ...

Страница 6: ...rs Remove the BPro before using a defibrillator DO NOT use the BPro BT in the presence of electrosurgery DO NOT use the BPro BT for monitoring of blood pressure during exercise or any vigorous activity DO NOT charge the device while taking measurement 4 2 Precautions on Cybersecurity It is of critical importance that the responsible institution i e the healthcare delivery organization implement an...

Страница 7: ...other commercially available health care oscillometric blood pressure monitor which has attained regulatory compliance i e FDA CE A person s blood pressure fluctuates over a 24 hour period and the BPro BT will automatically measure blood pressure at regular preset intervals Readings are stored in the memory of BPro BT For patients in shock noninvasive methods of measuring blood pressure may not be...

Страница 8: ...C Version Operator s Manual Unpacking your BPro BT Package 5 5 Unpacking your BPro BT Package Ensure that you have all the necessary items in your BPro BT package Refer to the respective components list provided separately ...

Страница 9: ... 1 Identification of parts Part no N6003A 1 LCD housing 9 Sensor positioning marker 2 Backlit LCD 10 Sensor housing 3 Panic Emergency button 11 Sensor case cushion 4 Sensor support strap 12 Up button 5 C bracket 13 Fastening strap 6 Connecting Strap 14 Strap diverter 7 Down button 15 Charging port 8 Sensor plunger 16 Mode button ...

Страница 10: ... select settings Up button To move selection upwards To increase value To enter sensor signal checking mode To toggle time between 12hr or 24hr format Down Button To move selection downwards To decrease value Turn on off audible beep alerts To toggle time between English or Chinese language format Button Panic Emergency button Reserved Up Button Down button Panic Emergency button Mode Set ...

Страница 11: ...s at preset intervals over a 24 hr session Store date and time stamp for every measurement Display real time radial artery waveform for blood pressure measurement Data process Store up to 5 sessions of BP monitoring data Send BP session s Delete BP session s Device configuration Pair or unpaired Mobile devices Pair or unpaired Healthstats BP monitor Select default mobile device and default BP cali...

Страница 12: ...starting up BPro BT for the first time the initialization screen will display the followings Display of Healthstats logo BPro BT device identification number firmware version and hardware version Time mode Default Date and Time Display status of Number of unsent data Ongoing BP session Buzzer Battery level ...

Страница 13: ...ur up to two times Measurement complete 1 short beep during BP session to indicate that the measurement is complete 6 6 2 Battery Life indicator The battery life is indicated by battery icon Ensure the battery icon show full bar in green prior to starting BP session Refer to the section Battery charging for more information on how to charge the battery Battery is fully charged green icon Battery i...

Страница 14: ... interference with patient measurements is minimized 6 7 1 Spectrum Bluetooth technology operates in the unlicensed industrial scientific and medical ISM band at 2 4 to 2 485 GHz which is available and unlicensed in most countries 6 7 2 Interference Bluetooth technology s adaptive frequency hopping AFH capability was designed to reduce interference between wireless technologies sharing the 2 4 GHz...

Страница 15: ...computer s documentation for more information 6 7 4 Proper Location of Devices for Use It is important to properly locate the devices within their specified range of use BPro BT monitor should be located less than 10 meters or 33 feet from the PC with BProSOft BT PC Software for data downloading Refer to the illustration below It is also important to locate the devices and computer at least 1 mete...

Страница 16: ... Specifications in Part 15 of this manual 6 7 7 Wireless Troubleshooting Should problems occur with wireless data transmission refer to the following suggestions Problem Action Resource No data transmission BPro BT is not operational Make sure the BPro BT monitor is on and has adequate battery power remaining before beginning data transmission Manual Part 6 6 2 No BPro BT recognized by host Make s...

Страница 17: ...tep 1 Place your index middle and ring fingers on the patient s wrist to feel the palpation in the radial artery Note The BPro BT should be mounted on the wrist of the arm from which calibration readings were taken Step 2 Locate the region where the radial pulse is most strongly felt usually at the middle finger Step 3 Position the sensor plunger over this region using the white marks on both side...

Страница 18: ...Up button or Down button to increase or decrease the date and time values respectively The sequences of date and time setting are hour minute year month and day Press Mode Set button to move to next parameter Press Down button to navigate to Exit Press Mode Set button to confirm to return to the Time mode Notes The highlighted time or date parameter yellow colour indicates the current selection or...

Страница 19: ...e instruction manual for the BP calibrator for details Step 3 Discard the first set of readings If any two of the remaining 3 readings for systolic or diastolic pressure differ by more than 10 mmHg repeat the measurement The last three BP readings will be averaged Note The average systolic and diastolic readings will be used for calibration Step 4 Remove the cuff from the patient and turn off the ...

Страница 20: ...rt Auto BP session mode Note Ensure that CON status is shown on Healthstats monitoring device display MC3100 For more information refer to MC3100 quick guide and user manual respectively 4 BPro BT will connect with Healthstats monitoring device to obtain the BP readings BPro BT displays the following messages Initializing connecting handshaking data received and disconnecting 5 BPro BT will displa...

Страница 21: ...roceeds to capture the waveform When the display shows constant pulsation remain still as this will follow with the calibration which takes about 10 seconds 8 A Tick will be displayed to indicate calibration is successful 9 It is then followed by a verification process 10 A second tick is displayed following a successful verification process 11 The ABPM session has started indicated by icon in tim...

Страница 22: ...s Down button to navigate down to Manual and press Mode Set button to select Manual BP session mode 4 Press Up button or Down button to increase decrease value for systolic and diastolic BP reading by increment decrement of one Press Mode Set to confirm and move to next parameter 5 Calibration will commence automatically after manually setting of the BP values 6 Subsequently the rest of the proced...

Страница 23: ...play a tick to indicate a successful measurement 4 If the BPro BT is unable to obtain a valid blood pressure reading it will produce a long beep and then activate a second measurement cycle If the second attempt fails again it will trigger the third measurement cycle 5 The BPro BT has been programmed to repeat this 3 cycle sequence two more times with an interval of thirty seconds between sequence...

Страница 24: ...display indicates that the BP session is in progress It will disappear after 24 hours or prematurely terminated By default the ABPM session will stop automatically after 24 hours To prematurely terminate a BP session perform the followings 1 Press Mode Set button to go into Main Menu mode Press Mode Set button to stop BP session 2 A dialogue box is displayed to confirm your selection Press Up butt...

Страница 25: ... button BPro BT enters into Pairing Mode 3 Press Mode Set button Navigate down to Pair w PC and press Mode Set button to confirm selection Pairing PC BProSOft Sequence BPro BT Initializing BPro BTPairing PC BProSOft Pairing Pairing successful Notes If pairing is unsuccessful BPro BT will show pairing failed The maximum number of Bluetooth devices that can be paired to BPro BT is 5 Example a combin...

Страница 26: ...tton to PC BPROSOFT Press Mode Set button to confirm the selection BPro BT will only send data to the selected PC BPROSOFT as highlighted in yellow 7 To return to the Main menu navigate down to Exit and press Mode Set button Notes If none of the Default mobile device is selected all listed devices will be in white When BPro BT attempts to communicate with the device a default Phone PC Not Set mess...

Страница 27: ...igate down to Device Config and press Mode Set button to confirm selection to Default select 3 Press Mode Set button to select Default Phone PC 4 Navigate using Up or Down button to CABLE ONLY By default if no other options are available CABLE ONLY will be highlighted in yellow Notes With CABLE ONLY selected BPro BT will always attempt to communicate with PC using USB Data Cable Please ignore the ...

Страница 28: ...ing Press Mode Set button to confirm the selection 3 Press Down button to navigate and select Pair w MC3100 Press Mode Set button to confirm the selection 4 Press Down button to navigate and select Default select Press Mode Set button to confirm the selection 5 Press Down button to navigate and select Default MC3100 Press Mode Set button to confirm the selection 6 Press Down button to navigate and...

Страница 29: ... sequence BPro BT Initializing BPro BT searching BT device BPro verifying BT device Or Fail to Pair BT device Back to Main Menu Notes It is important to note that pairing is successful after BPro BT has displayed Pairing Succeeded If none of the Default MC3100 device is selected all listed devices will be in blank white When BPro BT attempts to communicate with the MC3100 device a default MC3100 N...

Страница 30: ... minutes interval and save the BP into the memory as shown in the blue icon with the number of record saved 10 2 Sending BP Data Manually 1 BPro BT display in Time mode Press Mode Set button to enter Main Menu mode 2 Press Down button to navigate and select Data Process mode Press Mode Set button to confirm the selection 3 Press Down button to navigate and select the desired BP session to send Pre...

Страница 31: ...BPro BT Connect to PC Version Operator s Manual Sending of BP Data 27 Sending data sequence display as BPro BT connecting Cable connected Send complete S1 Blk 1 Sent Back to Menu ...

Страница 32: ...ress Mode Set button to confirm the selection 3 Press Down button to navigate and select Delete Session Press Mode Set button to confirm the selection 4 Press Down button to navigate and select the intended session to delete Press Mode Set button to confirm the selection The selected session to delete will be highlighted in yellow 5 Press Up button to confirm deletion of BP session Press Down butt...

Страница 33: ... Menu mode 2 Press Down button to navigate and select Data Process mode Press Mode Set button to confirm the selection 3 Press Down button to navigate and select Delete All Press Mode Set button to confirm the selection 4 Press Up button to confirm deletion of all BP sessions Press Down button to cancel deletion 5 This screen shows that all BP sessions have been deleted ...

Страница 34: ... blocks of BP data Eg 3 96 3 indicates unsent data and 96 indicates total BP records A before the indicates there is zero unsent data and a indicate no BP session initiated yet The deletion of BP session s is localized to BPro BT only It will NOT delete the BP sessions that were already sent to the BDSS The maximum number of BP sessions that BPro BT can hold is 5 If the 6th BP session is carried o...

Страница 35: ...aveform should be clean repeatable and with good amplitude 3 A bad waveform is noisy with small amplitude If necessary Re position the plunger or adjust the strap tension until satisfactory signal is obtained 4 5 When a flat line is shown it means that the sensor has no tension or over tension eg Not mounting or strap too tight respectively Try to adjust the strap tension until a good waveform is ...

Страница 36: ... of BPro BT there are four metal contacts also note the alignment notch Mount the charging clip onto BPro BT Make sure that the protruding tooth is positioned onto the alignment notch on BPro BT The four metals pins on the clip should be positioned onto the four metal contacts on BPro BT 3 This is how it should look like when the clip is correctly mount on BPro BT ...

Страница 37: ... PC Version Operator Manual Charging 33 4 Plug the charging adaptor into a power socket 220V connect the USB charging clip to begin charging It is recommended to have the device charged for 3 4 hours from a flat battery ...

Страница 38: ...ne of the C bracket holes holding the spring bar Step 2 Push in the tip of the tool and gently pull the strap away from the end of the C bracket Step 3 Insert one end of the spring bar diagonally into one of the C bracket holes Step 4 Insert the fork of the strap changing tool onto the top end groove of the spring bar and press it down Slowly move the bar into position and then release the fork A ...

Страница 39: ... for illustration of cleaning the LCD back housing with 70 isopropyl alcohol pad Note Do not allow moisture to enter the LCD during any of the above steps 14 3 Replacing the sensor cushion Step 1 Peel off the sensor cushion from sensor housing Step 2 Stick a new sensor cushion back to the housing Note It is recommended the sensor cushion be replaced after every 5 ABPM sessions use 14 4 Servicing T...

Страница 40: ...able and mobile communications equipment should be used no closer to any part of the BPro BT including cables than the recommended separation distance d calculated from the equation applicable to the frequency of the transmitter as follows Conducted RF IEC 61000 4 6 3 VRMS 150 kHz to 80 MHz Not applicable Not applicable Radiated RF IEC 61000 4 3 3 V m 80 MHz to 2 5 GHz 3 V m d 3 5 3 P meters for 8...

Страница 41: ...and pulse rate readings Bluetooth Connectivity Transmission Protocol Bluetooth v2 1 enhanced data rate EDR Profile stack Serial Port Profile SPP Dimension and Weight Watch head 45 W x 55 L x 16 H mm Sensor housing 32 W x 38 L x 18 H mm Weight Approximately 60 grams with battery Others I O connection BPro BT USB data cable Operating conditions 5 to 40 C 15 to 93 relative humidity non condensing 700...

Страница 42: ...BPro BT Connect to PC Version Operator Manual Specifications 38 ...

Страница 43: ...ecification of pre use checks Device labeling lists pre use check of device calibrator cuff serial cable and battery acceptable 19 Replaceable consumable components No Part Description Part Number 1 Sensor Cushion P3604A 2 Watch Strap G2 95 mm P3517A 3 Watch Strap G2 125 mm P3518A 4 Watch Strap G2 155 mm P3519A 20 Glossary Blood pressure BP Sometimes referred to as arterial blood pressure is the p...

Отзывы: