4
Features
Top Panel
1
3
4
4
5
5
6
6
2
2
2
7
8
9
10
11
12
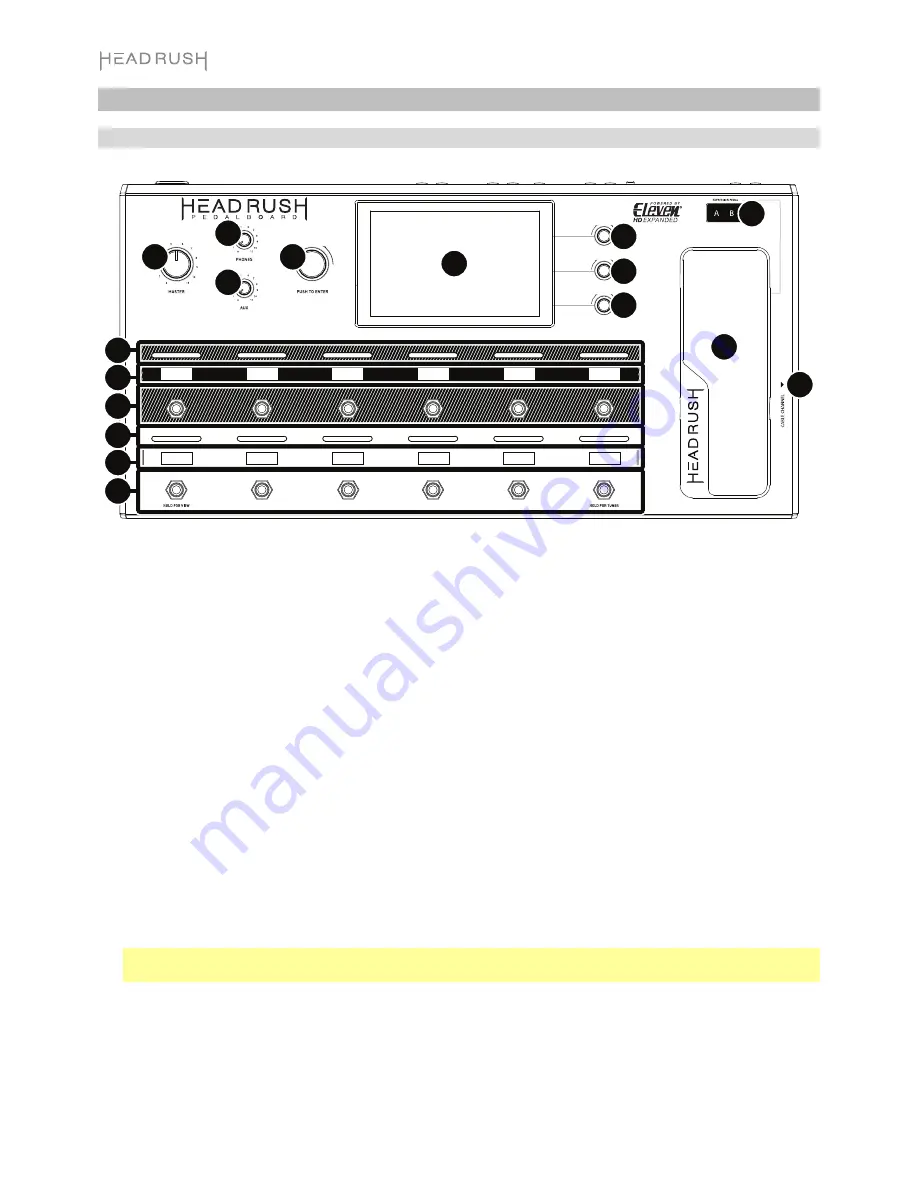
1.
Main Display
: This full-color multi-touch display shows information relevant to HeadRush Pedalboard’s
current operation. Touch the display (and use the hardware controls) to control the interface. See
Basic
Operation
to learn how it works.
2.
Parameter Knobs
: Turn these knobs to adjust the parameters or settings shown next to them in the main
display.
3.
Encoder
: Turn this encoder to scroll through the available menu options or adjust the parameter values of the
selected field in the display. Push the encoder to confirm your selection.
4.
Footswitches
: Press these footswitches to activate or deactivate the assigned model or to load the assigned rig.
5.
Footswitch Displays
: These display strips indicate the model or rig assigned to each footswitch.
6.
Footswitch Indicators
: These lights indicate whether the model or rig assigned to each footswitch is on
(brightly lit) or off (dimly lit).
7.
Expression Pedal
: Use this pedal to adjust the assigned parameter/parameters. See
Basic Operation
>
Hardware Assign
>
Expression Pedal
for more information.
8.
Expression Pedal Status LCD
: This small LCD indicates the current status of the expression pedal. See
Basic Operation
>
Hardware Assign
>
Expression Pedal
for more information.
9.
Master Volume
: Turn this knob to adjust the volume level of the
outputs
.
10.
Phones Volume
: Turn this knob to adjust the volume level of the
phones output
.
11.
Aux Volume
: Turn this knob to adjust the volume level of the
aux input
.
Important
:
The audio signal from the aux input is routed directly to the outputs of HeadRush Pedalboard
without any modeling applied. It is also unaffected by the master volume or phones volume knobs.
12.
Cable Channel
: Place your cables under and through this indent on the underside of HeadRush Pedalboard
to keep your stage clutter-free and prevent people from tripping over cables.
Содержание Pedalboard
Страница 2: ...2 ...
Страница 64: ...Manual Version 1 1 ...


