background image

--------------------------------------------------------------------------------------GEN II OPERATIONS MANUAL 

HealthCare Information, LLC 

32


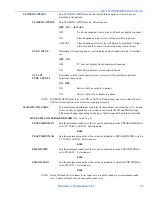
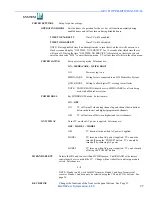
INPUT AUTO-DET 

When on, the TV will return to the previous input source if there is no video or the 
video is lost for the current input.  Selections are:           

ON - OFF  

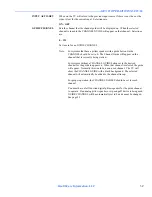
GUIDE CHANNEL 

Sets the channel that the channel guide will be displayed on.  When the selected 
channel is tuned to the CHANNEL GUIDE will appear on that channel.  Selections 
are:   

0 – 125   

Set to zero for no GUIDE CHANNEL   

Note: 

For systems that have a pillow speaker with a guide button Guide  
CHANNEL should be set to 0.  The Channel Guide will appear on the  
channel that is currently being viewed.    

For systems without a CHANNEL GUIDE button set to the desired  
channel for the guide to appear on.  When that channel is selected the guide  
will appear.  Normally this would be a non-used channel.  The TV will  
show the CHANNEL GUIDE with a black background.  The selected  
channel will automatically be added to the channel lineup.    

For proper operation, the CHANNEL LABELS should be set for each  
channel.    

You must have a full function digital pillow speaker for the guide channel  
to operate.  If an analog pillow speaker or sip and puff device is being used  
GUIDE CHANNEL will be automatically set to 0 and cannot be changed.   
See page 29. 

Содержание RoomMate RM20II

Страница 1: ...REVISION 7 0 TM ...

Страница 2: ......

Страница 3: ...NR 21 SOUND MENU 22 24 SPEAKER MODE 22 SOUND MODE 22 BASS 22 TREBLE 22 BALANCE 22 MTS 22 CLOSED CAPTION 22 23 MIN MAX VOLUME 23 24 TELEVISION 23 SINGLE PILLOW SPEAKER 23 DUAL PILLOW SPEAKER 24 ADVANCE MENU 25 26 USB CLONING 25 START UP SETTINGS 25 SOURCE 25 CHANNEL NUMBER 25 VOLUME 25 MENU LANGUAGE 25 MENU TRANSPARENCY 25 MENU DISPLAY TIME 25 PARENTAL CONTROL 25 SIP AND PUFF 25 PILLOW SPEAKER TYPE...

Страница 4: ...COLOR SELECT 40 AUTO LOGIN 40 USER NAME 40 PASSWORD 40 HOME PAGE SETTINGS 40 42 PC APPS 40 IMAGES 40 EDUCATION 41 MOVIES 41 AUDIO 41 AUTO PLAY GREEN 41 AUTO PLAY BLUE 41 AUTO PLAY PURPLE 41 ENABLE DISABLE BUTTONS 42 AUTOMATIC BUTTONS 42 USB 42 PRESCRIBED MEDIA 42 LOCAL MEDIA 42 MEDIALINK 42 TV 42 USING IPTV 43 44 SETTING IP ADDRESS 43 IPTV OPERATION 44 CONTROLLING PLAYBACK 44 HARD DRIVE FILE MANAG...

Страница 5: ...uidelines for proper grounding and in particular specifies that the cable ground shall be connected to the grounding system of the building as close to the point of the cable entry as practical REGULATORY INFORM This equipment generates uses and can radiate radio frequency energy and if not installed in accordance with this instruction manual may cause harmful interference to radio communications ...

Страница 6: ...ng type plug A polarized plug has two blades with one wider than the other A grounding type plug has two blades and a third grounding prong The wide blade or third prong are provided for your safety If the provided plug does not fit into you outlet consult an electrician for replacement of the obsolete outlet 10 Protect the power cord from being walked on or pinched particularly at plugs convenien...

Страница 7: ...EGUARDS FOR YOU AND YOUR NEW PRODUCT YOUR NEW PRODUCT HAS BEEN MANUFACTURED AND TESTED WITH YOUR SAFETY IN MIND HOWEVER IMPROPER USE CAN RESULT IN POTENTIAL ELECTRICAL SHOCK OR FIRE HAZARDS TO AVOID DEFEATING THE SAFEGUARDS THAT HAVE BEEN BUILT INTO YOUR NEW PRODUCT PLEASE READ AND OBSERVE THE FOLLOWING SAFETY POINTS WHEN INSTALLING AND USING YOUR NEW PRODUCT AND SAVE THEM FOR FUTURE REFERENCE OBS...

Страница 8: ...TV RM22II 22 Inch LCD HD IPTV RM26II 26 Inch LCD HD IPTV RM32II 32 Inch LCD HD IPTV RM42II 42 Inch LCD HD IPTV RM52II 52 Inch LCD HD IPTV This manual covers M star version 38 and Sigma version 33 NOTE Instructions in this manual apply to all of the above listed sets unless stated otherwise The RM52II model set is not UL Listed at this time Model RM52II is not available at the time of this printing...

Страница 9: ...ON 12 CHANNEL DOWN CHANGES CHANNEL TO THE NEXT LOWER PROGRAMMED CHANNEL 13 NUMBER BUTTONS DIRECT ACCESS TO CHANNELS 14 PREVIEW ENTERS PREVIEW MODE PIP 15 SLEEP SETS SLEEP TIMER 16 ALARM SETS ALARM S 17 TIME DISPLAYS DATE AND TIME 18 STATUS DISPLAYS TV STATUS 19 SCREEN SIZE SETS SCREEN SIZE ZOOM 20 NAVIGATION USED TO NAVIGATE SETUP MENUS AND IPTV MENUS 21 BANK CHANGE BANKS 22 SETUP USED TO ENTER SE...

Страница 10: ... GEN II OPERATIONS MANUAL HealthCare Information LLC 10 LEFT SIDE INPUT PANEL FRONT PANEL USB PORT RM22II ONLY FRONT PANEL With Favorites Function FRONT PANEL With EDU Function ...

Страница 11: ... GEN II OPERATIONS MANUAL HealthCare Information LLC 11 REAR I O PANEL SINGLE PILLOW SPEAKER BOARD VER 1 ...

Страница 12: ... GEN II OPERATIONS MANUAL HealthCare Information LLC 12 REAR I O PANEL SINGLE PILLOW SPEAKER BOARD VER 2 ...

Страница 13: ... GEN II OPERATIONS MANUAL HealthCare Information LLC 13 REAR I O PANEL DUAL PILLOW SPEAKER BOARD ...

Страница 14: ...e USB port Equipment With Composite Audio and Video Outputs You can connect a device with composite audio video outputs such as a DVD or VCR player to the composite input jacks on the left side of the monitor Connect the video output of the device to the yellow jack the right audio output of the device to the white jack and the left video output of the device to the red jack Change the source to A...

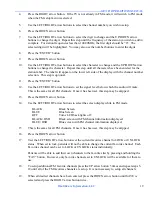
Страница 15: ... Speaker s Single Pillow Speaker Board Ver 1 and Ver 2 Before connecting the pillow speaker to the set you must plug the set in and enter the setup menu to set the set for the proper type of pillow speaker you are going to use See Page 26 To connect the TV for pillow speaker control you will need a jumper with either a phone plug or a 6 Pin Amphenol plug on the TV end The other end should match yo...

Страница 16: ...e same time Software Updates You will need a special programming board to update the TV operating software The PC board connects to the RS 232 port on the TV and a USB port on your PC or laptop Contact your dealer for the necessary hardware software and files to update the software IPTV software updates can be installed via a USB flash drive version 15 or higher or through the HCI MediaCare system...

Страница 17: ...s the setup button on the IR remote after entering the 9999 code to access the setup menus When in IPTV mode you may enter IPTV setup using the 9999 code To change the IR band on an HCI IR remote press and hold the power button for 10 seconds The IR band will toggle between IR Band 1 and IR Band 2 Press the VOL and CH buttons on the front or side panel at the same time to change IR bands See Pages...

Страница 18: ...buttons to set the signal type Press the ENTER button Use the Down arrow button to select AUTO SCAN Press the right arrow button to start the auto scan process The TV will scan all channels and store active channels in the program list Setting Date and Time Certain features such as the ALARM require the proper date and time to function properly To set the date and time 1 Enter function code 9999 w...

Страница 19: ...gnal level below which the audio will mute This is the same for all FM channels Once it has been set this step may be skipped 13 Press the DOWN arrow button 14 Use the LEFT RIGHT arrow buttons to select the screen display while in FM mode BLACK Black Screen BLUE Blue Screen OFF Turns LCD back lights off BLACK OSD Black screen with FM channel information displayed BLUE OSD Blue screen with FM chann...

Страница 20: ...to set the day 7 Press the DOWN ARROW button Use the LEFT RIGHT arrow buttons to set the hour 8 Press the DOWN ARROW button Use the LEFT RIGHT arrow buttons to set the month 9 Press the DOWN ARROW button Use the LEFT RIGHT arrow buttons to set the minute 10 Press the DOWN ARROW button Use the LEFT RIGHT arrow buttons to select AM or PM 11 Press the DOWN ARROW button Use the LEFT RIGHT arrow button...

Страница 21: ... are NORMAL WARM COOL SCREEN SIZE Selects the scale of the picture Also called ZOOM Selections are NORMAL PANORAMA WIDE ZOOM 1 ZOOM 2 NORMAL Adjusts the picture to standard broadcast size There will be a vertical blank area on the left and right side of the picture PANORAMA Stretches picture horizontally to fill screen Center of picture is not stretched The amount of stretching increases towards t...

Страница 22: ...low frequency sound level SOUND MODE must be set for user to adjust this setting TREBLE Adjusts the high frequency sound level SOUND MODE must be set for user to adjust this setting BALANCE Adjusts the right and left speaker sound levels SOUND MODE must be set for user to adjust this setting MTS Selects sound source Selections are STEREO MONO SAP STEREO VOL MONO VOL SAP VOL STEREO 2 Channel sound ...

Страница 23: ...atient NOTE CLOSED CAPTION must be set to ON or ALWAYS and at least one service must be set to YES for closed caption or text services to operate correctly MAX MIN VOLUMES Sets maximum and minimum sound levels that patients can adjust the set to Sound level can only be adjusted to a level that is between the MAX and MIN settings This menu changes depending on the type of pillow speaker board that ...

Страница 24: ...X Sets the maximum sound level the set can be adjusted to when SOUND MODE is set to PILLOW Selections are 0 100 PILLOW 6 PIN MIN Sets the minimum sound level the set can be adjusted to when SOUND MODE is set to PILLOW Selections are 0 100 PILLOW 6 PIN MAX Sets the maximum sound level the set can be adjusted to when SOUND MODE is set to PILLOW Selections are 0 100 NOTE Set the MIN and MAX volumes t...

Страница 25: ...e channel it was on when turned off Only channel numbers that are in the currently added list can be selected VOLUME Sets the volume level the TV will use when turned on NOTE If set to 0 TV will have the same volume level it had when turned off MENU LANGUAGE Sets the language used for the ON SCREEN MENUS Selections are ENGLISH FRANCAIS ESPANOL NOTE Press enter after making selection MENU Sets the ...

Страница 26: ... speaker sending Zenith code Provides 5VDC to operate the pillow speaker NOT DUAL PS This menu can not be accessed when using a single pillow speaker board Menu selection will be grayed out SINGLE PILLOW SPEAKER BOARD VER 2 PILLOW SPEAKER TYPE Sets the type of pillow speaker being used Selections are VIS ST SIP AND PUFF 1 KEY 3 KEY ZENITH PHILIPS ZEN 5V NOT DUAL PS This menu can not be accessed wh...

Страница 27: ... NOTE POWER SAVING must be set to MEDIACARE for all sets being used with a MediaCare system POWER ROLL Set POWER ROLL mode Selections are ON OFF ON TV will turn off when using channel up and channel down buttons between the lowest and highest programmed channels OFF TV will not turn off between highest and lowest channels ON WITH AC Turns TV on when AC power is applied Selections are OFF MODE 1 MO...

Страница 28: ...s on and on when the set is off ON IF TV ON Power LED is on when the set is on and off when the set is off ALWAYS OFF Power LED is off at all times IR BLINK Power LED is always off but blinks when a button is pressed on the front panel IR remote or pillow speaker CLOCK DST Turns Daylight Savings Time on and off Selections are OFF ON SOURCE ROLL When on CH and CH buttons will scroll through the act...

Страница 29: ...NOTE Most in house systems such as DIRECT TV will use CATV NOTE If you are on a CATV system and AIR is selected as the source you will not see any channels above channel 13 CH PREVIEW CH PREVIEW MODE displays 9 channels on the screen at the same time and scans MODE from one channel to the next as determined by the CHANNEL PREVIEW MODE setting Audio will be heard from the currently selected channel...

Страница 30: ... right and left arrow buttons to change channel Selected channel will be displayed behind the menu Use this to manually add channels ADD REMOVE Manually add or remove the current channel from the channel line up This affects the current selected bank only See pages 55 and 56 Selections are ADDED REMOVED NOTE When adding a digital channel it will take several seconds for the TV to scan the channel ...

Страница 31: ...if the On Screen Display is set on See SCR MODE Use the right left arrow keys to select the character to enter and the up down arrow keys to change FM LEVEL FM channels with signal strength below this setting will be muted SCREEN MODE SCREEN MODE Determines what the set will display when in FM mode Selections are BLACK BLUE SCREEN OFF BLACK OSD BLUE OSD BLACK Black screen only BLUE Blue screen onl...

Страница 32: ...d be set to 0 The Channel Guide will appear on the channel that is currently being viewed For systems without a CHANNEL GUIDE button set to the desired channel for the guide to appear on When that channel is selected the guide will appear Normally this would be a non used channel The TV will show the CHANNEL GUIDE with a black background The selected channel will automatically be added to the chan...

Страница 33: ... ADVANCE menu SCREEN SIZE Displays current zoom mode SOUND MODE Displays current sound mode PICTURE MODE Displays current picture mode MTS Displays current MTS selection HDTV ONLY DISPLAYS IF TV IS IN HDTV MODE Displays current HDTV picture resolution information TV ONLY DISPLAYS IF TV IS IN ANALOG MODE Displays current analog TV channel TV BANK ONLY DISPLAYS IF TV IS IN ANALOG MODE Displays the c...

Страница 34: ...U in the FUNCTION and OSD menus Both operate in the same manor IR remotes will have either an FAV or EDU button Both will work all sets regardless of the FAV EDU function CLOSED CAPTIONS Pressing the CC button on the TV IR remote or pillow speakers will switch between Closed Caption modes as follows CC OFF MUTE OFF MUTE CC1 MUTE CC2 MUTE CC3 MUTE CC4 MUTE TEXT 1 MUTE TEXT 2 MUTE TEXT 3 MUTE TEXT 4...

Страница 35: ...til CHANNEL UP or CHANNEL DOWN appears on the upper right corner of the screen About 3 seconds 4 To turn TV off press and hold the TV button until POWER OFF appears on the upper right corner of the display About 5 seconds 3 Button 1 Press the TV button to turn the set on or off 2 Press the UP button to change the channel to the next higher programmed channel 3 Press the DOWN button to change to th...

Страница 36: ...ailable for Curbell Electronics Gen 3 and Gen 4 pillow speakers and Anacom MedTek for use with both IPTV and an HCI DVD player When the TV input source is set for IPTV the pillow speaker buttons are interpreted as IPTV commands and when the input source is set for HDMI Component or A V the pillow speaker buttons are interpreted as DVD commands SD DVD switched the DVD player between the front panel...

Страница 37: ...uple of minutes Screen will show data transfer 8 Repeat steps 2 9 to load additional flash drives You may also use a PC to copy the data file to other USB Flash Drives LOADING DATA 1 Turn set on 2 Insert a USB Flash Drive that contains a clone file in the root directory into any USB port The left side port is usually easiest to access There are also USB ports on the left and right sides of the rea...

Страница 38: ...video on demand content from MediaCare servers Allows control of TV monitoring sending messages and reporting of TV activity 3 ThinClient Remote desktop for a ThinClient server to run PC applications Usually used for Internet access 4 Innova TV E Commerce capabilities revenue generating Video on Demand education service Patient Portal recovery surveys and access to hospital services and informatio...

Страница 39: ...TV Can not be changed Hard Disk Utility Hard Disk Checks and formats the hard disk for use in the TV Selections are Utility Check File System Format Hard Disk Check File System Checks to see if the hard drive is properly formatted Format Hard Disk Formats the hard drive WARNING Formatting the hard drive will result in all data stored on the hard drive being lost Hard drive should be formatted only...

Страница 40: ...d when remote desktop is selected Username User name automatically entered when Auto Login is enabled Determined by static IP address Password Password automatically entered when Auto Login is enabled Determined by static IP address Home Page Settings Home Page Setup allows the home page button to be enabled or disabled Disabled buttons will not be visible on the IPTV home page screen See the Medi...

Страница 41: ...n the MediaCare server If an internal hard drive is used then the Audio folder will be on the hard drive If a MediaCare system is not available or a hard drive is not installed this button should be disabled Folder names are case sensitive Auto Play Green Button This is a multi function button Selections are AV Green Disable AV Displays AV button Switches set to AV input OR Green Plays the file na...

Страница 42: ...ximately 30 seconds Automatic Buttons The following buttons will appear automatically when other devices or servers are connected to the set or found on the TV network USB Will appear when a USB flash drive is inserted in any of the USB ports on the set Prescribed Lists images and videos found in the Prescribed folder for this set on a MediaCare server Media Set must be connected to a MediaCare se...

Страница 43: ...up If setup is pressed press the ENTER button to remove the TV setup menu from the screen The IPTV setup menu will appear 4 Press the right arrow button 5 IP MODE should be set to Manual Change to manual if it is not 6 Arrow down to IP Address press the ENTER button and enter the assigned IP address for this set Press the ENTER button when finished 7 Press the down arrow button to select Subnet Ma...

Страница 44: ...us button on the IR remote when no media is playing or displayed will display the status of the hard drive if installed Drive size free space and used space will be displayed 8 Pressing the status button when media is being played or viewed will display file information of the current selection File name file size elapsed time how long it has been playing Length and repeat mode will be displayed C...

Страница 45: ...ress the ENTER button 4 Select the USB device USB devices are numbered according to the order they were plugged in to the TV Press the ENTER button 5 Select the file to be copied to the hard drive Press the yellow PAUSE button 6 Select Yes and press the enter button The file will be copied to the hard drive 7 When copy is finished FINISH will be selected in the copy window Press the ENTER button N...

Страница 46: ...n in the MY Network Places with the IP address name and open a connection to the TV 10 A window will open asking for a user name and password For early versions of software enter user name hciadmin and password ftphciadmin For later versions of software enter user name hci and password 1981 If you want windows to remember the password for this connection click on the Save password box to check it ...

Страница 47: ... B Turn TV on and change to IPTV mode C Open the My Network Places folder D Open the folder named with the IP address of the TV you wish to access E Enter user name and password Current software User Name hci and Password 1981 For older versions of software User Name hciadmin and Password ftphciadmin F You can create and Delete folders and transfer files to and from the hard drive and delete files...

Страница 48: ...set You may create folders and drag content files to the hdd folder DO NOT STORE FILES OR CREATE FOLDERS IN THE bin FOLDER m When finished transferring content close the ftp window and disconnect the Cat5e cables n Repeat this for all TV s you wish to transfer content to Note If your TV s are not connected to a network you can set all the IP address s the same and use the same network folder for a...

Страница 49: ...l be created in the root directory For proper operation the Video Audio and Picture folders MUST be in the root directory 6 To copy files to the Education folder you must use an FTP connection See pages 45 48 You must create and Education folder in the root directory if one does not already exist The Education folder must be in the root directory of the hard drive NOTE To protect copyrighted mater...

Страница 50: ... GEN II OPERATIONS MANUAL HealthCare Information LLC 50 ROOMMATE SERIES SETUP MENU TREE ...

Страница 51: ...D Suggestive Dialogue or Drama TV 14 Content may not be suitable for children under the age of 14 V Intense Violence S Moderate Sexual Situations L Coarse Language D Highly Suggestive Dialogue TV MA Content intended for mature audiences only Canadian Ratings C Content suitable for children under 8 years of age No profanity or sexual content Minimal comedic violence C8 Content suitable for children...

Страница 52: ...E Exempt programming No rating will appear on screen Setup 1 Enter the setup menu See page 17 2 Go to the ADVANCE MENU and select PARENT CONTROL Press the right arrow button 3 Enter password Default password is 0000 4 Select CHANGE PASSWORD if you wish to change the password Follow the on screen prompts to change the password 5 Select V CHIP and set to ON Use the right arrow button to change 6 Sel...

Страница 53: ...on you wish to change Not all buttons can be changed See diagram for button locations Later version keypads may be labeled differently but the location is the same 3 Use the right and left arrow button to change the function 4 Repeat steps 2 and 3 for all buttons you wish to change 5 Press the ENTER button when finished MODELS WITH FRONT PANEL KEYPAD MODELS WITH SIDE PANLE KEYPAD ONLY NOTE Keypad ...

Страница 54: ...channel and this information is not available on screen The second type of digital broadcast is used by cable companies This is called QAM QAM channels are identified by major channel number and sub channel number just like ATSC broadcasts but QAM channel may have more than one major channel and corresponding sub channels QAM channels can also contain 10 or more digital channels There are two type...

Страница 55: ...nd down arrow buttons to select the channel you wish to change 5 Use the right and left arrow buttons to select which bank you wish to change 6 Press the B button to toggle the channels status A check mark indicates active and a box indicates inactive 7 Repeat steps 3 5 for all channels you wish to change 8 To copy a bank use the left and right arrow keys to select the bank you wish to copy from T...

Страница 56: ...els that were not found during the AUTO SCAN process UNIVERSAL REMOTE OPERATION IR Bands 3 and 4 are for Universal Remote operation Band 3 is for Magnavox codes Band 4 is for Apex codes Both of these codes are common to most universal remotes Follow the instructions for your universal remote to set the remote for one of these codes Not all function may be available on all universal remotes The fol...

Страница 57: ...ealthCare Information LLC 57 DVD PLAYER ACCESSORIES ALL AXIS MOUNT FULL SWING WALL MOUNT TABLE MOUNTS VISITOR STATION DUAL PILLOW SPEAKER INTERFACE HARD DRIVE CEILING MOUNT DVD MOUNTS MEMORY MODULE KEYBOARDS AND MICE PIPE MOUNTS ...

Страница 58: ... GEN II OPERATIONS MANUAL HealthCare Information LLC 58 SPECIFICATIONS DIMENSIONS RM20II ...

Страница 59: ... GEN II OPERATIONS MANUAL HealthCare Information LLC 59 DIMENSIONS RM22II ...

Страница 60: ... GEN II OPERATIONS MANUAL HealthCare Information LLC 60 DIMENSIONS RM26II ...

Страница 61: ... GEN II OPERATIONS MANUAL HealthCare Information LLC 61 DIMENSIONS RM32II ...

Страница 62: ... GEN II OPERATIONS MANUAL HealthCare Information LLC 62 DIMENSIONS RM42II ...

Страница 63: ... GEN II OPERATIONS MANUAL HealthCare Information LLC 63 DIMENSIONS RM52II ...

Страница 64: ... GEN II OPERATIONS MANUAL HealthCare Information LLC 64 GENERAL SPECIFICATIONS ...

Страница 65: ... GEN II OPERATIONS MANUAL HealthCare Information LLC 65 ...

Страница 66: ... service notification must be given to the dealer the product was purchased through within at least 10 days after defect is first observed Repair of product requires it to be shipped to HCI in Loveland Ohio All shipping and freight charges to HCI shall be paid for by the customer and will not be accepted without a Return Authorization Number RA The dealer can provide you information on how to obta...

Страница 67: ......

Страница 68: ...HealthCare Information LLC 113 Commerce Blvd Loveland OH 45140 800 783 8105 www hci tv com Copyright 2009 HealthCare information LLC ...

Отзывы: