


OPERATION
13
1739579
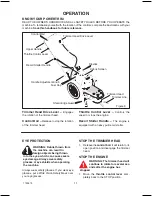
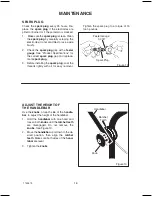
START THE ENGINE
NOTE: DO NOT BE ALARMED, your engine
will smoke the first time it is started. It is
burning off the protective coating that is on
the internal engine parts.
WARNING: Never leave the ma-
chine unattended while the en-
gine is running. Wait for the trim-
mer lines to stop rotation.
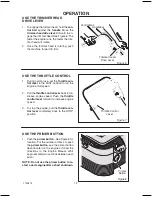
1. Before each use, remove debris from the
debris screen
shown in Figure 5. Debris
can cause the engine to overheat. Wipe
the
debris screen
with a cloth or paper
towel.
2. Move the throttle control lever forward to
the START or FAST position.
3. To start a cold engine, push the primer but-
ton five times. Wait two seconds between
each push of the primer button.
NOTE: Do not use the primer to start a
warm engine.
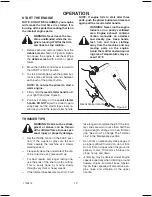
4. Firmly hold the
recoil starter handle
with
your right hand. See Figure 9.
5. Pull back sharply on the
recoil starter
handle
.
DO NOT
allow the starter rope to
snap back. Let the starter rope slowly re-
wind as you hold the recoil starter handle.
NOTE: If engine fails to start after three
pulls, push the primer button two times and
again pull the recoil starter handle.
WARNING: Never run the engine
indoors or in a poorly ventilated
area. Engine exhaust contains
carbon monoxide, an odorless
and deadly gas. Keep hands,
feet, hair and loose clothing
away from the machine and any
moving parts on the engine.
Avoid the muffler and surround-
ing areas. Temperatures may ex-
ceed 150 F.
Figure 9
Recoil Starter Handle
TRIMMER TIPS
WARNING: Debris such as sticks,
gravel or stones, can be thrown
with sufficient force to cause per-
sonal injury or property damage.
Set the throttle control in the FAST posi-
tion. If the weeds or grass are tall and
thick, operate the machine at a slower
walking speed.
Frequently clean the underside of the ma-
chine to remove any grass build up.
For best results and longer lasting line,
use the ends of the line to do the cutting.
This is easily done by moving slowly
through very thick or heavy weeds.
If the trimmer lines become too short, it will
take longer to complete the job. If the trim-
mer lines are worn to less than half their
original length, change to a new trimmer
line. “See How To Change The Trimmer
Line” in the Maintenance section.
Do not trim on excessively steep slopes. If
a slope is difficult to stand on, do not trim.
Do not trim on slopes when the ground is
slippery or wet. Trim across the face of a
slope, not up and down.
Trimming may be done at slower engine
speeds especially when trimming around
flowers, shrubs, and small trees. Operat-
ing at slower speeds will also reduce en-
gine noise and vibration at the upper
handle.