03/20
Model H1001.8/H1001.8HPS
Page 4 of 7
IN
STALLATION PROCEDURE…
STEP 5:
Remove slip joint nuts from bottom of fountain waste outlet. Assemble nut over 1-
1/4” O. D. end of waste elbow as supplied by Haws. Assemble waste elbow onto
bowl waste body using seal washer provided and tighten nut hand tight. Measure
vertical distance down to trap inlet and cut the vertical (not supplied) elbow to length
allowing 1/2” minimum for engagement into trap. Mark and similarly cut to length the
horizontal waste elbow. Install elbow and tighten all the slip joint nuts.
STEP 6:
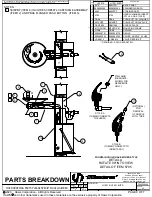
See Figure 2 for detail section view of side screw grille attachment. Unpack grille and
insert upper lip behind bottom of back panel, align sides and hold up flush to bottom
of back panel. Hold grille against wall and mark centers of grille side slots on wall.
Masking ta
pe may be used to prevent finished wall damage from mark. Install the “s”
clips in mounting frame using #10 sheet metal screws into pre-drilled holes on lower
end of each side of frame. Tighten #10 screw while holding “s” clips centered on wall
marks. Check grille fit by installing grille and partially tightening #6-23 socket head
screws through side of grille. Insure proper panel and grille alignment, then tighten
four 5/16-18x1 hex head screws.
STEP 7:
Unpack and remove chiller from carton. Remove front panel screws and panel. Do
not remove insulating putty and foam from copper tubes or Styrofoam insulation from
evaporator coil. Remove any inner packing, which may be around compressor. If
applicable, remove junction box cover and electrical knock out on lower right side of
housing. Install fittings (supplied) on chiller inlet and outlet tubes (See Installation
Drawing).
STEP 8
:
Thoroughly flush supply line to remove all foreign matter. Connect 1/2” IPS supply
screwdriver stop (not supplied) to stub-out in wall. Place chiller on chiller support tray
against right hand side, fully to rear, with condenser (open panel) side facing to front.
Install supply, 3/8” O.D. tubing (not supplied), between screwdriver stop (not
supplied) and strainer at chiller inlet. (Cut tubing to proper length, and follow general
notes for proper connection procedure for push-in style fittings). Tubing insulation is
not normally required on inlet side of chiller. Install insulated tube (supplied) between
fountain and chiller outlet. Cut tubes as required and connect to chiller outlet
compression fitting. Open screwdriver stop wide open while checking for leaks at all
connections. Also check waste for leaks.
STEP 9
: Adjust bubbler stream height using a small flat-head screwdriver inserted through a
hole in the center of the push button. For increased flow turn clockwise and for
decreased flow turn counterclockwise. If flow problems arise, see troubleshooting
guide for additional instructions to correct problems. Bubbler stream may lower
during short break-in period. Set initial stream height a little high to minimize or
eliminate the need for break-in period readjustment.
STEP 10:
Verify that electrical power is off and power supply voltage, phase and cycle match
specifications printed on chiller label. In accordance with local codes, wire directly to
incoming lines at internal chiller junction box. Verify that all inner packing is removed
and hand rotate fan blade to verify free rotation. Reattach chiller front panel. Turn
power on and verify that chiller cycles off after water reaches proper temperature.
Finally check for leaks.


