background image


16 

your_computer_name” will be shown, as the following figure. 


G.


Now, the installation program will detect the USB device and continue to 
install driver. 

H.


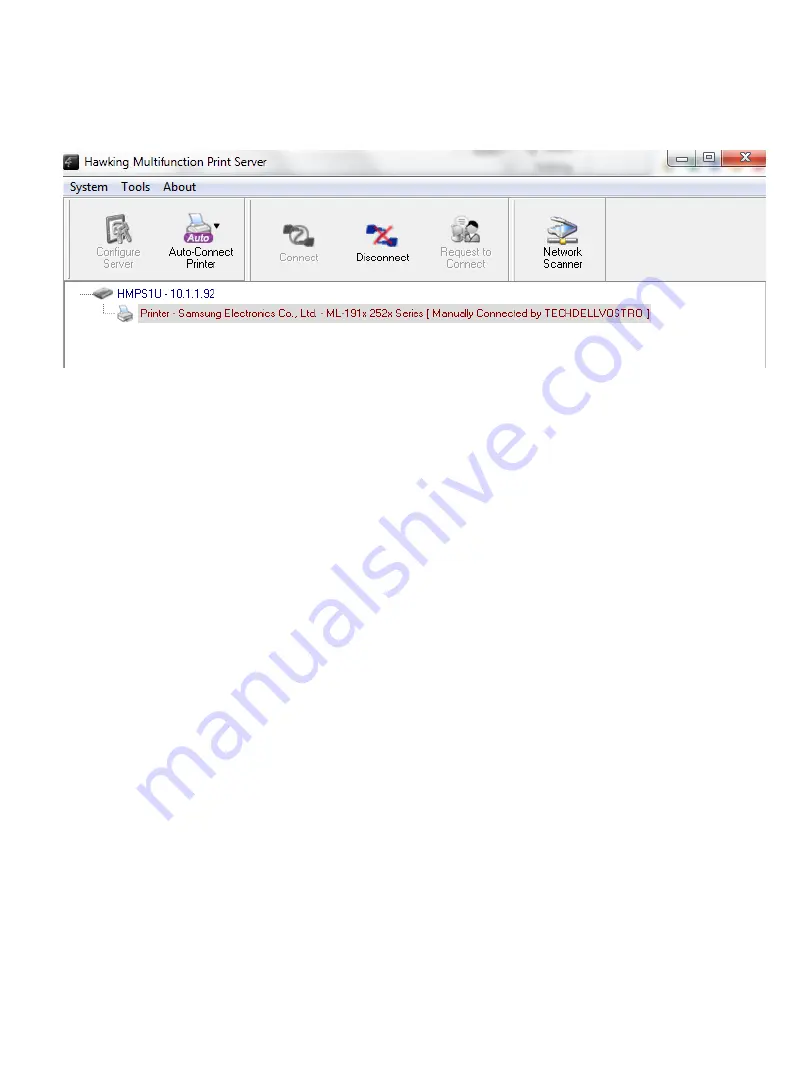
After the installation is completed, click the USB device in the HMPS1u 
Software and then click the “Disconnect” button to disconnect the USB 
device. 

 
Now the driver of your USB device is installed. 


Содержание HMPS1U

Страница 1: ...website www hawkingtech com e mail techsupport hawkingtech com COPYRIGHT 2015 HAWKING TECHNOLOGIES INC ALL RIGHTS RESERVED USER S MANUAL HMPS1U 1 PORT USB PRINT SERVER for MULTI FUNCTION PRINTERS ...

Страница 2: ...issue any refunds BE SURE TO HAVE YOUR PROOF OF PURCHASE RETURN REQUESTS CAN NOT BE PROCESSED WITHOUT PROOF OF PURCHASE When returning a product mark the Return Authorization number clearly on the outside of the package and include your original proof of purchase IN NO EVENT SHALL HAWKING TECHNOLOGY S LIABILTY EXCEED THE PRICE PAID FOR THE PRODUCT FROM DIRECT INDIRECT SPECIAL INCIDENTAL OR CONSEQU...

Страница 3: ...e receiving antenna 2 Increase the separation between the equipment and receiver 3 Connect the equipment into an outlet on a circuit different from that to which the receiver is connected 4 Consult the dealer or an experienced radio technician for help FCC Caution This equipment must be installed and operated in accordance with provided instructions and a minimum 20 cm spacing must be provided bet...

Страница 4: ...he directive 98 13 EEC Telecommunications Terminal Equipment and Satellite Earth Station Equipment As of April 8 2000 Safety This equipment is designed with the utmost care for the safety of those who install and use it However special attention must be paid to the dangers of electric shock and static electricity when working with electrical equipment All guidelines of this and of the computer man...

Страница 5: ...mes and Server Name Rules 10 3 2 5 Setting the IP Address Using DHCP 10 3 2 6 Setting the IP Address Using the HMPS1u Software 10 CHAPTER4 USING THE HMPS1U 14 4 1 Introduction 14 4 2 Connect Disconnect 14 4 3 Subnet Issue 14 4 4 Installation of a Printer Multifunction Printer Scanner 15 4 5 Auto Connect Printer 17 4 6 Network Scanner 19 4 7 USB Storage 21 4 8 Request to Connect 22 4 9 Quitting the...

Страница 6: ... 6 2 Firewall 31 CHAPTER7 RESTORE FACTORY DEFAULTS 32 7 1 Using the Server s Web Pages 32 7 2 Using Init Button 32 7 3 Default Parameters List 33 CHAPTER8 UPGRADE FIRMWARE 34 CHAPTER9 THE INIT BUTTON 36 ...

Страница 7: ...to set up and manage the HMPS1u in various network environments To fully benefit from this document you should be familiar with basic networking principles The instructions described in this manual are based on the settings in a new Server To reload the Factory Parameters you can reset this Server back to Factory Default which will restore most of the settings For details please refer to the chapt...

Страница 8: ...nserted You can also navigate to the CD and start the autorun exe file from within the Windows file manager 2 3 Physical Description 1 Power Adaptor Connector for DC IN 5V 1A power adaptor 2 Init Button for restoring the parameters to the default values 3 Ethernet Connector connected to a twisted pair category 5 cable 4 USB Host Ports USB 1 1 2 0 low full and Hi Speed compliant 5 Indicators Power ...

Страница 9: ...Port of this Server If it is not lit or if it blinks there is a problem with the USB device or this Server 2 4 Supported USB Devices The HMPS1u supports the following types of USB devices USB Printer USB multifunction printer MFP AIO USB scanner USB storage like USB external HD flash disk and digital camera ...

Страница 10: ...Server is correctly connected to the network When the USB indicator stops flashing the Server starts to work normally 3 2 Assigning an IP Address to the Server 3 2 1 Preliminary If you have a DHCP server on your network your Server will receive an IP address automatically The IP address will then appear on the setup software when it detects your print server If your DHCP server does not give an IP...

Страница 11: ...ing DHCP Follow the instructions below to get an IP address using DHCP 1 Edit or create a scope in the DHCP manager of the DHCP daemon The entries included in this scope should contain the following parameters range of IP addresses subnet mask default router IP address DNS server IP address lease duration 2 Activate the scope The Server automatically gets the DHCP parameters If you are using DNS y...

Страница 12: ...our local area network you will have to select one Server from the Server List 4 Double click the highlighted server or click the Configure Server button This will open a web browser showing the web interface of the HMPS1u Click the CONFIG button ...

Страница 13: ...12 5 Login with administrator ID default admin and its password default admin ...

Страница 14: ...s static or dynamic using DHCP When assigning a static IP address you also have to define Subnet Mask The default IP of the HMPS1u is 192 168 1 100 7 Click Submit to save your settings And the Server will reboot You have now finished the procedure of setting the IP address ...

Страница 15: ...connect operation is a software operation that simulates the disconnection of the USB device Once the connect operation is successful the operations to use that USB device are just the same as if the USB device is directly connected to the PC If a USB device is connected by a PC we say that PC has the ownership of the USB device Only one PC can get the ownership of a USB device at the same time Th...

Страница 16: ...nter s CDROM A Insert the printer s CDROM into the CD drive and run the install program B Follow the instructions of the installation program to install driver C When the installation program asks you to plug in the USB device run the Hawking Print Server software D In the Hawking Print Server software select the HMPS1u that has the desired USB device attached E Click the desired USB device as the...

Страница 17: ...nstallation program will detect the USB device and continue to install driver H After the installation is completed click the USB device in the HMPS1u Software and then click the Disconnect button to disconnect the USB device Now the driver of your USB device is installed ...

Страница 18: ... connect so users don t need to manually connect disconnect This and the next sections show you how to do this After the driver is installed as described in section 4 4 you can see a newly created printer in the setup software s Printers and Faxes Follow the steps below to do a NetUSB auto connect printing A In the HMPS1u software click the USB device server that has the desired printer or MFP att...

Страница 19: ... on the USB device server this is a physical printer Then click the Apply button E The printer will then be marked as an Auto Connected Printer in red If you choose Auto Connected Printer List in the Tools menu you can see a newly created item that describes the association between the Windows printer and the physical printer on the server ...

Страница 20: ...to Windows In order to skip this manual operation you can make the HMPS1u run automatically after you login Windows To do this choose the Configuration item in the Tools menu The following window will appear Click on the check box and then on the OK button This feature is enabled by default If you would like to break the association between the Windows printer and the physical printer just click o...

Страница 21: ...ed MFP or scanner attached B Click the desired MFP or scanner C Click the Network Scanner button Then you can see that the HMPS1u will automatically do a connect operation The following window will appear D Choose one of TWAIN or WIA item Click OK The following window will appear ...

Страница 22: ... usual steps to do scanning F After the scanning close the Auto Connect Scanner window 4 7 USB Storage You must use manually connect for USB storage If the USB storage is a flash drive the new disk is a removable disk ...

Страница 23: ...ure Then in the HMPS1u software click the USB storage device and click the Disconnect button to disconnect the USB storage device 4 8 Request to Connect If a USB device is manually connected by another user on the network you cannot use the device until they disconnect We offer a mechanism to notify the other user It is called Request to Connect The user on one computer can click the Request to Co...

Страница 24: ...tically connect 4 9 Quitting the HMPS1u Setup Software The HMPS1u setup software doesn t really quit if you click the X box close box at the top right corner of the window Instead it just minimizes itself to the system tray There are two ways to really close the software The first way is choosing Exit item in the File menu in the software The second way is right clicking the icon of the software i...

Страница 25: ...ations There are some limitations to use the NetUSB technology A Only supports Windows 2000 XP 2003 Vista 7 Windows 98 ME are not supported B Only one PC can get the ownership of the same USB device at the same time ...

Страница 26: ...e HMPS1u s software and clicking configure or by directly typing in the IP address of the device into your web browser 5 2 Using the Server s Web Pages 5 2 1 Displaying Server Status Click on the STATUS icon to see system status and network status System Status Firmware Version the current version of the firmware of the device Model Name the model name of the product Mac Address the machine addres...

Страница 27: ...u Storage Access Mode which storage mode the HMPS1u is in IP Address the current IP address of the HMPS1u Subnet Mask the current subnet mask of the HMPS1u DHCP Server the gateway of the HMPS1u Lease time if using DHCP how long the IP address has been assigned ...

Страница 28: ...d default admin to login General Server Information You have to set the Server Name which is the name to represent the Server Server Name The network name of the HMPS1u Workgroup The workgroup name of the HMPS1u Description This is an optional setting so you can put in a description of the device for your network settings Storage Access Mode allows for the USB hard drive configuration ...

Страница 29: ...P IP network Please see Chapter 3 2 for more details UPnP Setting Enable or disable the UPnP function Administrator You can change administrator name and password If you forgot administrator name and password you must perform Restore Factory Default action by plugging in the power adaptor while pressing the Init button Please refer to the chapter Restore Factory Defaults Administrator enter your d...

Страница 30: ...ware you can use the Maintenance tool Restart click this button to restart reboot the Server Factory Default click this button the Server will restore factory default values Firmware Upgrade click Browse to find the firmware file to be upgraded Click Upload to upload the firmware into the Server ...

Страница 31: ...30 ...

Страница 32: ...ower On Off Power off System error Link On Network connected Off No physical connection to network Status Blinking Activity on network Off No activity on network USB On USB device connected Blinking Connected USB device error Off No physical connection to USB device 6 2 Firewall If firewall software has been installed on your PC it may block the communication between the PC and the HMPS1u so that ...

Страница 33: ...s 1 Go to the Server s web page and click CONFIG 2 Enter administrator default admin and password default admin 3 Click Maintenance 4 Click Factory Default 5 Click Yes to confirm 7 2 Using Init Button Plug in the power adaptor while pressing the Init button until the USB indicators blink After that plug off the power adaptor and then plug in the ...

Страница 34: ...operate using the Factory Default values 7 3 Default Parameters List General Information Server Name HMPS1u TCP IP Automatically get IP by DHCP Enabled Static IP Disabled IP Address 192 168 1 100 Subnet Mask 255 255 255 0 User Accounts Administrator admin Password admin ...

Страница 35: ...e Double click the selected Server to get into the HMPS1u s web page Check the system status page to make sure you need an upgrade 4 Click CONFIG icon 5 Login the Server with Administrator default admin and Password default admin 6 Click Maintenance 7 Click Upgrade Firmware 8 Click Browse button to choose the file of new firmware 9 Click Upload button to start firmware upgrade 10 Wait for 20 secon...

Страница 36: ...pen your new firmware Please note that you must configure your PC s TCP IP such that PC and the HMPS1u belong to the same LAN i e PC s IP is 192 168 1 xxx and subnet mask is 255 255 255 0 4 Click Upload Image 5 Wait for Image Uploading to finish and then click Close 6 Unplug the power adapter and then plug in the power adapter to restart the HMPS1u ...

Страница 37: ...usly blink After that the HMPS1u will do the following tasks A Perform a Factory Default restoration of the HMPS1u which will restore most of the parameters and settings to factory default values B Perform a TFTP server You can upgrade new firmware using any TFTP client tool Note After performing the tasks mentioned above you have unplug and then plug in the HMPS1u so it will complete the task ...

Отзывы: