OPERATION
Form No. SRM-0608
7
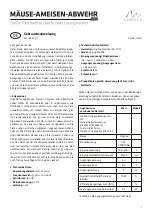
Digital Temperature
Controller
LIGHTS
Control Knob
Power ON/OFF
Switch
Figure 13. SRBW-1 and SRGBW-1 Control Panel
NOTE: The digital temperature controller is pre-set
to a setpoint temperature of 190°F (88°C) at
the factory. Once the setpoint temperature is
changed, the new setpoint temperature will
remain in memory until it is changed again.
The Serv-Rite
™
heated shelf has a
maximum setpoint temperature of 240°F
(116°C).
4. For SRBW-1 and SRGBW-1 models; turn on the
overhead heat lamps and adjust to the desired
temperature setting.
a. Turn the LIGHTS control knob clockwise out of
the “off” position.
b. Adjust the temperature of the overhead heat
lamps. Turning the LIGHTS control knob
clockwise will increase the temperature and
light intensity. Turning the LIGHTS control
knob counterclockwise will decrease the
temperature and light intensity.
NOTE: For SRGBW-1 models; heat generated by
the overhead heat lamps is absorbed by the
glass surface of the heated shelf during the
preheat cycle. This causes the temperature
shown on the display to rise past the setpoint
temperature. The display will return gradually
to the setpoint temperature once a pan or
food product is placed on the glass surface.
5. Allow the unit 30 minutes to reach operating
temperature before placing preheated food
product.
Shutdown
1. Move the Power ON/OFF switch to the OFF
position. The digital temperature controller,
heated shelf, and overhead heat lamps
(SRBW-1 and SRGBW-1 models only) will shut
off.
NOTE: For SRBW-1 and SRGBW-1 models, if the
overhead heat lamps are left on when the
Power ON/OFF switch is moved to the OFF
position, they will shut off as well. The lamps
will turn on immediately the next time the
Power ON/OFF switch is moved to the ON
position.
3. Unplug the power cord and allow the unit to cool
before performing any cleaning or maintenance.
Changing the Setpoint Temperature
Use the following procedure to change the setpoint
temperature of the heated shelf.
1. Press and release the SET key. The current
setpoint temperature will be shown on the display
and ”out 1” will flash in the upper left corner.
2. Press the Up Arrow key or Down Arrow key
within 15 seconds to change the setpoint
temperature. If no key is pressed within 15
seconds, the display will revert to the current
temperature of the heated shelf
3. Press the SET key or wait 15 seconds to lock in
the new setpoint temperature.
Locking/Unlocking the Digital
Temperature Controller
The keys on the digital temperature controller can be
locked to prevent unauthorized changes to the
settings.
To lock the keys of the digital temperature controller:
• Press and hold both the SET key and Down Arrow
key at the same time for over two seconds. The
message “Loc” will appear on the display.
To unlock the keys of the digital temperature
controller:
• Press and hold both the SET key and Down
Arrow key at the same time until the message
“UnL” appears on the display.
Содержание Serv-Rite SRB-1
Страница 15: ...NOTES 13 Form No SRM 0608...