background image

Form No. FSHC7WM-0121

8

English

INSTALLATION

  6.  Place the reservoir cover over the built-in water reservoir.
  7.  Place the unit in the desired location. 
 

•  Locate the unit in an area where the ambient air 

temperature is constant and a minimum of 70°F 

(21°C). Avoid areas that may be subject to active air 

movements or currents (i.e., near exhaust fans/hoods 

and air conditioning ducts).


•  Make sure the unit is located on solid, level flooring.


•  Make sure the unit is at the proper height in an area 

convenient for use.

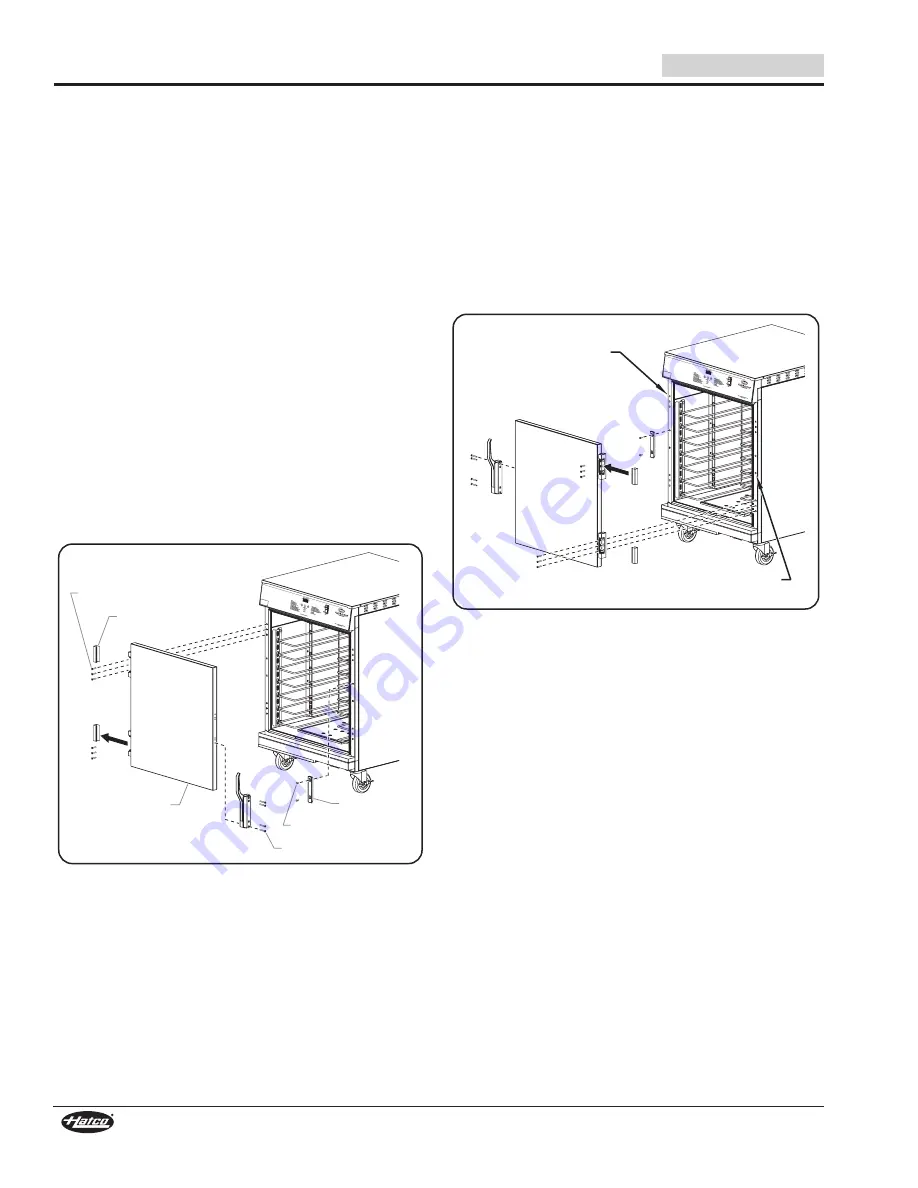
Reversing the Access Door

The access door is field reversible to allow it to be hinged on 

either the right or left side. Use the following procedure to 

reverse the door.
  1.  Remove the four handle screws securing the handle to the 

door. Remove the handle.

  2.  Slide the hinge covers off of the door hinges.
  3.  At each door hinge, remove the three hinge screws that 

secure the hinges to the cabinet frame. Remove the 

access door.

NOTE: The hinges remain mounted to the access door.

  4.  Transfer the screw plugs from the hinge screw holes on 

the opposite side of the cabinet to the open holes where 

the hinges were just removed.

Strike Plate Screw

Strike Plate

Hinge Cover

Hinge Screw

Access Door

Handle Screw

Removing the Access Door (FSHC-7W1-EE shown)

  5.  Remove the two strike plate screws that secure the strike 

plate to the cabinet.

  6.  Transfer the screw plugs from the strike plate holes on the 

opposite side of the cabinet to the open holes where the 

strike plate was just removed.

  7.  Install the strike plate on the opposite side of the cabinet 

using the original hardware.

  8.  Rotate the door 180° and install on the opposite side of 

cabinet using the original hardware.

  9.  Install the handle to the door in the upright position using 

the original hardware.

 10.  Slide the hinge covers back into place on the door hinges.

Hinge screw plugs

moved to these holes

(top and bottom).

Strike plate screw plugs

moved to these holes.

Reversing and Installing the Access Door (FSHC-7W1-EE shown)

Содержание FLAV-R-SAVOR FSHC-5W Series

Страница 1: ...ste equipo al menos que haya le do y comprendido el contenido de este manual Cualquier falla en el seguimiento de las instrucciones contenidas en este manual puede resultar en un serio lesi n o muerte...

Страница 2: ...safety instructions appearing in this manual be read prior to installation or operation of the unit Important Owner Information 2 Introduction 2 Important Safety Information 3 Model Description 4 Mod...

Страница 3: ...and install proper voltage and size electrical receptacle Turn OFF power switch unplug power cord and allow unit to cool before performing any cleaning adjustments or maintenance DO NOT submerge or sa...

Страница 4: ...that earn the ENERGY STAR prevent greenhouse gas emissions by meeting strict energy efficiency guidelines set by the U S Environmental Protection Agency and the U S Department of Energy NOTE Units eq...

Страница 5: ...212 lbs 96 kg 220 1081 4 9 50 60 CEE 7 7 Schuko AS 3112 or BS 1363 212 lbs 96 kg 230 1182 5 1 240 1287 5 4 FSHC 5W1 EE Non Humidified 120 818 6 8 60 NEMA 5 15P 212 lbs 96 kg 220 807 3 7 50 60 CEE 7 7...

Страница 6: ...FSHC 5W Series 20 15 16 W x 26 5 8 D x 18 3 16 H 532 x 678 x 462 mm FSHC 7W Series 20 15 16 W x 26 5 8 D x 21 3 16 H 532 x 678 x 538 mm Dimensions A B C Front View Side View FSHC 5W1 EE Dimensions If...

Страница 7: ...4 102 mm casters onto the bottom of the cabinet A low profile caster option is available for the FSHC 5W series use the same procedure below to install NOTICE Do not lay unit on side with control pan...

Страница 8: ...cabinet frame Remove the access door NOTE The hinges remain mounted to the access door 4 Transfer the screw plugs from the hinge screw holes on the opposite side of the cabinet to the open holes wher...

Страница 9: ...Overfilling can cause water to leak onto floor and create a slipping hazard NOTE The capacity of the water reservoir is approximately four 4 quarts 3 8 liters 3 Move the POWER ON OFF I O switch to the...

Страница 10: ...consistency The CABINET TEMPERATURE display shows the lowest temperature point inside the cabinet not the product temperature Setting the Humidity Level Use the following procedure to set the humidit...

Страница 11: ...on 4 Wipe down all the interior and the exterior surfaces using a clean damp cloth Stubborn stains may be removed with a good non abrasive cleaner Hard to reach areas should be cleaned with a small br...

Страница 12: ...section 3 Remove the reservoir cover 4 Fill the water reservoir with a mixture of 75 water and 25 white vinegar Do not use flavored vinegar 5 Replace the reservoir cover 6 Plug in and turn on the uni...

Страница 13: ...rvoir is empty Fill water reservoir with clean water Humidity is set too low Increase humidity level Refer to Setting the Humidity Level in the OPERATION section Water element defective Contact Author...

Страница 14: ...procedure in either the INSTALLATION section or the OPTIONS AND ACCESSORIES section 2 Remove the pan slides and reservoir cover from inside each cabinet and drain the water reservoirs if necessary 3...

Страница 15: ...ional Sanitation Foundation silicone sealant 9 Replace the pan slides and reservoir cover inside the cabinet Bumper Assembly A bumper assembly option is available for installation on the bottom of a u...

Страница 16: ...Warmer Elements metal sheathed Drawer Warmer Drawer Rollers and Slides Food Warmer Elements metal sheathed Display Warmer Elements metal sheathed air heating Holding Cabinet Elements metal sheathed ai...

Страница 17: ...nt t s lectionn s pour une durabilit maximale un aspect esth tique et une performance optimale Chaque appareil est soigneusement inspect et test avant exp dition Informations Importantes pour le Propr...

Страница 18: ...e tension de format et de configuration des broches corrects Si la fiche et la prise ne se correspondent pas s adresser un lectricien qualifi pour d terminer et installer une prise de courant de forma...

Страница 19: ...s ayant le label ENERGY STAR emp chent l mission des gaz effet de serre et r pondent aux r gles strictes en mati re d efficacit nerg tiques fix es par l Agence de protection de l environnement des tat...

Страница 20: ...232 lbs 230 1182 5 1 240 1287 5 4 FSHC 7W2 EE Non humidifi 120 818 6 8 60 NEMA 5 15P 105 kg 232 lbs 220 807 3 7 50 60 CEE 7 7 Schuko AS 3112 or BS 1363 105 kg 232 lbs 230 882 3 8 240 960 4 0 CARACT RI...

Страница 21: ...8 3 16 H 532 x 678 x 462 mm FSHC 7W S rie 20 15 16 W x 26 5 8 D x 21 3 16 H 532 x 678 x 538 mm CARACT RISTIQUES TECHNIQUES A B C Vue de face Vue de c t Dimensions du mod le FSHC 5W1 EE A B C Vue de fa...

Страница 22: ...ails 3 Retirer le ruban et le film de protection de toutes les surfaces de l appareil NOTA S il est n cessaire d installer des pieds de 102 mm 4 ou de 152 mm 6 ou un ensemble de butoirs se reporter la...

Страница 23: ...la proc dure suivante pour inverser la porte d acc s 1 Enlever les quatre vis de la poign e qui maintiennent la poign e sur la porte Enlever la poign e 2 Faire coulisser les caches de la charni re et...

Страница 24: ...r est trop rempli de l eau risque de s couler sur le sol et d entra ner un risque de glissement NOTA La capacit du r servoir d eau est d environ 3 8 litres quatre 4 quarts 3 Placer l interrupteur de m...

Страница 25: ...rature la plus basse dans l armoire et non la temp rature de l aliment R glage du niveau d humidit Suivre la proc dure suivante pour r gler le niveau d humidit sur les appareils humidifi s 1 Appuyer s...

Страница 26: ...s br lures Cet appareil ne contient aucune pi ce r parable par l utilisateur Si cet appareil doit tre r par contactez un r parateur Hatco agr ou le Service apr s vente Hatco au 800 558 0607 ou 414 671...

Страница 27: ...proc dure Retrait des d p ts de calcaire et de min raux pour proc der au nettoyage et au d tartrage p riodiques du r servoir d eau Les dommages du produit caus s par une accumulation de calcaire ou de...

Страница 28: ...e sur un niveau trop faible Augmenter le niveau d humidit Se reporter R glage du niveau d humidit de la section FONCTIONNEMENT l ment d eau d fectueux Contactez votre agent de maintenance agr ou Hatco...

Страница 29: ...Se reporter la proc dure appropri e d crite dans la section INSTALLATION ou OPTIONS ETACCESSOIRES 2 Retirez les glissi res et le couvercle du r servoir de l int rieur de chaque armoire et videz les r...

Страница 30: ...e travail avec une p te tanch ifiante de silicone approuv e NSF National Sanitation Foundation 9 Remettez les glissi res et le couvercle du r servoir dans chaque armoire Ensemble de but e Une option d...

Страница 31: ...enveloppe m tallique l ments de pr sentation du r chaud enveloppe m tallique air chauffant l ments des armoires de stockage enveloppe m tallique air chauffant l ments de puits chauffants s ries HW HW...

Страница 32: ...3Wire Plattsburgh 800 634 5005 Duffy s AIS Sauquoit 800 836 1014 J B Brady Inc Syracuse 315 422 9271 NORTH CAROLINA Authorized Appliance Charlotte 704 377 4501 OHIO Akron Canton Comm Svc Inc Akron 330...

Отзывы: