background image

PLAYBACK BASICS

16

PLAYBACK BASICS

Normal Play

To play a disc, first make certain that the unit is prop-
erly installed. Turn the CDR 26 on by pressing the

Power Switch

1

on the front panel or the 

Power

On Button

a

on the remote and note that the

front-panel display will light.

Insert a disc following the instructions shown on the
previous page. To start the playback, press the Play
button on the front panel for the appropriate deck

Ó

or press the Select button on the remote for

the desired deck 

d`

and then press the 

Play

Button

j

on the remote. The 

Play/Pause

Indicator

O

will show a right-pointing triangle 

and the 

Information Display

Y

will show the track

number being played and the running time of the
track. As each new track begins to play, the track time
will reset to 

00

:

00

and begin to count up for the

new track.

NOTE:

Remember that unfinalized CD-R or CD-RW

discs will only play in the 

Record Deck

%

. If you

attempt to play an unfinalized disc in the 

Play Deck

3

, a 

DISC ERROR

message will appear to

remind you to play the disc in the other deck.

To go directly to a specific track on a disc, enter the
track number using the 

Numeric Keys

p

. When

selecting a two-digit track number, the second digit
must be entered within three seconds after the first
Numeric Key is pressed.

To momentarily stop the disc at any time, press the

Pause Button

Ô

w

. When a disc is paused,

the 

Play/Pause Indicator

O

will add two vertical

lines to indicate a paused disc. Press either the 

Play

Button

Ó

j

or the 

Pause Button

Ô

w

to resume playback at the point where the disc

was paused.

In normal operation, the CDR 26 will automatically
stop when all tracks on the selected disc have played
through. To stop playback at any time, press the

Stop

Button

(

v

for the deck in use.

At the end of a listening session, remove the discs
from the decks by following the instructions shown on
the previous page. Do not leave the disc drawers open
when the unit is not in use to prevent dust and dirt
from entering the unit and to prevent damage to the
disc-drawer tray.

To place the unit in the Standby mode at the end of a
listening session, press the 

Power Off Button

.

The word 

OFF

will appear briefly in the 

Information

Display

Y

, any open disc trays will automatically

close, and the 

Status Mode Indicator

2

will turn

amber.

Random Play

To play all of the tracks on a disc in random order,
press the 

Select Button

d`

for the desired

deck, and then press the 

Random Play Button

k

.

The 

Random Indicator

G

will light and each track

will be played in random order until all tracks on the
disc have been played.

Search

You may quickly scan through the contents of a disc
while listening to the playback at high speed in forward
or reverse. To move forward through a disc, press the

Forward Search Button

x

on the remote or press

and hold the 

Next Button

Ò˘

on the front panel

that is appropriate for the deck in use. To move back-
ward through a disc, press the 

Reverse Search

Button

i

on the remote, or press and hold the

Previous Button

Ú¸

on the front panel that is

appropriate for the deck in use. When using the
remote, always remember to make certain that you
have selected the deck you wish to control by press-
ing the appropriate selector button 

d`

before

entering the desired remote command.

Track Skip

To move from one track on a disc directly to another,
enter the number for the desired track with the

Numeric Keys

p

. The disc will pause briefly to

locate the track, and then immediately play it. When
entering a two-digit track number, the second digit
must be entered within three seconds of the first digit.

To move to the next track on a disc by cycling through
the individual tracks, press the 

Next Button

z

on

the remote, or the appropriate front-panel 

Next Button

Ò˘

for the deck in use. Additional presses of the

button will move forward through the tracks on the disc.

When a disc is playing, press the 

Previous Button

Ú¸f

to return to the beginning of the track

being played. Additional presses of the Previous button
will move backwards through the tracks on the disc.

When a disc is stopped, you may press the Next or
Previous button to locate a specific track that you wish
to play. When the desired track number appears at the
left side of the appropriate 

Information Display

Y

,

press the 

Play Button

Ó

j

to hear that track.

35

30

36

34

35

34

35

Содержание CDR 26

Страница 1: ...ord Power Phones Phones Level Optical In Coaxial In Analog Rec Level SyncRec Dubbing TrackInc Speed Erase Finalize TIME INPUT PROGRAM PAUSE PLAY SELECT STOP CDR 26 DUAL TRAY CD R CD RW RECORDER PLAYER OWNER S MANUAL Power for the Digital Revolution ...

Страница 2: ...rding 20 Recording From an External Source 21 Finalizing CD R and CD RW Discs 21 Unfinalizing and Erasing CD RW Discs 23 Troubleshooting Guide and Error Messages 24 Technical Specifications Typographical Conventions In order to help you use this manual with the remote control front panel controls and rear panel connections certain conventions have been used EXAMPLE bold type indicates a specific r...

Страница 3: ...yment that will result from proper use of the CDR 26 If you have additional questions about this product its installation or its operation that are not answered in this manual please contact your dealer who is your best source of local information You may also contact Harman Kardon via e mail through our Web site at www harmankardon com Special Features Dual deck CD player and CD R CD RW recorder ...

Страница 4: ...he product Make certain that proper space is provided both above and below the unit for ventilation If this product will be installed in a cabinet or other enclosed area make certain that there is sufficient air movement within the cabinet Do not place the unit directly on a carpeted surface Avoid installation in extremely hot or cold locations or an area that is exposed to direct sunlight or heat...

Страница 5: ...ion on dubbing Speed Press this button to select the recording speed for internal dubs See page 19 for more infor mation on selecting the proper speed Track Increment Press this button during recording to insert a new track marker at that point in the recording The current track number will be incremented by one Erase Press this button to erase one or more tracks or the entire contents of an unfin...

Страница 6: ...ton to select the input source analog or digital for recording See page 20 for more information on input selection Ù Record Deck Time Display Select Press this button to cycle through the time display options for the Record Deck See page 17 for more information on the time display ı Information Display The indicators in the Information Display provide status reports on the oper ation of the CDR 26...

Страница 7: ...ital source connected to one of the optical inputs is being recorded See page 20 for more infor mation on source selection C Analog Indicator This indicator lights when an analog source is being recorded See page 20 for more information on source selection D Front Panel Input Indicator This indicator lights in conjunction with the Coaxial Digital Indicator A or the Optical Digital Indicator B when...

Страница 8: ...playing in either deck 3 or S Time Indicators These indicators light in conjunc tion with one of the time indicators TUVW to show which of the time status modes is active T Remaining Time Indicators These indicators light when the Information Display Y shows the time remaining on a disc U Recorded Time Indicator While a recording is in progress and up until a CD R or CD RW disc in the Record Deck ...

Страница 9: ...igital input should only be connected to digital input or output jacks Even though it uses the same RCA type connector as standard analog audio connections DO NOT connect it to conventional analog input or output jacks Optical Digital Input This jack accepts the digi tal audio input signal from a compatible digital audio product and should be connected to the optical digital output on a CD or DVD ...

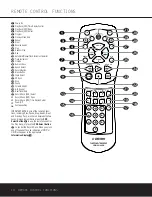
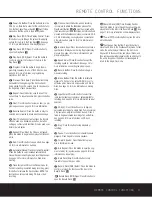
Страница 10: ...isplay Control 30 Power Off 31 Continuous Play 32 IMPORTANT NOTE Some of the remote s func tions including Play Pause Stop Search Next and Previous Track are shared between the two decks Always remember to press the CDP Select Button d to use the remote to control the Play Deck or press the CDR Select Button to control the Record Deck When you press one of these buttons an indication of CDP or CDR...

Страница 11: ...finalization process is complete CD R or CD RW discs may not be played on conventional CD machines See page 21 for more information on finalization p Numeric Keys Press these buttons to access a specific track for playback or during the programming process See page 18 for more information on pro grammed playback q Speed Select Press this button to select the recording speed for internal dubs See p...

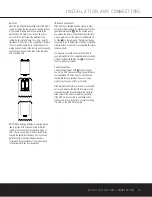
Страница 12: ...emble those of a standard tape recorder this may make it easier to select it as an input on your receiver or pre amp Connect the Analog Output Jacks to the Play In jacks of a Tape or Aux input on your receiver or preamp Connect the Analog Input Jacks to the Tape Rec Out jacks on your receiver or preamp To play the output through the digital decoder in your receiver or an external processor connect...

Страница 13: ...Remote Connections If the CDR 26 is installed behind a cabinet or other obstruction that may block the path between the front panel Remote Sensor ˆ and the location where you will use the remote an optional external IR sensor may be used Connect the sensor to the Remote IR In Jack on the rear panel This jack may also be connected to the IR Output jack of another compatible Harman Kardon component ...

Страница 14: ...they have been properly finalized in accordance with audio standard IEC958 The CDR 26 is specifically designed for the recording and playback of consumer audio discs and cannot be used to copy data discs DVDs or other optical discs used by video game systems CD R Terminology and Display Messages Compact disc recording has its own special terminology and some of the messages displayed by the CDR 26...

Страница 15: ...e front cover of the disc tray When the drawer is closed the word CLOSE will appear momentarily in the Information Display Y and the letters TOC will begin to flash in the display once the drawer is completely closed If the disc is a standard CD or a finalized CD R or CD RW disc TOC will flash while the unit reads the disc s Table of Contents information Once that data is read the Information Disp...

Страница 16: ... in the Standby mode at the end of a listening session press the Power Off Button The word OFF will appear briefly in the Information Display Y any open disc trays will automatically close and the Status Mode Indicator 2 will turn amber Random Play To play all of the tracks on a disc in random order press the Select Button d for the desired deck and then press the Random Play Button k The Random I...

Страница 17: ...ad the Information Display Y for any deck that has a CD inside will show the number of tracks on the disc in the two left digits of the display and the total running time of the disc When the disc is playing the tracks will count up as each new track is reached and time display will show the elapsed time for the track being played To view the time remaining in the track being played press the Time...

Страница 18: ...ay Deck 3 Follow the instructions on page 20 for complete information on recording and dubbing Once you have programmed a playlist it will remain in the unit s memory until the disc is removed or the unit is turned off Thus if you play through a programmed list simply press the Play Button Ó j again to replay the list To cancel an entire program list while the program is playing press the Program ...

Страница 19: ...source These copies may be made in real time at twice normal speed or at four times normal playback speed Recordings may be made from an external CD player or other digital source that is synchronized with the dub being made in the CDR 26 Recordings may be made from any compatible external digital source Recordings may be made from an external analog source You may record a compilation or mix of t...

Страница 20: ...Button 8u twice so that ALL appears in the record deck s Information Display Y The Sync Indicator E will light and the Record Indicator P will flash When the desired mode has been selected start the playback from the source machine The CDR 26 will automatically recognize the incoming digital data and begin recording If the source material is a CD the track numbering from the original disc will be ...

Страница 21: ...cation such as 1 11 The 1 11 part of the message is the start of a countdown clock that will tell you how much time is remaining in the finalization process When the display counts down to 0 00 and the Record Indicator P goes out the Infor mation Display Y will return to its normal indica tions and the finalization process is complete The disc is now ready to be played in any compatible CD or DVD ...

Страница 22: ...rtant Note Tracks at the beginning or in the middle of the disc may not be erased until all of the tracks after them have been erased Important Note on Erasure and Finalization Times Regardless of the speed at which a disc was recorded the CDR 26 will erase and finalize discs at the x4 speed to minimize the length of the process However in some cases it may be necessary for the unit to repeat the ...

Страница 23: ... record related button has been pressed when a Unfinalize the disc to add tracks to a CD RW disc finalized disc is in the Record Deck Replace the disc with a blank CD R or CD RW disc A record related button has been pressed when a Replace the disc with a blank CD R or CD RW disc standard CD is in the Record Deck DATA DISC A non audio CD ROM or a CD Video disc has been Only CD Audio and DTS discs w...

Страница 24: ...g S N Digital Dub Mode Equal to Source Recording S N Digital External Source Source 10dB Recording Dynamic Range 90dB Recording THD 0 01 0dB Analog Input Sensitivity 330mV RMS 47kΩ 0dB Digital Inputs Direct Recording 44 1kHz 100 ppm min General Power Requirement 110 240 VAC 50 60Hz Power Consumption 20 Watts Dimensions Width 17 5 16 440mm Height 4 7 16 112mm Depth 13 15 16 355mm Weight 13 lb 5 8kg...

Страница 25: ...disc has started playing and without it the CDR 26 cannot begin a recording This is outside of our control as some manufacturers design products this way to prevent digital copies from being made Should you find that a digital recording cannot be made from an external playback source you may always use an analog connection to make the copy by pressing the Input Select Button on the front panel or ...

Страница 26: ...or cable system is grounded so as to provide some protection against voltage surges and built up static char ges Article 810 of the National ELectrical Code ANSI NFPA 70 provides infor mation with regard to proper groundrng of the mast and supporting structure grounding of the lead rn wire to an antenna discharge unit size of grounding conductors Location of antenna discharge unit connection to gr...

Страница 27: ......

Отзывы: