5.
6.
8
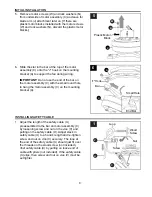
Slide the slot in the bar at the top of the motor
assembly (C) onto the "J" hook on the mounting
bracket (A) to support the fan during wiring.
IMPORTANT:
Do not use the end of the bar on
the motor assembly (C) with the small round hole
to hang the motor assembly (C) on the mounting
bracket (A).
INITIAL INSTALLATION
6
Remove motor screws (W) and lock washers (N)
from underside of motor assembly (C) and save for
blade arm (J) attachment later on. [If there are
plastic motor blocks installed with the motor screws
(W) and lock washers (N), discard the plastic motor
blocks.]
6
C
"J" Hook
Bar
A
Small Hole
End Bar
1. Adjust the length of the safety cable (U)
preassembled to the bar on motor assembly (C)
by loosening screw and nut on the vice (V) and
pulling on the safety cable (U). Adjust slack in
safety cable (U) to a hand’s length and re-tighten
screw and nut on vice (V) securely. The loop at
the end of the safety cable (U) should just fit over
the threads on the wood screw (not included).
Test safety cable (U) by pulling on loose end of
cable with pliers (not included). If the safety cable
(U) slips, then screw and nut on vice (V) must be
set tighter
.
U
V
1
C
Screw
Nut
Loop
Wood
Screw
INSTALLING SAFETY CABLE
5
N
W
C
Plastic Motor
Block


