Harbor Breeze 856 Скачать руководство пользователя страница 7

12

13

CARE AND MAINTENANCE

TROUBLESHOOTING

IMPORTANT: Shut the main power supply off before beginning any maintenance.


• DO NOT use water or detergents when cleaning the fan or fan blades. A dry dust cloth or lightly  

  dampened cloth will be suitable for most cleaning. 

• Clean the fan housing using a soft bristle brush or lint-free cloth to avoid scratching the finish.  

  Clean the blades with a lint-free cloth. You may occasionally apply a light coat of furniture polish  

  to the blades for added protection. 

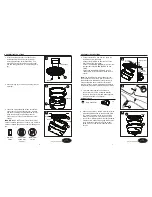
• Al least twice a year, tighten all the screws and lower the canopy to check the mounting bracket  

  screws and downrod assembly. 

• Bulb replacement: Use 75-watt max. type-E11 halogen bulbs only. CFLs and LEDs are not  

  recommended for this item. 

• Battery replacement: Use an A23 12-volt alkaline battery for the remote control.

PROBLEM

POSSIBLE CAUSE

CORRECTIVE ACTION

Fan blades do not 

move.

1.  The power is off or the fuse is 

blown.

1.  Turn the power on or check fuse.

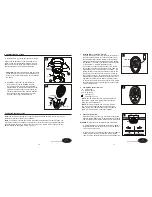
2.  Turn power off. Loosen motor 

housing; check all the connec-

tions.

Noisy operation.

1.  Blades are loose.

2.  Cracked blade.

1.  Tighten all blade screws.

2.  Replace blades (call customer 

service).

Excessive wobbling.

1.  The blades are loose.

2.  Unbalanced blades.

3.  The fan is not securely mounted

1.  Tighten all blade screws.

2.  Use a balance kit (not included).

3.  Turn power off. Carefully loosen 

the canopy and remount securely.

Remote control

malfunction.

1.  No sound after the fan power is 

on.

2.  No flash on transmitter LED.

3.  The remote control does not 

work.

1.  Please check if the power supply 

is connected properly and main 

power is on.

2.  Please check if the battery is 

installed into the remote control. 

Make sure the battery is installed 

properly. One side of the battery is 

positive and the other is negative.

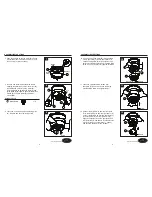
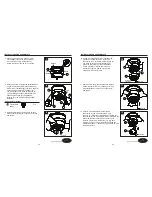
3.  Sync the remote control to the 

receiver following the steps 

described in step 1 on page 11. 

Make sure power to the fan is 

off before beginning the sync 

process.

Lowes.com/harborbreeze

Lowes.com/harborbreeze

Page 10

Содержание 856

Страница 1: ...a registered trademark of LF LLC All Rights Reserved Questions problems missing parts Before returning to your retailer call our customer service department at 1 800 643 0067 8 a m 6 p m EST Monday T...

Страница 2: ...the risk of fire electric shock or personal injury mount to an outlet box marked ACCEPTABLE FOR FAN SUPPORT OF 35 1 lbs OR LESS and use the mounting screws provided with the outlet box Most outlet box...

Страница 3: ...der electrical tape pliers wire cutters wire strippers Helpful Tools not included Electrical Circuit tester AA Wire Connector Qty 4 BB Blade Screw Qty 10 PACKAGE CONTENTS PART DESCRIPTION QUANTITY A M...

Страница 4: ...l electrician to determine proper wiring 2 Place trim ring C over canopy and lay it on fan motor B 3 Loosen two preassembled screws across from each other on the mounting plate A Remove and save remai...

Страница 5: ...for remaining blades D enhance plates E and blade screws BB 11 Loosen two preassembled screws from light plate F Remove and save remaining preassembled screw from light plate F 9 Loosen two screws fro...

Страница 6: ...dim Release the light button when light is at desired level NOTE This remote control has a memory function The receiver stores the fan speed and light setting when the fan is turned off When the fan...

Страница 7: ...1 The power is off or the fuse is blown 1 Turn the power on or check fuse 2 Turn power off Loosen motor housing check all the connec tions Noisy operation 1 Blades are loose 2 Cracked blade 1 Tighten...

Страница 8: ...Brass finish fans maintain the beauty when protected from varying weather conditions Any glass provided with this fan is not covered by this warranty Any replacement of defective parts for the ceiling...

Страница 9: ...a registrada de LF LLC Todos los derechos reservados Preguntas problemas piezas faltantes Antes de volver a la tienda llame a nuestro Departamento de Servicio al Cliente al 1 800 643 0067 de lunes a j...

Страница 10: ...para reducir el riesgo de incendio descargas el ctricas o lesiones personales monte el ventilador en una caja de salida marcada como ACCEPTABLE FOR FAN SUPPORT OF 35 1 LBS OR LESS apta para sostener...

Страница 11: ...acables pinzas pelacables Herramientas tiles no se incluyen Probador de circuito el ctrico AA Conector de cables Cant 4 BB Tornillo para aspas Cant 10 CONTENIDO DEL PAQUETE PIEZA DESCRIPCI N CANTIDAD...

Страница 12: ...dor B 3 Afloje dos tornillos preensamblados uno frente a otro en la placa de montaje A Retire los dos tornillos preensamblados que quedan y gu rdelos Cuelgue el motor del ventilador B en el gancho de...

Страница 13: ...tornillos para aspas BB Repita este paso para las aspas D las placas de refuerzo E y los tornillos para aspas BB restantes 11 Afloje dos tornillos preensamblados en la placa de iluminaci n F Retire y...

Страница 14: ...dad de la luz cuando se apaga el ventilador Cuando se vuelve a encender el ventilador arrancar con la ltima configuraci n establecida 3 Icono de sol Icono de copo de nieve 3 Interruptor deslizante par...

Страница 15: ...ible quemado 1 Conecte la alimentaci n el ctrica o revise el fusible 2 Desconecte la alimentaci n Afloje la carcasa del motor y revise todas las conexiones El funcionamiento es ruidoso 1 Las aspas est...

Страница 16: ...res con acabado de lat n mantienen su belleza cuando se los protege de las condiciones clim ticas cambiantes La garant a no cubre los elementos de vidrio incluidos con este ventilador Cualquier reempl...

Отзывы: