-CS -21
Select a needle of the right type. See the following “SELECT THREADS”.
1
2
4
3
A
4_1 D424
4-1
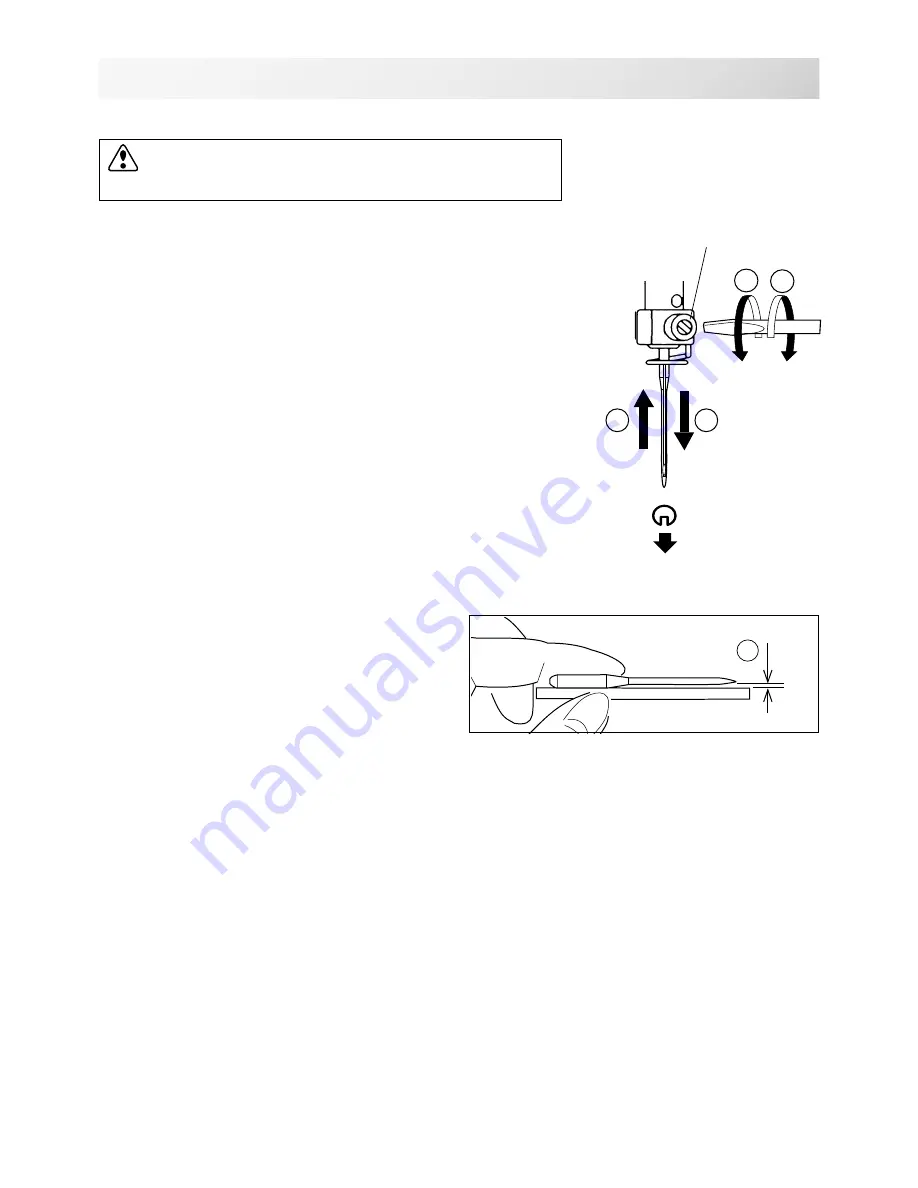
Needle clamp screw
INSERTING A NEEDLE
Front
T
S
CAUTION: To prevent accidents.
Turn off the power before removing the needle.
1. Loosen the needle clamp screw slightly with the screw-
driver.
2. Remove the needle.
3. Insert a new needle into the needle clamp with push it up
as far as it will go keeping the slotted side of the needle in
front.
4. Tighten the needle clamp screw with the screwdriver.
A. Do not use a bent or blunt needle.
Place the needle on a flat surface and check
for straightness.
Содержание HCD2
Страница 1: ...D2N401 11 Computerized Single Head Embroidery Machine INSTRUCTION BOOK HCD2...
Страница 2: ......
Страница 86: ...D2 69 11 1b PATTERNS IN MEMORY 5_B M201 5 Press Repeat steps 3 and 5 to unlock Press to return to Menu mode...
Страница 91: ...D2 74 6 Press The pattern name will be changed 11 5b PATTERNS IN MEMORY 11_5 M401 Press to return to Menu mode...
Страница 159: ...D2 133 20 6 FRAME CONFIRMATION 20_5 N101 11 Press Press to return to Drive mode...
Страница 176: ...D2 151 6 Press 7 Press 8 Press The machine will be rebooted The setting is fixed 22 2 OTHER SETTINGS 22_1 M201...
Страница 205: ...SJ 81 Those fonts are created by www i cliqq com 26 3 BUILT IN FONT LIST 26_3 N401...


