background image

English _

25


!

USING CONTROLLER MODE


~

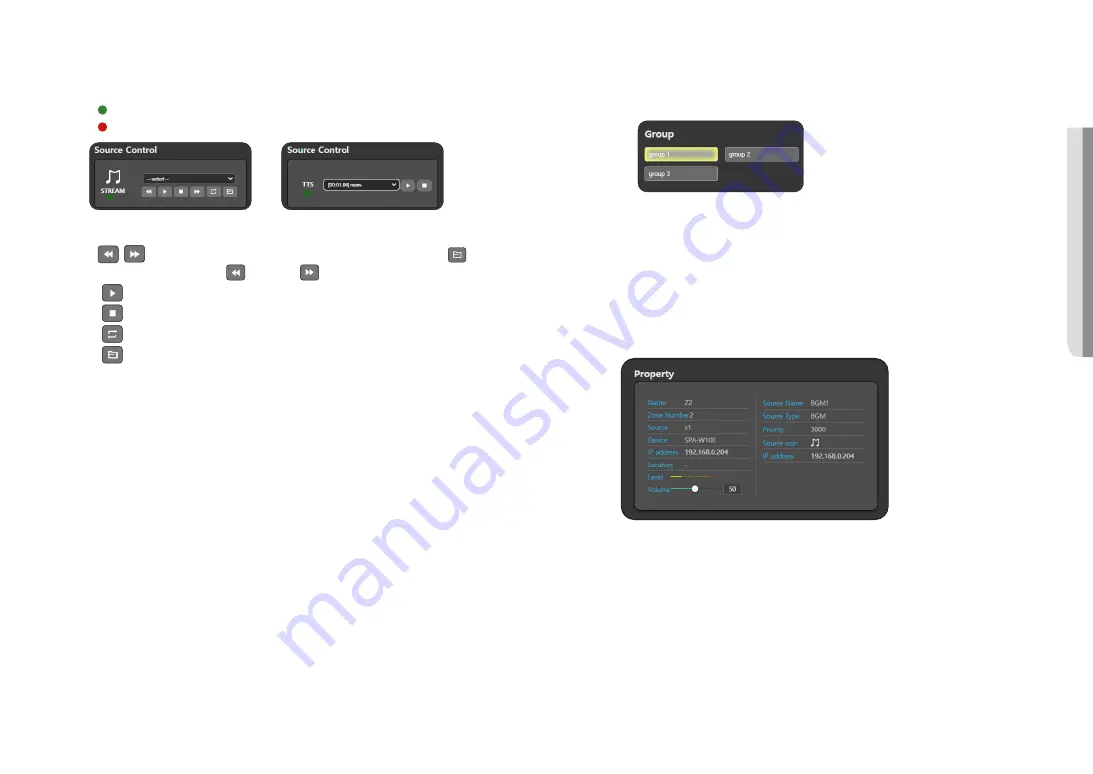
Source Control: BGM or TTS lists of the selected source device are displayed. 
When you select a zone speaker to broadcast and select <

Start Broadcasting

> or <

Stop 

Broadcasting

>, the broadcast readiness will be displayed in the source control window.


-

 : When the <

Start Broadcasting

> button is pressed (Button Mode broadcasting Standby)


-

 : Initial status or when the <

Stop Broadcasting

> button is pressed

<BGM Control Window>

<TTS Control Window>


-

 :  While all the audio sources in the BGM list are played by pressing the [

 ] button, if you 

press either the [

 ] button or [

 ] button, the previous or next audio will be played.


-

 : It will play or temporarily pause the selected audio source. 


-

 : It will stop playing the audio source. 


-

 : It will repeat playing the current audio source or all the sound sources.  


-

 : It will play from the first audio source in the list to the last one.  


M


`

Check the <

CTRL

> box in the <

System Setting

;

 <

Source Registration

>, and select the <

Source Type

> and <

CTRL Type

> to 

display the Source Control Window.


`

When you play the sound source in <

BGM Control Window

>, the <

Broadcast Client

> operation of the zone output 

device is executed, and it is displayed in the level meter. When you stop playing the sound source or pause it, the level 
meter also stops. 


~

Select Zone:  An output device in the connected zone can be selected. The selected zone will be 

displayed as highlighted. When you select the Source Device and Output Device and click 
the [

Start Broadcasting

] button, the BGM or TTS icon will be displayed in the Output 

Device.


- If you click the [

Select/Deselect All

] button, all connected zones will be selected or deselected.


- When you click the [

Sort

] button, they will be sorted in the order of <

System Setting

;

 <

Zone ID

of <

Zone Registration

>. The Zone button can be moved by drag and drop. 


- If you click the [

Move Previous

] and [

Move Next

] buttons, it will switch to the selected devices one 

by one.


- If you click the [

Lock

] and [

UnLock

] buttons, the zone selection layout can be locked or unlocked. 


~

Group :  You can select an output group among the set groups, and duplicate selection is also possible. 

The selected group will be displayed as highlighted.  
When you select the Source Device and group and click the [

Start Broadcasting

] button, the 

BGM or TTS icon will be displayed in the Output Device.


~

Property:  If you select a source device or zone device, information for each device will be displayed.  

The output of the audio being played is indicated by a meter, and the volume can be adjusted. 


M


`

When you press each [

Zone

] button, its speaker information value will be displayed on the <

Property

> menu, and you 

can directly control the <

Volume

>.   


`

The speaker volume of the <

Property

> menu is linked to the volume of <

Device Monitoring

;

 <

Output Device

>. 


`

The speaker volume of the <

Property

> menu is linked to the volume of <

Output Volume Setting

> of the <

Operation 

Setting

;

 <

DSP Setting

> of the device.


`

When you click only the source, its details are displayed in the source portion of the <

Property

>. When you click a zone, 

details on the zone and broadcasting source will be displayed if it is on air, while only details on the zone will be displayed 
if it is not on air. 


`

If you click the [

Select/Deselect All

] button, all connected zones will be selected or deselected.


`

If you click the [

End all broadcasting

] button, all the regions' broadcasting which use the source will stop broadcasting. 

Broadcasting to the region does not stop by pressing the <

Event & Preset

> button. The [

Event & Preset

] button must 

be clicked and disabled to stop broadcasting. 


`

If you click the [

Start Broadcasting

] button and play audio on the STREAM or TTS window of the <

Source Control

>, the 

selected audio of the source device will broadcast through the output device of the selected zone.


`

If you click the [

Stop Broadcasting

] button, the selected region’s broadcasting will stop. 


M


`

Feedback is caused if you adjust the <

DSP Setting

;

 <

Input Volume Setting

> of zone output speakers after TTS 

audio broadcasting is over or while it is paused. (Only when the same speaker is selected for the source and zone 
purposes in button mode.) 
Make sure to adjust the <

DSP Setting

;

 <

Input Volume Setting

> of the zone output speakers only when they are in 

the [

Stop Broadcasting

] status.

Содержание SPA-C100B

Страница 1: ...IP AUDIO SYSTEM User Manual SPA C100B SPA C100W SPA C110B SPA C110W SPA W100B SPA W100W SPA H100B SPA H100W SPA P100B SPA P100W SPA D1000...

Страница 2: ...n this document but no formal guarantee shall be provided Use of this document and the subsequent results shall be entirely on the user s own responsibility Hanwha Vision reserves the right to change...

Страница 3: ...mation point within an equilateral triangle is intended to alert the user to the presence of important operating and maintenance servicing instructions in the literature accompanying the product CAUTI...

Страница 4: ...l the product using non compliant tools the product may be damaged 19 Do not install the product in a place where chemical substances or oil mist exists or may be generated As edible oils such as soyb...

Страница 5: ...W100W 9 Names and functions of the IP speakers HORN type SPA H100B SPA H100W 10 Names and functions of the IP speakers Pendant type SPA P100B SPA P100W 11 Broadcast System Configuration Diagram 12 Con...

Страница 6: ...Terminal A terminal that connects a switching hub supporting PoE or PoE and a network cable for power and network connection e micro SD card slot A slot for a micro SD card f SPEAKER A terminal connec...

Страница 7: ...rves to protect the product from lightning strikes Before connection be sure to turn off the power of the device d Speaker terminal cover Covers the speaker terminal Name Function Description e Screw...

Страница 8: ...module Equipped with an audio module Name Function Description d Gasket Dustproof waterproof gasket e Speaker terminal cover Covers the speaker terminal f Grounding port Used for earth grounding Grou...

Страница 9: ...when connecting the network and alarm cables d Speaker terminal cover Protects the speaker terminals Name Function Description e Gasket Dustproof waterproof gasket f Audio module Equipped with an audi...

Страница 10: ...vided carabiner b Detachable grille Prevents dust intrusion c Audio module Equipped with an audio module Name Function Description d Grounding port Used for earth grounding Grounding serves to protect...

Страница 11: ...aker Controller mode Network M You can use the IP audio server SPA S1000 as a controller The IP audio module can be used as an IP speaker when connected to an analog speaker with a permissible input o...

Страница 12: ...3 4 5 6 7 8 9 0 VOLUME MONITOR MIC TALK PUSH MAX MIN AUX MAX MIN CHIME MENU PRESET PREV NEXT CHIME POWER 6dB 0dB NETWORK 3dB 6dB MAX MIN ALL Switching hub PoE PoE supported IP audio module IP microph...

Страница 13: ...the IP addresses resulting in failing to set passwords Use Device Manager to set the initial password and IP address to use Registering using Device Manager If the product is connected to a network wh...

Страница 14: ...s are not used in the IP audio product 4 Products with IP addresses must be logged in from the Credential menu to be queried as Login OK When you execute New Project Search authentication is canceled...

Страница 15: ...al IP address into the web browser s address bar 2 The admin account password must be registered when accessing the product for the first time When the Change Password window appears please enter a ne...

Страница 16: ...ct the power until the system initialization is complete after pressing the RESET button of the product or during product resetting It will take up to 10 minutes to reboot the product after initializi...

Страница 17: ...The software version information of the product is available in the upper right corner of the Home screen Changing the Password You can change the passwords of each account 1 On the Home screen click...

Страница 18: ...the product information on the home screen Unlock Account For all accounts except the admin account if you enter the wrong password more than 5 times when logging in the account will be locked for 30...

Страница 19: ...leted previously registered product information should be deleted from the controller mode speaker or audio server SPA S1000 and you must register if you wish to use the product As the log information...

Страница 20: ...o the time server 2 Click Apply to apply the set Time and Date information J If the product is used in a local network environment without an external Internet connection the time information may beco...

Страница 21: ...PSE supply maximum power Voltage range PSE Maximum current POE 802 3af 15 4W 44 57V 350mA POE 802 3at 30W 50 57V 600mA J When the product s power mode is PoE a switch hub for both PoE PoE which suppo...

Страница 22: ...duct cumulative operating time and product time will be displayed f Language Shows the language options supported on the website Korean English supported g Go to the Official Website If you click Hanw...

Страница 23: ...he volume If the volume is adjusted the speaker volume of the Button mode property is reflected on the same level When the volume is adjusted its output volume will be reflected at the same level in t...

Страница 24: ...put device connected to the product or by the set Event Preset and Group formats If you set the transmission mode of the source device to Multicast and broadcast the BGM sound source of the source dev...

Страница 25: ...u can select an output group among the set groups and duplicate selection is also possible The selected group will be displayed as highlighted When you select the Source Device and group and click the...

Страница 26: ...dcast is displayed as Broadcasting count Total count If you separately control Broadcast Server or Broadcast Client in the BGM Streaming menu on a speaker selected as a source or zone while running al...

Страница 27: ...ork register all the other speakers as Speaker mode Control Mode When you run Start Broadcasting Stop Broadcasting from the Operate Button Mode you can control the zone devices with either the TCP or...

Страница 28: ...lect BGM 1 BGM will be shown If you select TTS 2 TTS will be shown Transmission Method If you select UNICAST Trans IP will be deactivated and the device s IP address will be used You can enter the Por...

Страница 29: ...Mode broadcast will be kept since the priority of the microphone is higher Source Name Inputs or changes the name of a source Source Type Displayed as mic CH Name Displayed as 1 mic Transmission Metho...

Страница 30: ...splayed Channel Displayed as audio_output_1 2 Once set click the Apply button 3 If you click the View Settings button the set value can be saved as a CSV file M As the same speakers can be registered...

Страница 31: ...roadcast as per the scenario set in the All Event Preset List if an event such as the Event Preset of the button mode RM button of the microphone device or an external signal CP of the audio module oc...

Страница 32: ...losure Output setting the Contact Closure Output signal will be active until the Contact Closure INPUT is Off If Contact Closure INPUT is Off while a sound source is being broadcasted the sound source...

Страница 33: ...volume can be set Initial value 50 input value 0 100 The output volume is reflected only to Event Preset Delay Enter the delayed time before starting scenario broadcasting once the event has taken pla...

Страница 34: ...load and upload functions of the Holiday menu Copy Schedules for each month can be copied When the Copy Settings window appears click the Copy button The selected year automatically resets to the fift...

Страница 35: ...h and Year if you select a specific day the schedule is set on the specific date for every month or year If you specify a date range in Month or Year and select days of the week in Everyday the schedu...

Страница 36: ...t that has an event priority set as 2000 in the Event Preset if the schedule time for a schedule that has a priority set as 1501 in the Annual Scheduler comes up the Event Preset broadcast will stop a...

Страница 37: ...ed when the product s system is initialized please download it in advance M Every input field must be filled in Special characters cannot be input in the input field Locate a mouse pointer on a failur...

Страница 38: ...TINGS You can set up the CP function broadcast audio BGM TTS CHIME DSP speaker built in microphone volume scheduled broadcast and SIP VoIP phone voice transmission Contact Closure Settings 1 On the Ho...

Страница 39: ...orted A microSD card capacity of up to 32 GB is supported SDHC MLC Class 10 or higher We recommend Sandisk and Transcend products Compatibility by manufacturer and product type may vary 4 Uploaded sou...

Страница 40: ...operation information are displayed in Broadcast Server Settings Information BGM Streaming This is a function to directly transmit and play sounds that have been uploaded to BGM Play to speakers regi...

Страница 41: ...ck the Start Stop buttons to select whether to operate the Broadcast Client Click the Settings button to move to the Broadcast Client Settings screen 2 Communication Information and Play Information a...

Страница 42: ...the internal storage and external storage SD and share the Available Capacity with BGM and TTS files Up to 10 files can be uploaded and uploaded files up to 10 seconds long can be saved 4 Uploaded Ch...

Страница 43: ...Click the Save button to save the set TTS files If you click the Reset button set values for input information and options are reset M Only TTS files created directly from the website can be used TTS...

Страница 44: ...schedules and it will not broadcast on days set as holidays 1 On the Home screen click Operation Setting Annual Scheduler Registered schedules can be viewed by month week day year 2 The scheduler s a...

Страница 45: ...f you set the date 2021 01 01 2021 01 02 time 23 00 01 00 Everyday the broadcast schedule is set up twice from 23 00 on January 1st until 1 00 on January 2nd and from 23 00 on January 2nd until 01 00...

Страница 46: ...e continuous broadcast schedule is set twice from 23 55 on January 1st to 0 05 on January 2nd and from 23 55 on January 2nd to 0 05 on January 3rd TTS Enter sentences with the language to be used in t...

Страница 47: ...randstream and VoIP phone Grandstream environment SIP Account 1 Register the account and IP PBX information in SIP Account Information User ID ID of SIP users account in the IP PBX Name Names that use...

Страница 48: ...gistration Interval Enter the SIP registration period Default 3600 2 Enter Port Setting items SIP Port Set up the port to operate SIP communication Default 5060 RTP Port Set the RTP port Default 35000...

Страница 49: ...f where and how they can take these items for environmentally safe recycling Business users should contact their supplier and check the terms and conditions of the purchase contract This product and i...

Страница 50: ......

Отзывы: