background image

Fitting and installation

Page EN-9

Important information for 
installation 

 WARNING

Risk of electric shock!
Improper handling of the appliance 
may result in electric shock or short cir-
cuit.

Connect the appliance only if the 
socket voltage matches the require-
ments indicated on the type plate.

Since all poles of the appliance can-
not be disconnected from the mains 
via an accessible disconnecting de-
vice, an all-pole disconnecting device 
in accordance with overvoltage cate-
gory III must be connected within the 
house installation with at least 3 mm 
contact clearance; consult a qualifi ed 
professional if necessary (see “Ser-
vice” on page EN-18).

Do not kink or pinch the mains cord 
or lay it over sharp edges. 

After installation, the mains cable 
must not be allowed to touch the rear 
wall or the bottom of the appliance.

 CAUTION

Risk of burns!
Improper handling of the appliance 
can lead to burns.

The installation height must be se-
lected in such a way that users can 
see the contents of the dishes. This 
is the only way to prevent scalding 
caused by hot food spilling over.

Fire hazard!
Improper handling of the appliance 
can lead to fi re.

Do not connect the appliance to a 
multiple socket or to a power supply 
by way of an extension cable.

Veneers, plastic coverings and ad-
hesives used in the cabinet must be 
heat-resistant (100 °C)

The appliance must not be installed 
behind a furniture front. 

The ventilation slots and intake open-
ings must not be covered. 

Installation requirements

– The appliance must be installed together 

with a combination appliance, such as a 
built-in microwave. 
– The combination appliance must not 

weigh more than 60 kg when loaded.

– The combination appliance must be posi-

tioned on the warming drawer without an 
intermediate shelf. 

– During installation, follow the installation 

and operating instructions for the combi-
nation appliance.

– A firmly installed, horizontally aligned floor 

must be in place to ensure the required 
load-bearing capacity for both appliances 
(for appliance weight, see “Technical spec-
ifications” on page EN-20).

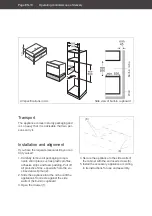
– To allow sufficient air circulation,

– the built-in niche must not have a rear 

wall, but rather only a raised edge of no 
more than 50 mm.

– there must be a distance of at least 

45 mm between the built-in cupboard 
and the wall.

 Fitting and installation

Содержание TCN14J6D-S

Страница 1: ...W rmeschublade Gebrauchsanleitung Anleitung Version 93748 DE 20220114 Bestell Nr 864 717 875 099 Nachdruck auch auszugs weise nicht gestattet TCN14J6D S TCN14J6N S...

Страница 2: ...n in Ihrem Land die zus tzlich zu den in dieser Anleitung ge nannten Vorschriften g ltig sind Bewahren Sie alle Sicherheitshinweise und Anweisungen f r die Zukunft auf Geben Sie alle Sicherheitshinwei...

Страница 3: ...icht vermieden wird den Tod oder eine schwere Verletzung zur Folge haben kann VORSICHT Dieser Signalbegriff bezeichnet eine Gef hr dung mit einem niedrigen Risikograd die wenn sie nicht vermieden wird...

Страница 4: ...Sie das Ger t ausschlie lich wie in dieser Gebrauchsanleitung beschrieben Jede andere Verwendung gilt als nicht be stimmungsgem und kann zu Sach oder sogar Personensch den f hren Der Herstel ler berni...

Страница 5: ...t verringerten physischen sensorischen oder mentalen F hig Ger t nur in eingebautem Zustand betreiben Falls der Netzstecker nach dem An schluss nicht mehr zug nglich ist muss eine allpolige Trennvorri...

Страница 6: ...lementen zu vermeiden Kinder j nger als 8 Jahre m ssen ferngehalten werden es sei denn sie werden st ndig beaufsichtigt Zum Schutz der H nde Topfhand schuhe oder lappen verwenden Nur trockene Textilie...

Страница 7: ...de kann zu Sch den am Ger t f hren Das Schubfach darf mit maximal 25kg belastet werden Der Teleskop auszug zum ffnen und Schlie en des Ger ts kann Schaden nehmen W hrend des Beladens mehrfach tes ten...

Страница 8: ...der das Ger t einen Transportschaden aufweisen nehmen Sie bitte Kontakt mit unserem Service auf siehe Service auf Seite DE 18 WARNUNG Stromschlaggefahr Das Ber hren spannungsf hrender Tei le kann zu s...

Страница 9: ...ahr Unsachgem er Umgang mit dem Ge r t kann zu Brand f hren Ger t nicht an eine Mehrfachsteck dose oder mit Hilfe eines Verl nge rungskabels an die Stromversorgung anschlie en Furniere Kunststoffbel g...

Страница 10: ...Klebe streifen und Schaumpolster falls noch nicht geschehen Ziehen Sie alle Schutz folien ab insbesondere von der beiliegen den Anti Rutsch Matte 2 2 Schieben Sie das Ger t so weit in die Nische bis...

Страница 11: ...rauch gereinigt werden 1 Wischen Sie das Schubfach 1 mit ein wenig Sp lmittel aus und trocknen Sie es anschlie end mit einem weichen Tuch 2 Reinigen Sie die Anti Rutsch Matte 2 mit ein wenig warmer Se...

Страница 12: ...nicht durch K chenpapier oder hnliches ersetzen Die Anti Rutsch Matte 2 sorgt f r festen Halt des Geschirrs Betreiben Sie das Ger t deshalb nur mit eingelegter An ti Rutsch Matte 2 Erstes Aufheizen B...

Страница 13: ...gsschlitze frei sind 2 8 Beladebeispiel 6 Essteller in cm 26 0 6 Suppenteller in cm 23 0 6 Dessertteller in cm 19 0 1 ovale Platte in cm 32 0 1 mittlere Serviersch ssel in cm 15 5 1 kleine Serviersch...

Страница 14: ...stellt die erforderliche Mindesttemperatur von 60 C sicher Ger t ca 10 Min vorheizen Ger t nicht zum Garen von Speisen oder zum Wiedererw rmen erkalteter Speisen verwenden Betriebsarten temperatur un...

Страница 15: ...Minus oder Plus bis das Dis play 4 die gew nschte Dauer anzeigt Bitte beachten es lassen sich nur gan ze Stunden einstellen 5 Betrieb starten Tippen Sie auf den Sensor 6 Schlie en Sie das Schubfach 1...

Страница 16: ...Sie nur Sp l wasser und ein weiches Tuch zum Reini gen Stellen Sie vor dem dem Schlie en des Schubfachs 1 sicher dass sie vollst ndig trocken ist um muffigem Geruch oder Schimmelbildung vorzubeugen A...

Страница 17: ...die korrekte Betriebsart f r Gl ser Tassen oder f r Teller Sch sseln Stellen Sie eine niedrigere Temperatur ein Das Ger t erzeugt Ger usche w hrend des Betriebs Die Ger usche stammen von dem Gebl se d...

Страница 18: ...eser Anleitung verursachte Sch den k nnen leider nicht anerkannt werden Beratung Bestellung und Reklamation Wenden Sie sich bitte an die Produktberatung Ihres Versandhauses wenn die Lieferung unvollst...

Страница 19: ...los beim lokalen Wertstoff Recyclinghof abgeben F r weitere Informationen zu diesem Thema wenden Sie sich direkt an Ihren H ndler Verpackung entsorgen Unsere Verpackungen werden aus umweltfreundlichen...

Страница 20: ...Hz 220 240 50 60 Leistungsaufnahme in W 1000 Ma e Ger te B H T in mm Nische B T in mm 595 141 561 ge ffnet 995 560 550 Gewicht in kg ca 19 Alle Angaben ohne Gew hr Technische nderungen Tippfehler und...

Страница 21: ...Warming drawer User manual Manual version 93748 EN 20220114 Order no 864 717 875 099 Reproduction even of ex cerpts is not permitted TCN14J6D S TCN14J6N S...

Страница 22: ...country which are valid in addition to the regulations specified in this user manual Keep all safety notices and instructions for future reference Pass all safety notic es and instructions on to the...

Страница 23: ...level of risk which if not avoided could result in death or serious injury CAUTION This term indicates a hazard with a low level of risk which if not avoided could result in minor or moderate injury...

Страница 24: ...deemed to be improper and may lead to dam age to property or even injury to persons The manufacturer accepts no liability for damage caused by improper use Safety notices In this chapter you will find...

Страница 25: ...in a safe way and understand the hazards involved Since all poles of the appliance can not be disconnected from the mains via an accessible disconnecting de vice an all pole disconnecting device in a...

Страница 26: ...ody away from the drawer when it is extended Fire hazard Improper handling can lead to re Do not use the appliance for storage purposes Do not use the appliance to heat the room Objects in the vicinit...

Страница 27: ...e may be damaged When loading test several times to check whether the drawer can still be opened and closed with ease Do not lean or sit on the drawer when it is pulled out Remove soiling immediately...

Страница 28: ...ng transit 3 If the delivery is incomplete or the ap pliance has been damaged during tran sit please contact our service center page EN 18 WARNING Risk of electric shock Touching live parts may result...

Страница 29: ...by hot food spilling over Fire hazard Improper handling of the appliance can lead to re Do not connect the appliance to a multiple socket or to a power supply by way of an extension cable Veneers pla...

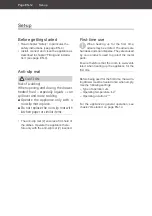
Страница 30: ...c profiles adhesive strips and foam padding Pull off all protective films especially from the en closed anti slip mat 2 2 Slide the appliance into the niche until the appliance s front rests against t...

Страница 31: ...t the appliance must be cleaned be fore first use 1 Wipe out the drawer 1 with a little wash ing up liquid and then dry it with a soft cloth 2 Clean the anti slip mat 2 with a little warm soapy water...

Страница 32: ...items The anti slip mat 2 ensures a firm hold of the dishes Operate the appliance there fore only with the anti slip mat 2 inserted First time use When heating up for the first time odours may be emit...

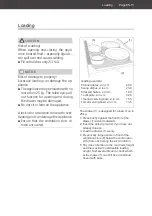
Страница 33: ...ilation slots re main uncovered 2 8 Loading example 6 dinner plates in cm 26 0 6 soup dishes in cm 23 0 6 dessert plates in cm 19 0 1 oval plate in cm 32 0 1 medium serving bowl in cm 15 5 1 small ser...
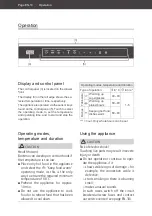
Страница 34: ...ensure the required minimum temperature of 60 C Preheat the appliance for approx 10 min Do not use the appliance to cook food or to reheat food that has been allowed to cool down Operating modes tempe...

Страница 35: ...on the minus sensor or the plus sensor as often as required until the display 4 shows the desired dura tion Note that only whole hours can be set 5 Start operation Tap the sensor 6 Close the drawer 1...

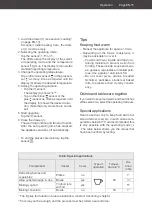
Страница 36: ...prevent damage to the surface use only rinsing water and a soft cloth for cleaning Before closing the drawer 1 ensure that it is completely dry to prevent musty smells or mould from forming Clean the...

Страница 37: ...ode for glasses cups or for plates bowls Set a lower temperature The unit emits a noise during operation The noise comes from the fan that distributes the warm air evenly in the Warming drawer These a...

Страница 38: ...is manual will not unfortunately be recognised Advice order and complaint Please contact your mail order company s customer service center if the delivery is incomplete the appliance is damaged during...

Страница 39: ...ally friendly recyclable materi als Outer packaging made of cardboard Moulded parts made of foamed CFC free polystyrene PS Films and bags made of polyethylene PE Tension bands made of polypropylene PP...

Страница 40: ...ion in V Hz 220 240 50 60 Power consumption in W 1000 Dimensions Appliances W H D in mm Niche W D in mm 595 141 561 open 995 560 550 Weight in kg approx 19 All information without guarantee Subject to...

Отзывы: