background image

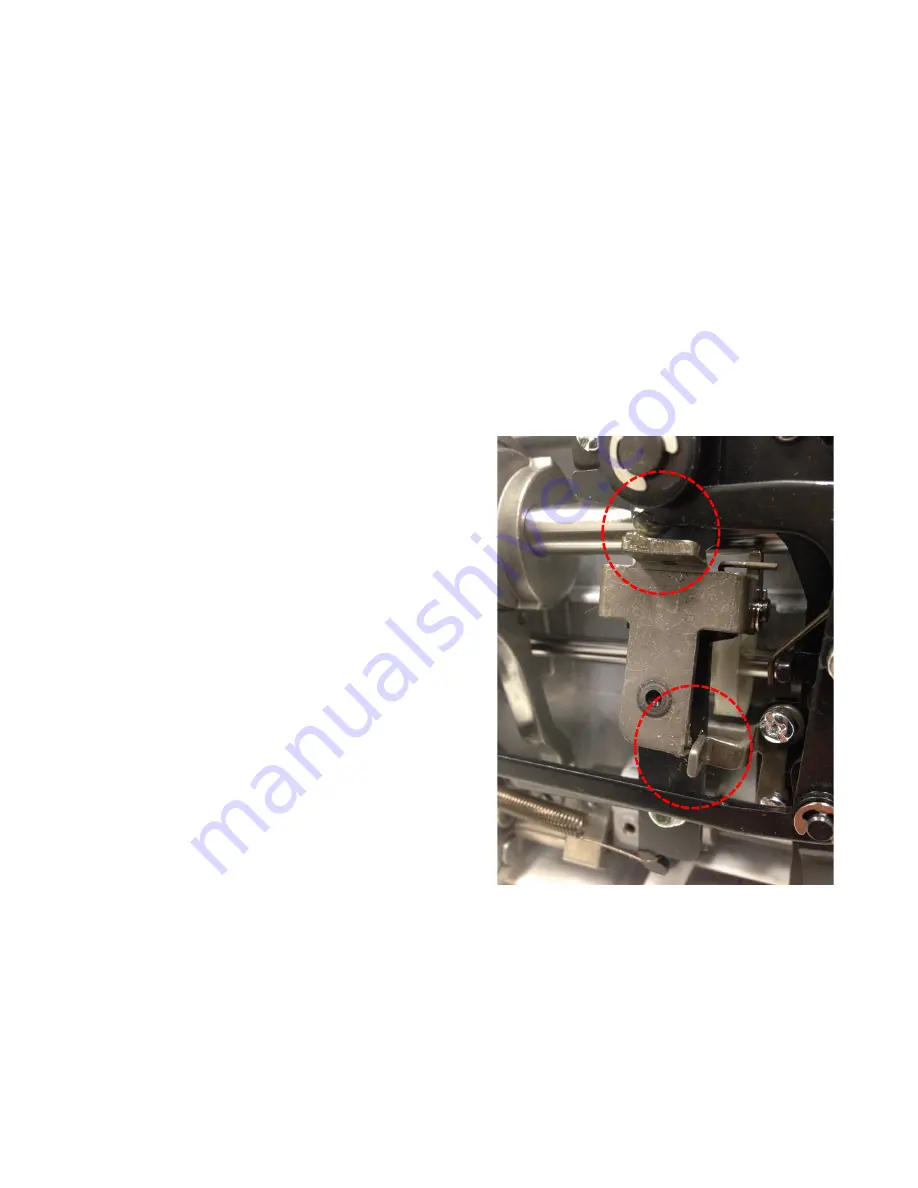
Grease – Put a small amount of grease on the following: 

#15  The thread cutter linkage (under bottom cover). 

21

Содержание HQ STITCH 510

Страница 1: ...HQ Stitch 510 SERVICE MANUAL 10 11 16...

Страница 2: ...Static Cutter Blade Needle to Cutter Cam Timing Thread Drawing Lever Adjustment Auto Tension Release Identifying Electronic Components Connections A Board Removal Installing the A Board Needle Stop Po...

Страница 3: ...the top cover be very careful not to pull it off There is a plug connection coming from the bobbin winder motor to the top of the A board Carefully disconnect the wires and remove the cover 3 Look at...

Страница 4: ...move them 2 Start to remove the belt cover from the front and unlocking it from the clips in the rear Be careful not to remove it fast and tear it away from the machine There is a plug connection on t...

Страница 5: ...BASE PLATE REMOVAL 3 1 Lay the machine down and locate the four black screws in the rubber feet and remove them completely 2 Gently lift up on the machine and remove the base plate...

Страница 6: ...HQ Stitch 510 Lubrication 4...

Страница 7: ...tion Notes Factory Note Factory lubricated parts will provide years of household sewing without routine oiling However whenever the machine is being serviced check to see if any parts need to be lubri...

Страница 8: ...otes 1 Oil Put a drop of HQ Stitch oil on each point 2 Grease Put a small amount of HQ Stitch grease on each point 3 Excessive lubrication can cause more harm than good use only a little lube in the r...

Страница 9: ...Oil Put a drop of oil on the following 1 The presser bar at the top and bottom bushing behind the face cover and under the top cover 4 4 7 4...

Страница 10: ...Oil Put a drop of oil on the following 2 The top and bottom of the needle bar at the bushings behind the face cover 4 4 8...

Страница 11: ...Oil Put a drop of oil on the following 3 The felt on the underside of the machine top cover for the presser bar and take up lever seen when removed 9...

Страница 12: ...Oil Put a drop of oil on the following 4 The felt at the top of the needle bar bushing under top cover 10...

Страница 13: ...Oil Put a drop of oil on the following 5 The take up lever crank at the three orifices under top cover 7 11...

Страница 14: ...n the following 6 The take up lever connecting rod between the crank and the needle bar driver at the top orifice and at the bottom where it connects to the needle bar driver behind the face cover and...

Страница 15: ...he following 7 The oil wicks at the top needle bar bushing and take up lever links under top cover Note oil the wicks enough more than a drop so that the oil can run down to the ends of the wicks to l...

Страница 16: ...p of oil on the following 8 The large bottom timing shaft with timing belt right end bushing oil between the collar and the bushing on the left and between the pulley and bushing on the right under bo...

Страница 17: ...Oil Put a drop of oil on the following 9 The large bottom timing shaft with timing belt left end bushing oil at each side of the bushing under bottom cover 10 15...

Страница 18: ...Oil Put a drop of oil on the following 10 The bottom feed shaft bushings on both sides of bushing at shaft There are two left bushings and two right bushings under the bottom cover 16...

Страница 19: ...Oil put a drop of oil on each of the following 11 The articulating links between the two bottom feed shafts at each pivot point under bottom cover 17...

Страница 20: ...Oil put a drop of oil on each of the following 12 The two felts on the feed dog support shaft under bottom cover 18...

Страница 21: ...ut a small amount of grease on the following 13 The bottom timing shaft large white timing gear under the grease cover after removing the bottom cover Note makes sure to remove any lint in the gears f...

Страница 22: ...Grease Put a small amount of grease on the following 14 The large timing shaft feed dog lift cam under bottom cover 20...

Страница 23: ...Grease Put a small amount of grease on the following 15 The thread cutter linkage under bottom cover 21...

Страница 24: ...Grease Put a small amount of grease on the following 16 The thread cutter linkage under bottom cover 22...

Страница 25: ...n the left side of the needle bar The upper hairline should be flush with the bushing 2 If it is not correct locate the needle bar driver on the needle bar and with a 2 5 hex driver loosen the set scr...

Страница 26: ...which is 6mm 2 If it is not correct locate the hex screw that is on the presser bar block Take the 2 5 hex driver and insert it through the front set plate and the arm thread guide and into the block...

Страница 27: ...to see the full tooth above the needle plate and no more Use the small 202007308 feed A B feed dog height gauge When A is up the gauge should move and when B is up it should not 2 If they are not the...

Страница 28: ...hex set screws with a 2 5mm hex tool Use bottom part of gauge QM39401 for center feed position 4 Move the feed base arm up or down to obtain the 4 2 4 5 center feed position 5 Move the feed rock arm l...

Страница 29: ...k feed cam timing for proper sewing remove the foot turn the stitch length dial to 6 Bring the needle to the highest position Start to lower the needle and stop a little below 17 5mm top line At this...

Страница 30: ...the feed dogs should be just about even with the surface of the needle plate 2 If an adjustment is needed lay the machine on it s back and locate the feed lifting cam Loosen the two hex set screws wi...

Страница 31: ...ttom edge of the needle bar bushing Important Note Before Proceeding with Timing The timing belt should provide Imediate Transfer of Motion to the hook when the hand wheel is turned If the timing belt...

Страница 32: ...sier viewing 3 When the bottom hairline on the needle bar matches the bottom edge of the needle bar bushing the tip of the hook should be on the near or right hand side of the needle as shown See next...

Страница 33: ...TIMING CLEARANCE 3 of 5 3 Enlarged image When the bottom hairline on the needle bar matches the bottom edge of the needle bar bushing the tip of the hook should be on the near or right hand side of th...

Страница 34: ...4 If an adjustment is needed lay the machine down remove the bottom baseplate cover if it has not already been removed Locate the back of the hook race There are three black slotted screws that hold t...

Страница 35: ...with a clearance of 0 0 05mm 7 While holding your timing in place along with the clearance tighten one of the screws on the hook race to hold the position Best way to do this is to have the machine so...

Страница 36: ...ng Hook stopper 1 To check to see if you have correct hook stopper position use the needle as a gauge The needle should be lined up in the center of the hook stopper and the outer side of the hook sto...

Страница 37: ...STOPPER POSITION 2 of 3 2 To adjust the hook stopper position lay the machine down and locate the set screw that holds the stopper bracket Loosen the screw and move the stopper into the correct positi...

Страница 38: ...OSITION 3 of 3 1 To check to see if you have correct hook stopper position use the needle as a gauge The needle should be lined up in the center of the hook stopper and the outer side of the hook stop...

Страница 39: ...expose the threader block on the needle bar Loosen the block with a 2 mm hex driver and either move it up or down to get the correct height Do not rotate the block when adjusting it up and down Then t...

Страница 40: ...eedle thread bunches up on the wrong side of the fabric at the beginning of the seam A too long tail of the needle thread is left after thread cutting Adjust the needle to cutter cam timing pages 44 4...

Страница 41: ...mm above the needle plate It would be the distance of where the presser foot would be when raised Since the needle plate is off you will have to estimate the 6mm above the plate 2 Lay the machine down...

Страница 42: ...ter should be 2 2 5 mm from the center needle position which you can gauge through the thread guide 2 2 5mm 4 If you need to adjust the position of the thread cutter locate the 7mm nut loosen it and m...

Страница 43: ...THREAD GUIDE ADJUSTMENT 1of 2 1 4MM 1 When the needle is lowered down into the thread guide the left inner edge of the thread guide plate should be about 1 4mm from the center needle position 41...

Страница 44: ...the smallest step of the step gauge QM39401 from the center needle position 3 If you need to adjust the thread guide plate loosen the small black Philip s head screw and the larger Philip s head screw...

Страница 45: ...ush up on the link body while turning the hand wheel As you do this the thread cutter will move Stop when the thread cutter hole is in the center needle position where the needle would normally come d...

Страница 46: ...nce the needle plate is off you will have to estimate the 6mm above the plate 2 Lay the machine down and push up on the link body while turning the hand wheel Stop as soon as the thread cutter linkage...

Страница 47: ...ace has to be held tight as soon as the second screw is loosened on the gear While holding the hook race tight turn the hook race gear either clockwise to raise the needle point or counterclockwise to...

Страница 48: ...should also tap against the bobbin in the bobbin case very lightly 4 If an adjustment is needed push the solenoid disk closed and loosen the screw on the thread drawing arm and move it left or right...

Страница 49: ...th the solenoid open in its relaxed position and with the thread drawing lever down the stopper should be up against the thread drawing lever If not loosen the Phillips screw holding it and move it ov...

Страница 50: ...sk to the right 3 The tension disks should open 5 1 0mm 4 If you need to make an adjustment locate the 8mm lock nuts 8mm wrench QM40235 from the regular HQ Retailer tool kit on the cable Loosen the lo...

Страница 51: ...IDENTIFYING ELECTRONIC COMPONENTS CONNECTIONS 49...

Страница 52: ...e Carefully remove the wires from the black cover attached to the right side of the A board casing 2 Remove the two Philip s head screws holding the black cover to the A board casing 3 Unplug the thre...

Страница 53: ...et transformer and driving motor wires into the A board first 3 Place the black cover on top and make sure to guide the wires through their respective opening and replace the two screws Make sure not...

Страница 54: ...ne 2 Lower the needle bar by turning the hand wheel towards you and stop when the red and green arrows are both illuminated The needle point should be 18 7 mm above the surface of the needle plate one...

Страница 55: ...screws that hold the drive motor to the casting of the machine 2 Lift up on the motor to cause slack and remove the belt from the hand wheel 3 Remove the three screws that hold the motor cover to the...

Страница 56: ...on while pushing down the connector lock 6 Remove the two screws that hold the motor connection bracket 7 Cut the zip tie that holds the wires to the motor unit and remove the motor from the machine R...

Страница 57: ...INSTALLING THE DRIVE MOTOR 1 of 2 1 Place the motor connection bracket back onto the motor unit and install the two screws 2 Plug in the motor connection 3 Plug in the motor sensor connection 55...

Страница 58: ...to find the proper tension of the belt If you lift the motor up and tighten you will have a lot of slack It should be about 5mm of deflection 5mm 6 Take a zip tie and wrap it around the motor bracket...

Страница 59: ...EMENT 1 of 2 1 Reattach the plug for the external thread cutter 2 Start to attach the cover and be careful of the wires Start from the rear and close it towards the front 3 Insert the three screws and...

Страница 60: ...unit in the top cover to the A board 2 Place the top cover on top of the machine being careful not to pinch anything and tighten the two screws 3 Hold the face plate to the left side of the machine a...

Страница 61: ...ACHING THE BASE PLATE 1 Hold the base plate to the machine and align it so the rubber feet with screws can go back in 2 Tighten the four screws in the rubber feet to hold the base plate to the machine...

Страница 62: ...marked before to the thread guide should be about 11 15mm Starting point 11 15mm 3 To adjust the tension stroke locate the screw under the beehive tension unit and loosen it Swing the tension unit to...

Страница 63: ...chine down carefully on its back side 2 Locate the two phillips washer head screws that hold the idler bearing plate 3 Loosen and very slightly snug the left screw Be careful to put pressure on the sc...

Отзывы: