background image


NAUTIZ X2

 User Manual


- 11 - 


2.6.6 Shortcuts 

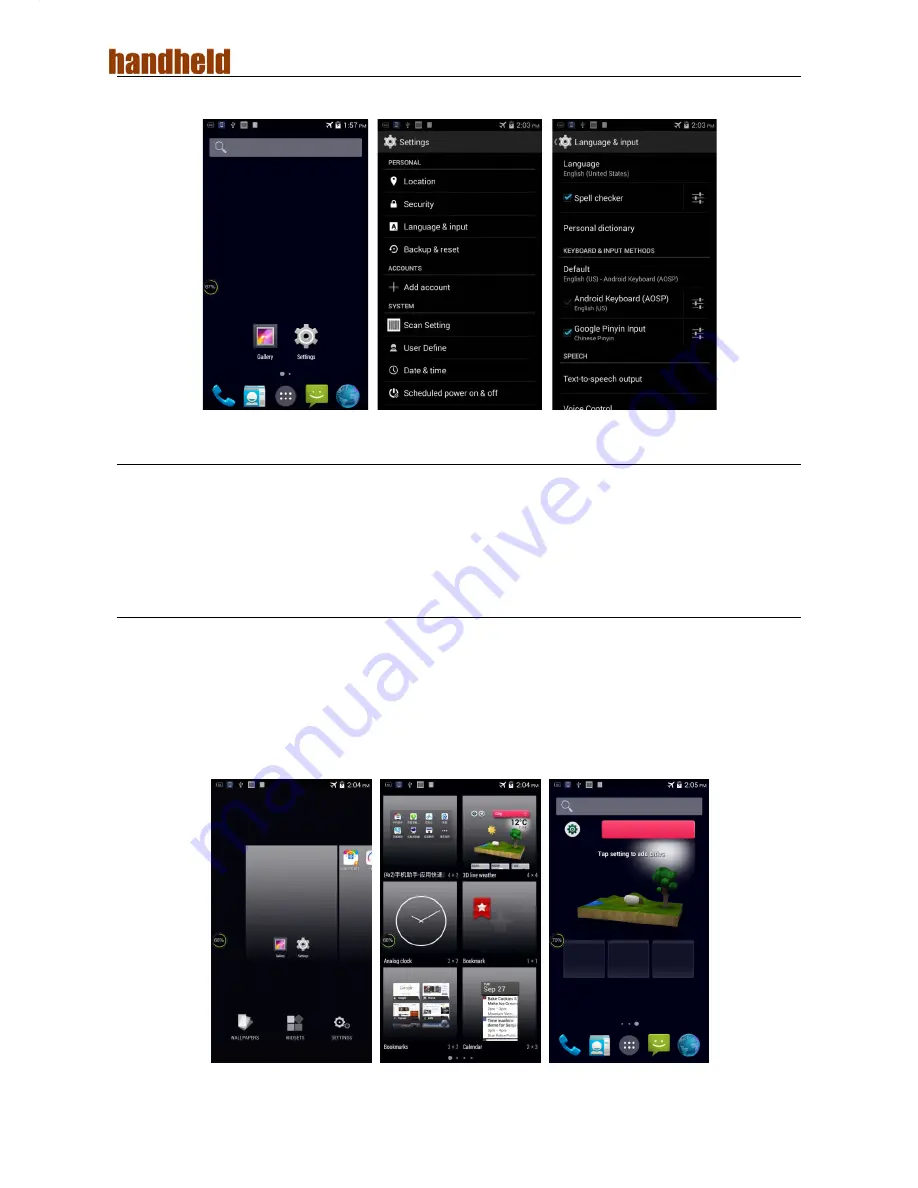
You can add shortcut icons on the home screen of the NAUTIZ X2. 

On the home screen, click the icon of application tray, press and hold an icon and drag it to 

the home screen.   

2.6.7 Widgets   

You can add widgets such as clock, music player and calendar on the home screen of the 

NAUTIZ X2.   

On the home screen, press and hold a blank space. The entry for setting wallpaper and 

widgets is displayed. Click a widget and drag it to a blank space.   

Click the icon of a widget to open the widget. 


Содержание NAUTIZ X2

Страница 1: ...NAUTIZ X2 User Manual ...

Страница 2: ...S 13 3 4 Email 14 4 Network Connection and Connection Synchronization 16 4 1 GPRS Data Connection 16 4 2 Wi Fi Network Connection 17 4 3 Bluetooth 17 4 4 GPS 19 4 5 Connecting the NAUTIZ X2 to a PC 19 4 6 Synchronization 20 5 Enabling the Scan Function 21 5 1 To start the iScan program and enable scanning do as follows 21 6 Enabling the NFC Function 22 6 1 To enable the NFC function do as follows ...

Страница 3: ...NAUTIZ X2 User Manual 1 1 Introduction 1 1 Appearance of NAUTIZ X2 Figure 1 1 Front view of NAUTIZ X2 Figure 1 2 Rear view of NAUTIZ X2 ...

Страница 4: ...ving the Battery 1 Push the battery cover lock to the left 2 Pull up the battery cover from the groove at the upper end of the battery cover Note The NAUTIZ X2 adapts integrated design for the battery and battery cover 1 4 Inserting a SIM Card 1 Insert a SIM card by following the direction in the figure below Note Micro SIM cards are applicable to the NAUTIZ X2 After replacing a SIM card restart t...

Страница 5: ... Open the card cover upwards and insert a TF card as shown in the figure below 3 Close the card cover as shown in the figure below 4 Pull back the card cover by following the LOCK direction marked on the card cover Note TF cads namely Micro SD cards are applicable to the NAUTIZ X2 After replacing a TF card restart the NAUTIZ X2 ...

Страница 6: ...green When the battery volume is low 1 a message indicating that the battery volume is less than 20 is displayed on the screen 2 the NAUTIZ X2 gives out a low battery prompt tone 3 the charging indicator blinks in red Tips The following operations help obtain a longer standby duration of the NAUTIZ X2 Shorten the time to sleep by selecting Settings Display Sleep Set the screen brightness to a smal...

Страница 7: ...ptions is displayed Click Power Off 2 2 Locking and Unlocking the NAUTIZ X2 Locking the NAUTIZ X2 Press the On Off key momentarily to lock the NAUTIZ X2 If you do not perform any operation for the NAUTIZ X2 within the default locking time the NAUTIZ X2 is automatically locked Unlocking the NAUTIZ X2 Press the On Off key momentarily and slide the unlock key to the right on the screen 2 3 Keys The N...

Страница 8: ...creen click the icon of any application to open the application Tips You can freely add or delete the icon of an application in the blank of the home screen If you click the application tray all applications can be viewed 2 5 Status Icons and Indicators Status icons and indicators are in the status bar at the upper part of the screen and show device status and notifications Return key Scan key App...

Страница 9: ... full Silent mode Multiple notification icons which are beyond the scope of display Application permission EDGE Connection between USB and PC pea pod Note As software is upgraded continuously status indicators may be different from those displayed on the NAUTIZ X2 The actual status indicators prevail 2 6 Basic Settings 2 6 1 Date and Time Settings To change the date and time in the NAUTIZ X2 do as...

Страница 10: ...t Settings Date time Set date or Set time 2 6 2 Display Setting 1 Find the following icon 2 Select Settings Display Lock screen notification Wallpaper Brightness Auto rotate screen Sleep Interactive screensaver Font size Cast screen ...

Страница 11: ...con 2 Select Settings Audio profiles General Silent Meeting Outdoor Click different modes and set the ringtone in the modes 2 6 4 Security Setting 1 Find the following icon 2 Select Settings Backup reset Factory data reset The NAUTIZ X2 starts to restore factory settings ...

Страница 12: ...and applications Downloaded applications The following data will not be cleared Current system software and bound applications Files in the SD card for example music and photos 2 6 5 Language and Input Method Setting 1 Find the following icon 2 Select Settings Language input click Language select a language click Default and select an input method ...

Страница 13: ... press and hold an icon and drag it to the home screen 2 6 7 Widgets You can add widgets such as clock music player and calendar on the home screen of the NAUTIZ X2 On the home screen press and hold a blank space The entry for setting wallpaper and widgets is displayed Click a widget and drag it to a blank space Click the icon of a widget to open the widget ...

Страница 14: ...terminate the call 3 2 Contacts 1 Find the following icon 2 Click Contacts to open the list of contacts 3 To add a contact click 4 To import or export contacts press the menu key and click Import Export 5 To edit or delete a contact select the contact press the menu key and click Edit Delete Call records Contacts Keypad for dialing Voice call ...

Страница 15: ...receiver and text to be sent 3 Click to send the message 4 On the message editing page press the menu key click Add subject to convert the message into a multimedia message After editing the message click to send the message Tips Click to add attachments such as photo video and audio ...

Страница 16: ...ck Settings in the upper right corner of the email account page find and select the server option and inbox option and then save The email account is set To set an email account on the NAUTIZ X2 do as follows 1 Find the following icon 2 Enter an email address and password and click Next 3 Set Inbox checking frequency and click Next 4 Create a name for the account and click Next The email receiving...

Страница 17: ... do as follows 1 On the home screen click Settings 2 Under the ACCOUNTS option click POP3 to open added accounts and click the name of an account to be synchronized or deleted On the Sync page click in the upper right corner and select Sync now or Remove account ...

Страница 18: ...fault configuration by accident you can set the network by performing the following steps take the network of China Unicom as the example 1 Find the following icon 2 Select Settings More Mobile network APN China Unicom 3G Network Then set the following items Name China Unicom 3G network APN 3gnet APN type default supl net Proxy not set Port not set Username not set Password not set Server null MMS...

Страница 19: ...is completed 4 3 Bluetooth After you enable the Bluetooth function on the NAUTIZ X2 you can establish wireless connections with other Bluetooth devices such as computers and mobile phones In the scope without solid obstacles the effect of Bluetooth connections is good 1 Find the following icon 2 Select Setting WIRELESS NETWORKS Bluetooth 3 Click the icon for enabling disabling Bluetooth to enable ...

Страница 20: ... and click Pair to connect the device 6 Click on the right of a paired device The Rename Unpair and Internet access options are displayed Perform operation as required Click to enable Bluetooth and search for Bluetooth devices Click to make other devices able to detect the device ...

Страница 21: ...the demonstration program You can download navigation software in HiMarket for details about how to install GPS navigation software and information about HiMarket see 6 1 Installing Programs and view position information 4 5 Connecting the NAUTIZ X2 to a PC Connect the NAUTIZ X2 to a PC by using a USB data cable so that you can transmit and process files such as photo video and music files between...

Страница 22: ...ount 4 Select Company or Email enter the email address and password click Next and wait until the connection is complete for details about email setting see 3 4 Email 5 Click Accounts On the synchronization setting page perform setting as required Click the option to open the USB storage device and copy files between the PC and the device ...

Страница 23: ...le the scanning function if you click the slider again the scanning function is disabled 3 Press the yellow key to scan a barcode When the scanning indicator becomes green from red and a beep is heard the barcode is scanned successfully Note iScan is used to scan barcodes By default iScan is installed and scanning is enabled upon delivery of the device You can down the latest version from the foll...

Страница 24: ...ollows 1 Click the Settings icon on the menu page 2 Select WIRELESS NETWORKS More NFC 3 Click the blue slider on the right to enable NFC if you click the blue slider again NFC is disabled 4 Put an NFC card close to the back of the NAUTIZ X2 After a beep is heard the card is read successfully ...

Страница 25: ...stall software for the NAUTIZ X2 on the PC However first of all you need to install phone assistant software such as APK install pea pod and phone assistant 91 In this way programs can be installed in batches 7 2 Uninstalling Applications If too many programs are installed or some programs are unnecessary uninstall programs to improve the running speed of the NAUTIZ X2 To uninstall a program do as...

Страница 26: ...n the application management screen you can view application status in the options such as Downloaded SD Card and Running click an application access the application information screen and perform operations such as forcibly stopping uninstalling and stopping an application ...

Страница 27: ...he NAUTIZ X2 may be faulty Do not use strong chemical products or strong detergent to clean the NAUTIZ X2 If the NAUTIZ X2 become dirty clean the surface of the NAUTIZ X2 by using a soft cloth soaked with dilute glass detergent Please use the protective film to reduce wear as much as possible The screen protective film can improve the availability and durability of the screen Pay attention to the ...

Страница 28: ...Charge the battery or replace the battery The battery is incorrectly installed Correctly install the battery The system breaks down Restore factory settings The rechargeable battery can no longer be charged The battery fails Replace the battery The temperature of the battery is too high or low Put the battery in normal temperature During data communication data is not transmitted or transmitted da...

Страница 29: ...lled on the NAUTIZ X2 Remove applications installed on the NAUTIZ X2 The NAUTIZ X2 cannot decode a barcode while reading it The scan application is not loaded Load the scan application in the NAUTIZ X2 Reading a barcode fails Check that the barcode is indefective The battery volume is low If the scanner stops sending out a light beam after you press the trigger switch check the battery volume ...

Страница 30: ...luetooth phone identifies the NAUTIZ X2 as the previously paired NAUTIZ X2 The Bluetooth phone memorizes the name and address of the NAUTIZ X2 paired previously over Bluetooth Remove the paired device and the name from the Bluetooth phone A Bluetooth device can be detected but cannot be connected The NAUTIZ X2 does not support connecting a Bluetooth device without a password Set a password for the...

Страница 31: ...to 32 GB Display 4 7 inch 1280 x 720 High resolution Touch Panel Industrial grade capacitive touch panel supporting operation with gloves Camera Optional 8 MXP camera in the back side autofocus lens LED flash Exit Window Corning Gorilla glass Keypad 4 front keys 4 side keys Power key Battery 3 7 V 3300 mAh rechargeable lithium polymer battery Audio Built in microphone Mini USB Headphone connector ...

Страница 32: ...Humidity 0 to 95 non condensing Drop specification Multiple drops to cement ground from a distance of 1 2m Sealing standard IP65 ESD 15 kV air discharge 8 kV direct discharge 1D laser scanning engine Optical resolution 4 mil Scan depth of field 3 81 cm to 60 98 cm Scanning angle 47 3 standard Scanning speed 102 12 times per second two way 1D 2D image scanning engine Optical resolution 3 mil Scanni...

Страница 33: ... 2000mA Battery Manufacturer HANDHELD GROUP AB Model 1ICP9 65 85 Capacity 3300 mAh 12 2Wh Nominal Voltage DC 3 7V Maximum Charge Voltage DC 2 4V CE marking CAUTION RISK OF EXPLOSION IF BATTERY IS REPLACED BY AN INCORRECT TYPE DISPOSE OF USED BATTERIES ACCORDING TO THE INSTRUCTIONS To prevent possible hearing damage do not listen at high volume levels for long periods Fully understand user manual b...

Страница 34: ...his document is subject to update without notice Without written approval of Handheld Group AB no one shall copy extract back up modify spread or translate any part of this document in any form or method or use the whole or part of this document for business purposes If you have any question you are free to send an email to www handheldgroup com ...

Страница 35: ...ver Connect the equipment into an outlet on a circuit different from that to which the receiver is connected Consult the dealer or an experienced radio TV technician for help Specific Absorption Rate SAR information This Rugged Mobile PDA meets the government s requirements for exposure to radio waves The guidelines are based on standards that were developed by independent scientific organizations...

Страница 36: ... maintained between the user s body and the handset including the antenna Third party belt clips holsters and similar accessories used by this device should not contain any metallic components Body worn accessories that do not meet these requirements may not comply with RF exposure requirements and should be avoided Use only the supplied or an approved antenna ...

Отзывы: