6
7
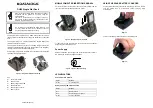
5.1. Base station
•
Use the base to position the base station on a level surface.
5.2. Measuring station
•
You can also position the measuring station on a level outdoor surface.
•
We recommend installing the measuring station securely on an outdoor wall
using the opening (20).
•
Install an anchor, screw, nail, etc. in the wall of your choice.
•
Hang the measuring station using the opening intended for this purpose (20).
6. Operation
Note – Input
Hold down the
CH+
button (11) or the
MEM
– button (15) to select the values faster.
6.1. Connection to the measuring station
•
After you insert the batteries, the base station automatically searches for a connection to
the measuring station and performs initial setup.
Note
•
Initial setup takes approx. 5 minutes.
•
During connection, the wireless symbol on the measuring station will flash (6).
•
Do not press any buttons during setup. Otherwise, values may not be transmitted
correctly and there is a risk of value errors and inaccuracies.
•
The setup process is completed when the indoor (4) and outdoor (3) measurement data
is displayed.
•
If the base station still does not receive a signal from the measuring station, press the
SENSOR
button (13) to start the manual search for the signal. During the connection
attempt, the measuring station radio symbol (6) will flash.
•
During the manual search, press and hold the
SENSOR
button (13) for approx. 3 seconds
to end the search. The radio symbol (6) disappears.
6.2. Selecting the channel/other measuring stations
Note
•
You can install two more measuring stations in addition to the included measuring
station. Ensure that the base and measuring stations are set to the same channel.
Visit www.hama.com for suitable measuring stations.
•
Press the
CH+
button (11) repeatedly to set the channel to that set on the respective
measuring station – see 4.1. Measuring station. Either
1
,
2
or
3
(2) is displayed.
•
The base station now shows the data measured (3) on the selected measuring station (2).
•
Press and hold the
CH+
button (11) to select the channel scan. The measurement values
of the individual measuring stations/channels (2) are displayed consecutively for 4 seconds
each.
•
Press the
CH+
button (11) again to return to normal mode.
6.3. Basic and manual settings
Automatic setting using the DCF signal
After the first time the base station is switched on and successful transmission is established
between the base station and the measuring station, the clock will automatically search for a
DCF signal. During the search, the wireless symbol (8) will flash.
When the radio signal is received, the date and time are automatically set.
Radio icon
Signal strength
No reception
Poor
Fair
Excellent