
3
4
Vielen Dank, dass Sie sich für ein Hama Produkt entschieden
haben!
Nehmen Sie sich Zeit und lesen Sie die folgenden Anweisungen
und Hinweise zunächst ganz durch. Bewahren Sie diese
Bedienungsanleitung anschließend an einem sicheren Ort auf,
um bei Bedarf darin nachschlagen zu können.
1. Erklärung von Warnsymbolen und Hinweisen
Warnung
Wird verwendet, um Sicherheitshinweise zu kennzeichnen
oder um Aufmerksamkeit auf besondere Gefahren und
Risiken zu lenken.
Hinweis
Wird verwendet, um zusätzlich Informationen oder wichtige
Hinweise zu kennzeichnen.
2. Packungsinhalt
• „Wedge” Notebookschloss
• diese Bedienungsanleitung
3. Sicherheitshinweise
Warnung
Verlegen Sie das Kabel des Notebookschlosses so, dass es
keine Stolpergefahr darstellt oder Fluchtwege blockiert!
• Dieses Produkt gehört, wie alle elektrischen Produkte, nicht
in Kinderhände!
• Nehmen Sie keine Veränderungen am Produkt vor. Dadurch
verlieren Sie jegliche Gewährleistungsansprüche.
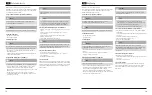
4. Einstellung der Zahlenkombination:
Hinweis
Werksseitig ist die Zahlenkombination „0000“ eingestellt.
• Drücken Sie bei gültiger Kombination (werksseitig „0000”
oder individuell gespeicherter Code) den Reset-Knopf mit
einem Schraubenzieher nach unten und drehen Sie ihn um
90° nach rechts.
• Stellen Sie mit Hilfe der Zahlenräder Ihre neue individuelle
Kombination ein.
• Drehen Sie nun den Reset-Knopf um 90° nach links zurück,
um ihn in die Ausgangsposition zu bringen.
Hinweis
• Wir empfehlen ausdrücklich, eine geänderte Kombination
zu notieren und an einem sicheren Ort zu verwahren.
• Wir übernehmen keine Haftung für Folgekosten, die durch
Verlust/Vergessen der Zahlenkombination entstehen.
5. Anschluss und Schließen des Notebookschlosses
• Befestigen Sie das Kabel an einem feststehendem
Objekt z.B. Tischfuß, Schrank.
• Schieben Sie die Entriegelungstaste am Schloss nach unten
und halten Sie die Taste in dieser Position.
• Stecken Sie das Schloss in den Verriegelungsslot des zu
sichernden Gerätes.
• Lassen Sie die Entriegelungstaste los.
• Verstellen Sie nun die Zahlenkombination.
6. Öffnen des Notebookschlosses
• Stellen Sie die richtige Zahlenkombination ein.
• Schieben Sie die Entriegelungstaste am Schloss nach unten
und halten Sie die Taste in dieser Position.
• Ziehen Sie das Schloss aus dem Verriegelungsslot heraus.
7. Haftungsausschluss
Die Hama GmbH & Co KG übernimmt keinerlei Haftung
oder Gewährleistung für Schäden, die aus unsachgemäßer
Installation, Montage und unsachgemäßem Gebrauch des
Produktes oder einer Nichtbeachtung der Bedienungsanleitung
und/oder der Sicherheitshinweise resultieren.
Thank you for choosing a Hama product.
Take your time and read the following instructions and
information completely. Please keep these instructions in a safe
place for future reference.
1. Explanation of Warning Symbols and Notes
Warning
This symbol is used to indicate safety instructions or to draw
your attention to specific hazards and risks.
Note
This symbol is used to indicate additional information or
important notes.
2. Package Contents
• „Wedge” Notebook Lock
• These operating instructions
3. Safety notes
Warning
Run the cable of the Notebook lock so that it does not pose
a tripping hazard or block emergency exits.
• Keep this product, as all electrical products, out of the reach
of children!
• Do not modify the product in any way. Doing so voids the
warranty.
4. Setting the combination number
Note
The combination is factory-set to ‘0000’.
• With a valid combination selected (factory-set „0000” or
personally stored code), push the reset button down with a
screwdriver and turn it 90° to the right.
• Set your new personal combination using the number wheels.
• Now turn the reset button 90° to the left to return it to its
starting position.
Note
• We expressly recommend writing the new combination
down and storing it in a safe place.
• We accept no liability for any damages resulting from lost
or forgotten combinations.
5. Connection and locking of Notebook lock
• Attach the cable to a fixed object, e.g. foot of a table,
cupboard.
• Push the unlocking button on the lock down and hold the
button in this position.
• Insert the lock into the locking slot of the device to be
secured.
• Let go of the unlocking button.
• Now adjust the number combination.
6. Open the Notebook lock
• Enter the correct combination number.
• Push the unlocking button on the lock down and hold the
button in this position.
• Pull the lock out of the locking slot.
7. Warranty Disclaimer
Hama GmbH & Co KG assumes no liability and provides no
warranty for damage resulting from improper installation/
mounting, improper use of the product or from failure to
observe the operating instructions and/or safety notes.
D
Bedienungsanleitung
G
Operating instruction
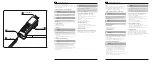
1
Screwdriver
2
Reset button
Release button
4
3
Locking Hook