background image

7

7.4 Actual Direction Mode / Richtungsmodus

Hinweis - Actual Direction Mode

Ist der Actual Direction Mode aktiviert, orientiert

sich die Steuerung der Drohne bei Befehlen an der

Position des Piloten.

Bewegen Sie den rechten Steuerhebel (9) nach oben/

unten, fliegt die Drohne von Ihnen weg/auf Sie zu.

Bewegen Sie den rechten Steuerhebel (9) nach links/

rechts, fliegt die Drohne nach links/rechts.

Die Flugrichtung und Position der Drohne ist bei

diesem Modus irrelevant.

Achten Sie darauf, die Position, die Sie während der

Kalibrierung mit der Fernbedienung einnehmen,

beizubehalten.

Positionieren Sie die Drohne direkt vor sich, so dass

deren Rumpf in die gewünschte Flugrichtung und von

Ihnen weg zeigt.

Halten Sie die Fernsteuerung so, dass sie in direkter Linie

auf den hinteren Teil der Drohne zeigt.

Starten Sie die Drohne und fliegen Sie sie auf eine stabile

Höhe.

Drücken Sie während des Flugs die Actual Direction

Mode – Taste (7), um den Actual Direction Mode zu

aktivieren.

Der Actual Direction Mode wird durch zwei Signaltöne

und schnelles Blinken der LED-Anzeige (5) der Drohne

bestätigt.

Drücken Sie erneut die Actual Direction Mode – Taste (7),

wird dieser Modus deaktiviert. Es ertönt ein Signalton

und die LED-Anzeige (5) der Drohne leuchtet nun

dauerhaft.

7.5 Geschwindigkeitsstufen

Hinweis

Nach dem Einschalten befindet sich die Drohne im

minimalen Geschwindigkeitsmodus.

Erfahrene Piloten können die Geschwindigkeit

der Drohne erhöhen, indem Sie den Modus der

maximalen Geschwindigkeit einstellen.

Drücken Sie die [H]-Taste (3), um die Geschwindigkeit der

Drohne auf das Maximum zu erhöhen.

Zwei Signaltöne bestätigen die Einstellung Maximum.

Drücken Sie die [L]-Taste (5), um die Geschwindigkeit der

Drohne auf das Minimum zu begrenzen.

Ein Signalton bestätigt die Einstellung Minimum.

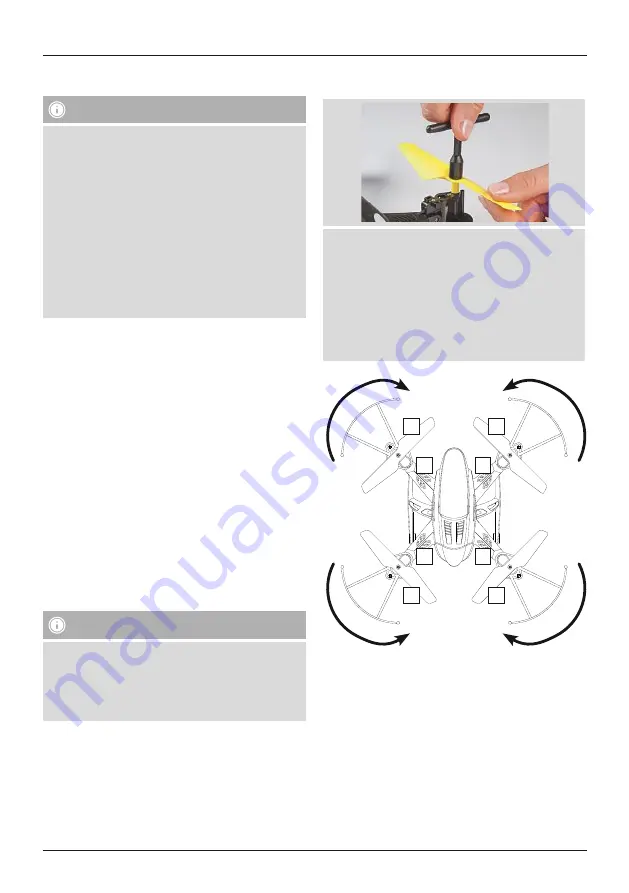
7.6 Wechsel der Rotorblätter

Lösen Sie die Schraube des Rotorblattes mit dem

beiliegenden Schraubenzieher.

Entfernen Sie das vorhandene Rotorblatt.

Setzen Sie das neue Rotorblatt auf der Motorwelle

auf. Achten Sie darauf, die Rotorblätter gemäß der

Zeichnung zu montieren, da sonst die Drehrichtung

nicht stimmt und kein Auftrieb erzeugt wird.

Schrauben Sie das Rotorblatt mithilfe des beiliegenden

Schraubenziehers fest.

1

A2

B1

B2

A1

3

2

4

7.7 Ausschalten der Drohne

Landen Sie die Drohne.

Schieben Sie den Schiebeschalter (7) der Drohne auf die

Position OFF.

Drücken Sie den Ein-/Ausschalter (12), um die

Fernsteuerung auszuschalten.

Содержание 00 126851

Страница 1: ...PL F D GB RO Operating Instructions Bedienungsanleitung Mode d emploi Instrukcja obs ugi Manual de utilizare Looptastic Quadrocopter Quadrocopter 00 126851...

Страница 2: ......

Страница 3: ...1 8 1 3 4 6 10 11 11 2 5 2 12 9 3 3 6 7 5 10 7 4 13...

Страница 4: ...mpartment Thank you for choosing a Hama product Take your time and read the following instructions and information completely Please keep these instructions in a safe place for future reference If you...

Страница 5: ...German regulations and laws at the time of printing Before using the product in other countries find out about the applicable regulations Please note that in accordance with 1 para 2 no 9 of the Germ...

Страница 6: ...he battery loses power so as not to crash Before flying make sure the weather conditions are suitable Always anticipate hazards when flying Pay attention to both the drone and your environment Do not...

Страница 7: ...ediately if the battery becomes hot and or deformed Use a heat resistant fire proof surface for charging Note charging battery capacity It takes approximately 1 hours to fully charge the battery The b...

Страница 8: ...emote control to the left Right control To fly the drone right move the right control lever 9 on the remote control to the right Flying forwards and backwards Right control To fly the drone forwards m...

Страница 9: ...ft Repeat this step until the drone is aligned If the drone continually tilts to the left during the flight briefly push the Tweaking button 11 to the right Repeat this step until the drone is aligned...

Страница 10: ...he drone is in low speed mode Experienced pilots can increase the drone s speed by setting the top speed mode Press the H button 3 to increase the drone s speed to the highest speed Two signal tones c...

Страница 11: ...mpty Fully charge the battery of the drone The batteries of the remote control are weak or empty Check the batteries of the remote control and replace them with new batteries if necessary The drone ro...

Страница 12: ...ion Frequency range 2 4 GHz 16 Recycling Information Note on environmental protection After the implementation of the European Directive 2012 19 EU and 2006 66 EU in the national legal system the foll...

Страница 13: ...merksamkeit auf besondere Gefahren und Risiken zu lenken Hinweis Wird verwendet um zus tzlich Informationen oder wichtige Hinweise zu kennzeichnen 2 Packungsinhalt Drohne 1x Fernsteuerung 1x Akku f r...

Страница 14: ...Freizeit vorgesehen Dieses Produkt ist f r die Verwendung ab 14 Jahren und unter elterlicher Aufsicht vorgesehen Dieses Produkt ist f r die Verwendung in Innenr umen vorgesehen kann jedoch bei trocken...

Страница 15: ...as mitgelieferte USB Ladekabel am Akku der Drohne an Schlie en Sie den freien Stecker des USB Kabels an einer freien USB Buchse Ihres Computers oder einem anderen geeigneten USB Ladeger t an Beachten...

Страница 16: ...LED Anzeige der Drohne 5 und der Fernsteuerung 12 leuchten nun dauerhaft 7 2 Flugsteuerung Hinweis Steuern Sie die Drohne nur durch minimale Bewegungen der Steuerhebel um ein ruhiges Flugverhalten de...

Страница 17: ...r Seite zu fliegen 7 3 Feinjustierung der Steuerung Trimmen Hinweis Trimmen Die Drohne sollte ruhig und stabil in der Luft liegen und nur in die Richtung fliegen die durch die Steuerung vorgegeben wir...

Страница 18: ...rneut die Actual Direction Mode Taste 7 wird dieser Modus deaktiviert Es ert nt ein Signalton und die LED Anzeige 5 der Drohne leuchtet nun dauerhaft 7 5 Geschwindigkeitsstufen Hinweis Nach dem Einsch...

Страница 19: ...e den Akku der Drohne vollst ndig auf Die Batterien der Fernsteuerung sind schwach oder leer berpr fen Sie die Batterien der Fernsteuerung und tauschen Sie diese ggf gegen neue Batterien aus Die Drohn...

Страница 20: ...Ladeart USB A Kupplung Frequenzbereich 2 4 GHz 16 Entsorgungshinweise Hinweis zum Umweltschutz Ab dem Zeitpunkt der Umsetzung der europ ischen Richtlinien 2012 19 EU und 2006 66 EG in nationales Rech...

Страница 21: ...r des consignes de s curit ou pour attirer votre attention sur des dangers et risques particuliers Remarque Ce symbole est utilis pour indiquer des informations suppl mentaires ou des remarques import...

Страница 22: ...e utilisation dans le cadre d activit s de sport et de loisirs Ce produit est destin aux utilisateurs partir de 14 ans sous surveillance parentale Ce produit est destin une utilisation l int rieur de...

Страница 23: ...entuels 6 1 T l commande Insertion des piles Ouvrez le compartiment piles 13 et ins rez 4 piles LR6 AA en respectant les indications de polarit Refermez ensuite le couvercle du compartiment piles 6 2...

Страница 24: ...Couplage du drone avec la t l commande Placez le drone sur une surface plane Placez l interrupteur coulissant 7 du drone en position ON Les voyants LED 5 se mettent clignoter Appuyez sur l interrupteu...

Страница 25: ...er le drone une altitude de 3 m tres environ Appuyez sur la touche Looping 1 1 afin d effectuer un looping Appuyez sur la touche Looping 2 8 puis d placez le levier de commande droit 9 vers la gauche...

Страница 26: ...ne D marrez le drone et faites le voler une altitude stable Pendant le vol appuyez sur la touche Actual Direction Mode 7 afin d activer le mode de direction actuelle L activation du mode Actual Direct...

Страница 27: ...drone Les piles de la t l commande sont faibles ou vides V rifiez les piles de la t l commande et le cas ch ant remplacez les Le drone pivote uniquement sur son axe vertical se retourne ou ne d marre...

Страница 28: ...piles LR6 AA M thode de charge connexion USB type A Plage de fr quence 2 4 GHz 16 Consignes de recyclage Remarques concernant la protection de l environnement Conform ment la directive europ enne 201...

Страница 29: ...two lub ryzyko Wskaz wki U ywane w celu zwr cenia uwagi na szczeg lnie przydatne informacje 2 Zawarto opakowania Dron 1 pilot zdalnego sterowania 1 akumulator do drona 1 kabel aduj cy USB 1 klucz p as...

Страница 30: ...cznie do zastosowa sportowych i rekreacyjnych Produkt przeznaczony jest do stosowania od 14 roku ycia i pod kontrol rodzic w Niniejszy produkt jest przeznaczony do stosowania w pomieszczeniach w przyp...

Страница 31: ...baterii Otworzy schowek na baterie 13 i w o y 4 baterie AA zwracaj c uwag na w a ciw biegunowo Nast pnie zamkn pokryw schowka na baterie 6 2 Model samolotu adowanie akumulatora Wskaz wka Akumulator dr...

Страница 32: ...poni ej 5 C i powy ej 25 C mog zmniejszy pojemno baterii 7 Tryb latania 7 1 Parowanie drona z pilotem zdalnego sterowania Ustawi dron na p askiej powierzchni Przesun suwak 7 drona do pozycji ON Diody...

Страница 33: ...lub w prawo eby wykona obr t o 360 w bok 7 3 Dok adna kalibracja sterowania trymowanie Wskaz wka trymowanie Dron powinien unosi si w powietrzu w spos b spokojny i stabilny i wykonywa lot wy cznie w k...

Страница 34: ...wi kowe i szybkie miganie diody LED 5 drona Ponownie wcisn przycisk Actual Direction Mode 7 aby wy czy ten tryb Rozlegnie si sygna d wi kowy a dioda LED 5 drona za wieci wiat em ci g ym 7 5 Prze czan...

Страница 35: ...a kowicie na adowa bateri drona Baterie pilota zdalnego sterowania s s abe lub roz adowane Sprawdzi baterie pilota zdalnego sterowania i w razie potrzeby wymieni je na nowe Dron obraca si tylko wok os...

Страница 36: ...emno 380 mAh Wymagania co do baterii pilot zdalnego sterowania 4 baterie typu AA Spos b adowania gniazdo USB A Zakres cz stotliwo ci 2 4 GHz 16 Informacje dotycz ca recyklingu Wskaz wki dotycz ce ochr...

Страница 37: ...re Se folose te la marcarea instruc iunilor de siguran sau la concentrarea aten iei n caz de pericol i riscuri mari Instruc iune Se folose te pentru marcarea informa iilor i instruc iunilor importante...

Страница 38: ...ilor Acest produs este prev zut pentru utilizare n interior dar se poate folosi i n exteriorul cl dirilor n condi ii meteorologice f r ploaie i v nt moderat sau de loc Este interzis ascensiunea i fun...

Страница 39: ...cta i cablul de nc rcare USB livrat cu acumulatorul Conecta i fi a liber a cablului USB la un port USB liber al calculatorului sau la un alt nc rc tor USB adecvat V rug m s respecta i instruc iunile d...

Страница 40: ...de afi aj ale dronei 5 i telecomenzii 12 lumineaz continuu 7 2 Comand zbor Indica ie Comanda dronei se face cu mi c ri minime ale p rghiei de comand asigur ndu se astfel un zbor lini tit Evita i mi c...

Страница 41: ...omand se afl n pozi ia de pauz pozi ia zero Prin ajustarea precis a comenzii declina iile direc iei pot fi ndep rtate st nga dreapta Dac se apleac la dreapta ap sa i tasta de ajustare precis 11 scurt...

Страница 42: ...rin ajust ri precise dese gre ite Trimmen se poate ajunge la dereglarea pozi ion rii dronei Aceasta se poate ndep rta prin resetarea dronei la pozi ia neutral Dac picioarele de aterizare sus inere sun...

Страница 43: ...acumulatorul complet Bateriile telecomenzii sunt slabe sau desc rcate Verifica i bateriile i dac este cazul nlocui i le Drona se rote te numai n jurul axei verticale se rostogole te sau nu porne te E...

Страница 44: ...A Domeniu frecven 2 4 GHz 16 Informa ii pentru reciclare Instruc iuni pentru protec ia mediului nconjur tor Din momentul aplic rii directivelor europene 2012 19 EU i 2006 66 EU n dreptul na ional sunt...

Страница 45: ...ed brands are trademarks of the corresponding companies Errors and omissions excepted and subject to technical changes Our general terms of delivery and payment are applied Hama GmbH Co KG 86652 Monhe...

Отзывы: