Supplied By www.heating spares.co Tel. 0161 620 6677
FAULT FINDING
8
8.1
GENERAL
8.2
DIAGNOSTIC INDICATOR LED’S
8.3
START/POWER UP FAULTS
8.4
IGNITION FAULTS
8.5
DHW FAULT FINDING
8.6
CENTRAL HEATING FAULT FINDING
Before looking for a fault condition, check that:
The mains electrical supply is turned on.
The clock and / or room thermostat (if fitted) are calling for heat
(CH ‘faults’ only)
The gas service cock is open.
The DHW and CH isolation cocks are open.
The system is at design pressure.
Before attempting any electrical fault finding, always conduct the
preliminary electrical system checks as described in the
Instructions for the British Gas Multimeter or other similar
instrument.
On completion of any service or fault finding operation involving
making or breaking electrical connections always check for EARTH
CONTINUITY, POLARITY, and RESISTANCE TO EARTH.
Detailed procedures for replacing faulty components are
described in section 9 (Parts Replacement)
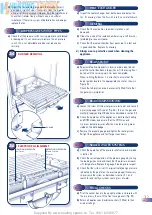
The LED’s on the fascia panel (Fig. 31) show the status of the
boiler as described below:
Power
ON
LED illuminated. (Green): Boiler is in service. If no
other LED’s are illuminated, the appliance is awaiting a demand
for heating or hot water.
Burner
ON
LED illuminated (Amber): Burner is alight.
Safety Lockout LED flashing (Red): Burner has failed to light and
gone to ignition lock-out. Re-set the appliance by disconnecting
the power supply (or turning off the CH/DHW heat demand)
waiting 10 seconds, and restoring the power (or demand).
Safety Lockout LED illuminated (Red): There is a fault condition
preventing operation of the appliance. Follow fault finding
procedure.
When the power is first turned on The pump and fan will operate
for 10 to 15 seconds whilst the controls check the operation of the
air pressure switch, the water flow switch, and the overheat
thermostat. If any of these are not operating correctly the Safety
Lock-out LED will be illuminated.
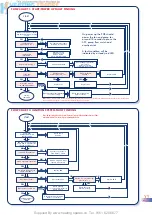
In the event of a power up fault investigate the problem by
following flow chart 1.
In the event of the boiler failing to light, investigate the problem
by following flow chart 2.
When the hot water tap is turned on, the controls should carry out
a set of start up checks (flow chart 1) followed by an ignition
sequence (flow chart 2)
If the control has powered up correctly but does not respond to a
DHW demand, investigate in the following order:
Check for 0V d.c. across pins 23 and 24. If 5V is present across
pins 23 and 24 check water flow switch and wiring.
If 0V is present, check DHW thermistor and wiring. If DHW
thermistor and wiring are OK, replace PCB.
If burner lights and remains lit, but fails to modulate correctly:
Check voltage at modureg valve, pins 30 and 31. Voltage should
be in the range 2.5 - 20V d.c. (During ignition, voltage should be
approx 10V d.c.). If outside this range, check DHW thermistor and
wiring, If DHW thermistor and wiring are OK, replace PCB.
If modureg voltage varies with temperature but burner pressure
remains constant replace gas valve.
Upon a demand for Central Heating, (closure of the room
thermostat and time switch if fitted) the appliance should respond
to the demand.
If the control does not respond to a CH demand, investigate in
the following order:
If a time switch is not fitted, ensure that the link is in the ‘no clock’
position.
If 240V a.c. is present across pins 2 and 4 but no start up
procedure occurs ensure that the control is not in anti-cycle mode
by removing power from the control and restoring it after a delay
of 10 seconds.
If the control still does not carry out start up checks,
Check CH thermistor and wiring. If CH thermistor and wiring are
OK, replace PCB.
If burner lights and remains lit, but fails to modulate correctly:
Check voltage at modureg valve, pins 30 and 31. Voltage should
be in the range 2.5 - 20V d.c. (During ignition, voltage should be
approx 10V d.c.). If outside this range, check CH thermistor and
wiring, If CH thermistor and wiring are OK, replace PCB.
If modureg voltage varies with temperature but burner pressure
remains constant replace gas valve.
Note: Whenever a CH demand is removed, either by the timer,
the room thermostat or the boiler internal temperature
control, an anti cycle mode is initiated which prevents the
boiler firing in CH mode for 3 minutes.
26

