background image

14

5 s

5

.

.

.

1 s

2 s

3 s

4 s

5 s

6 s

7 s

8 s

stop

0 s

DO NOT MOVE

GO TO POSITION

MIN. PRESENCE
TIME

*

* before activation 

should stand at least 

min presence time 

selected (default 2s).

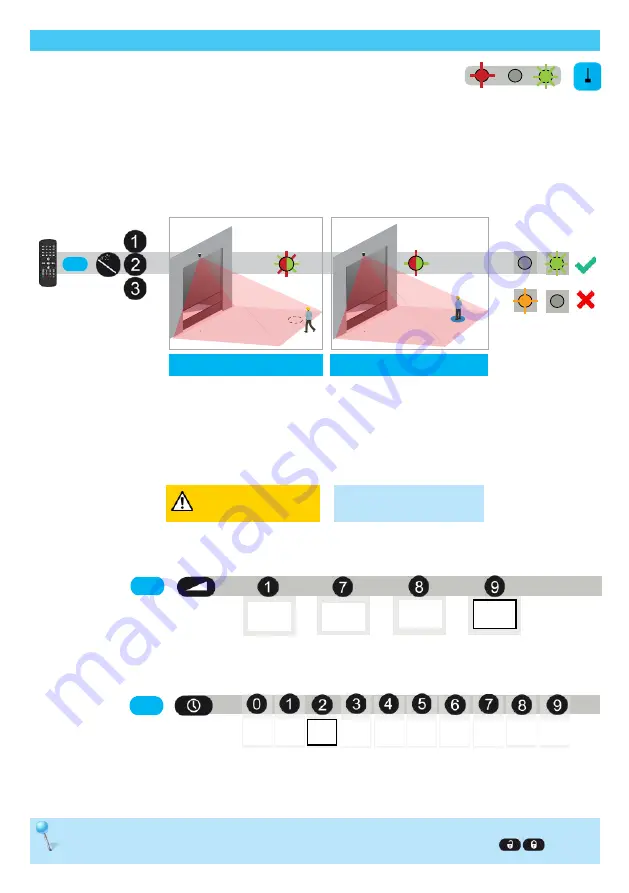
VIRTUAL PULL CORD

The door only opens when an object is detected in one of the three virtual pull cord zones during the chosen min. presence 

time (factory value : 2 seconds).

In order to use this function:

- the sensor must know its environment: teach-in install is OK.

- the corresponding wires must be connected to the door activation input (out 1 by default)

- the output or relay function must be set to motion or pull cord (factory value) or pull cord.

To create a virtual pullcord:

To delete the virtual pull cord zone, simply relaunch a pull cord teach-in without standing in the scanning zone. 
After 1 minute the sensor flashes 5x orange. Push lock to exit the adjustment mode:

The teach-in process 

is finalized. The LED 

quickly flashes green 

or is out. 

If flashing orange see 

troubleshooting.

If the LED flashes green, 
stop moving.

OBJECT TYPE

Launch a pull cord teach-in 

by remote control. You can 

create 3 different pull cords 

in the scanned area.

Go to the position where you 

want to activate the door by a 

virtual pull cord. 

The LED quickly flashes red-green 

during 5 seconds. 

The learning process starts, please 

do not move. 

The LED slowly flashes red-green.

By remote control you can choose the object type and its minimum presence time to activate the door:

The maximum presence time for the pull cord function is the same as the one defined for the presence function.

vehicle

any

vehicle

XL

0 s: immediate activation
stop: only a complete stop of the object activates the door

DO NOT 
MOVE

pedestrian

pedestrian

: detects pedestrians only 

vehicle XL: 

detects


large vehicles; rejects bicycles & narrow forklifts

vehicle

: detects all types of vehicles; rejects pedestrians

any

: detects all objects

Make sure there is nothing 
in the scanned area !

Содержание BEA LZR-WIDESCAN

Страница 1: ...N User s Guide for software version SW 0400 and higher refer to tracking label on product please refer to page 4 OPENING PRESENCE SAFETY SENSOR FOR INDUSTRIAL DOORS Download the LZR WIDESCAN installat...

Страница 2: ...justments or performance of procedures other than those specified herein may result in hazardous radiation exposure The device emits invisible IR and visible laser radiations The visible laser beams c...

Страница 3: ...reen 10 keypad 11 tilt angle adjustment screw 1x 12 parallel angle adjustment screw 2x 13 lateral angle lock screw 1x 14 mounting bracket The LZR Widescan is an industrial door sensor with opening and...

Страница 4: ...rs and the protection of equipment These characteristics allow for additional safety but the sensor is not a sensitive protective equipment providing protection of persons according to safety standard...

Страница 5: ...roubleshooting No smartphone connected Smartphone connected All fields Motion field Pull cord Presence field Safety field Speed Height SETTINGS in IR Remote Session DETECTION GENERAL SYMBOLS 1 Slightl...

Страница 6: ...pots Teach in install Teach in pull cord Presettings Restoring to factory values MOTION PRESENCE SAFETY Enter a Password if necessary Specific menu password 1234 Activate red spots on floor Launch CEN...

Страница 7: ...ssary see p 16 Mounting height as high as possible in acc to the limitations in the Technical specifications The size of the detection field depends on the mounting height Mounting position centre of...

Страница 8: ...or in order to align the centre of the red spots with the centre of the door To activate red spots Press 2x OK product keypad Press 2x IR remote control Mobile app PARALLEL ANGLE TILT ANGLE LOCK THE S...

Страница 9: ...CD screen are aligned The visible spots must now be off center for the detection field to cover the whole door symmetrically Carefully lock the sensor position by firmly fastening the angle lock screw...

Страница 10: ...t fits a new environment in case the conditions have changed The Walk teach in is used to re shape all or a dedicate the detection field or If standard teach in cannot be performed because the centere...

Страница 11: ...time infinite field width max field stop max object type vehicle direction uni field width max field stop 3 m object type vehicle max presence time 30 min motion or pull cord or safety presence or sa...

Страница 12: ...cts bicycles narrow forklifts vehicle detects all types of vehicles rejects pedestrians any detects all objects PRESENCE Teach in Field width Field stop Field start Object type Immunity Max presence t...

Страница 13: ...mot or pull mot or pull or safe mot or pull or pres pres or safety pres or safety no change no change no change presence safety presence height pres height height speed pull cord presence safety moti...

Страница 14: ...teach in process is finalized The LED quickly flashes green or is out If flashing orange see troubleshooting If the LED flashes green stop moving OBJECT TYPE Launch a pull cord teach in by remote con...

Страница 15: ...ompletely height detection relay 2 25 m 2 25 m All objects moving slower than 5 km h will activate the selected output This option is typically used in confined areas with no frontal traffic and is in...

Страница 16: ...IONS Presence Safety Presence or safety Presence and height OUT 1 DOOR ACTIVATION FUNCTIONS Motion Motion or pull cord Motion or pull cord or safety Motion or pull cord or presence Pull cord Motion Mo...

Страница 17: ...ngle max 15 Diagnostics LCD Launch install teach in Adjust lateral angle max 45 Diagnostics LCD Launch install teach in Adjust mounting height max 6 m min 2 m Launch install teach in Push OK LCD to re...

Страница 18: ...18...

Страница 19: ...19...

Страница 20: ...max switching voltage 100 mA max switching current in switching mode NO NC in frequency mode pulsed signal f 100 Hz 10 1 electro mechanic relay galvanic isolation polarity free 42 V DC AC peak max sw...

Отзывы: