background image

6

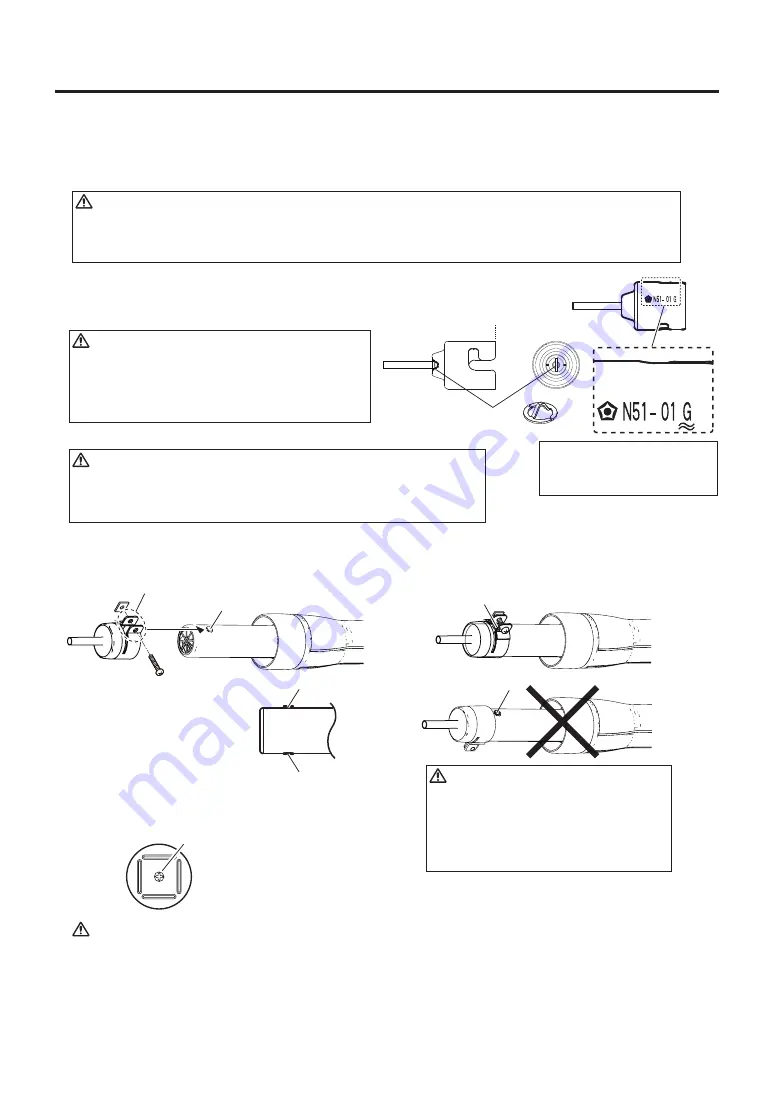
 Using vacuum function inoperative nozzle {N51-01(G), N51-05(G), N51-06(G)}

a. Retract the vacuum pipe to the shortest length using the vacuum pipe 

control knob.

b. Tighten the nozzle mounting screw.

CAUTION

● 

Pad

The pad does not last indefinitely. When it becomes deteriorated, replace it. Since exposure to 

high temperatures causes it to deteriorate faster, Hakko recommends it be cooled after use.

2. Attach the pad.

a. Attach the pad.

b. Adjust the pad to an appropriate position.

Adjust the vacuum pipe so that the pipe and pad protrude as little as possible.

NOTE:

Letter  G  is marked on the 

nozzle with the pipe guard.

←A

A

Pipe guard

CAUTION

The new N51-01/05/06 nozzle has a pipe 

guard inside. These nozzles could not be 

attached to HAKKO FR-811 when the vacuum 

pipe is extended. Do not use excessive force.

CAUTION

CAUTION

When “G” is not marked on the nozzle, these nozzles do not 

have space to blow hot air. using them with the HAKKO FR-811 

may result in danger.

● 

Vacuum function inoperative nozzles. (Old nozzle)

A1124B, A1130, A1131, A1132, A1133, A1134, A1142B, A1183, A1190, A1191, A1192, A1325

These nozzles could not be attached to HAKKO FR-811 when the vacuum pipe is extended. 

Do not use excessive force.

A1124, A1142

Do not use these nozzles with HAKKO FR-811. 

These nozzles do not have space to blow hot air, 

using them with the HAKKO FR-811 may result in danger.

 How to Use a old nozzle

Align the 

projection part

, attach the old nozzle to the heater pipe.

There are two projection with 

different heights. Align the 

nozzle 

screwing position

 with 

the higher projection part of 

the pipe.

Projection part(high)

Projection part(low)

Screwing position

When attached in the wrong direction,
the nozzle could not be fully inserted 
and can cause air leakage.
Make sure to attach the nozzle in the 
correct direction.

CAUTION

M3×5

QFP nozzle

※When using the QFP nozzle, remove the 

inside screw (M3 × 5) of the nozzle.

Projection part

Projection part

Projection part

Содержание FR-811

Страница 1: ...ATURE DISTRIBUTION CHART 10 MAINTENANCE INSPECTION 11 ERROR MESSAGE 12 TROUBLE SHOOTING GUIDE 13 PARTS LIST Instruction Manual SMD Rework Station with Vacuum Pickup Thank you for purchasing the HAKKO...

Страница 2: ...ut no plug C5026 230 240V 3 wired cord Australian plug 2 SPECIFICATIONS Handpiece Power consumption Total length w o cord Weight w o cord Power consumption This product is protected against electrosta...

Страница 3: ...nce shall not be made by children without supervision To prevent accidents or damage to the HAKKO FR 811 be sure to observe the following Turn the power off when not in use or left unattended Do not s...

Страница 4: ...position or changes the selected item Example When the hundreds digit in the temperature setting screen is blinking tilting it once to the right will shift the selected position to the tens digit Tilt...

Страница 5: ...sed the blowing of air is automatically stopped V VACUUM button Pressing this button switches the vacuum pump ON and OFF T C connector Labeled with P for parts Insert the thermocouple in the thermocou...

Страница 6: ...g in the power cord Pad The pad absorbs parts Nozzle not included Sensor internal This sensor detects the temperature of the hot air Vacuum pipe The pad is mounted on the tip of the vacuum pipe Vacuum...

Страница 7: ...o not have space to blow hot air using them with the HAKKO FR 811 may result in danger Vacuum function inoperative nozzles Old nozzle A1124B A1130 A1131 A1132 A1133 A1134 A1142B A1183 A1190 A1191 A119...

Страница 8: ...tacle on the back panel of the station 2 Place the handpiece on the grip stand assembly 3 Plug the power cord into a grounded wall socket 4 Turn the power switch ON CAUTION Vacuum pipe Do not use exce...

Страница 9: ...ion the part on the P W B Heating Hot air blows from the nozzle to melt the solder Cooling Heater is stopped cooling begins Lift the handpiece Make sure the solder has hardened before lifting the hand...

Страница 10: ...be performed Display during operation A Mode selection 2 modes can be selected on the HAKKO FR 811 according to how it will be used The screens are different for the different modes Regarding setting...

Страница 11: ...er is controlled When POWER mode is selected the setting becomes the output power When T C mode is selected the startup rate can be set When pressing the S button on the station on the display screen...

Страница 12: ...ect TOP Select PART T C connector Circuit board side Thermocouple Perform control using thermocouple sensor M A N U T O P S E T T C L I N K R A M P R A T E E x i t T O P 0 0 F S T O P B T M CAUTION Re...

Страница 13: ...mperature settings can be programmed Select the preset number with The procedure for making changes to the preset temperatures is the same as the 2 Setting the Temperature Enter the parameter setting...

Страница 14: ...items which can be set are as follows C AUTO mode settings Changes values and the selected item Selected item Selected position Enter Set in the following operation In the menu screen turning the ope...

Страница 15: ...elect USB MEMORY when reading a profile stored in the USB memory device or saving a profile to the USB memory device This item cannot be selected if there is no USB memory device plugged in C O F T C...

Страница 16: ...6 settings Read sample data for demo mode Copy a desired profile to another profile To top screen A U T O P R O F I L E S E T R E N A M E T I M E R M O D E C O M M E N T P R E Z O N E S E T Z O N E 1...

Страница 17: ...various settings of the bottom heater can be performed First select whether the bottom heater function will be ON or OFF When ON is selected the following settings can be performed When ON is selected...

Страница 18: ...AKKO FR 811 will not operate POWER mode Example Power Air temperature Time TIMER Hot air Bottom heater POWER T C mode START TMG Selected TEMP Temperature Temperature Time TEMP RAM P RATE T C mode STAR...

Страница 19: ...g the Timer RAMP RATE setting Temperature rise rate setting 02 to 20 s Heating temperature setting 120 to 1120 Setting the Temperature Vacuum function ON OFF setting ON OFF Vacuum setting When is set...

Страница 20: ...click on Update driver software 4 Select Browse my computer for driver software 5 Select the included CD as the browse destination 6 Select Install this driver software 7 After a short while the inst...

Страница 21: ...11_PCSoftware exe to any folder on your computer When FR811_PCSoftware is run for the first time a Files folder will be created in the same folder as the software FR811_PCSoftware will store graph dat...

Страница 22: ...1 NO DATA 2 NO DATA 3 NO DATA 4 NO DATA 5 NO DATA 6 NO DATA 7 NO DATA 8 NO DATA 9 NO DATA 10 NO DATA 11 NO DATA FR 811 PCsoftware X 0 0 100 200 300 400 500 600 700 800 900 1000 5 15 20 25 30 35 40 45...

Страница 23: ...a new file 1 Select profile and double click it 3 A new profile data is created Change settings as needed For the items which can be changed see Zone settings soldering iron heater on p 23 or Zone set...

Страница 24: ...DATA NO DATA NO DATA All 21 30 NO DATA NO DATA NO DATA NO DATA NO DATA NO DATA NO DATA NO DATA NO DATA NO DATA All 31 40 NO DATA NO DATA NO DATA NO DATA NO DATA NO DATA NO DATA NO DATA NO DATA NO DATA...

Страница 25: ...Operation Refresh Starting graph charting To start graph charting click csv capture Start Stopping graph charting To stop graph charting click If is checked the software will ask whether to save the...

Страница 26: ...300 60 sec 0 0 30 60 90 120 150 180 210 240 270 300 30 90 120 150 180 210 240 270 300 60 sec Part temperature graph Heater temperature graph Part temperature profile setting Profile setting based on g...

Страница 27: ...5 pcs 01 30 min ON CUSTOM OFF LOCK FREE LOCK FREE LOCK FREE LOCK FREE LOCK FREE LOCK FREE LOCK FREE LOCK FREE LOCK FREE LOCK FREE Date setting 05 05 Partial All Cancel Parameter name Temp Mode Sleep...

Страница 28: ...s on the TC B alert to stop heater control if the temperature fails to reach the predetermined level after a specific period of time following the start of control The heater power alert function will...

Страница 29: ...p Mode 1 Turn the control knob select Temp Mode 2 After selecting press the center of the control knob 3 and will be switched alternately 4 After selecting press the center of the control knob S y s t...

Страница 30: ...S y s t e m P a r a m e t e r T e m p M o d e S l e e p S h u t O f f A i r S h u t O f f P r e s e t T C B A l e r t C O N 60m O F F O F F Set the time Sleep 1 Turn the control knob select Sleep 2 A...

Страница 31: ...3 0 m O F F O F F P r e s e t OFF ON Select ON P r e s e t M a x N u m 5 Set the Preset number S y s t e m P a r a m e t e r T e m p M o d e S l e e p S h u t O f f A i r S h u t O f f P r e s e t T...

Страница 32: ...d e S l e e p S h u t O f f A i r S h u t O f f P r e s e t T C B A l e r t C O N 3 0 m O F F O F F 30m S y s t e m P a r a m e t e r T C B A l e r t L o c k M o d e D a t e T i m e C o n t r a s t I...

Страница 33: ...Select a character 12 After selecting then move to the next character 13 Select a character 14 After setting press the center of the control knob Select Lock or Free Select character Select character...

Страница 34: ...e t D a t e a n d T i m e 2016 01 01 00 00 Set the date and time Changes the selected item Contrast 1 Turn the control knob select Contrast 2 After selecting press the center of the control knob 3 Ad...

Страница 35: ...do not perform the initial reset select CANCEL 4 After setting press the center of the control knob S y s t e m P a r a m e t e r T C B A l e r t L o c k M o d e P a s s w o r d D a t e T i m e C o n...

Страница 36: ...e hot air temperature may not reach the set temperature depending upon the combination of the nozzle and the set air flow In this case reduce the set temperature or the air flow Test condition Measure...

Страница 37: ...0 10 20 30 40 50 60 70 80 90 100 Temp 700 1292 600 1112 500 932 400 752 300 572 200 392 100 212 0 32 100 200 300 400 500 600 N51 03 Single 5 5 0 22 Air 0 10 20 30 40 50 60 70 80 90 100 Temp 700 1292...

Страница 38: ...30 40 50 60 70 80 90 100 Temp 700 1292 600 1112 500 932 400 752 300 572 200 392 100 212 0 32 N51 05 Bent Single 1 5 x 3 0 06 x 0 12 100 200 300 400 500 600 Air 0 10 20 30 40 50 60 70 80 90 100 Temp 7...

Страница 39: ...re to turn the power switch OFF and be careful of the following procedure when replacing the heating element B Measure the resistance value Normal heater resistance value Connect an ohmmeter across th...

Страница 40: ...y of a sensor failure or a failure in the sensor circuit The S E displayed and the power is shut down This error occurs when the temperature of the hot air is falling even though the heater is on The...

Страница 41: ...eplace the heater Is the location of measurement for the thermocouple inappropriate or is the thermocouple mounted improperly Mount the thermocouple to an appropriate location of measurement The fan m...

Страница 42: ...an plug B Power cord 3 wired cord SI plug Power cord 3 wired cord BR plug Inlet Pump Heat resistant pad Thermocouple USB cable Specifications for LCD 100 127V 220 240V 100 127V 220 240V U S A India 22...

Страница 43: ...811 bottom heater rear Connecting cable Connecting cable Bottom heater Bottom heater sold separately Packing list The bottom heater sold separately can be connected to the HAKKO FR 811 with the connec...

Страница 44: ...combined with the following products in addition to bottom heaters for operation as a rework system For usage details please refer to the instruction manual for each product Example Combination of HA...

Страница 45: ...ttom heater Bottom heater Bottom heater Bottom heater Bottom heater Bottom heater Bottom heater Bottom heater Board holder Grip Fixture M Grip Fixture L Adapter for fixture C1392B Thermocouple Heat re...

Страница 46: ...4 BGA 12 12 4 5 0 18 4 5 0 18 7 0 28 7 0 28 9 0 35 11 0 43 13 0 51 13 0 51 15 0 59 16 0 63 16 0 63 18 0 71 19 0 75 19 0 75 21 0 83 23 0 91 25 0 98 28 1 1 30 1 18 36 1 42 9 0 35 11 0 43 15 0 59 18 0 71...

Страница 47: ...46 MEMO...

Страница 48: ...OPMENT CO LTD TEL 2811 5588 FAX 2590 0217 http www hakko com hk E mail info hakko com hk SINGAPORE HAKKO PRODUCTS PTE LTD TEL 6748 2277 FAX 6744 0033 http www hakko com sg E mail sales hakko com sg Pl...

Отзывы: