18
●
Checking procedure
WARNING
Unless otherwise specified, perform the following steps after turning the power switch OFF
and disconnecting the AC plug.
Checking the electrical continuity of the cord
assembly
1. Remove the plug of the cord assembly from
the station.
2. If the handle is attached, remove it.
3. Remove the nozzle cartridge. For this removal,
see “Attaching and replacing the nozzle
cartridge.”
4. Remove the screws for the grip and measure
the resistance between the socket terminal
and the connector pin as shown below (refer
to the wiring diagram).
Plug 1 .......... Red (socket) 3
Plug 2 .......... Green (socket) 1
Plug 3 .......... Black (socket) 2
Plug 4 .......... Brown (LED circuit board)
Plug 5 .......... White (thermistor)
Plug 6 .......... Blue (switch circuit board)
If the resistance is larger than 0
Ω
or
∞
in any
location, replace the cord assembly.
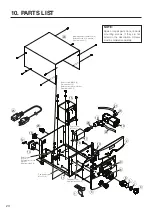
1. Measure the resistance between plug pin 2
and the nozzle end.
2. If the resistance value exceeds 2
Ω
(at room
temperature), perform the maintenance for
the tip, which is described in the next page. If
this does not decrease the value, check the
electrical continuity of the cord assembly.
■
Checking the cord assembly
1
3
2
1
4
7
2
8
5
6
3
Plug
Switch circuit board Blue
White
White
LED circuit board
Green
Black
Red
Brown
Thermistor
Socket
<Wiring diagram of MODEL FM-2024>
■
Checking the grounding line


