background image

Provide a level concrete slab. To prevent transmission of noise or vibration, slab should not be connected
to building structure. Some sort of sound-absorbing material should be placed between the condenser
and the slab. A good material to use is rubber and cork pad.

For rooftop application, make sure the building construction can support the weight and that proper
consideration is given to the weather-tight integrity of the roof. The condensing unit contains moving
parts and can vibrate. Therefore, sound is also a consideration in rooftop applications.

6

! WARNING

 - Install the unit securely in a place that can bear the weight of the unit. When installed

in an insufficiently strong place, the unit could fall causing injury.

6.2.UNIT CLEARANCES

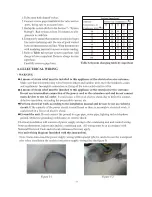
The minimum clearances for the unit are illustrated in 

Figure 3

. Condenser air enters from three sides.

Air discharges upward from the top of the unit. Refrigerant tube and electrical connections are made
from the service access area. The most common application will find the unit best located about 10"
from back wall with connection side facing the wall. This application minimizes exposed tubing and
wiring, minimizing the space for youngsters to run around the unit with subsequent damage to the
tubing or wiring.

In more confined application spaces, such as corners provide a minimum of 10" clearance on all air
inlet sides. For service access to the compressor and control box, allow 18" minimum clearance. Ensure
top is unobstructed. If units are to be located under an overhang, there should be a minimum of 36"
clearance and provision made to deflect the warm discharge air out from the overhang.

In order to have an unrestricted air flow, owners should be advised to avoid lawn mower discharge
toward the unit depositing debris on the fin coil surface reducing the unit efficiency.

6.3.REFRIGERANT PIPING

The refrigerant piping is very important as it affects the proper operation and efficiency of the air
conditioning system. Note the following guidelines:

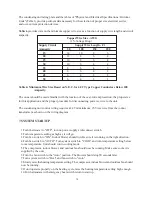
10" Min.

Service Access

    18" Min.

Figure 3

10" Min.

10"

10"

Service Access

    18" Min.

Содержание HR18D2VAR

Страница 1: ...No 0010578573 HR18D2VAR HR24D2VAR HR30D2VAR 13 SEER 1 5 to 3 0 Ton HR36D2VAR ...

Страница 2: ...ese instructions thoroughly before attempting installation or operation Failure to follow these instructions may result in improper installation adjustment service or maintenance possibly resulting in fire electrical shock property damage personal injury or death This product is designed and manufactured to permit installation in accordance with National Codes It is the installer s responsibility ...

Страница 3: ...stallation can result in unsatisfactory operation or dangerous conditions Carefully read this manual and any instructions packaged with separate equipment required to make up the system prior to installation Give this manual to the owner and explain its provisions The owner should retain this manual for future reference 2 NOMENCLATURE FOR MODEL NUMBER H Brand symbol H Haier R System type C Air con...

Страница 4: ... e N W g k s b L t h g i e 6 8 9 8 1 8 7 2 7 1 g n i p p i h S x o r p p A W 7 8 1 g k s b L t h g i e 3 9 5 0 2 5 8 The dimensions for the condensing unit are illustrated in Figure 1 Physical and electrical specifications are provided in Table 1 for 13 SEER systems respectively The Figure 2 show a schematic of a heat pump on the cooling cycle and the heating cycle Table 1 Model HR18 36D2VAR L E D...

Страница 5: ...ating Capacity HSPF CFM 10 0 10 20 30 40 50 60 HR18D2VAR HB2400VD1M20 M 15000 7 8 670 4773 6418 8036 9682 11272 73 13264 15627 18000 HR24D2VAR HB2400VD1M20 H 20000 7 8 900 6364 8558 10715 12909 15030 17685 20836 24000 HR30D2VAR HB3600VD1M22 L 26000 7 8 1125 8273 11125 13930 16782 19539 22990 27087 31200 HR36D2VAR HB3600VD1M22 H 32500 7 8 1240 10341 13906 17412 20977 24424 28738 33859 39000 Table 2...

Страница 6: ...TDOOR COIL COMPRESSOR SERVICE PORT ACCUMULATOR HIGH PRESSURE SWITCH LOW PRESSURE DEFROSED SENSOR CHECK VALVE ORIFICE DRIER optional Heating REVERSING VALVE R E S N E D N O C R O T A R O P A V E REVERSING VALVE R E S N E D N O C R O T A R O P A V E CHECK VALVE ORIFICE SERVICE VALVE SERVICE PORT SERVICE VALVE SERVICE PORT CHECK VALVE ORIFICE DISTRIBUTOR DISTRIBUTOR Warning The Bi flow drier is stron...

Страница 7: ...trical power to the unit before servicing Disconnect power to both the indoor and outdoor units NOTE There may be more than one electrical disconnect switch Failure to shut off power can cause electrical shock resulting in personal injury or death Frequent washing of the cabinet fan blade and coil with fresh water Regular cleaning and waxing of the cabinet with good automobile polish A good liquid...

Страница 8: ...ns are made from the service access area The most common application will find the unit best located about 10 from back wall with connection side facing the wall This application minimizes exposed tubing and wiring minimizing the space for youngsters to run around the unit with subsequent damage to the tubing or wiring In more confined application spaces such as corners provide a minimum of 10 cle...

Страница 9: ...not kink or twist the tubing Refrigerant piping should not be installed in a cement slab as this limits access to the refrigerant should a leak be suspected To ensure good oil return to the compressor it is important to pitch the horizontal suction line toward the compressor approximately 1 2 for every 10 of line Line Insulation Suction line requires insulation in order to prevent condensation fro...

Страница 10: ...ndoor unit is below the outdoor unit Figure 4 A and 50 when the indoor unit is above the outdoor unit Figure 4 B To ensure good oil return to the compressor when the indoor unit is below the outdoor unit suction line oil trap should be used as illustrated in Figure 4 A Tubing Connections CAUTION Use extreme caution in removing the caps from the suction and liquid line fittings as there is pressure...

Страница 11: ...rough the tubing while brazing 7 After brazing quench with a wet rag to cool the joint Reinstall the Schrader core in the valve if removed for brazing 8 Pressurize the lines to 150 psi maximum with dry nitrogen Check for leaks at all joints with liquid detergent If a leak is found repair it after removing the nitrogen Repeat the process and re ckeck 9 Do not purge the lines with refrigerant Evacua...

Страница 12: ...microns If unable to obtain 500 microns or vacuum rises above 800 microns over 15 minutes period discontinue evacuation pressurize and check for leaks Repair any leaks found and repeat the step 2 3 Close valve to the vacuum pump and stop pump 4 When sure of a tight well evacuated system charge with refrigerant Charging the System For systems with capillary tube or fixed orifice metering device Bef...

Страница 13: ...5 5 ...

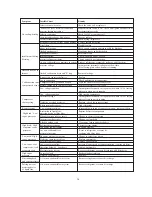
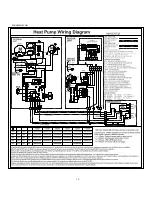
Страница 14: ...he condensing unit control wiring requires a 24 Volt minimum 25 VA service from the indoor transformer as shown on the wiring diagram 7 SYSTEM STARTUP 1 Turn thermostat to OFF turn on power supply at disconnect switch 2 Turn temperature setting as high as it will go 3 Turn fan switch to ON Indoor blower should run Be sure it is running in the right direction 4 Turn fan switch to AUTO Turn system s...

Страница 15: ...Table 7 included in this manual P14 9 3 Wiring Diagram Refer to the appropriate wiring diagram included in this manual P15 Table 7 Troubleshooting Guide WARNING Disconnect all electrical power to the unit before servicing Disconnect power to both the indoor and outdoor units NOTE There may be more than one electrical disconnect switch Failure to shut off power can cause electrical shock resulting ...

Страница 16: ...vapor cool Low evaporator airflow Increase blower speed or reduce restriction replace air filter compressor iced Operating below 65 F outdoors Add low ambient kit evaporator coil Moisture in the system Recover refrigerant evacuate recharge add filter drier High vapor Excessive load Recheck load calculation pressure Defective compressor Replace Fluctuating head Air or non condensibles in system Rec...

Страница 17: ...HR18 36D2VAR 15 YL GR ...

Страница 18: ...Made in P R C ...

Отзывы: