background image

Page 15/45

installer_07-2017

  If the 

General Term of Use (GToU)

 for the coviva app have not yet been accepted in the 

myHager

 account this must be repeated at this point (see 

The first Login

).


„

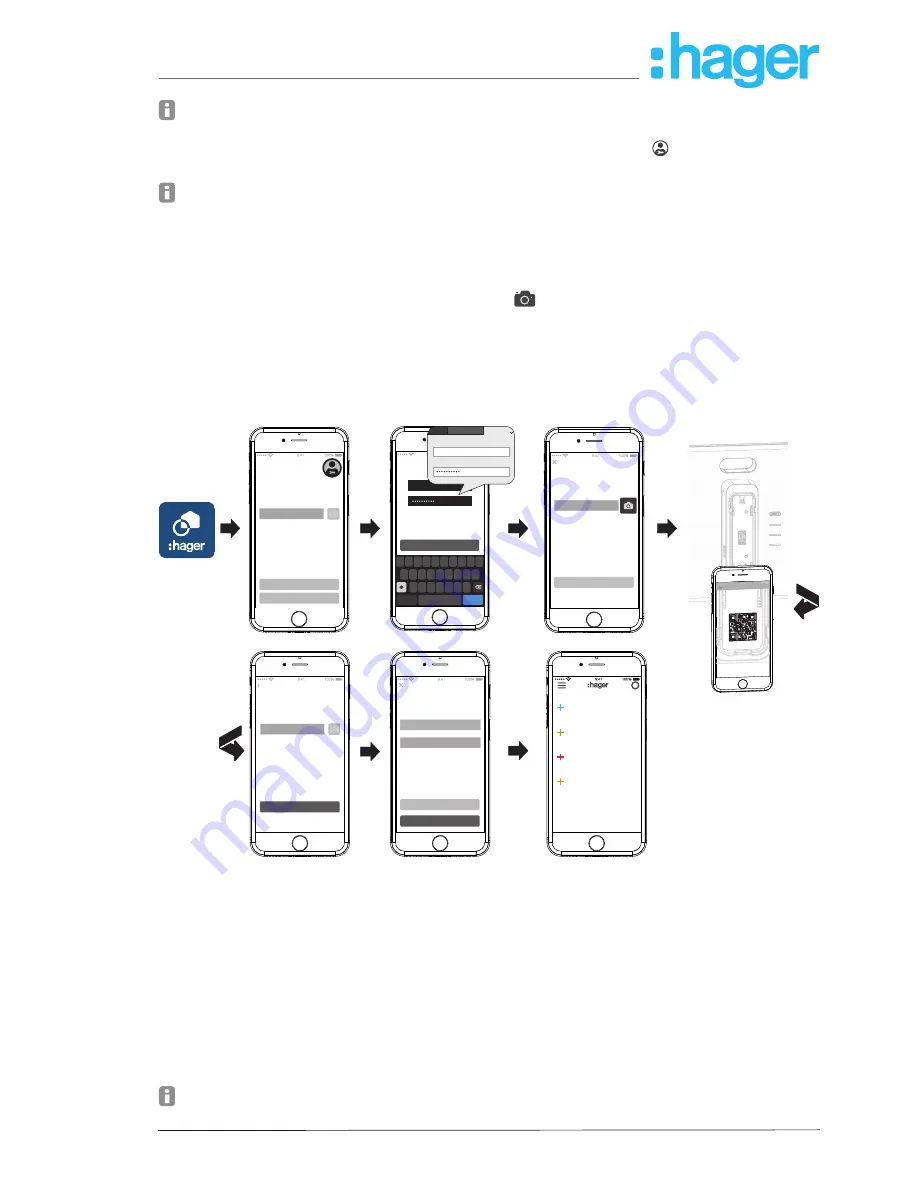
If a previously started project is to be continued, click once again on 

 and select 

Installa

-

tions

.

 If several projects have already started, all unfinished projects appear after selecting 

Instal

-

lations

. Select the project to be edited from the corresponding line.


„

Select 

New installation

 to start another new project.

The main menu view opens.


„

Push down the protective back cover of the smartbox (11) and remove it.


„

Call up the camera of the mobile end device via 

 and hold it in front of the QR-Code (5) at 

a distance of approx. 10 … 15 cm until the ID is displayed in the app.

Or:


„

Enter the 12-digit coviva ID manually via the keypad of the end device.


„

Then finish the creation of the new project with 

Connect

.

The coviva app and the smartbox can now communicate with each.

Welcome to coviva !

The unique ID on the rear of your 

coviva controller connects you directly 

to your coviva 

Login

Test without login

coviva ID

i

my devices

my groups

my covigrams

my favorites

Connect

Controller coviva

back

Please connect to your coviva 

controller by scanning controller’s 

QR-code or typing in your coviva 

ID.Make sure that you have access to 

the local n...the coviva controller 

0024C6F21834

Save

Save later

 Add user

Repeat email

Email

Please add the email address of the 

Principle user. Use Hager portal 

account email address

Connect

Controller coviva

Please connect to your coviva 

controller by scanning controller’s 

QR-code or typing in your coviva 

ID.Make sure that you have access to 

the local n...the coviva controller 

coviva ID

Q W E R T Y U I O

A S D F G H

Z X C V B N M

J K L

P

Login

[email protected]

myHager

E-mail (User name) 

Password

[email protected]

return

space

.?123

0024C6F21834

GC03/16

Scan

Figure 11: Create a new project

Afterwards, you are requested to enter the e-mail address of the customer (administrator), 

with which he created his 

myHager

 account.


„

Enter the e-mail address of the customer (administrator).


„

To confirm this, enter the e-mail address a second time and finish with 

Save

The empty main menu for the configuration opens. The configuration can begin.

The e-mail address of the customer (administrator) can also be entered at the end of the config

-

uration during the handover. The request comes automatically during the project handover, if no 

administrator has yet been created.


„

To do this select 

Save later

.

  If the e-mail address of the customer (administrator) is entered incorrectly or if this has to be 

corrected, a user reset can be carried out (see 

Carrying out a reset

).

hager.com

coviva smartbox

Содержание coviva Smartbox TKP100A

Страница 1: ...Page 1 45 installer_07 2017 Mounting and configuration instructions hager com coviva smartbox coviva smartbox TKP100A WLAN stick TKH180 Power supply replacement requirement TKC110...

Страница 2: ...e wirelessly to WLAN 12 3 Configuration 13 Configure access for mobile end device 13 Configure separate hotspot via WLAN stick 13 Create a new project 14 Update device software 16 Configure WLAN integ...

Страница 3: ...38 Carrying out a reset 41 Carry out a network reset 41 Carry out a user reset 42 Carry out rest to factory settings 42 RGB LED display 42 Remote maintenance 43 Appendix 44 User profiles and rights 44...

Страница 4: ...sign and layout of the device 1 10 9 8 7 6 5 12 13 14 15 16 11 4 2 3 ONLINE WLAN POWER 005587 GC03 16 Figure 1 Rear side view and accessories 1 RGB LED display 2 USB connection sockets 3 RJ45 connecti...

Страница 5: ...itored and operated on mobile end devices or stationary computers by means of a mobile app or browser based web app In this way location independent access to the building management system via the ho...

Страница 6: ...le or via optional WLAN stick see Accessories The device is only suitable for indoor areas Product characteristics secure system administration via user profiles with different rights control of quick...

Страница 7: ...uired Family members fellow occupants Table 1 User profiles Detailed information on the access rights per user profile can be found in an overview table in the appendix myHager account In order to cre...

Страница 8: ...users must use the iPhone only setting when running searches in App Store Call up coviva web app As an alternative to the mobile app it is also possible to access the smartbox after project hand over...

Страница 9: ...ease confirm the terms and conditions of use for your coviva Smartbox Personal data coviva terms and conditions of use I accept the coviva terms and conditions of use of dated 31 01 2017 Mandatory fie...

Страница 10: ...microwave devices the device is mounted far from metal surfaces reinforced concrete or heat sources and moisture the material penetration is taken into account Table 2 The range of the device can be o...

Страница 11: ...the project process Connect the smartbox on the RJ45 connection socket 3 to the LAN router using the en closed connection cable This can take place directly on an RJ45 connection of the router or on a...

Страница 12: ...n or the smartbox is mounted on a wall and no net work connection is in the vicinity The wireless connection is a good alternative particularly for daily use at the customer s premises once the projec...

Страница 13: ...7 lights up white permanently Select the automatically WLAN network coviva 12 digit coviva ID in the settings of the mobile end device The successful connection to the smartbox is displayed in the en...

Страница 14: ...ate the Hotspot mode if want your coviva controller to open up its own Wifi network Hotspot mode coviva 0024C6F21834 Settings Wifi settings Network The IP adress will show here as soon as you connect...

Страница 15: ...R code or typing in your coviva ID Make sure that you have access to the local n the coviva controller 0024C6F21834 Save Save later Add user Repeat email Email Please add the email address of the Prin...

Страница 16: ...g out the update immediately in order to get new functional improve ments and to prevent incompatibilities Start the update with Install The RGB display 1 of the smartbox flashes during the update It...

Страница 17: ...All users Network IP adress The IP adress will show here as soon as you connect your coviva controller via LAN to a router DHCP The status LED of your coviva controller will turn on when a compliant...

Страница 18: ...station none 1 1 2 3 4 5 6 7 8 9 0 Let s go Add a device space 123 my customer email com Adding Netatmo weather station Enter the user name and password of your Netatmo account return i my devices Off...

Страница 19: ...etector hall Heating kitchen Light garden shed Figure 16 Add Comfort device Edit remove device Figure 17 Figure 18 After adding the devices they can be edited in the app or removed again at any time P...

Страница 20: ...Groups Scene TV Off Details Save Back space return 123 Standard lamp sofa_85 i my devices my groups my covigrams Off Off Off Wall light living ro Living Scene TV Ceiling light living Standard lamp sof...

Страница 21: ...iling light livi my devices my groups my covigrams Off Off Living All off Scene TV Wall light living ro Ceiling light living Figure 18 Remove device Combine devices into groups Figure 19 Devices can b...

Страница 22: ...C V B N M J K L P 123 return 123 123 Group Save space Eat in kitchen Ceiling light living Wall light living room Standard lamp sofa i Off my devices Off Back Wall light living ro Standard lamp so Eat...

Страница 23: ...s are displayed Then carry out the following actions as required Change the name of the group by activating the name line and making an entry via the keypad Add Devices to this group or remove it from...

Страница 24: ...g Wall light living room_TR Standart lamp_85105100 Q W E R T Y U I O A S D F G H Z X C V B N M J K L P Detail Save space return 123 Delete Back Device Ceiling light living Living room i my devices my...

Страница 25: ...e written for one several triggers which appears as a push message for all users in the app when triggered Timely information can be helpful in order to initiate a countermeasure if required Once the...

Страница 26: ...vice Time Event Play Choose a trigger Blind Light Ceiling lig Heating Heatin Q W E R T Y U I O A S D F G H Z X C V B N M J K L P Covigrams Save return 123 space Temperature warning or Then If 18 0 C 1...

Страница 27: ...days at 17 00 every evening To do this press the red button The editing page Covigramm opens The title line under is activated Give the covigram a name via the keypad and terminate the entry with the...

Страница 28: ...lete Covigram eve Sa Su eve Mo or and Then If Back Detail Save Back Outdoor light Delete Covigram Eve Sa Su Eve Mo or Input Sidewalk Housewa and Then If Save Trigger Choose a device Choose a trigger T...

Страница 29: ...e Ceiling light living Switched off and finish with Save In the detailed view of the covigram under Then is displayed Add the remaining lights in the house via in the same way Wall light Living Standa...

Страница 30: ...ss i in the top right corner of the main menu All elements in the main menu are switched to edit mode Select the covigram to be edited via i on the corresponding Covigram Details about the covigram ar...

Страница 31: ...Q W E R T Y U I O A S D F G H Z X C V B N M J K L P Save return blank 123 Detail Temperature message Heati S Heati K or Then If Back i my groups my covigrams Off Off Wall light living ro Scene Tv Eat...

Страница 32: ...in menu All elements in the main menu are switched to edit mode Select the device in the favourites list to be removed via i on the relevant device Details about the device such as the switching state...

Страница 33: ...24C6F21834 Date Time 09 11 16 00 00 coviva Language English coviva Vers 2 6 7 cc24680 KNX Version 1 1 13 Alarm Version 1 0 6 Users My account User All Users Settings Q W E R T Y U I O A S D F G H Z X...

Страница 34: ...ed incorrectly or must be changed for example a new e mail address should be entered the user must first be deleted via Delete User and created again with the correct data Change settings Figure 29 Ba...

Страница 35: ...rofile data see above only display not changeable Other Administrator all profile data see above only display not changeable access for installers for remote maintenance de activatable unlimited all p...

Страница 36: ...installed The IP adress will show here as soon as you connect your coviva controller via LAN to a router DHCP The IP adress will show here as soon as you connnect your coviva controller via LAN to a r...

Страница 37: ...created as administrator at the start of the project Figure 12 a corresponding message appears at this point In this case Select Add user Enter the e mail address of the administrator under which his...

Страница 38: ...ff Off Off i my devices my groups my covigrams Off Off Off Wall light living ro Living Scene TV Ceiling light living Standard lamp_85 Welcome to coviva The unique ID on the rear of your coviva control...

Страница 39: ...uitive and corresponds to the routines of other app operations Be low is an overview of the basic operating modes and applications in the coviva app see Table 4 Instead of a touch operation or a swipe...

Страница 40: ...erated as described above Calling up a device list with a touch for ex ample all lights on the ground floor all loads in the living dining kitchen area My covigrams Open close the display by touch in...

Страница 41: ...state prior to the handover Other settings project and user profiles remain unchanged Reset to factory settings Complete restart of a project Resetting of the smartbox to the default state Removal of...

Страница 42: ...pow er supply The RGB LED display 1 first flashes red approx 5 times slowly then flashes red rapidly Release the RESET button 10 and wait a few minutes until the RGB LED display 1 no longer flashes Th...

Страница 43: ...nce Remote access is possible either via the mobile app or via the web app see Call up coviva web app Appendix User profiles and rights User profile Rights Installer3 Administrator User name Define ad...

Страница 44: ...nstallation height above sea level 2000 m Dimensions W x H x D 178 5 x 156 x 48 4 mm without protective back cover Standards EN 60950 1 EN 55032 EN 55024 EN 300220 1 EN 300220 2 EN 301489 3 Power supp...

Страница 45: ...rature indicates that it should not be disposed with other household waste at the end of its working life To prevent possible harm to the environment or human health from uncontrolled waste disposal p...

Отзывы: